USB CHRYSLER 200 2011 1.G User Guide
[x] Cancel search | Manufacturer: CHRYSLER, Model Year: 2011, Model line: 200, Model: CHRYSLER 200 2011 1.GPages: 76, PDF Size: 1.96 MB
Page 3 of 76
INTRODUCTION/WELCOMEWelcome From Chrysler Group LLC......2
CONTROLS AT A GLANCEDriver Cockpit................4
Instrument Cluster ..............6
GETTING STARTEDKeyFOB...................8
Remote Start.................8
Theft Alarm .................9
Seat Belt ...................9
Supplemental Restraint System (SRS) —
Airbags ...................10
Child Restraints ................10
Front Seats ..................12
Rear Seats ..................14
Heated Seats .................15
Tilt / Telescoping Steering Column .......16
OPERATING YOUR VEHICLETurn Signal/Lights Lever............17
Wiper/Washer Lever .............18
Speed Control ................18
Manual Climate Controls ...........20
Automatic Temperature Controls (ATC) ....21
Power Sunroof ................22
Wind Buffeting ................23
ELECTRONICSYour Vehicle's Sound System .........24
Non-Touch-Screen Radios ...........26
Touch-Screen Radio ..............29
Steering Wheel Audio Controls ........32
Uconnect™ Phone ...............33
Uconnect™ Voice Command .........35
iPod®/USB/MP3 Control ...........36
Electronic Vehicle Information Center
(EVIC) ....................37
Programmable Features ............38
Universal Garage Door Opener
(HomeLink®) .................39 Power Outlet
.................41
UTILITY
Trailer Towing Weights (Maximum Trailer
Weight Ratings) ...............42
Recreational Towing
(Behind Motorhome, Etc.) ...........43
WHAT TO DO IN EMERGENCIES
24-Hour Towing Assistance ..........44
Instrument Cluster Warning Lights .......44
If Your Engine Overheats ...........47
Jacking And Tire Changing ..........49
Jump-Starting ................52
Shift Lever Override .............54
Towing A Disabled Vehicle ..........55
Freeing A Stuck Vehicle ............56
Event Data Recorder (EDR) ..........57
MAINTAINING YOUR VEHICLE
Opening The Hood..............58
Engine Compartment .............59
Fluids And Capacities .............61
Maintenance Chart ..............62
Fuses .....................64
Tire Pressures .................66
Wheel And Wheel Trim Care .........66
Exterior Bulbs .................67
CONSUMER ASSISTANCE
Chrysler Group LLC Customer Center .....68
Chrysler Canada Inc. Customer Center ....68
Assistance For The Hearing Impaired .....68
Publications Ordering .............68
Reporting Safety Defects In The 50 United
States And Washington, D.C. .........69
MOPAR ACCESSORIES
Authentic Accessories By MOPAR® ......70
INDEX..................71
TABLE OF CONTENTS
Page 32 of 76
Clock Setting
• Turn the radio on, then touch the screen where the time is displayed.
• Touch the USER CLOCK soft-key (Navigation radio only).
• To adjust the hours, touch either the HOUR FORWARD or HOUR BACKWARD soft-key.
• To adjust the minutes, touch either the MINUTE FORWARD or MINUTE BACKWARDsoft-key.
• To save the new time setting, touch the screen where the word “Save” is displayed.
Store Radio Presets
• Press the RADIO hard-key to display AM FM SAT in the upper left corner of the screen.
• Select the radio band by touching either the AM, FM, or SAT soft-key.
• Find the station to store by touching the right and left arrow soft-keys, touching the SCAN soft-key, or by using the DIRECT TUNE soft-key.
• Once the station is found, touch and hold one of the PRESET soft-keys in the list to the right, until you hear a confirmation beep.
Hard-Disk Drive Operation
Copy Complete Audio Disc To Hard Drive
• Press the LOAD hard-key.
• Insert a disc, then press the MENU hard-key.
• Touch the MY FILES soft-key, then select MY MUSIC.
• Touch the Add Music Files to HDD soft-key, then touch the From Disc soft-key in the next screen to start the process.
Copying From USB • The USB port on the radio faceplate is for copying files to your hard drive. To access, lift up on the cover.
• Insert a USB device (e.g., thumb drive or memory stick), then select MY MUSIC.
• Touch the Add Music Files to HDD soft-key, then touch the From USB soft-key in the next screen.
• Select the folders or titles you would like to copy, then touch the DONE soft-key to start the copy process.
Copy Pictures To The Hard Drive • Insert either a CD or a USB device containing your pictures in JPEG format into the USB port on the radio face.
• Touch the MY FILES soft-key, then go to the MANAGE MY FILES screen.
• Touch the MY PICTURES soft-key to get an overview of the currently stored images.
• Touch one of the ADD PICTURES soft-keys, then select the type of media inserted.
• Use the PAGE soft-keys to page through a list of pictures and press the picture you would like to import. ELECTRONICS
30
Page 33 of 76
• Confirm your selection by touching the YES soft-key. The imported picture is now available inthe MANAGE MY PICTURES screen.
• In order to display the imported picture in the radio screen, touch the desired picture soft-key.
• Select this picture by pressing the PICTURE VIEW soft-key. A check mark indicates the currently used picture.
Cleaning Your Touch-Screen Radio
• Do not spray any liquid or caustic chemicals directly on the screen. Use a clean and dry microfiber lens cleaning cloth in order to clean the touch-screen.
• If necessary, use a lint-free cloth dampened with a cleaning solution such as isopropyl alcohol or an isopropyl alcohol and water solution ratio of 50:50. Be sure to follow the solvent
manufacturer's precautions and directions.
USB Port
• The USB port on the radio allows you to copy songs from a connected USB drive or supportedmedia device onto your Media Center hard drive.
• The USB port located in the instrument panel storage bin also offers the ability to play songs from connected USB drives, or supported media devices. Supported devices may be controlled
through the vehicles steering wheel or radio controls, or even with voice commands, and may
be charged through the USB port.
Navigation – Media Center 430N (Sales Code RHB) Only
• For software updates, visit http://www.garmin.com/chrysler website, or contact your authorizeddealer for the latest available software.
• The Navigation system receives GPS signals from satellites to display the position of your vehicle. You may experience interruptions or delays in receiving navigation information in
garages, tunnels, large cities, or other situations where the vehicle does not have a direct line of
sight to the sky.
• Voice Command is not available for navigation commands on this radio (although Voice Command functions for all other radio functions).
Map • Touch the NAV soft-key in the upper-right corner of your radio screen to access the Navigation system.
• Touch the View Mapsoft-key to display a map of your current position.
Finding a Point of Interest • Touch the NAV soft-key in the upper-right corner of your radio screen to access the Navigation system.
• Touch the Where To?soft-key to program a destination.
• Next touch one of the subcategories to search for your destination. Address, Points of Interest, Recently Found, Favorites and Intersection are a few of the options.
• After touching one of the subcategories, follow the on-screen steps to complete the process and be routed to your destination. ELECTRONICS
31
Page 37 of 76
Uconnect™ VOICE COMMAND• The Uconnect™ Voice Command system allows you to control your AM, FM radio, satelliteradio, disc player, Uconnect™ Phone, a memo recorder, and supported portable media devices.
The Voice Command system also provides limited capability to select and play music by artist,
song, album, music, genre, or playlist from your compatible iPod® device (this capability is
available for Media Center 430/430N when connected to the USB port).
• When you press the Voice Command button
located on the radio faceplate or
steering wheel, you will hear a beep. The beep is your signal to give a command. If you do not
say a command within a few seconds, the system will present you with a list of options. If you
ever wish to interrupt the system while it lists options, press the Voice Command
button
, listen for the BEEP, and say your command.
Voice Command for Text Messaging
• If equipped with Uconnect™ Voice Command, your Media Center 430N radio may be able to play incoming SMS messages through the vehicle sound system.
• It also allows you to respond by selecting from various pre-defined phrases.
• Not all phones are compatible with this feature. Refer to the phone compatibility list at chrysler.com/uconnect. Connected mobile phones must be bluetooth-compatible, and paired
with your radio.
Changing The Volume
• Start a dialogue by pressing the Voice Command button, then say a command (for
example, “tutorial”).
• Use the radio ON/OFF VOLUME rotary knob to adjust the volume to a comfortable level while the Voice Command system is speaking. The volume setting for Voice Command is
different than the audio system.
• For vehicles equipped with Video Entertainment System (VES)™, refer to the Uconnect™ Voice Command section of the Uconnect™ User's Manual on the DVD for further details.
• For vehicles not equipped with VES™, refer to your vehicle Owner's Manual on the DVD for Uconnect™ Voice Command information.
NOTE: To access the tutorial, press the Voice Command button
. After the BEEP, say
“tutorial”. Press any hard-key/button or touch the display (Touch-Screen radio) to cancel the tutorial.
WARNING!
Any voice commanded system should be used only in safe driving conditions following
local laws and phone use. All attention should be kept on the roadway ahead. Failure to do
so may result in a collision causing you and others to be severely injured or killed.
ELECTRONICS
35
Page 38 of 76
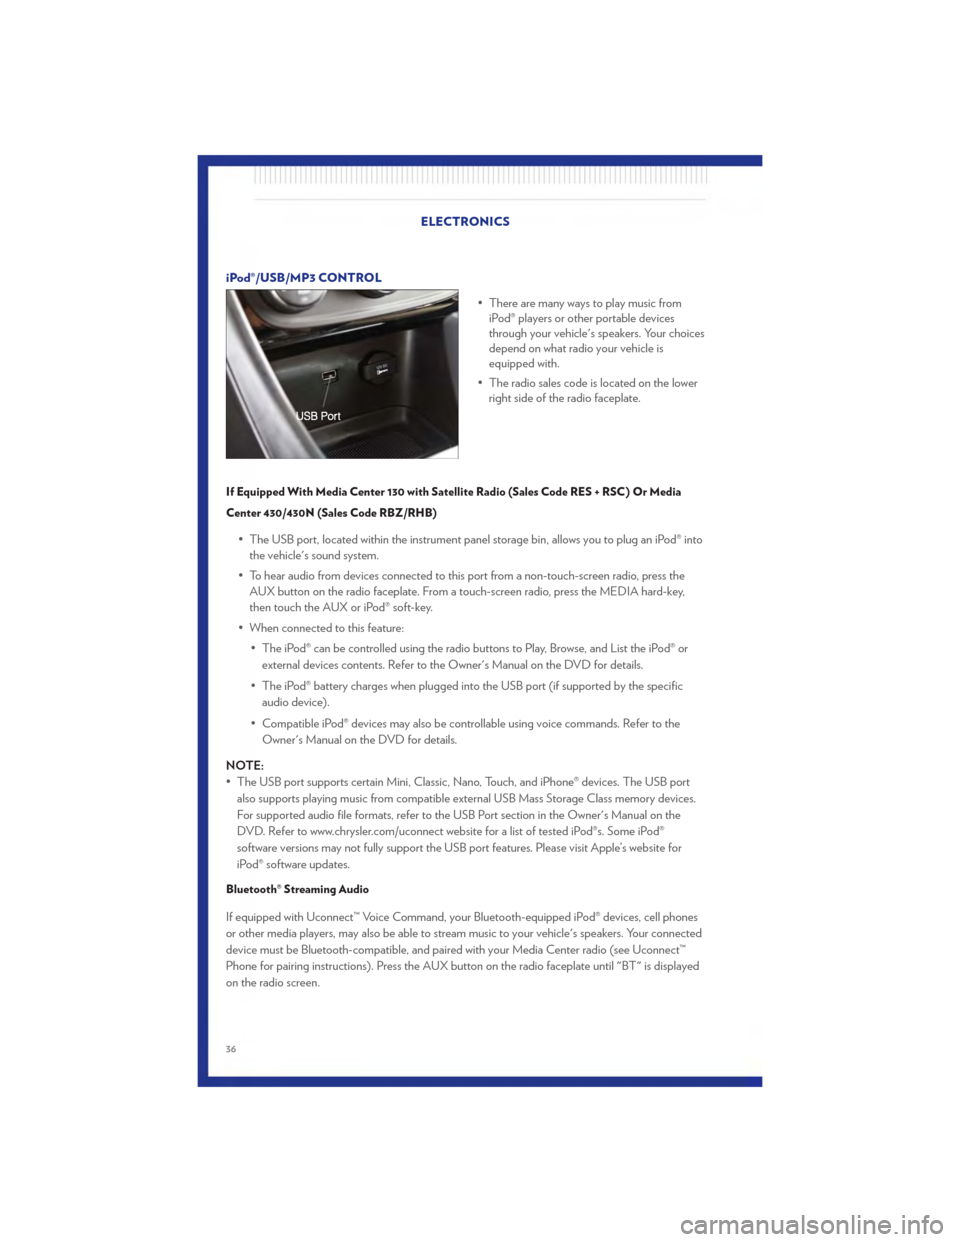
iPod®/USB/MP3 CONTROL• There are many ways to play music fromiPod® players or other portable devices
through your vehicle's speakers. Your choices
depend on what radio your vehicle is
equipped with.
• The radio sales code is located on the lower right side of the radio faceplate.
If Equipped With Media Center 130 with Satellite Radio (Sales Code RES + RSC) Or Media
Center 430/430N (Sales Code RBZ/RHB)
• The USB port, located within the instrument panel storage bin, allows you to plug an iPod® into
the vehicle's sound system.
• To hear audio from devices connected to this port from a non-touch-screen radio, press the AUX button on the radio faceplate. From a touch-screen radio, press the MEDIA hard-key,
then touch the AUX or iPod® soft-key.
• When connected to this feature: • The iPod® can be controlled using the radio buttons to Play, Browse, and List the iPod® orexternal devices contents. Refer to the Owner's Manual on the DVD for details.
• The iPod® battery charges when plugged into the USB port (if supported by the specific audio device).
• Compatible iPod® devices may also be controllable using voice commands. Refer to the Owner's Manual on the DVD for details.
NOTE:
• The USB port supports certain Mini, Classic, Nano, Touch, and iPhone® devices. The USB port also supports playing music from compatible external USB Mass Storage Class memory devices.
For supported audio file formats, refer to the USB Port section in the Owner's Manual on the
DVD. Refer to www.chrysler.com/uconnect website for a list of tested iPod®s. Some iPod®
software versions may not fully support the USB port features. Please visit Apple’s website for
iPod® software updates.
Bluetooth® Streaming Audio
If equipped with Uconnect™ Voice Command, your Bluetooth-equipped iPod® devices, cell phones
or other media players, may also be able to stream music to your vehicle's speakers. Your connected
device must be Bluetooth-compatible, and paired with your Media Center radio (see Uconnect™
Phone for pairing instructions). Press the AUX button on the radio faceplate until "BT" is displayed
on the radio screen.
ELECTRONICS
36
Page 74 of 76
Oil, EngineCapacity ................61
Overheating, Engine ...........47
Panic Alarm .................8
Phone (Pairing) ..............33
Phone (Uconnect) .............33
Power Glass Sunroof ..............22
Outlet (Auxiliary Electrical Outlet) . . . 41
Seats ..................12
Steering .................61
Preparation for Jacking ..........49
Programmable Electronic Features .....38
Radio Operation ............ 26,29
Rain Sensitive Wiper System ........18
Rear Seat, Folding .............14
Recreational Towing ............43
Remote Starting System ..........8
Replacement Bulbs ............67
Restraints, Child ..............10
Seat Belts ..................9
Seats ....................12
Adjustment ...............13
Folding Front Passenger .........14
Heated .................15
Power ..................12
RearFolding ..............14
Setting the Clock ............ 28,30
Shift Lever Override ............54
Signals, Turn ................17
SpareTire .................49
Spark Plugs ................61
Speed Control (Cruise Control) ......18
Starting Remote .................8 Steering
Tilt Column ...............16
Steering Wheel Audio Controls ......32
Store Radio Presets ........... 28,30
SunRoof .................22
Supplemental Restraint System - Airbag . . 10
Theft Alarm (Security Alarm) ........9
Theft System Arming ............9
Theft System Disarming ..........9
Tilt Steering Column ............16
Ti re s Air Pressure ...............66
Changing ................50
Flat Changing .............50
Jacking .................50
Pressure Warning Light .........44
Towing ..................42 24-Hour Towing Assistance .......44
Disabled Vehicle ............55
Recreational ..............43
Towing Vehicle Behind a Motor Home . . . 43
Trailer Towing Trailer and Tongue Weight .......42
Trailer Weight ...............42
Transmission Fluid ..................
6
1
Turn Signals ................17
Uconnect™ Phone .............33
USBPort ................ 31,36
VoiceCommand..............35
Washers, Windshield ............18
Wheel and Wheel Trim Care .......66
Wind Buffeting ..............23
Windshield Washers ............18
Windshield Wipers .............18
INDEX
72