mirror controls CHRYSLER 200 2013 1.G User Guide
[x] Cancel search | Manufacturer: CHRYSLER, Model Year: 2013, Model line: 200, Model: CHRYSLER 200 2013 1.GPages: 108, PDF Size: 3.81 MB
Page 7 of 108
A. Turn Signal/Lights Lever (behind steeringwheel) pg. 16
B. Electronic Vehicle Information Center (EVIC) Display (behind steering wheel)
pg. 6
C. Instrument Cluster pg. 6
D. Wiper/Washer Lever (behind steering wheel) pg. 18
E. Audio System (touch-screen-radio shown) pg. 24 F. SWITCH PANEL
• Heated Seat Switches pg. 15
• Electronic Stability Control pg. 69
• Hazard Switch
G. Climate Controls pg. 20
H. Transmission Gear Selector
I. Park Brake Lever
J. Power Outlet/Cigar Lighter pg. 66 K. USB Port
L. Electronic Speed Control pg. 19
M. Electronic Vehicle Information Center
(EVIC) Controls pg. 61
N. Hood Release pg. 84
O. Power Mirrors
P. Power Door Locks
Q. Power Windows
CONTROLS AT A GLANCE
5
Page 22 of 108
MANUAL CLIMATE CONTROLS
Air Recirculation
• Use Recirculation for maximum A/C operation.
• For window defogging, turn the recirculation button off.
• Recirculation is allowed in floor mode.
• Recirculation is allowed in defrost/floor (mix modes) for approximately five minutes.
Heated Mirrors
• The mirrors are heated to melt frost or ice. This feature is activated whenever you turn on therear window defroster.
OPERATING YOUR VEHICLE
20
Page 23 of 108
AUTOMATIC TEMPERATURE CONTROLS (ATC)
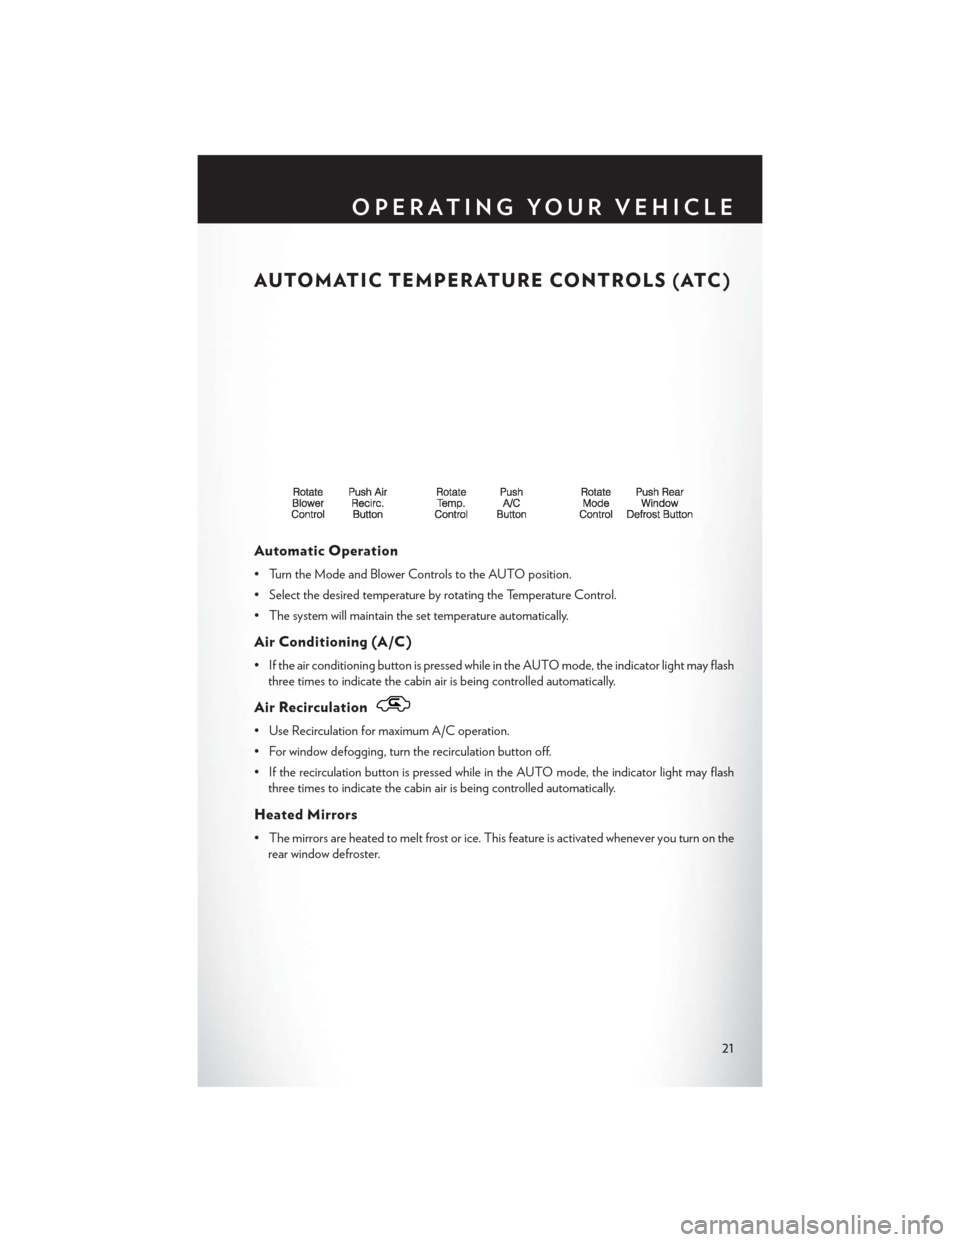
Automatic Operation
• Turn the Mode and Blower Controls to the AUTO position.
• Select the desired temperature by rotating the Temperature Control.
• The system will maintain the set temperature automatically.
Air Conditioning (A/C)
• If the air conditioning button is pressed while in the AUTO mode, the indicator light may flashthree times to indicate the cabin air is being controlled automatically.
Air Recirculation
• Use Recirculation for maximum A/C operation.
• For window defogging, turn the recirculation button off.
• If the recirculation button is pressed while in the AUTO mode, the indicator light may flashthree times to indicate the cabin air is being controlled automatically.
Heated Mirrors
• The mirrors are heated to melt frost or ice. This feature is activated whenever you turn on therear window defroster.
OPERATING YOUR VEHICLE
21
Page 95 of 108
FUSES
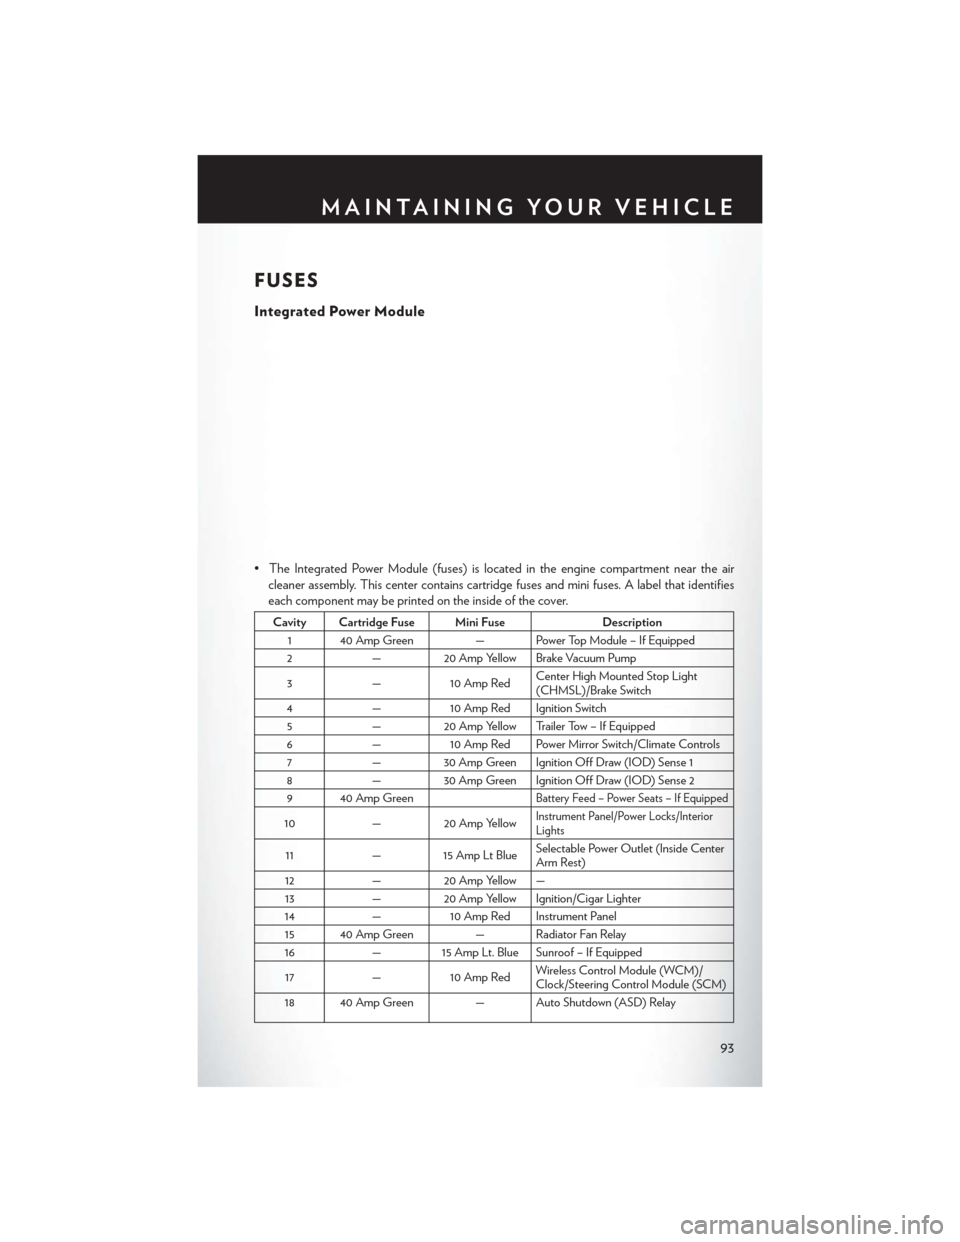
Integrated Power Module
• The Integrated Power Module (fuses) is located in the engine compartment near the aircleaner assembly. This center contains cartridge fuses and mini fuses. A label that identifies
each component may be printed on the inside of the cover.
Cavity Cartridge Fuse Mini Fuse Description
1 40 Amp Green — Power Top Module – If Equipped
2 — 20 Amp Yellow Brake Vacuum Pump
3 —10 Amp Red Center High Mounted Stop Light
(CHMSL)/Brake Switch
4 —10 Amp Red Ignition Switch
5 — 20 Amp Yellow Trailer Tow – If Equipped
6 —10 Amp Red Power Mirror Switch/Climate Controls
7 — 30 Amp Green Ignition Off Draw (IOD) Sense 1
8 — 30 Amp Green Ignition Off Draw (IOD) Sense 2
9 40 Amp Green
Battery Feed – Power Seats – If Equipped
10 — 20 Amp YellowInstrument Panel/Power Locks/Interior
Lights
11— 15 Amp Lt Blue Selectable Power Outlet (Inside Center
Arm Rest)
12 — 20 Amp Yellow —
13 — 20 Amp Yellow Ignition/Cigar Lighter
14 —10 Amp Red Instrument Panel
15 40 Amp Green — Radiator Fan Relay
16 — 15 Amp Lt. Blue Sunroof – If Equipped
17 —10 Amp Red Wireless Control Module (WCM)/
Clock/Steering Control Module (SCM)
18 40 Amp Green — Auto Shutdown (ASD) Relay
MAINTAINING YOUR VEHICLE
93
Page 96 of 108
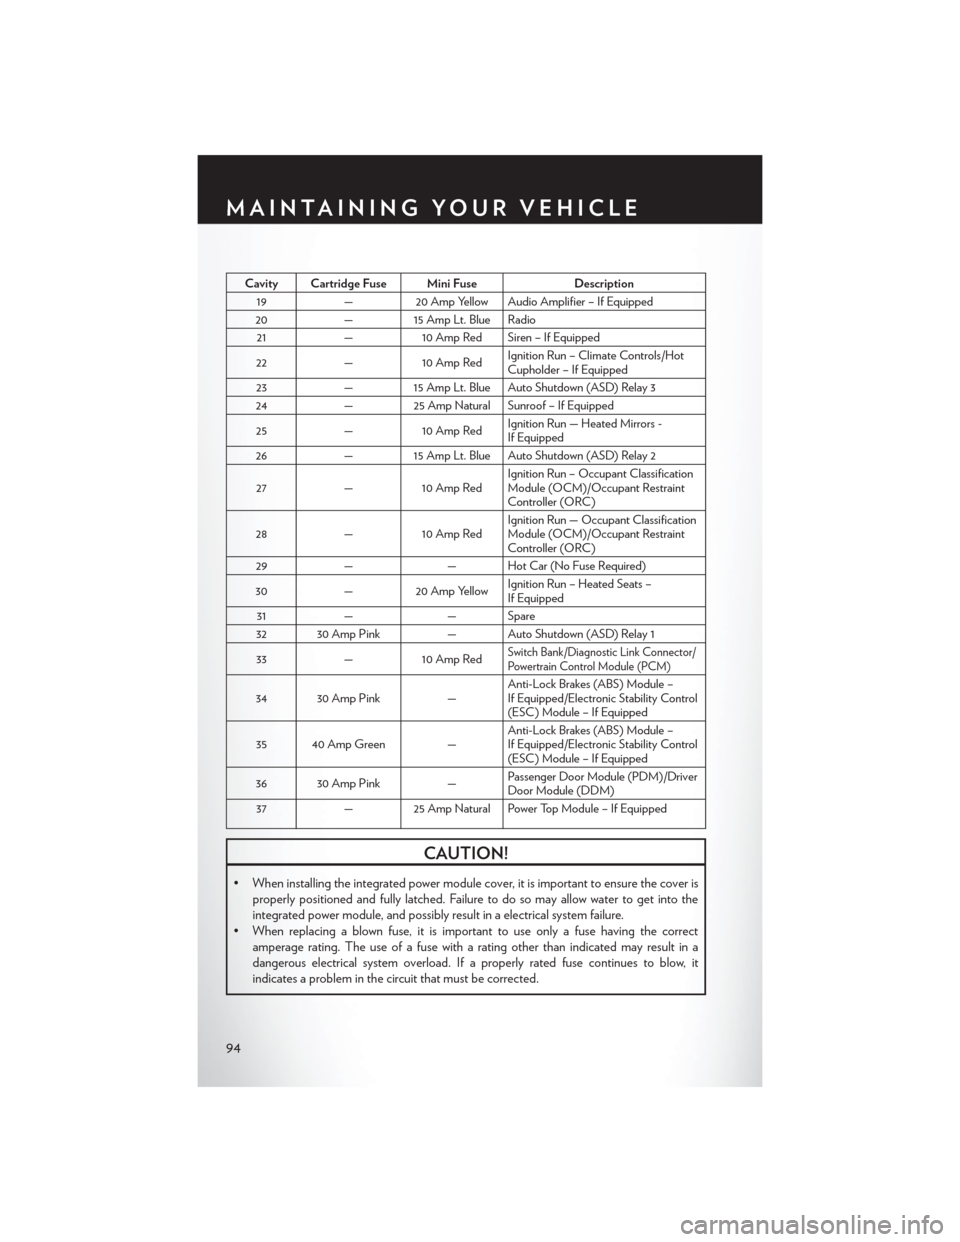
Cavity Cartridge Fuse Mini FuseDescription
19 — 20 Amp Yellow Audio Amplifier – If Equipped
20 — 15 Amp Lt. Blue Radio
21 —10 Amp Red Siren – If Equipped
22 —10 Amp Red Ignition Run – Climate Controls/Hot
Cupholder – If Equipped
23 — 15 Amp Lt. Blue Auto Shutdown (ASD) Relay 3
24 — 25 Amp Natural Sunroof – If Equipped
25 —10 Amp Red Ignition Run — Heated Mirrors -
If Equipped
26 — 15 Amp Lt. Blue Auto Shutdown (ASD) Relay 2
27 —10 Amp Red Ignition Run – Occupant Classification
Module (OCM)/Occupant Restraint
Controller (ORC)
28 —10 Amp Red Ignition Run — Occupant Classification
Module (OCM)/Occupant Restraint
Controller (ORC)
29 — — Hot Car (No Fuse Required)
30 — 20 Amp Yellow Ignition Run – Heated Seats –
If Equipped
31 — — Spare
32 30 Amp Pink — Auto Shutdown (ASD) Relay 1
33 —10 Amp Red
Switch Bank/Diagnostic Link Connector/
Powertrain Control Module (PCM)
34 30 Amp Pink —Anti-Lock Brakes (ABS) Module –
If Equipped/Electronic Stability Control
(ESC) Module – If Equipped
35 40 Amp Green — Anti-Lock Brakes (ABS) Module –
If Equipped/Electronic Stability Control
(ESC) Module – If Equipped
36 30 Amp Pink —Passenger Door Module (PDM)/Driver
Door Module (DDM)
37 — 25 Amp Natural Power Top Module – If Equipped
CAUTION!
• When installing the integrated power module cover, it is important to ensure the cover is
properly positioned and fully latched. Failure to do so may allow water to get into the
integrated power module, and possibly result in a electrical system failure.
• When replacing a blown fuse, it is important to use only a fuse having the correct amperage rating. The use of a fuse with a rating other than indicated may result in a
dangerous electrical system overload. If a properly rated fuse continues to blow, it
indicates a problem in the circuit that must be corrected.
MAINTAINING YOUR VEHICLE
94
Page 103 of 108
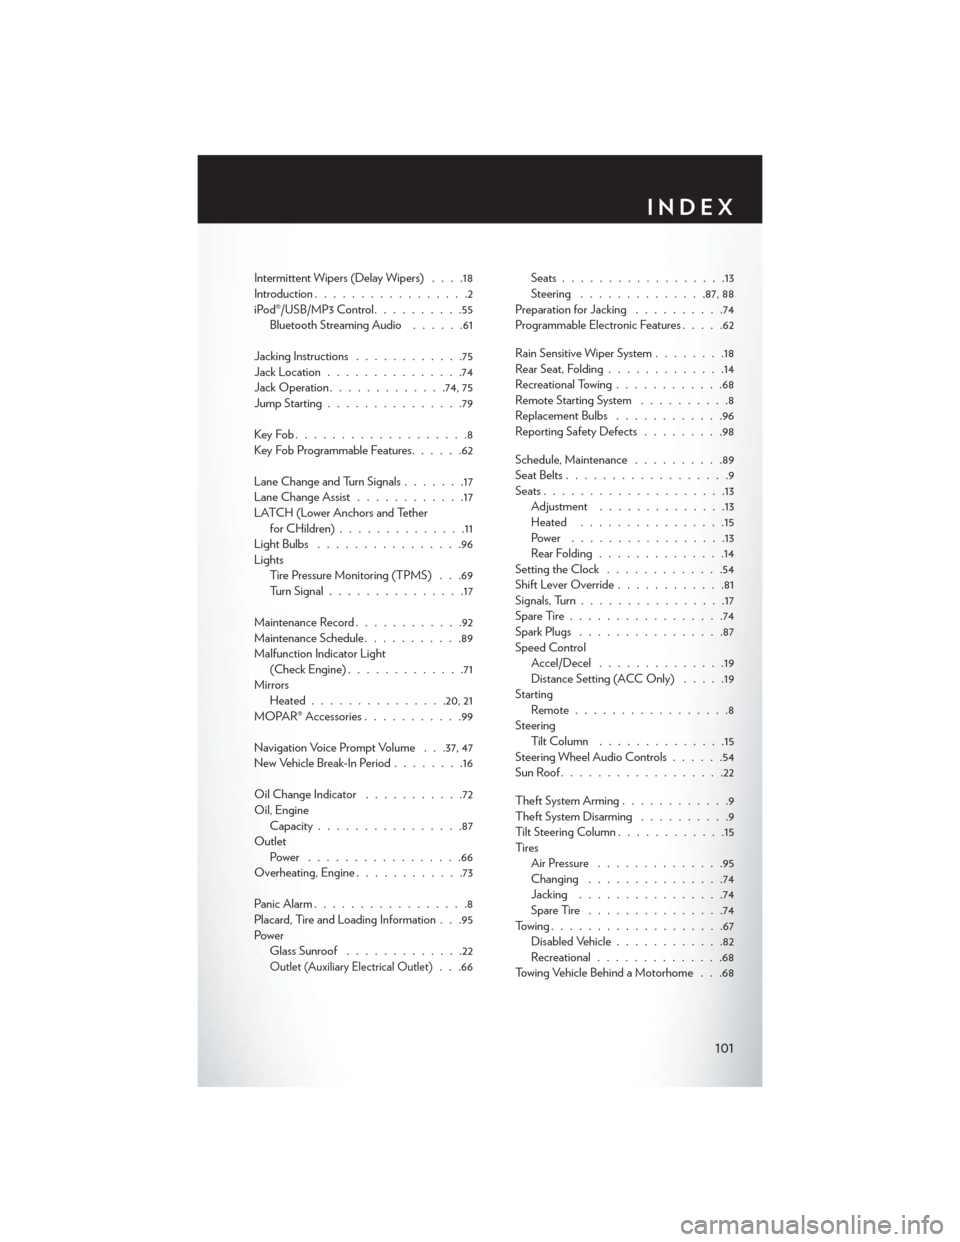
Intermittent Wipers (Delay Wipers)....18
Introduction .................2
iPod®/USB/MP3 Control ..........55
Bluetooth Streaming Audio ......61
Jacking Instructions ............75
Jack Location ...............74
Jack Operation .............74, 75
Jump Starting ...............79
KeyFob...................8
Key Fob Programmable Features ......62
Lane Change and Turn Signals .......17
Lane Change Assist ............17
LATCH (Lower Anchors and Tether forCHildren)..............11
LightBulbs ................96
Lights Tire Pressure Monitoring (TPMS) . . .69
Turn Signal ...............17
Maintenance Record ............92
Maintenance Schedule ...........89
Malfunction Indicator Light (Check Engine) .............71
Mirrors Heated .............. .20, 21
MOPAR® Accessories ...........99
Navigation Voice Prompt Volume . . .37, 47
New Vehicle Break-In Period ........16
Oil Change Indicator ...........72
Oil, Engine Capacity ................87
Outlet Power .................66
Overheating, Engine ............73
Panic Alarm .................8
Placard, Tire and Loading Information . . .95
Power Glass Sunroof .............22
Outlet (Auxiliary Electrical Outlet). . .66 Seats
..................13
Steering ............. .87, 88
Preparation for Jacking ..........74
Programmable Electronic Features .....62
Rain Sensitive Wiper System ........18
Rear Seat, Folding .............14
Recreational Towing ............68
Remote Starting System ..........8
Replacement Bulbs ............96
Reporting Safety Defects .........98
Schedule, Maintenance ..........89
Seat Belts ..................9
Seats ....................13
Adjustment ..............13
Heated ................15
Power .................13
Rear Folding ..............14
Setting the Clock .............54
Shift Lever Override ............81
Signals, Turn ................17
SpareTire.................74
Spark Plugs ................87
Speed Control Accel/Decel ..............19
Distance Setting (ACC Only) .....19
Starting Remote.................8
Steering TiltColumn ..............15
Steering Wheel Audio Controls ......54
SunRoof..................22
Theft System Arming ............9
Theft System Disarming ..........9
Tilt Steering Column ............15
Ti re s Air Pressure ..............95
Changing ...............74
Jacking ................74
SpareTire ...............74
Towing...................67 Disabled Vehicle ............82
Recreational ..............68
Towing Vehicle Behind a Motorhome . . .68
INDEX
101