radio controls CHRYSLER 200 2014 1.G User Guide
[x] Cancel search | Manufacturer: CHRYSLER, Model Year: 2014, Model line: 200, Model: CHRYSLER 200 2014 1.GPages: 116, PDF Size: 3.15 MB
Page 3 of 116
INTRODUCTION/WELCOME
WELCOME FROM CHRYSLER
GROUPLLC ..................2
CONTROLS AT A GLANCE
DRIVER COCKPIT...............4
INSTRUMENT CLUSTER ...........6
GETTING STARTED
KEYFOB ....................8
REMOTE START................9
TRUNK LOCK AND RELEASE ........9
SECURITY ALARM ..............10
SEATBELT ...................10
SUPPLEMENTAL RESTRAINT SYSTEM
(SRS)—AIRBAGS ...............11
CHILD RESTRAINTS .............12
FRONTSEATS ................15
REAR SEATS ..................17
HEATEDSEATS ................17
TILT/TELESCOPING STEERING
COLUMN ...................18
OPERATING YOUR VEHICLE
ENGINE BREAK-IN
RECOMMENDATIONS ............19
TURN SIGNAL/LIGHTS LEVER . . . ....20
WIPER/WASHER LEVER ...........21
SPEED CONTROL ..............22
MANUAL CLIMATE CONTROLS .....24
AUTOMATIC TEMPERATURE
CONTROLS (ATC) ..............25
POWER SUNROOF .............26
WIND BUFFETING . . ............27
ELECTRONICS
YOUR VEHICLE'S SOUND SYSTEM ....28
Uconnect® 130 .................30
Uconnect® 130 WITH SiriusXM
SATELLITE RADIO ..............32
Uconnect® 430/430N ..............35
Uconnect® 730N . ...............44
SiriusXM SATELLITE RADIO/TRAVEL
LINK.......................55
STEERING WHEEL AUDIO CONTROLS..59
SETTING THE ANALOG CLOCK .....59
iPod®/USB/MP3 CONTROL .........60
Uconnect® PHONE ...............61
Uconnect® VOICE COMMAND . . .....64
Bluetooth® STREAMING AUDIO ......66
ELECTRONIC VEHICLE INFORMATION
CENTER (EVIC) ...............67
PROGRAMMABLE FEATURES .......67
UNIVERSAL GARAGE DOOR OPENER
(HomeLink®) ..................69
POWER OUTLETS . .............72
UTILITY
TRAILER TOWING WEIGHTS
(MAXIMUM TRAILER WEIGHT
RATINGS) ...................73
RECREATIONAL TOWING
(BEHIND MOTORHOME, ETC.) ......74
WHAT TO DO IN EMERGENCIES
ROADSIDE ASSISTANCE..........75
INSTRUMENT CLUSTER WARNING
LIGHTS ....................75
IF YOUR ENGINE OVERHEATS . . . . . . 79
JACKING AND TIRE CHANGING .....80
BATTERY LOCATION ............86
JUMP-STARTING ...............86
SHIFT LEVER OVERRIDE ..........89
TOWING A DISABLED VEHICLE .....89
FREEING A STUCK VEHICLE .......90
EVENT DATA RECORDER (EDR) . . ....91
MAINTAINING YOUR VEHICLE
OPENING THE HOOD . . .........92
ENGINE COMPARTMENT .........93
FLUIDSANDCAPACITIES .........95
MAINTENANCE SCHEDULE ........97
MAINTENANCE RECORD . ........100
FUSES .....................101
TIRE PRESSURES ...............103
WHEEL AND WHEEL TRIM CARE ....104
EXTERIOR BULBS ..............104
CONSUMER ASSISTANCE
CHRYSLER GROUP LLC
CUSTOMER CENTER ...........105
CHRYSLER CANADA INC.
CUSTOMER CENTER ...........105
ASSISTANCE FOR THE HEARING
IMPAIRED ..................105
PUBLICATIONS ORDERING ........105
REPORTING SAFETY DEFECTS IN
THEUNITEDSTATES ............106
MOPAR® ACCESSORIES
AUTHENTIC ACCESSORIES
BYMOPAR® .................107
INDEX................... 108
FREQUENTLY ASKED
QUESTIONS
FAQ’s ......................111
TABLE OF CONTENTS
Page 22 of 116
TURN SIGNAL/LIGHTS LEVER
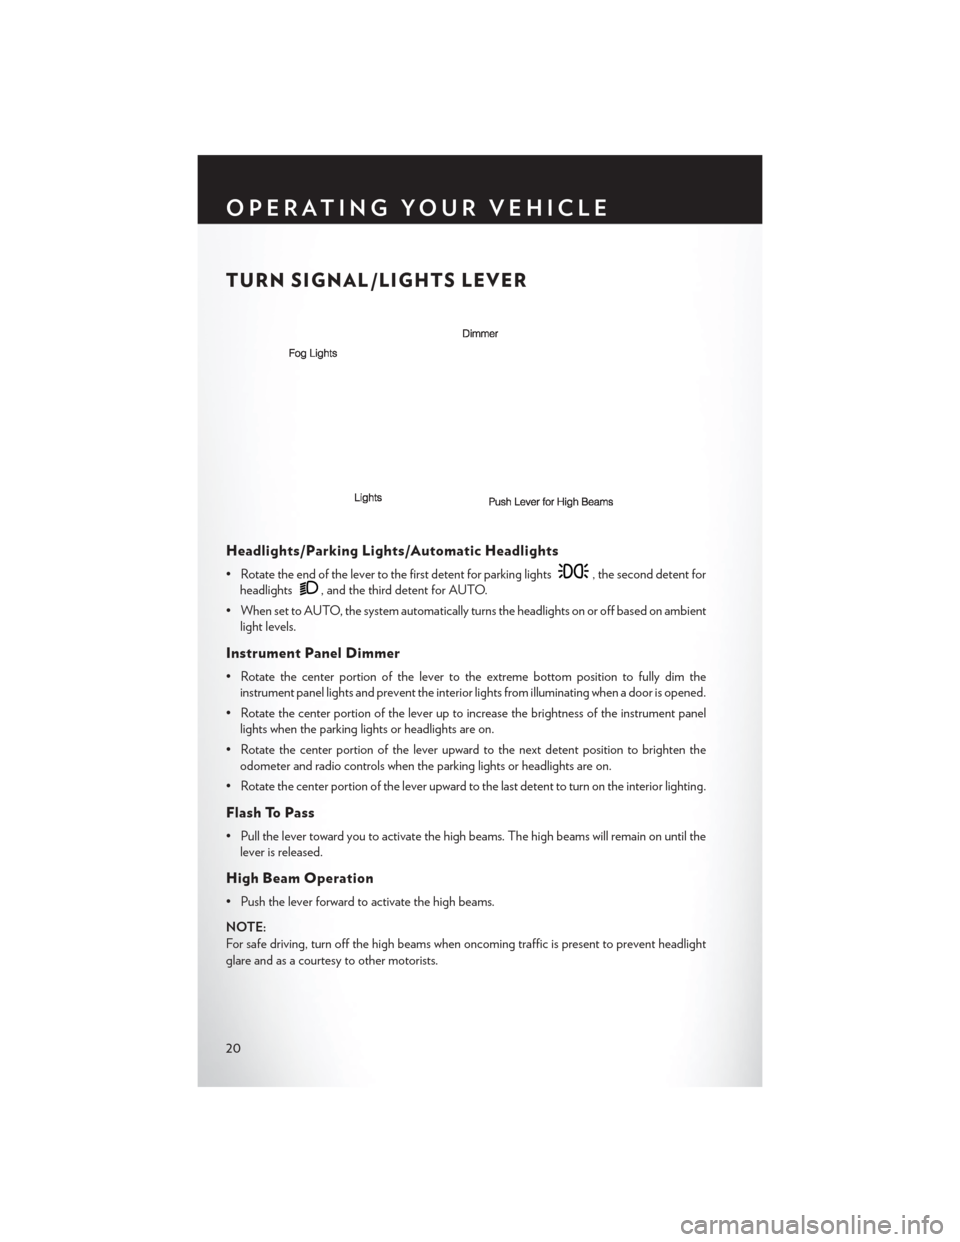
Headlights/Parking Lights/Automatic Headlights
• Rotate the end of the lever to the first detent for parking lights, the second detent for
headlights
, and the third detent for AUTO.
• When set to AUTO, the system automatically turns the headlights on or off based on ambient light levels.
Instrument Panel Dimmer
• Rotate the center portion of the lever to the extreme bottom position to fully dim theinstrument panel lights and prevent the interior lights from illuminating when a door is opened.
• Rotate the center portion of the lever up to increase the brightness of the instrument panel lights when the parking lights or headlights are on.
• Rotate the center portion of the lever upward to the next detent position to brighten the odometer and radio controls when the parking lights or headlights are on.
• Rotate the center portion of the lever upward to the last detent to turn on the interior lighting.
Flash To Pass
• Pull the lever toward you to activate the high beams. The high beams will remain on until the lever is released.
High Beam Operation
• Push the lever forward to activate the high beams.
NOTE:
For safe driving, turn off the high beams when oncoming traffic is present to prevent headlight
glare and as a courtesy to other motorists.
OPERATING YOUR VEHICLE
20
Page 57 of 116
SiriusXM SATELLITE RADIO/TRAVEL LINK
• SiriusXM Travel Link requires a subscription, sold separately after the 1 year trial subscriptionincluded with your vehicle purchase.
• SiriusXM Travel Link is only available in the United States.
• The following describes features that are available when in SiriusXM Satellite Radio mode.
• To access SiriusXM Satellite Radio, press the RADIO/MEDIA or RADIO hard-key, then touch the “SAT” soft-key tab.
Info
• Touch the “i” soft-key to view detailed information about the current Sirius XM Satellite channel.
SiriusXM Parental Controls
• SiriusXM offers the option to permanently block selected channels. Call 1-888-539-7474 and request the Family Package.
• Uconnect® 430/430N and 730N: Press the “MENU” hard-key while in SiriusXM Satellite
Radio Mode, then touch the “Channel Lock” to enable and/or disable desired channels. The
SEEK and SCAN function will then only display channels without Channel lock.
Search/Browse
• Touch the “magnifying glass” soft-key to search/browse the SiriusXM channel listing by Favorites and Categories such as Song, Artist and Channel Name. The Search/Browse also
allows you to manage your Favorites.
ELECTRONICS
55
Page 61 of 116
STEERING WHEEL AUDIO CONTROLS
•The steering wheel audio controls are located
on the rear surface of the steering wheel.
Right Switch
• Press the switch up or down to increase or decrease the volume.
• Press the button in the center to change modes AM/FM/CD/SAT.
Left Switch
• Press the switch up or down to search for thenext listenable station or select the next or
previous CD track.
• Press the button in the center to select the next preset station (radio) or to change CDs if equipped with a CD Changer.
SETTING THE ANALOG CLOCK
To set the analog clock at the top center of the instrument panel, press and hold the button until
the setting is correct.
ELECTRONICS
59
Page 104 of 116
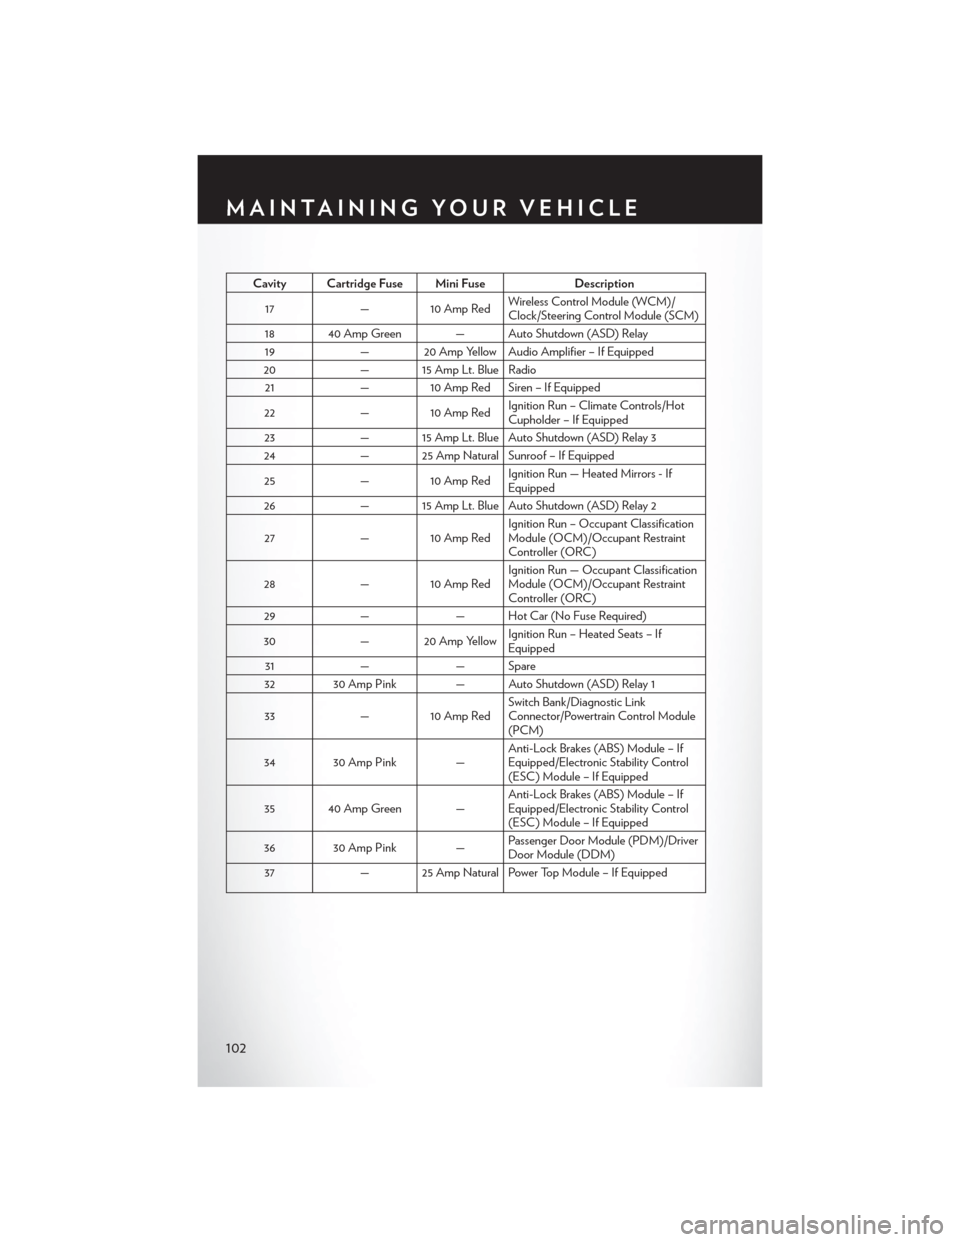
Cavity Cartridge Fuse Mini FuseDescription
17 — 10 Amp Red Wireless Control Module (WCM)/
Clock/Steering Control Module (SCM)
18 40 Amp Green — Auto Shutdown (ASD) Relay 19 — 20 Amp Yellow Audio Amplifier – If Equipped
20 — 15 Amp Lt. Blue Radio
21 — 10 Amp Red Siren – If Equipped
22 — 10 Amp Red Ignition Run – Climate Controls/Hot
Cupholder – If Equipped
23 — 15 Amp Lt. Blue Auto Shutdown (ASD) Relay 3
24 — 25 Amp Natural Sunroof – If Equipped
25 — 10 Amp Red Ignition Run — Heated Mirrors - If
Equipped
26 — 15 Amp Lt. Blue Auto Shutdown (ASD) Relay 2
27 — 10 Amp Red Ignition Run – Occupant Classification
Module (OCM)/Occupant Restraint
Controller (ORC)
28 — 10 Amp Red Ignition Run — Occupant Classification
Module (OCM)/Occupant Restraint
Controller (ORC)
29 —— Hot Car (No Fuse Required)
30 — 20 Amp Yellow Ignition Run – Heated Seats – If
Equipped
31 — — Spare
32 30 Amp Pink — Auto Shutdown (ASD) Relay 1
33 — 10 Amp Red Switch Bank/Diagnostic Link
Connector/Powertrain Control Module
(PCM)
34 30 Amp Pink — Anti-Lock Brakes (ABS) Module – If
Equipped/Electronic Stability Control
(ESC) Module – If Equipped
35 40 Amp Green — Anti-Lock Brakes (ABS) Module – If
Equipped/Electronic Stability Control
(ESC) Module – If Equipped
36 30 Amp Pink — Passenger Door Module (PDM)/Driver
Door Module (DDM)
37 — 25 Amp Natural Power Top Module – If Equipped
MAINTAINING YOUR VEHICLE
102
Page 112 of 116
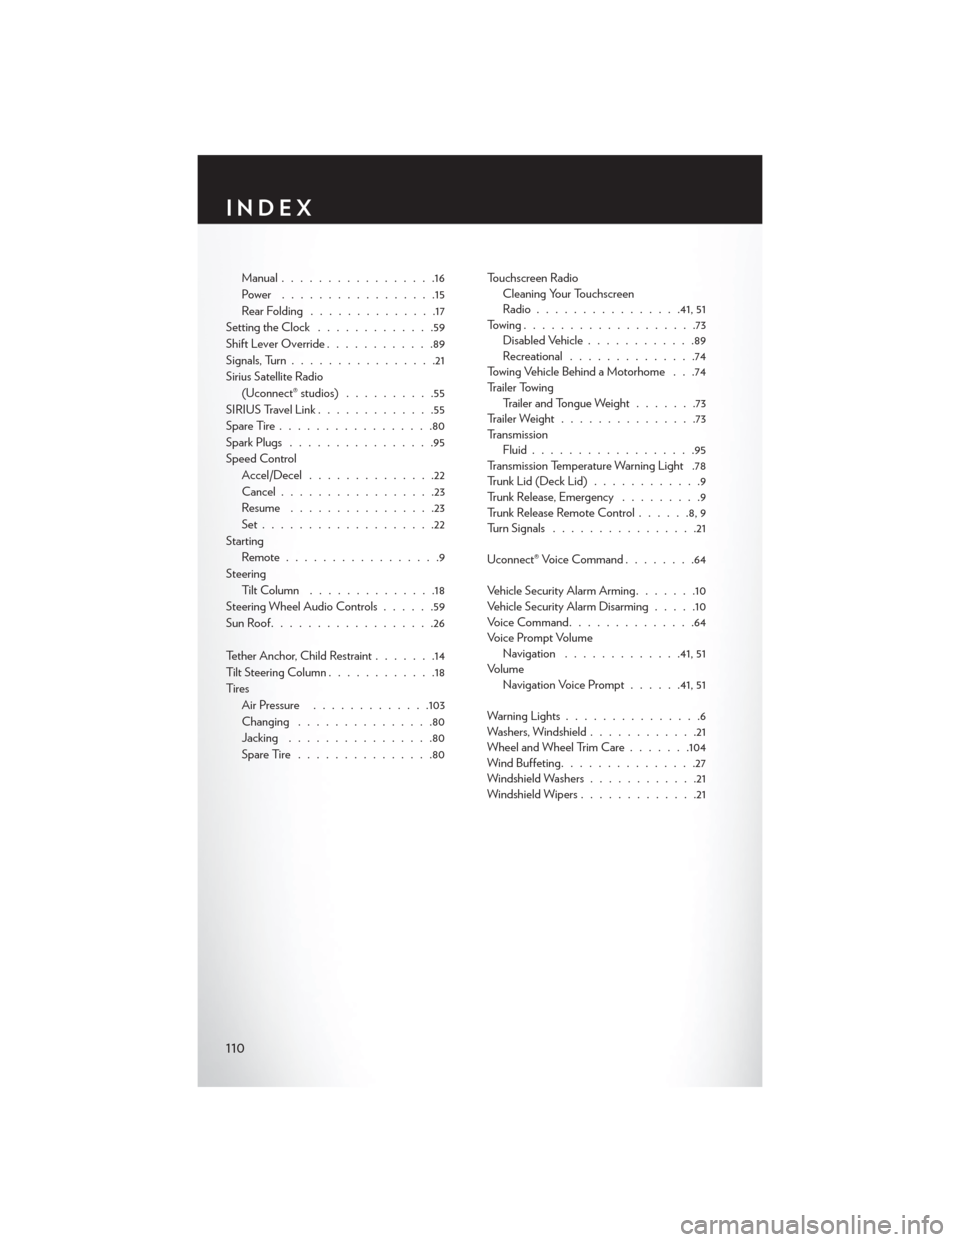
Manual.................16
Power .................15
RearFolding ..............17
Setting the Clock .............59
Shift Lever Override ............89
Signals, Turn ................21
Sirius Satellite Radio (Uconnect® studios) ..........55
SIRIUSTravelLink.............55
SpareTire.................80
Spark Plugs ................95
Speed Control Accel/Decel ..............22
Cancel .................23
Resume ................23
Set...................22
Starting Remote.................9
Steering Tilt Column ..............18
Steering Wheel Audio Controls ......59
SunRoof..................26
Tether Anchor, Child Restraint .......14
Tilt Steering Column ............18
Ti re s Air Pressure .............103
Changing ...............80
Jacking ................80
SpareTire...............80 Touchscreen Radio
Cleaning Your Touchscreen
Radio ............... .41, 51
Towing...................73 Disabled Vehicle ............89
Recreational ..............74
Towing Vehicle Behind a Motorhome . . .74
Trailer Towing Trailer and Tongue Weight .......73
Trailer Weight ...............73
Transmission Fluid ..................95
Transmission Temperature Warning Light .78
TrunkLid(DeckLid)............9
Trunk Release, Emergency .........9
Trunk Release Remote Control ......8,9
Turn Signals ................21
Uconnect® Voice Command ........64
Vehicle Security Alarm Arming .......10
Vehicle Security Alarm Disarming .....10
VoiceCommand..............64
Voice Prompt Volume Navigation .............41, 51
Volume Navigation Voice Prompt ......41, 51
Warning Lights ...............6
Washers, Windshield ............21
Wheel and Wheel Trim Care .......104
Wind Buffeting ...............27
Windshield Washers ............21
Windshield Wipers .............21
INDEX
110