ECO mode CHRYSLER 200 2015 2.G Owner's Manual
[x] Cancel search | Manufacturer: CHRYSLER, Model Year: 2015, Model line: 200, Model: CHRYSLER 200 2015 2.GPages: 220, PDF Size: 3.7 MB
Page 167 of 220
If the sealant (white fluid) does not flow within0–10seconds through the Sealant Hose (6):
1. Press the Power Button (4) to turn Off the Tire Service Kit. Disconnect the Sealant Hose (6) from the valve stem. Make sure the valve stem is free of debris. Reconnect the Sealant
Hose (6) to the valve stem. Check that the Mode Select Knob (5) is in the Sealant Mode
position and not Air Mode. Press the Power Button (4) to turn On the Tire Service Kit.
2. Connect the Power Plug (8) to a different 12 Volt power outlet in your vehicle or another vehicle, if available. Make sure the engine is running before turning ON the Tire Service Kit.
3. The Sealant Bottle (1) may be empty due to previous use. Call for assistance.
NOTE:
If the Mode Select Knob (5) is on Air Mode and the pump is operating, air will dispense from the
Air Pump Hose (7) only, not the Sealant Hose (6).
If the sealant (white fluid) does flow through the Sealant Hose (6):
1. Continue to operate the pump until sealant is no longer flowing through the hose (typically takes 30 - 70 seconds). As the sealant flows through the Sealant Hose (6), the Pressure Gauge
(3) can read as high as 70 psi (4.8 Bar). The Pressure Gauge (3) will decrease quickly from
approximately 70 psi (4.8 Bar) to the actual tire pressure when the Sealant Bottle (1) is empty.
2. The pump will start to inject air into the tire immediately after the Sealant Bottle (1) is empty. Continue to operate the pump and inflate the tire to the pressure indicated on the tire pressure
label on the driver-side latch pillar (recommended pressure). Check the tire pressure by
looking at the Pressure Gauge (3).
If the tire does not inflate to at least 26 psi (1.8 Bar) pressure within 15 minutes:
The tire is too badly damaged. Do not attempt to drive the vehicle further. Call for assistance.
NOTE:
If the tire becomes over-inflated, press the Deflation Button to reduce the tire pressure to the
recommended inflation pressure before continuing.
If the tire inflates to the recommended pressure or is at least 26 psi (1.8 Bar) pressure within
15 minutes:
1. Press the Power Button (4) to turn off the Tire Service Kit.
2. Remove the Speed Limit sticker from the top of the Sealant Bottle (1) and place the sticker on the instrument panel.
3. Immediately disconnect the Sealant Hose (6) from the valve stem, reinstall the cap on the fitting at the end of the hose, and place the Tire Service Kit in the vehicle storage location.
Quickly proceed to (D) “Drive Vehicle.”
(D) Drive Vehicle:
Immediately after injecting sealant and inflating the tire, drive the vehicle 5 miles (8 km) or
10 minutes to ensure distribution of the Tire Service Kit Sealant within the tire. Do not exceed
55 mph (88 km/h).
WHAT TO DO IN EMERGENCIES
165
Page 168 of 220
(E) After Driving:
Pull over to a safe location. Refer to “Whenever You Stop to Use Tire Service Kit” before
continuing.
1. Turn the Mode Select Knob (5) to the Air Mode position.
2. Uncoil the Air Pump Hose (7) (black in color) and screw the fitting at the end of hose (7) ontothe valve stem.
3. Uncoil the power plug and insert the plug into the vehicles 12 Volt power outlet.
4. Check the pressure in the tire by reading the Pressure Gauge (3).
If tire pressure is less than 19 psi (1.3 Bar), the tire is too badly damaged. Do not attempt to
drive the vehicle further. Call for assistance.
If the tire pressure is 19 psi (1.3 Bar) or higher:
1. Press the Power Button (4) to turn on Tire Service Kit and inflate the tire to the pressure indicated on the tire and loading information label on the driver-side door opening.
2. Disconnect the Tire Service Kit from the valve stem, reinstall the cap on the valve stem and unplug from 12 Volt outlet.
3. Place the Tire Service Kit in its proper storage area in the vehicle.
4. Have the tire inspected and repaired or replaced at the earliest opportunity at an authorized dealer or tire service center.
5. Remove the Speed Limit sticker from the instrument panel after the tire has been repaired.
6. Replace the Sealant Bottle (1) and Sealant Hose (6) assembly at your authorized dealer as soon as possible. Refer to “(F) Sealant Bottle and Hose Replacement.”
NOTE:
• If the tire becomes over-inflated, press the Deflation Button to reduce the tire pressure to the recommended inflation pressure before continuing.
• When having the tire serviced, advise the authorized dealer or service center that the tire has been sealed using the Tire Service Kit.
(F) Sealant Bottle And Hose Replacement:
1. Uncoil the Sealant Hose (6) (clear in color).
2. Locate the round Sealant Bottle release button in the recessed area under the sealant bottle.
3. Press the Sealant Bottle release button. The Sealant Bottle (1) will pop up. Remove the bottle
and dispose of it accordingly.
4. Clean any remaining sealant from the Tire Service Kit housing.
5. Position the new Sealant Bottle (1) in the housing so that the Sealant Hose (6) aligns with the hose slot in the front of the housing. Press the bottle into the housing. An audible click will be
heard indicating the bottle is locked into place.
WHAT TO DO IN EMERGENCIES
166
Page 180 of 220
WARNING!
• When temperatures are below the freezing point, electrolyte in a discharged battery mayfreeze. Do not attempt jump-starting because the battery could rupture or explode and
cause personal injury. Battery temperature must be brought above the freezing point
before attempting a jump-start.
• Take care to avoid the radiator cooling fan whenever the hood is raised. It can start anytime the ignition switch is on. You can be injured by moving fan blades.
• Remove any metal jewelry, such as watch bands or bracelets, that might make an inadver-
tent electrical contact. You could be severely injured.
• Batteries contain sulfuric acid that can burn your skin or eyes and generate hydrogen gas
which is flammable and explosive. Keep open flames or sparks away from the battery.
• Do not allow vehicles to touch each other as this could establish a ground connection and
personal injury could result.
• Failure to follow this procedure could result in personal injury or property damage due to
battery explosion.
• Do not connect the cable to the negative post (-) of the discharged battery. The resulting electrical spark could cause the battery to explode and could result in personal injury.
FREEING A STUCK VEHICLE
If your vehicle becomes stuck in mud, sand or snow, it can often be moved by a rocking motion.
Turn your steering wheel right and left to clear the area around the front wheels. Then shift back
and forth between REVERSE and DRIVE. Using minimal accelerator pedal pressure to maintain
the rocking motion, without spinning the wheels, is most effective.
NOTE:
• Shifts between DRIVE and REVERSE can only be achieved at wheel speeds of 5 mph
(8 km/h) or less. Whenever the transmission remains in NEUTRAL for more than 2 seconds,
you must press the brake pedal to engage DRIVE or REVERSE.
• To improve the vehicle's traction when starting off in deep snow, sand or gravel, it may be desirable to switch the Electronic Stability Control (ESC) to “Partial Off ” mode by momen-
tarily pressing the ESC Off
switch. For further information on ESC, refer to the Owner's
Manual on the DVD.
CAUTION!
• When “rocking” a stuck vehicle by shifting between REVERSE and DRIVE, do not spin the wheels faster than 15 mph (24 km/h), or drivetrain damage may result.
• Revving the engine or spinning the wheels too fast may lead to transmission overheating
and failure. It can also damage the tires. Do not spin the wheels above 30 mph (48 km/h)
while in gear (no transmission shifting occurring).
WHAT TO DO IN EMERGENCIES
178
Page 183 of 220
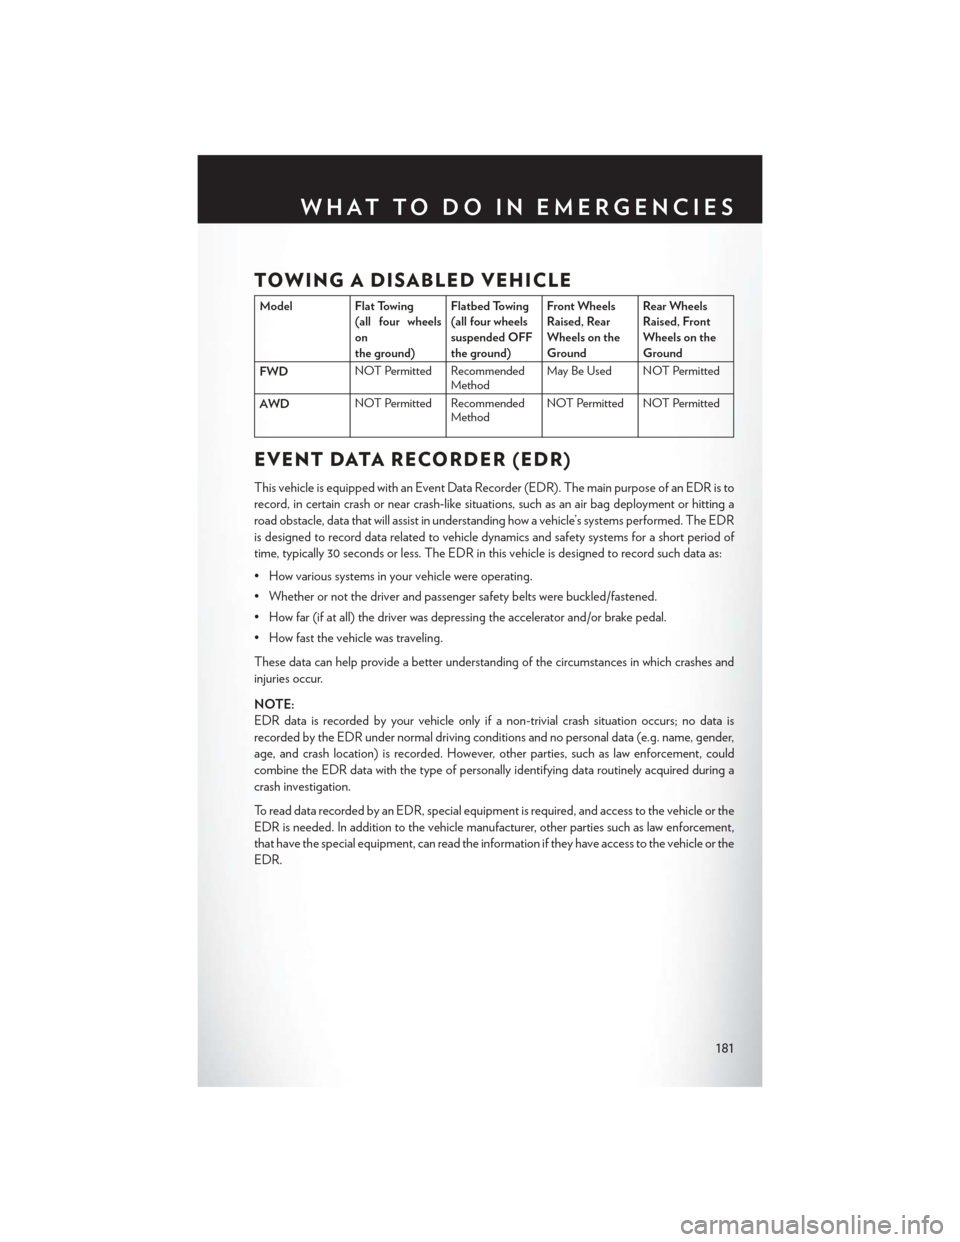
TOWING A DISABLED VEHICLE
Model Flat Towing(all four wheels
on
the ground) Flatbed Towing
(all four wheels
suspended OFF
the ground)Front Wheels
Raised, Rear
Wheels on the
GroundRear Wheels
Raised, Front
Wheels on the
Ground
FWD NOT Permitted Recommended
MethodMay Be Used NOT Permitted
AWD NOT Permitted Recommended
MethodNOT Permitted NOT Permitted
EVENT DATA RECORDER (EDR)
This vehicle is equipped with an Event Data Recorder (EDR). The main purpose of an EDR is to
record, in certain crash or near crash-like situations, such as an air bag deployment or hitting a
road obstacle, data that will assist in understanding how a vehicle’s systems performed. The EDR
is designed to record data related to vehicle dynamics and safety systems for a short period of
time, typically 30 seconds or less. The EDR in this vehicle is designed to record such data as:
• How various systems in your vehicle were operating.
• Whether or not the driver and passenger safety belts were buckled/fastened.
• How far (if at all) the driver was depressing the accelerator and/or brake pedal.
• How fast the vehicle was traveling.
These data can help provide a better understanding of the circumstances in which crashes and
injuries occur.
NOTE:
EDR data is recorded by your vehicle only if a non-trivial crash situation occurs; no data is
recorded by the EDR under normal driving conditions and no personal data (e.g. name, gender,
age, and crash location) is recorded. However, other parties, such as law enforcement, could
combine the EDR data with the type of personally identifying data routinely acquired during a
crash investigation.
To read data recorded by an EDR, special equipment is required, and access to the vehicle or the
EDR is needed. In addition to the vehicle manufacturer, other parties such as law enforcement,
that have the special equipment, can read the information if they have access to the vehicle or the
EDR.
WHAT TO DO IN EMERGENCIES
181
Page 204 of 220
CHRYSLER GROUP LLC CUSTOMER CENTER
P.O. Box 21–8004 Auburn Hills, MI 48321–8004 Phone: 1–800–247–9753
CHRYSLER CANADA INC. CUSTOMER CENTER
P.O. Box 1621 Windsor, Ontario N9A 4H6 Phone: 1–800–465–2001 (English) Phone:
1–800–387–9983 (French)
ASSISTANCE FOR THE HEARING IMPAIRED
To assist customers who have hearing difficulties, the manufacturer has installed special TDD
(Telecommunication Devices for the Deaf ) equipment at its customer center. Any hearing or
speech impaired customer, who has access to a TDD or a conventional teletypewriter (TTY) in
the United States, can communicate with the manufacturer by dialing 1–800–380–CHRY.
Canadian residents with hearing difficulties that require assistance can use the special needs relay
service offered by Bell Canada. For TTY teletypewriter users, dial 711 and for Voice callers, dial
1–800–855–0511 to connect with a Bell Relay Service operator.
WARNING!
Engine exhaust, some of its constituents, and certain vehicle components contain, or emit,
chemicals known to the State of California to cause cancer and birth defects, or other
reproductive harm. In addition, certain fluids contained in vehicles and certain products of
component wear contain, or emit, chemicals known to the State of California to cause cancer
and birth defects, or other reproductive harm.
PUBLICATIONS ORDERING
• If you are the first registered retail owner of your vehicle, you may obtain a complimentaryprinted copy of the Owner's Manual, Navigation/Uconnect® Manuals or Warranty Booklet.
United States customers may visit the Chrysler Contact Us page at www.chrysler.com scroll to
the bottom of the page and select the “Contact Us” link, then select the “Owner’s Manual and
Glove Box Material” from the left menu. You may also obtain a complimentary copy by calling
1–800–247–9753 (U.S.) or 1–800–387–1143 (Canada).
• Replacement User Guide kits or DVDs or, if you prefer, additional printed copies of the Owner's Manual, Warranty Booklet or Radio Manuals may be purchased by visiting
www.techauthority.com or by calling 1–800–890–4038 (U.S.) or 1–800–387–1143 (Canada).
Visa, Master Card, American Express and Discover orders are accepted. If you prefer mailing
your order, please call the above numbers for an order form.
NOTE:
• A street address is required when ordering manuals (no P.O. Boxes).
• The Owner's Manual and User Guide electronic files are also available on the Chrysler, Jeep, Ram Truck, Dodge and SRT websites.
• Click on the “For Owners” tab, select “Owner/Service Manuals”, then select your desired model year and vehicle from the drop down lists.
CONSUMER ASSISTANCE
202
Page 212 of 220
Lights...................201
Fog................. .160
Headlights...............36
High Beam Indicator .........160
Security Alarm ............160
Tire Pressure Monitoring (TPMS) . .156
Turn Signal ...............35
Locks Door..................10
Lower Anchors and Tether for CHildren (LATCH)................26
Lubrication, Body .............189
Maintenance Free Battery .........189
Maintenance, General ..........189
Maintenance Procedures .........189
Maintenance Record ...........192
Maintenance Schedule ..........190
Malfunction Indicator Light (Check Engine) ............... .159
Master Cylinder (Brakes) .........189
MemorySeat ...............29
Mirrors Heated ............ .45, 47, 50
MOPAR® Accessories ..........204
Navigation ..............106,138
New Vehicle Break-In Period ........35
Occupant Restraints ............24
Octane Rating, Gasoline (Fuel) ......188
Oil,Engine............. .188, 189
Capacity .............. .188
Change Interval ...........189
Checking ...............189
Disposal .............. .189
Filter .............. .188, 189
Filter Disposal ............189
Materials Added to ..........189
Recommendation ........188, 189
Viscosity ............ .188, 189
Oil Filter, Selection ............189
Oil Pressure Light ............ .155
Outlet Power................ .152
Overheating, Engine ...........161
Paddle Shift Mode .............53 Paint Care
............... .189
Panic Alarm ................
11
Parking Brake ...............55
ParkSense® .................57
ParkSense® Active Park Assist .......58
ParkSense® System, Front And Rear ....57
ParkSense® System, Rear ..........57
Phone (Pairing) ...........109, 142
Placard, Tire and Loading Information . .198
Power Deck Lid Release ...........16
Glass Sunroof .............61
Inverter ............... .151
Outlet (Auxiliary Electrical Outlet) . .152
Seats .................29
Preparation for Jacking ..........169
Programmable Electronic Features . . . .148
Purchase Apps Uconnect® Access ...........71
Radio ...................66
Radio (Sound Systems) ..........66
Rain Sensitive Wiper System ........37
RearCamera ...............60
RearCrossPath..............60
Rear Park Assist System ..........57
Rear ParkSense System ........57, 60
Rear Seat, Folding .............31
Recreational Towing ............153
Refrigerant ................189
Remote Keyless Entry (RKE) Arm The Alarm .............17
Disarm The Alarm ...........17
Lock The Doors ............10
Panic Alarm ..............11
Unlatch The Trunk ...........10
Unlock The Doors ...........10
Remote Starting Enter Remote Start Mode .......11
Exit Remote Start Mode ........11
How To Use Remote Start .......11
KeyFob ................11
Remote Starting System ........11
Remote Starting System ..........11
Remote Trunk Release ...........16
Replacement Bulbs ............201
Reporting Safety Defects .........203
INDEX
210
Page 213 of 220
Restraint, Head..............28
Schedule, Maintenance ..........190
Seat Belt Maintenance ..........189
Seat Belts Adjustable Shoulder Belt ........18
Pretensioners .............18
Seats ....................29
Heated ................32
RearFolding ..............31
Ventilated ...............32
Security Alarm ............. .160
Arm The System ............17
Disarm The System ...........17
Security Alarm .............17
Selection of Coolant (Antifreeze) .....188
Set Up Your Via Mobile Profile Uconnect® ...............70
Shifting Automatic Transmission ........51
Signals, Turn ............. .35, 160
SIRIUS Travel Link ............141
Sound Systems (Radio) ..........66
SpareTire............168, 199, 200
SparkPlugs............... .188
Specifications Fuel (Gasoline) ............188
Oil ................. .188
Speed Control Accel/Decel ..............38
Distance Setting (ACC Only) .....39
Mode Setting (ACC Only) ......41
Speed Control (Cruise Control) ......38
Starting Remote ................11
Steering Tilt Column ..............34
Wheel, Heated ............33
Steering Wheel Audio Controls ......145
SunRoof..................61
Supplemental Restraint System - Airbag . .19
Temperature Control, Automatic (ATC) . .48
Tether Anchor, Child Restraint .......27
Text Messaging ..........90, 112, 144
Tilt Steering Column ............34
Ti re s Air Pressure .............198 Changing
.............. .168
CompactSpare............199
Jacking ............... .168
SpareTire ..............168
Tire Service Kit ............161, 163
Towing................. .153
D
isabled Vehicle ...........181
Recreational .............153
Towing Vehicle Behind a Motorhome . . .153
Trailer Towing Trailer and Tongue Weight ......153
Trailer Weight .............. .153
Transmission ................51
Automatic ...............51
Fluid ................ .189
Maintenance .............189
Transmission Temperature Warning Light ................. .157
Trunk Lid (Deck Lid) ............16
Trunk Release, Emergency .........16
Trunk Release Remote Control .....10,16
Turn Signals ............. .35, 160
Uconnect® Access .................67
Set Up Your Via Mobile Profile .....70
Using Access ..............72
Via Mobile Apps ............83
Uconnect® 3.0 ...............84
Uconnect® 5.0 ...............86
Uconnect® 8.4A ..............98
Uconnect® 8.4AN ............ .129
Uconnect® Access .............67
APP..................70
In Vehicle Features ...........74
Purchase Apps .............71
Uconnect® Voice Command ......91, 113
Using Access Uconnect® ...............72
Vehicle Security Alarm Disarming .....17
Via Mobile Apps Uconnect® ...............83
VoiceCommand........... .91, 113
Voice Recognition System (VR) . . . .91, 113
Washer Adding Fluid .............189
INDEX
211