air condition CHRYSLER 200 2015 2.G User Guide
[x] Cancel search | Manufacturer: CHRYSLER, Model Year: 2015, Model line: 200, Model: CHRYSLER 200 2015 2.GPages: 220, PDF Size: 3.7 MB
Page 22 of 220
• The ORC turns on the Air Bag Warning Light in the instrument panel for approximately fourto eight seconds for a self-check when the ignition switch is first turned to the ON/RUN
position. After the self-check, the Air Bag Warning Light will turn off. If the ORC detects a
malfunction in any part of the system, it turns on the Air Bag Warning Light, either momen-
tarily or continuously. A single chime will sound to alert you if the light comes on again after
initial startup.
• The ORC monitors the readiness of the electronic parts of the air bag system whenever the ignition switch is in the START or ON/RUN position. If the ignition switch is in the OFF
position or in the ACC position, the air bag system is not on and the air bags will not inflate.
• If the Air Bag Warning Light in the instrument panel is not on during the four to eight seconds when the ignition switch is first turned to the ON/RUN position, stays on, or turns on while
driving, have the vehicle serviced by an authorized service center immediately.
NOTE:
If the speedometer, tachometer, or any engine related gauges are not working, the Occupant
Restraint Controller (ORC) may also be disabled. In this condition the air bags may not be ready
to inflate for your protection. Have an authorized dealer service the air bag system immediately.
• After any collision, the vehicle should be taken to an authorized dealer immediately.
• Do not drive your vehicle after the air bags have deployed. If you are involved in another
collision, the air bags will not be in place to protect you.
• If it is necessary to modify the air bag system for persons with disabilities, contact your authorized dealer.
• Refer to the Owner's Manual on the DVD for further details regarding the Supplemental Restraint System (SRS).
Occupant Classification System
This vehicle is equipped with a right front passenger Occupant Classification System (“OCS”)
that is designed to provide Passenger Advanced Front Air Bag output appropriate to the
occupant’s seated weight input, as determined by the OCS.
The Occupant Classification System (OCS) consists of the following:
• Occupant Restraint Controller (ORC)
• Occupant Classification Module (OCM) and Sensor located in the front passenger seat
• Air Bag Warning Light
The OCS will NOT prevent deployment of the Passenger Advanced Front Air Bag. The OCS may
reduce the inflation rate of the Passenger Advanced Front Air Bag if the OCS estimates that:
• The front passenger seat is unoccupied or has very light objects on it; or
• The front passenger seat is occupied by a small passenger, including a child; or
• The front passenger seat is occupied by a rear-facing child restraint; or
• The front passenger is not properly seated or his or her weight is taken off of the seat for aperiod of time.
GETTING STARTED
20
Page 52 of 220
Air Conditioning (A/C)
If the air conditioning button is pressed while in AUTO mode, the system will exit AUTO mode
and stay in A/C. The mode and blower will be set at the closest mode and blower position that the
system was operating in AUTO.
MAX A/C
MAX A/C sets the control for maximum cooling performance.
• Press and release to toggle between MAX A/C and the prior settings. The button on thetouchscreen illuminates when MAX A/C is ON.
In MAX A/C, the blower level and mode position can be adjusted to desired user settings.
Pressing other settings will cause the MAX A/C operation to switch to the prior settings and the
MAX A/C indicator will turn off.
SYNC Temperature Button
• Press the “SYNC” button once to control driver and passenger temperatures simultaneously.
• Press the “SYNC” button a second time to control the temperatures individually.
Air Recirculation
• Use Recirculation for maximum A/C operation.
• For window defogging, turn the Recirculation button off.
• If the Recirculation button is pushed while in the AUTO mode, the indicator light may flash three times to indicate the cabin air is being controlled automatically. The Recirculation button
will be greyed out in these conditions.
Heated Mirrors
The mirrors are heated to melt frost or ice. This feature is activated whenever you turn on the rear
window defroster.
OPERATING YOUR VEHICLE
50
Page 56 of 220
STOP/START SYSTEM — 2.4L ENGINE
The Stop/Start function is developed to save fuel and reduce emissions. The system will stop the
engine automatically during a vehicle stop if the required conditions are met. Releasing the brake
pedal or pressing the accelerator pedal on an automatic transmission will start the engine.
Automatic Mode
The Stop/Start feature is enabled after every normal customer engine start. It will remain in
STOP/START NOT READY until you drive forward with a vehicle speed greater than 5 mph
(8 km/h). At that time, the system will go into STOP/START READY and if all other conditions
are met, can go into a STOP/START AUTOSTOP ACTIVE “Autostop” mode.
To Activate The Autostop Mode, The Following Must Occur:
• The system must be in STOP/START READY state. A STOP/START READY message willbe displayed in the Electronic Vehicle Information Center (EVIC) or Driver Information
Display (DID) within the Stop/Start section. Refer to “Electronic Vehicle Information Center
(EVIC)” or “Driver Information Display (DID)” in “Understanding Your Instrument Panel” in
your owners manual on the DVD for further information.
• The vehicle must be completely stopped.
• The shifter must be in DRIVE or NEUTRAL and the brake pedal depressed.
The engine will shut down, the tachometer will move to the zero position and the Stop/Start
telltale will illuminate indicating you are in Autostop. While in Autostop, the Climate Controls
system may automatically adjust airflow to maintain cabin comfort. Customer settings will be
maintained upon return to an engine running condition.
Refer to the “Stop/Start System” in the “Starting and Operating” section located in your owners
manual on the DVD for further information.
To Manually Turn Off The Stop/Start System
1. Press the STOP/START Off switch (located on the switch bank). The light on the switch will illuminate.
2. The “STOP/START OFF” message will ap- pear in Electronic Vehicle Information Cen-
ter (EVIC) or Driver Information Display
(DID). Refer to “Electronic Vehicle Infor-
mation Center (EVIC)” or “Driver Informa-
tion Display (DID)” in “Understanding Your
Instrument Panel” your owners manual on
the DVD for further information.
3. At the next vehicle stop (after turning off the STOP/START system) the engine will
not be stopped.
4. The STOP/START system will reset itself back to an ON condition every time the key is turned off and back on.
STOP/START OFF Switch
OPERATING YOUR VEHICLE
54
Page 76 of 220
Selling Your Vehicle
When you sell your vehicle, we recommend that you remove your Uconnect® Access Account
information from the vehicle. You can do this using the radio touchscreen in the vehicle or on the
Mopar Owner Connect website (moparownerconnect.com). Removing your account informa-
tion cancels your subscription and makes your vehicle factory-ready for a new owner/subscriber.
1. From your vehicle’s radio touchscreen, select “Uconnect® Store” from the Apps Menu.
2. Select “My Apps,” then “Settings.” Press “Remove Uconnect® Account.”
3. Enter your Uconnect® Security PIN, and select “Continue.”
For additional information on Uconnect®:
• U.S. residents - visit DriveUconnect.com or call 1-877-855-8400.
• Canadian Residents - visit DriveUconnect.ca or call, 1-800-465-2001 (English) or1-800-387-9983 (French).
Built-In Features (Uconnect® 8.4AN Only)
CAUTION!
• Ignoring the rearview mirror light could mean you may not have 9-1-1 Call service if needed. If the rearview mirror light is illuminated, have an authorized dealer service the
9-1-1 Call system immediately.
• The Occupant Restraint Controller (ORC) turns on the Air Bag Warning Light on the
instrument panel if a malfunction is detected in any part of the air bag system. If the Air
Bag Warning Light is illuminated, the air bag system may not be working properly and the
9-1-1 system may not be able to send a signal to a 9-1-1 operator. If the Air Bag Warning
Light is illuminated, have an authorized dealer service your vehicle immediately.
• If anyone in the vehicle could be in danger (e.g., fire or smoke is visible, dangerous road
conditions or location), do not wait for voice contact from a 9-1-1 operator. All occupants
should exit the vehicle immediately and move to a safe location.
• Do not add any aftermarket electrical equipment to the vehicle’s electrical system. This
may prevent your vehicle from sending a signal to initiate an emergency call. To avoid
interference that can cause the 9-1-1 Call system to fail, never add aftermarket equipment
(e.g., two-way mobile radio, CB radio, data recorder, etc.) to your vehicle’s electrical
system or modify the antennas on your vehicle. IF YOUR VEHICLE LOSES BATTERY
POWER FOR ANY REASON (INCLUDING DURING OR AFTER AN ACCI-
DENT), THE UCONNECT® FEATURES, APPS AND SERVICES, AMONG OTH-
ERS, WILL NOT OPERATE.
ELECTRONICS
74
Page 159 of 220
on the vehicle that prevent the TPMS from functioning properly. Always check the TPMS
malfunction telltale after replacing one or more tires or wheels on your vehicle to ensure that the
replacement or alternate tires and wheels allow the TPMS to continue to function properly.
NOTE:
Tire pressures change by approximately 1 psi (7 kPa) per 12° F (7° C) of air temperature change.
Keep this in mind when checking tire pressure inside a garage, especially in the Winter. Example:
If garage temperature is 68°F (20°C) and the outside temperature is 32°F (0°C), then the cold
tire inflation pressure should be increased by 3 psi (21 kPa), which equals 1 psi (7 kPa) for every
12°F (7°C) for this outside temperature condition.
CAUTION!
The TPMS has been optimized for the original equipment tires and wheels. TPMS pressures
and warning have been established for the tire size equipped on your vehicle. Undesirable
system operation or sensor damage may result when using replacement equipment that is not
of the same size, type, and/or style. Aftermarket wheels can cause sensor damage. Do not use
tire sealant from a can, or balance beads if your vehicle is equipped with a TPMS, as damage
to the sensors may result.
- Engine Temperature Warning Light
This light warns of an overheated engine condition.
If the light turns on or flashes continuously while driving, safely pull over and stop the vehicle. If
the A/C system is on, turn it off. Also, shift the transmission into NEUTRAL and idle the vehicle.
If the temperature reading does not return to normal, turn the engine off immediately.
We recommend that you do not operate the vehicle or engine damage will occur. Have the
vehicle serviced immediately.
WARNING!
A hot engine cooling system is dangerous. You or others could be badly burned by steam or
boiling coolant.
- Transmission Temperature Warning Light
This light indicates that there is excessive transmission fluid temperature that might occur with
severe usage such as trailer towing. If this light turns on, stop the vehicle and run the engine at idle,
with the transmission in NEUTRAL, until the light turns off. Once the light turns off, you may
continue to drive normally.
CAUTION!
Continuous driving with the Transmission Temperature Warning Light illuminated will even-
tually cause severe transmission damage or transmission failure.
WHAT TO DO IN EMERGENCIES
157
Page 160 of 220
WARNING!
If you continue operating the vehicle when the Transmission Temperature Warning Light is
illuminated you could cause the fluid to boil over, come in contact with hot engine or exhaust
components and cause a fire.
- Seat Belt Reminder Light
When the ignition switch is first turned to ON/RUN, this light will turn on if the driver’s seat belt
is unbuckled, a chime will sound. When driving, if the driver’s seat belt remains unbuckled, the
Seat Belt Reminder Light will illuminate and the chime will sound.
Please have your vehicle serviced immediately.
WARNING!
Driving a vehicle with the red brake light on is dangerous. Part of the brake system may have
failed. It will take longer to stop the vehicle. You could have a collision. Have the vehicle
checked immediately.
- Brake Warning Light
This light monitors various brake functions, including brake fluid level and parking brake appli-
cation. If the brake light turns on it may indicate that the parking brake is applied, that the brake
fluid level is low, or that there is a problem with the anti-lock brake system reservoir.
If the light remains on when the parking brake has been disengaged, and the fluid level is at the
full mark on the master cylinder reservoir, it indicates a possible brake hydraulic system malfunc-
tion or that a problem with the Brake Booster has been detected by the Anti-Lock Brake System
(ABS)/Electronic Stability Control (ESC) system. In this case, the light will remain on until the
condition has been corrected. If the problem is related to the brake booster, the ABS pump will
run when applying the brake and a brake pedal pulsation may be felt during each stop.
The dual brake system provides a reserve braking capacity in the event of a failure to a portion of
the hydraulic system. A leak in either half of the dual brake system is indicated by the Brake
Warning Light, which will turn on when the brake fluid level in the master cylinder has dropped
below a specified level. The light will remain on until the cause is corrected.
Vehicles equipped with the Anti-Lock Brake System (ABS), are also equipped with Electronic
Brake Force Distribution (EBD). In the event of an EBD failure, the Brake Warning Light will turn
on along with the ABS Light. Immediate repair to the ABS system is required.
Operation of the Brake Warning Light can be checked by turning the ignition switch from the
OFF position to the ON/RUN position. The light should illuminate for approximately two
seconds. The light should then turn off unless the parking brake is applied or a brake fault is
detected. If the light does not illuminate, have the light inspected by an authorized dealer.
The light also will turn on when the parking brake is applied with the ignition switch in the
ON/RUN position.
WHAT TO DO IN EMERGENCIES
158
Page 163 of 220
IF YOUR ENGINE OVERHEATS
In any of the following situations, you can reduce the potential for overheating by taking the
appropriate action:
• On the highways — slow down.
• In city traffic — while stopped, shift the transmission to NEUTRAL, but do not increase engineidle speed.
NOTE:
There are steps that you can take to slow down an impending overheat condition:
• If your air conditioner (A/C) is on, turn it off. The A/C system adds heat to the engine cooling system and turning the A/C off can help remove this heat.
• You can also turn the temperature control to maximum heat, the mode control to floor and the blower control to high. This allows the heater core to act as a supplement to the radiator and
aids in removing heat from the engine cooling system.
CAUTION!
Driving with a hot cooling system could damage your vehicle. If the temperature gauge reads
HOT (H), pull over and stop the vehicle. Idle the vehicle with the air conditioner turned off
until the pointer drops back into the normal range. If the pointer remains on HOT (H), and
you hear continuous chimes, turn the engine off immediately, and call for service.
WARNING!
You or others can be badly burned by hot engine coolant (antifreeze) or steam from your
radiator. If you see or hear steam coming from under the hood, do not open the hood until the
radiator has had time to cool. Never try to open a cooling system pressure cap when the
radiator or coolant bottle is hot.
TIRE SERVICE KIT
Your vehicle may be equipped with a Tire Service Kit.
Small punctures up to 1/4” (6 mm) in the tire tread can be sealed with the Tire Service Kit. Foreign
objects (e.g., screws or nails) should not be removed from the tire. The Tire Service Kit can be
used in outside temperatures down to approximately -4°F (-20°C).
This kit will provide a temporary tire seal, allowing you to drive your vehicle up to 100 miles
(160 km) with a maximum speed of 55 mph (90 km/h).
WHAT TO DO IN EMERGENCIES
161
Page 169 of 220
6. Verify that the cap is installed on the fitting at the end of the Sealant Hose (6) and return thehose to its storage area (located on the bottom of the air pump).
7. Return the Tire Service Kit to its storage location in the vehicle.
NOTE:
• The metal end fitting from Power Plug (8) may get hot after use, so it should be handled carefully.
• Failure to reinstall the cap on the fitting at the end of the Sealant Hose (6) can result in sealant contacting your skin, clothing, and the vehicle’s interior. It can also result in sealant contacting
internal Tire Service Kit components which may cause permanent damage to the kit.
WARNING!
• Do not attempt to seal a tire on the side of the vehicle closest to traffic. Pull far enough off
the road to avoid the danger of being hit when using the Tire Service Kit.
• Do not use the Tire Service Kit or drive the vehicle under the following circumstances:
• If the puncture in the tire tread is approximately 1/4”. (6 mm) or larger.
• If the tire has any sidewall damage.
• If the tire has any damage from driving with extremely low tire pressure.
• If the tire has any damage from driving on a flat tire.
• If the wheel has any damage.
• If you are unsure of the condition of the tire or the wheel.
• Keep the Tire Service Kit away from open flames or heat source.
• A loose Tire Service Kit thrown forward in a collision or hard stop could endanger the
occupants of the vehicle. Always stow the Tire Service Kit in the place provided. Failure to
follow these warnings can result in injuries that are serious or fatal to you, your passengers,
and others around you.
• Take care not to allow the contents of the Tire Service Kit to come in contact with hair,
eyes, or clothing. The Tire Service Kit is harmful if inhaled, swallowed, or absorbed
through the skin. It causes skin, eye, and respiratory irritation. Flush immediately with
plenty of water if there is any contact with eyes or skin. Change clothing as soon as
possible, if there is any contact with clothing.
• The Tire Service Kit Sealant solution contains latex. In case of an allergic reaction or rash,
consult a physician immediately. Keep the Tire Service Kit out of reach of children. If
swallowed, rinse mouth immediately with plenty of water and drink plenty of water. Do not
induce vomiting! Consult a physician immediately.
• The Tire Service Kit is not a permanent flat tire repair. Have the tire inspected and repaired
or replaced after using the Tire Service Kit. Do not exceed 55 mph (88 km/h) until the tire
is repaired or replaced. Failure to follow this warning can result in injuries that are serious or
fatal to you, your passengers, and others around you.
WHAT TO DO IN EMERGENCIES
167
Page 183 of 220
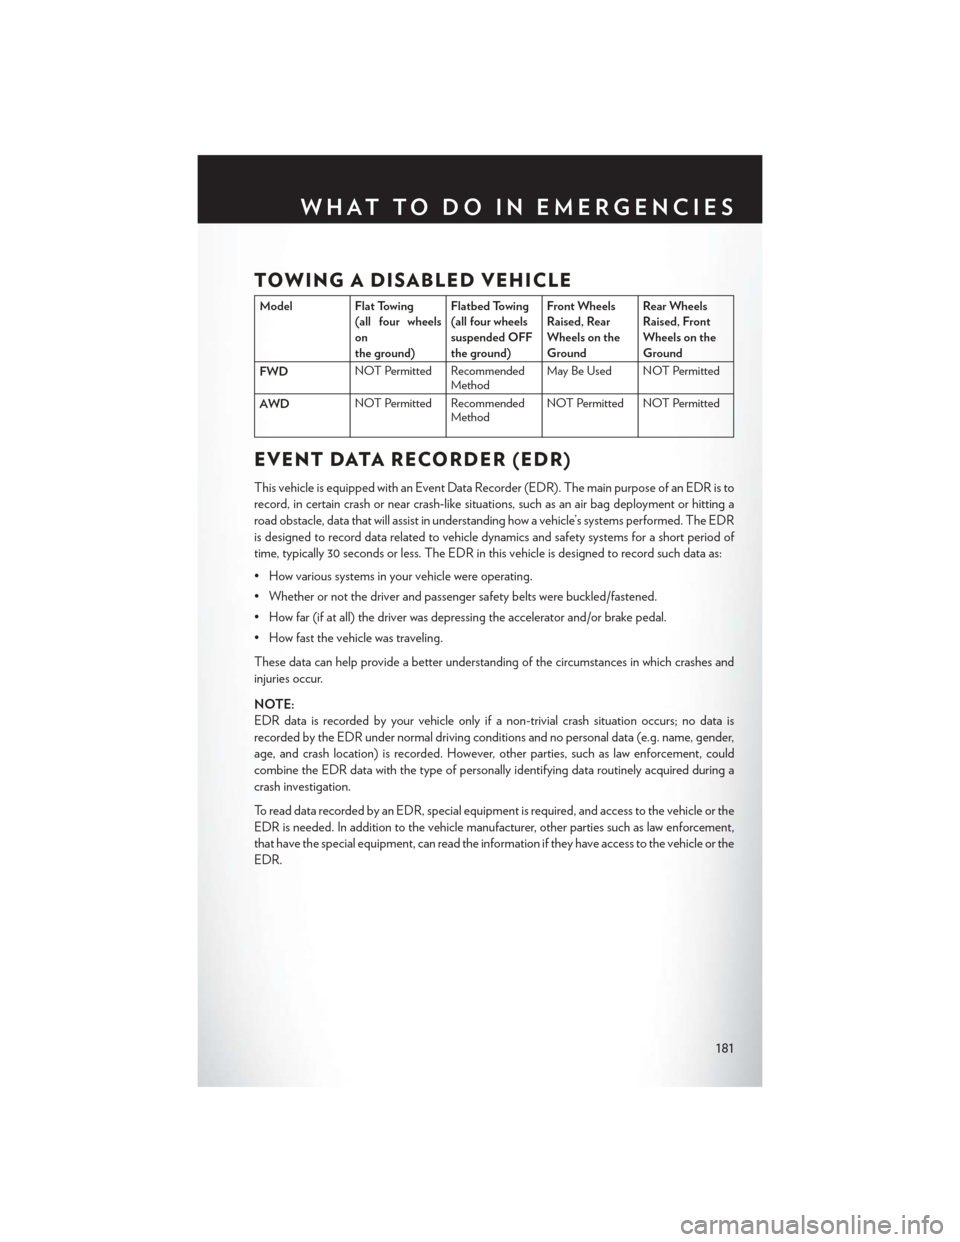
TOWING A DISABLED VEHICLE
Model Flat Towing(all four wheels
on
the ground) Flatbed Towing
(all four wheels
suspended OFF
the ground)Front Wheels
Raised, Rear
Wheels on the
GroundRear Wheels
Raised, Front
Wheels on the
Ground
FWD NOT Permitted Recommended
MethodMay Be Used NOT Permitted
AWD NOT Permitted Recommended
MethodNOT Permitted NOT Permitted
EVENT DATA RECORDER (EDR)
This vehicle is equipped with an Event Data Recorder (EDR). The main purpose of an EDR is to
record, in certain crash or near crash-like situations, such as an air bag deployment or hitting a
road obstacle, data that will assist in understanding how a vehicle’s systems performed. The EDR
is designed to record data related to vehicle dynamics and safety systems for a short period of
time, typically 30 seconds or less. The EDR in this vehicle is designed to record such data as:
• How various systems in your vehicle were operating.
• Whether or not the driver and passenger safety belts were buckled/fastened.
• How far (if at all) the driver was depressing the accelerator and/or brake pedal.
• How fast the vehicle was traveling.
These data can help provide a better understanding of the circumstances in which crashes and
injuries occur.
NOTE:
EDR data is recorded by your vehicle only if a non-trivial crash situation occurs; no data is
recorded by the EDR under normal driving conditions and no personal data (e.g. name, gender,
age, and crash location) is recorded. However, other parties, such as law enforcement, could
combine the EDR data with the type of personally identifying data routinely acquired during a
crash investigation.
To read data recorded by an EDR, special equipment is required, and access to the vehicle or the
EDR is needed. In addition to the vehicle manufacturer, other parties such as law enforcement,
that have the special equipment, can read the information if they have access to the vehicle or the
EDR.
WHAT TO DO IN EMERGENCIES
181
Page 192 of 220
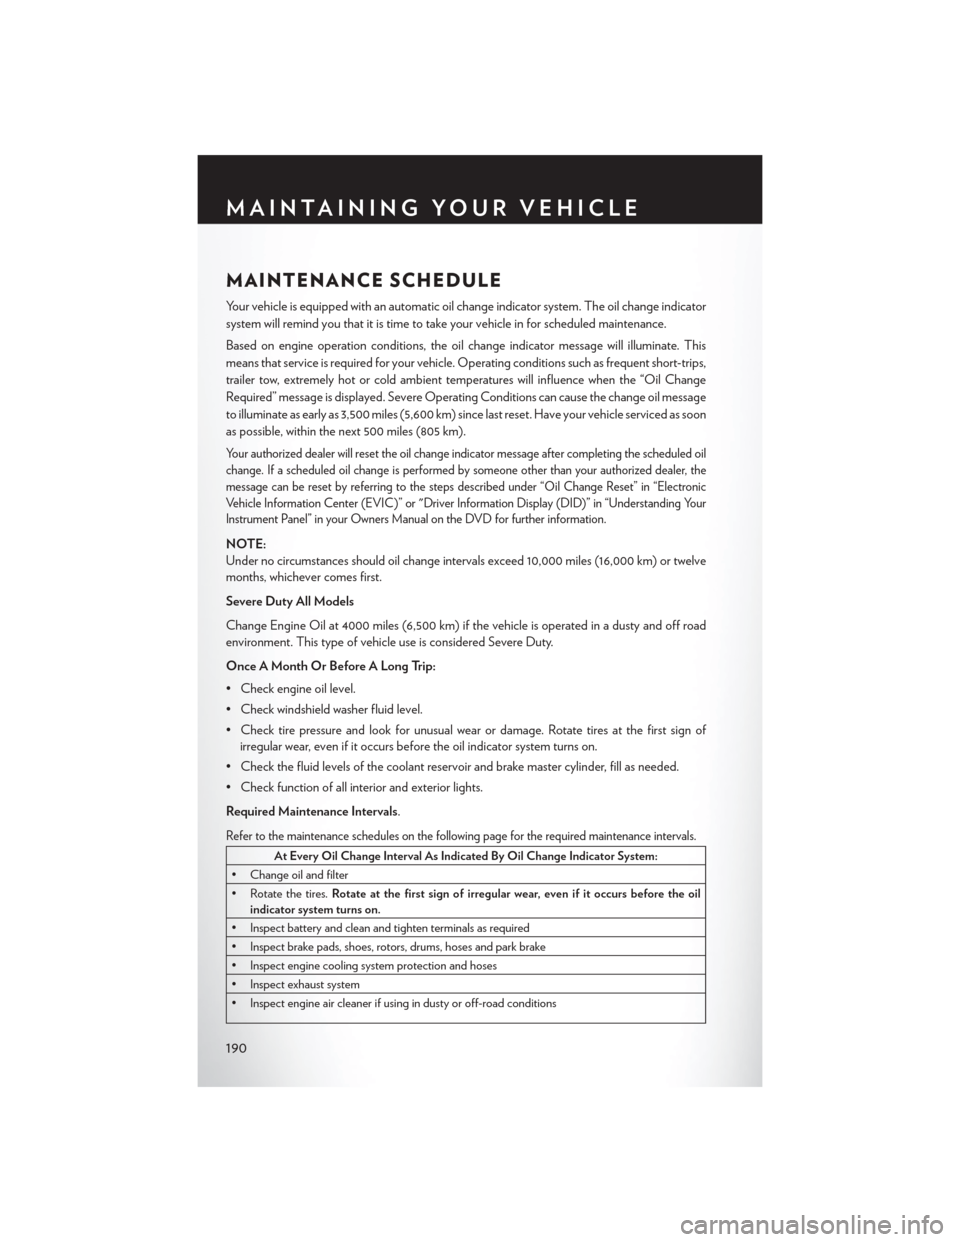
MAINTENANCE SCHEDULE
Your vehicle is equipped with an automatic oil change indicator system. The oil change indicator
system will remind you that it is time to take your vehicle in for scheduled maintenance.
Based on engine operation conditions, the oil change indicator message will illuminate. This
means that service is required for your vehicle. Operating conditions such as frequent short-trips,
trailer tow, extremely hot or cold ambient temperatures will influence when the “Oil Change
Required” message is displayed. Severe Operating Conditions can cause the change oil message
to illuminate as early as 3,500 miles (5,600 km) since last reset. Have your vehicle serviced as soon
as possible, within the next 500 miles (805 km).
Your authorized dealer will reset the oil change indicator message after completing the scheduled oil
change. If a scheduled oil change is performed by someone other than your authorized dealer, the
message can be reset by referring to the steps described under “Oil Change Reset” in “Electronic
Vehicle Information Center (EVIC)” or "Driver Information Display (DID)” in “Understanding Your
Instrument Panel” in your Owners Manual on the DVD for further information.
NOTE:
Under no circumstances should oil change intervals exceed 10,000 miles (16,000 km) or twelve
months, whichever comes first.
Severe Duty All Models
Change Engine Oil at 4000 miles (6,500 km) if the vehicle is operated in a dusty and off road
environment. This type of vehicle use is considered Severe Duty.
Once A Month Or Before A Long Trip:
• Check engine oil level.
• Check windshield washer fluid level.
• Check tire pressure and look for unusual wear or damage. Rotate tires at the first sign ofirregular wear, even if it occurs before the oil indicator system turns on.
• Check the fluid levels of the coolant reservoir and brake master cylinder, fill as needed.
• Check function of all interior and exterior lights.
Required Maintenance Intervals.
Refer to the maintenance schedules on the following page for the required maintenance intervals.
At Every Oil Change Interval As Indicated By Oil Change Indicator System:
• Change oil and filter
• Rotate the tires. Rotate at the first sign of irregular wear, even if it occurs before the oil
indicator system turns on.
• Inspect battery and clean and tighten terminals as required
• Inspect brake pads, shoes, rotors, drums, hoses and park brake
• Inspect engine cooling system protection and hoses
• Inspect exhaust system
• Inspect engine air cleaner if using in dusty or off-road conditions
MAINTAINING YOUR VEHICLE
190