run flat CHRYSLER 200 CONVERTIBLE 2011 1.G Owners Manual
[x] Cancel search | Manufacturer: CHRYSLER, Model Year: 2011, Model line: 200 CONVERTIBLE, Model: CHRYSLER 200 CONVERTIBLE 2011 1.GPages: 505, PDF Size: 6.09 MB
Page 63 of 505
Because air bag sensors measure vehicle deceleration
over time, vehicle speed and damage by themselves are
not good indicators of whether or not an air bag should
have deployed.
Seat belts are necessary for your protection in all acci-
dents, and also are needed to help keep you in position,
away from an inflating air bag.
The ORC monitors the readiness of the electronic parts of
the air bag system whenever the ignition switch is in the
START or ON/RUN position. If the key is in the OFF
position, in the ACC position, or not in the ignition, the
air bag system is not on and the air bags will not inflate.
The ORC contains a backup power supply system that
may deploy the air bags even if the battery loses power or
it becomes disconnected prior to deployment.Also, the ORC turns on the Air Bag Warning
Light in the instrument panel for approxi-
mately four to eight seconds for a self-check
when the ignition is first turned on. After the
self-check, the Air Bag Warning Light will turn off. If the
ORC detects a malfunction in any part of the system, it
turns on the Air Bag Warning Light, either momentarily
or continuously. A single chime will sound if the light
comes on again after initial startup.
It also includes diagnostics that will illuminate the instru-
ment cluster Air Bag Warning Light if a malfunction is
noted that could affect the air bag system. The diagnos-
tics also record the nature of the malfunction.
2
THINGS TO KNOW BEFORE STARTING YOUR VEHICLE 61
Page 67 of 505
Maintaining Your Air Bag System
WARNING!
•Modifications to any part of the air bag system
could cause it to fail when you need it. You could
be injured if the air bag system is not there to
protect you. Do not modify the components or
wiring, including adding any kind of badges or
stickers to the steering wheel hub trim cover or the
upper right side of the instrument panel. Do not
modify the front bumper, vehicle body structure,
or add aftermarket side steps or running boards.
•It is dangerous to try to repair any part of the air
bag system yourself. Be sure to tell anyone who
works on your vehicle that it has an air bag system.(Continued)
WARNING! (Continued)
•Do not attempt to modify any part of your air bag
system. The air bag may inflate accidentally or
may not function properly if modifications are
made. Take your vehicle to an authorized dealer
for any air bag system service. If your seat includ-
ing your trim cover and cushion needs to be
serviced in any way (including removal or
loosening/tightening of seat attachment bolts),
take the vehicle to your authorized dealer. Only
manufacturer approved seat accessories may be
used. If it is necessary to modify the air bag system
for persons with disabilities, contact your autho-
rized dealer.
2
THINGS TO KNOW BEFORE STARTING YOUR VEHICLE 65
Page 68 of 505
Air Bag Warning Light
You will want to have the air bags ready to
inflate for your protection in a collision. The
Air Bag Warning Light monitors the internal
circuits and interconnecting wiring associated
with air bag system electrical components. While the air
bag system is designed to be maintenance free. If any of
the following occurs, have an authorized dealer service
the air bag system immediately.
•The Air Bag Warning Light does not come on during
the four to eight seconds when the ignition switch is
first turned to the ON/RUN position.
•The Air Bag Warning Light remains on after the four to
eight-second interval.
•The Air Bag Warning Light comes on intermittently or
remains on while driving. NOTE:
If the speedometer, tachometer, or any engine
related gauges are not working, the Occupant Restraint
Controller (ORC) may also be disabled. The air bags may
not be ready to inflate for your protection. Promptly
check the fuse block for blown fuses. Refer to the label
located on the inside of the fuse block cover for the
proper air bag fuses. See your authorized dealer if the
fuse is good.
Event Data Recorder (EDR)
This vehicle is equipped with an event data recorder
(EDR). The main purpose of an EDR is to record, in
certain crash or near crash-like situations, such as an air
bag deployment or hitting a road obstacle, data that will
assist in understanding how a vehicle’s systems per-
formed. The EDR is designed to record data related to
vehicle dynamics and safety systems for a short period of
time, typically 30 seconds or less. The EDR in this vehicle
is designed to record such data as:
•How various systems in your vehicle were operating;
66 THINGS TO KNOW BEFORE STARTING YOUR VEHICLE
Page 100 of 505
Manually
Closing the power convertible top manually is a compli-
cated and physically demanding procedure, and it re-
quires a special tool to do so. In the event that you
experience a malfunction when operating the power
convertible top:
1. Read all of the Notes, Cautions, and Warning found
under “Power Convertible Top Usage Precautions” to
verify all operating conditions are met.
2. Check for Operation and Warning Messages as de-
scribed under “Power Convertible Top Operation and
Warning Messages.” If applicable, perform the related
action to correct the condition present.
3. If Steps 1 and 2 do not resolve the problem, refer to
“Emergency Bypass Mode”.
Wind Stop — If Equipped
The Wind Stop installs in the backseat area of the vehicle.
The Wind Stop will not interfere with power top opera-
tion. Therefore, it can remain installed when the top is up.
However, when not in use, the Wind Stop folds to allow
for convenient storage underneath the cargo shield in the
trunk.
NOTE:It is recommended that you lower the convert-
ible top before installing or removing the Wind Stop.
Installing The Wind Stop
1. Remove the Wind Stop from the trunk.
2. Unfold the Wind Stop framework.
3. Lay the small frame (1) flat on top of the large frame
(2) and snap the two frames together by engaging the
frame lock (3).
98 UNDERSTANDING THE FEATURES OF YOUR VEHICLE
Page 329 of 505
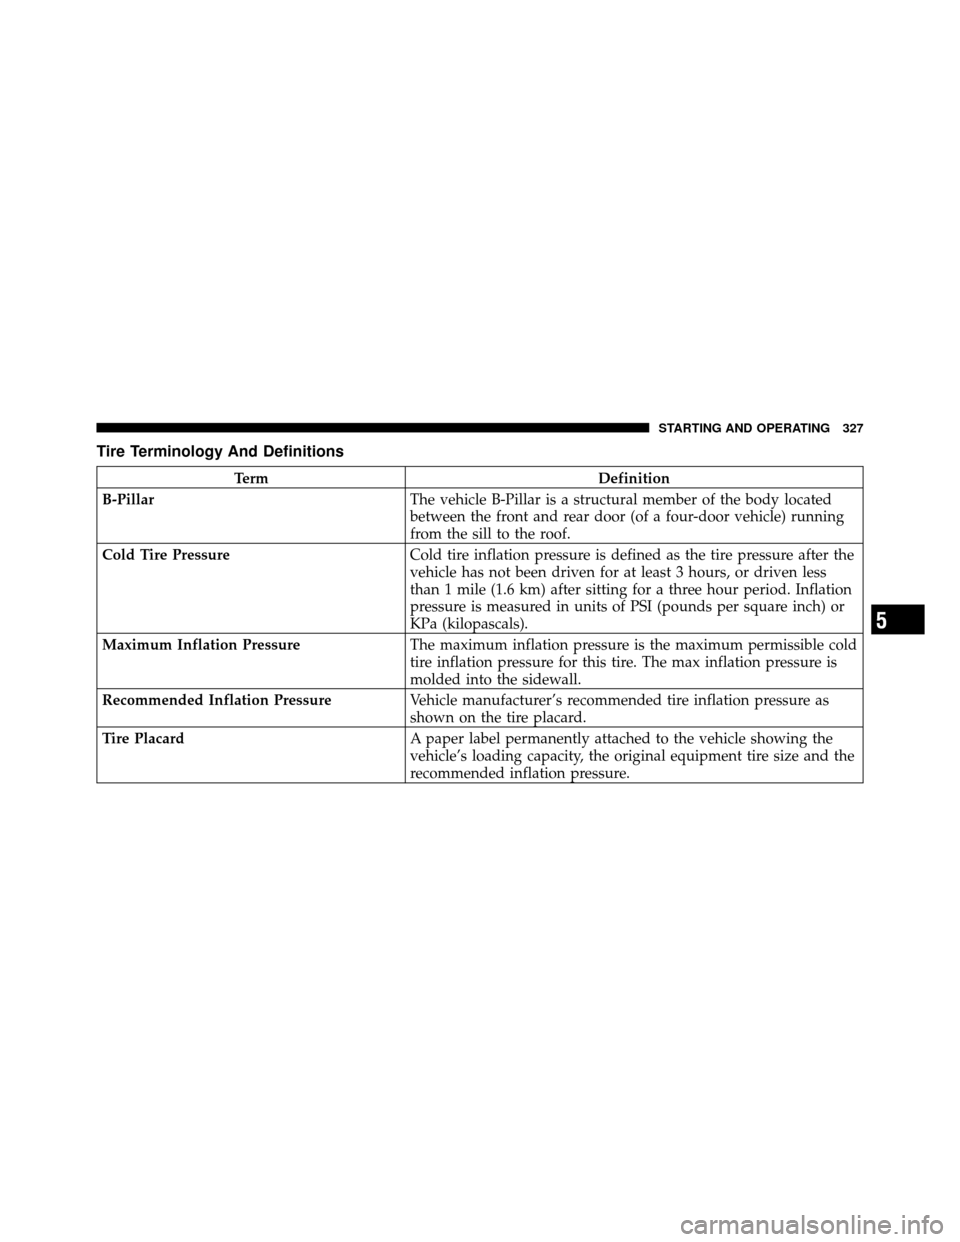
Tire Terminology And Definitions
TermDefinition
B-Pillar The vehicle B-Pillar is a structural member of the body located
between the front and rear door (of a four-door vehicle) running
from the sill to the roof.
Cold Tire Pressure Cold tire inflation pressure is defined as the tire pressure after the
vehicle has not been driven for at least 3 hours, or driven less
than 1 mile (1.6 km) after sitting for a three hour period. Inflation
pressure is measured in units of PSI (pounds per square inch) or
KPa (kilopascals).
Maximum Inflation Pressure The maximum inflation pressure is the maximum permissible cold
tire inflation pressure for this tire. The max inflation pressure is
molded into the sidewall.
Recommended Inflation Pressure Vehicle manufacturer’s recommended tire inflation pressure as
shown on the tire placard.
Tire Placard A paper label permanently attached to the vehicle showing the
vehicle’s loading capacity, the original equipment tire size and the
recommended inflation pressure.
5
STARTING AND OPERATING 327
Page 399 of 505
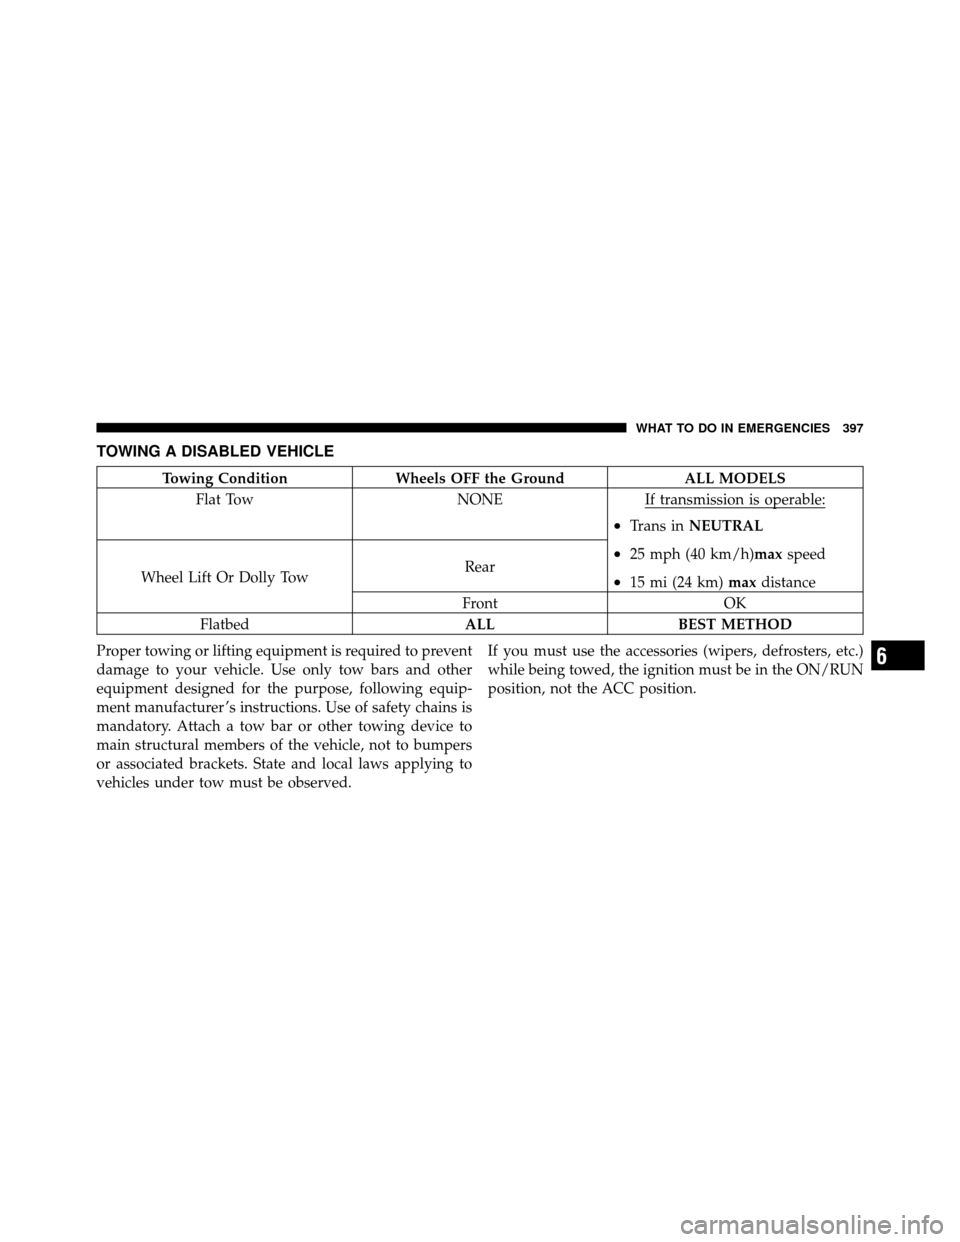
TOWING A DISABLED VEHICLE
Towing ConditionWheels OFF the Ground ALL MODELS
Flat Tow NONEIf transmission is operable:
•Trans inNEUTRAL
•25 mph (40 km/h)max speed
•15 mi (24 km)maxdistance
Wheel Lift Or Dolly Tow Rear
Front OK
Flatbed ALLBEST METHOD
Proper towing or lifting equipment is required to prevent
damage to your vehicle. Use only tow bars and other
equipment designed for the purpose, following equip-
ment manufacturer ’s instructions. Use of safety chains is
mandatory. Attach a tow bar or other towing device to
main structural members of the vehicle, not to bumpers
or associated brackets. State and local laws applying to
vehicles under tow must be observed. If you must use the accessories (wipers, defrosters, etc.)
while being towed, the ignition must be in the ON/RUN
position, not the ACC position.
6
WHAT TO DO IN EMERGENCIES 397
Page 452 of 505
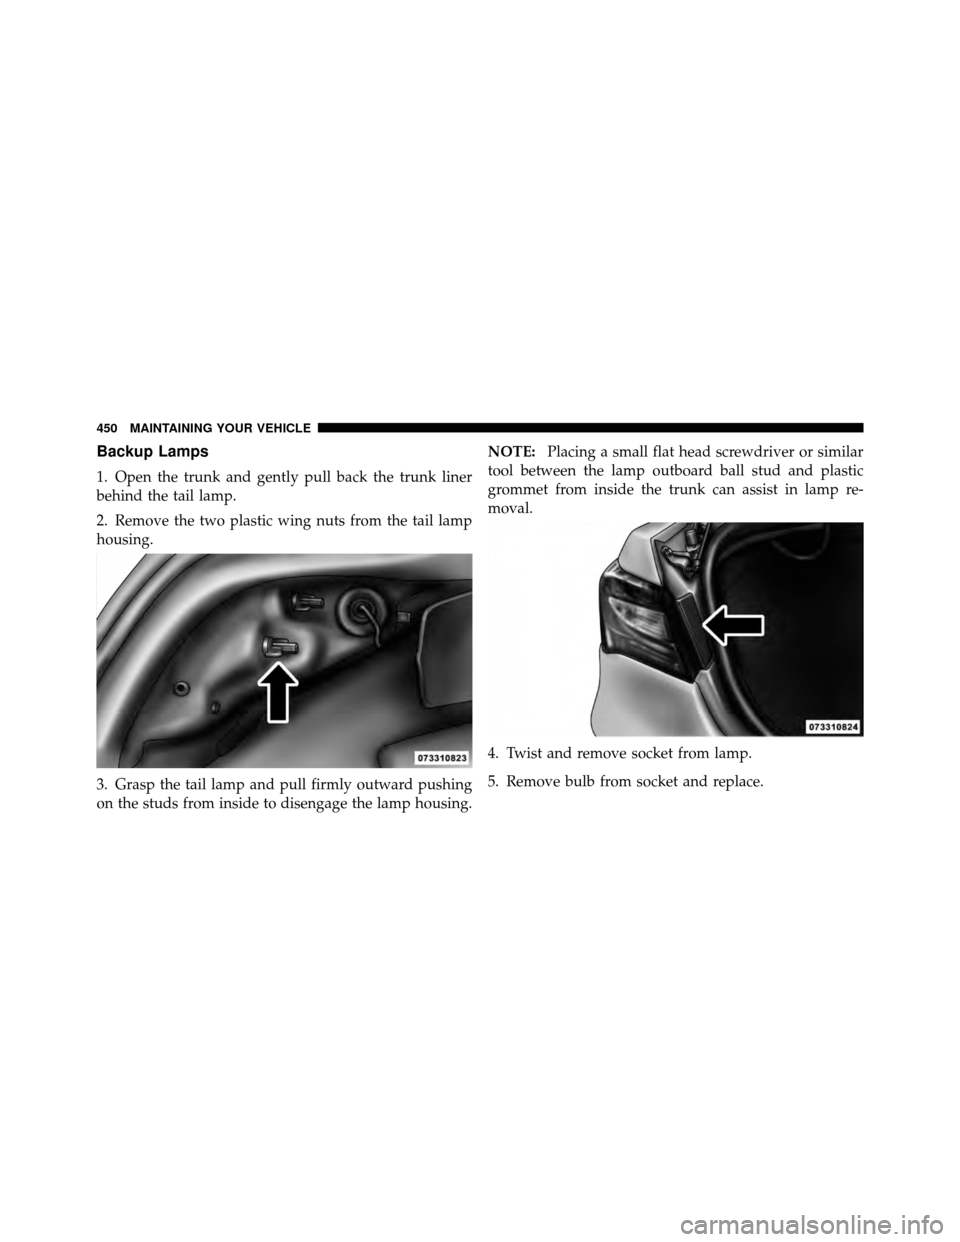
Backup Lamps
1. Open the trunk and gently pull back the trunk liner
behind the tail lamp.
2. Remove the two plastic wing nuts from the tail lamp
housing.
3. Grasp the tail lamp and pull firmly outward pushing
on the studs from inside to disengage the lamp housing.NOTE:
Placing a small flat head screwdriver or similar
tool between the lamp outboard ball stud and plastic
grommet from inside the trunk can assist in lamp re-
moval.
4. Twist and remove socket from lamp.
5. Remove bulb from socket and replace.
450 MAINTAINING YOUR VEHICLE