transmission oil CHRYSLER 200 CONVERTIBLE 2011 1.G Owners Manual
[x] Cancel search | Manufacturer: CHRYSLER, Model Year: 2011, Model line: 200 CONVERTIBLE, Model: CHRYSLER 200 CONVERTIBLE 2011 1.GPages: 505, PDF Size: 6.09 MB
Page 80 of 505
WARNING!
An incorrectly anchored tether strap could lead to
increased head motion and possible injury to the
child. Use only the anchor positions directly behind
the child seat to secure a child restraint top tether
strap.
Transporting Pets
Air Bags deploying in the front seat could harm your pet.
An unrestrained pet will be thrown about and possibly
injured, or injure a passenger during panic braking or in
an accident.
Pets should be restrained in the rear seat in pet harnesses
or pet carriers that are secured by seat belts.
ENGINE BREAK-IN RECOMMENDATIONS
A long break-in period is not required for the engine and
drivetrain (transmission and axle) in your vehicle.
Drive moderately during the first 300 miles (500 km).
After the initial 60 miles (100 km), speeds up to 50 or
55 mph (80 or 90 km/h) are desirable.
While cruising, brief full-throttle acceleration within the
limits of local traffic laws contributes to a good break-in.
Wide-open throttle acceleration in low gear can be detri-
mental and should be avoided.
The engine oil installed in the engine at the factory is a
high-quality energy conserving type lubricant. Oil
changes should be consistent with anticipated climate
conditions under which vehicle operations will occur. For
the recommended viscosity and quality grades, refer to
“Maintenance Procedures” in “Maintaining Your Ve-
hicle”. NON-DETERGENT OR STRAIGHT MINERAL
OILS MUST NEVER BE USED.
78 THINGS TO KNOW BEFORE STARTING YOUR VEHICLE
Page 198 of 505
flash or remain on continuously. Refer to “Occupant
Restraints” in “Things To Know Before Starting Your
Vehicle” for further information.
9. Oil Pressure Warning LightThis light indicates low engine oil pressure. The
light will come on and remain on when the
ignition switch is turned from the OFF to the ON/RUN
position, and the light will turn off after the engine is
started. If the bulb does not come on during starting,
have the system checked by an authorized dealer.
If the light comes on and remains on while driving, stop
the vehicle and shut off the engine. DO NOT OPERATE
THE VEHICLE UNTIL THE CAUSE IS CORRECTED.
The light does not show the quantity of oil in the engine.
This can be determined using the procedure shown in
“Maintaining Your Vehicle”. 10. Engine Temperature Warning Light
This light warns of an overheated engine condi-
tion. As temperatures rise and the gauge ap-
proaches H,this indicator will illuminate and a
single chime will sound after reaching a set threshold.
Further overheating will cause the temperature gauge to
pass H,the indicator will continuously flash and a
continuous chime will occur until the engine is allowed
to cool.
If the light turns on while driving, safely pull over and
stop the vehicle. If the A/C system is on, turn it off. Also,
shift the transmission into NEUTRAL and idle the ve-
hicle. If the temperature reading does not return to
normal, turn the engine off immediately and call for
service. Refer to “If Your Engine Overheats” in “What To
Do In Emergencies” for further information.
196 UNDERSTANDING YOUR INSTRUMENT PANEL
Page 202 of 505
NOTE:If the instrument cluster is equipped with the
optional Electronic Vehicle Information Center (EVIC),
then all warnings including ”Low Tire,” “Door Ajar” and
“Trunk Ajar” will only display in the EVIC. (Refer to
“Electronic Vehicle Information Center (EVIC)” for spe-
cific messages).
Refer to “Convertible Top Operation” in “Understanding
The Features Of Your Vehicle” for a table that explains
how long each message is displayed and the conditions
under which each message is displayed.
LoW tirE
When the appropriate condition exists, the odometer
display will toggle between LoW and TirE for three
cycles. HOTOIL
When this message is displayed there is a transmission
over-temperature condition. When this condition occurs,
the “HOTOIL” message will be displayed in the odom-
eter along with a chime.
NOTE:
When this message is displayed, bring the
vehicle to a stop and idle the engine in park until the
message clears. Raising the idle of the engine slightly will
help speed up the cooling.
gASCAP
If the vehicle diagnostic system detects a leak or change
in the evaporative system, or the fuel filler cap is loose,
improperly installed, or damaged, the words “gASCAP”
will display in the odometer display area. If this occurs,
tighten the fuel filler cap properly and press the odom-
eter reset button to turn off the “gASCAP” message.
(Refer to “Onboard Diagnostic System — OBDII” in
“Maintaining Your Vehicle” for further information). If
200 UNDERSTANDING YOUR INSTRUMENT PANEL
Page 210 of 505
CAUTION!
Continuous driving with the Transmission Tempera-
ture Warning Light illuminated will eventually cause
severe transmission damage or transmission failure.
WARNING!
If the Transmission Temperature Warning Light is
illuminated and you continue operating the vehicle,
in some circumstances you could cause the fluid to
boil over, come in contact with hot engine or exhaust
components and cause a fire.
28. High Beam Indicator This light indicates that the headlights are on high
beam. Pull the turn signal lever toward the steer-
ing wheel to switch the headlights to low beam. 29. Electronic Vehicle Information Center (EVIC)
Display — If Equipped
This display shows the EVIC messages when the appro-
priate conditions exist. Refer to “Electronic Vehicle Infor-
mation Center (EVIC)” for further information.
MINI-TRIP COMPUTER — IF EQUIPPED
The Mini-Trip Computer is located in the instrument
cluster and features a driver-interactive trip information
and temperature display.
NOTE:
The system will display the last known outside
temperature when starting the vehicle and may need to
be driven several minutes before the updated tempera-
ture is displayed. Engine temperature can also affect the
displayed temperature; therefore, temperature readings
are not updated when the vehicle is not moving.
208 UNDERSTANDING YOUR INSTRUMENT PANEL
Page 310 of 505
CAUTION! (Continued)
•Driving through standing water may cause dam-
age to your vehicle’s drivetrain components. Al-
ways inspect your vehicle’s fluids (i.e., engine oil,
transmission, axle, etc.) for signs of contamination
(i.e., fluid that is milky or foamy in appearance)
after driving through standing water. Do not con-
tinue to operate the vehicle if any fluid appears
contaminated, as this may result in further dam-
age. Such damage is not covered by the New
Vehicle Limited Warranty.
•Getting water inside your vehicle’s engine can
cause it to lock up and stall out, and cause serious
internal damage to the engine. Such damage is not
covered by the New Vehicle Limited Warranty.
WARNING!
•Driving through standing water limits your vehi-
cle’s traction capabilities. Do not exceed 5 mph
(8 km/h) when driving through standing water.
•Driving through standing water limits your vehi-
cle’s braking capabilities, which increases stop-
ping distances. Therefore, after driving through
standing water, drive slowly and lightly press on
the brake pedal several times to dry the brakes.
•Getting water inside your vehicle’s engine can
cause it to lock up and stall out, and leave you
stranded.
•Failure to follow these warnings may result in
injuries that are serious or fatal to you, your
passengers, and others around you.
308 STARTING AND OPERATING
Page 405 of 505
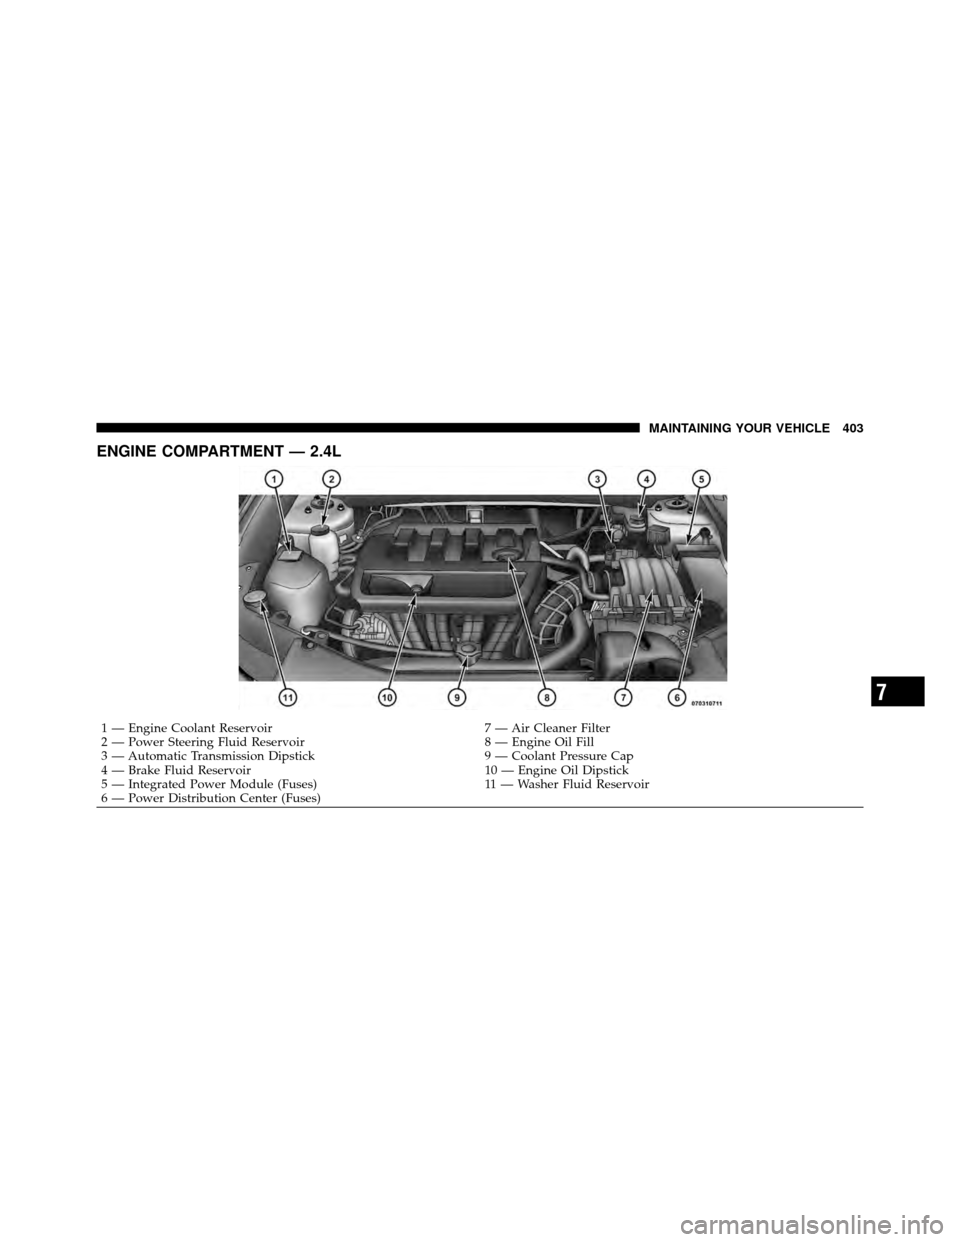
ENGINE COMPARTMENT — 2.4L
1 — Engine Coolant Reservoir7 — Air Cleaner Filter
2 — Power Steering Fluid Reservoir 8 — Engine Oil Fill
3 — Automatic Transmission Dipstick 9 — Coolant Pressure Cap
4 — Brake Fluid Reservoir 10 — Engine Oil Dipstick
5 — Integrated Power Module (Fuses) 11 — Washer Fluid Reservoir
6 — Power Distribution Center (Fuses)
7
MAINTAINING YOUR VEHICLE 403
Page 411 of 505
CAUTION! (Continued)
•Your vehicle has been built with improved fluids
that protect the performance and durability of
your vehicle and also allow extended maintenance
intervals. Do not use chemical flushes in these
components as the chemicals can damage your
engine, transmission, power steering or air condi-
tioning. Such damage is not covered by the New
Vehicle Limited Warranty. If a flush is needed
because of component malfunction, use only the
specified fluid for the flushing procedure.
Engine Oil
Checking Oil Level
To assure proper engine lubrication, the engine oil must
be maintained at the correct level. Check the oil level at
regular intervals, such as every fuel stop. The best time to
check the engine oil level is about five minutes after afully warmed engine is shut off. Do not check oil level
before starting the engine after it has sat overnight.
Checking engine oil level when the engine is cold will
give you an incorrect reading.
Checking the oil while the vehicle is on level ground and
only when the engine is hot, will improve the accuracy of
the oil level readings. Maintain the oil level between the
range markings on the dipstick. Either the range mark-
ings consist of a crosshatch zone marked SAFE or a
crosshatch zone marked with MIN at the low end of the
range and MAX at the high end of the range. Adding one
quart of oil when the reading is at the low end of the
range marking will raise the oil level to the high end of
the range marking.
7
MAINTAINING YOUR VEHICLE 409
Page 431 of 505
WARNING! (Continued)
•To avoid contamination from foreign matter or
moisture, use only new brake fluid or fluid that
has been in a tightly closed container. Keep the
master cylinder reservoir cap secured at all times.
Brake fluid in a open container absorbs moisture
from the air resulting in a lower boiling point.
This may cause it to boil unexpectedly during hard
or prolonged braking, resulting in sudden brake
failure. This could result in a collision.
•Overfilling the brake fluid reservoir can result in
spilling brake fluid on hot engine parts, causing
the brake fluid to catch fire. Brake fluid can also
damage painted and vinyl surfaces, care should be
taken to avoid its contact with these surfaces.(Continued)
WARNING! (Continued)
•Do not allow petroleum based fluid to contami-
nate the brake fluid. Brake seal components could
be damaged, causing partial or complete brake
failure. This could result in a collision.
Automatic Transmission
The automatic transmission and differential assembly are
contained within a single housing.
The fluid level in the automatic transmission should be
checked whenever the vehicle is serviced. Operation with
an improper fluid level will greatly reduce the life of the
transmission and the fluid.
Selection Of Lubricant
It is important that the proper lubricant is used in the
transmission to assure optimum transmission perfor-
mance. Use only the manufacturer’s recommended trans-
mission fluid. Refer to “Fluids, Lubricants, and Genuine
7
MAINTAINING YOUR VEHICLE 429
Page 460 of 505
Once A Month
•Check tire pressure and look for unusual wear or
damage.
•Inspect the battery and clean and tighten the terminals
as required.
•Check the fluid levels of coolant reservoir, brake
master cylinder, and transmission and add as needed.
•Check all lights and other electrical items for correct
operation.At Each Oil Change
•Change the engine oil filter.
•Inspect the brake hoses and lines.
CAUTION!
Failure to perform the required maintenance items
may result in damage to the vehicle.
Required Maintenance Intervals
Refer to the Maintenance Schedules on the following
pages for the required maintenance intervals.
8
M
A I
N T
E
N A
N CE
S
C
H E
D
U L
E
S458 MAINTENANCE SCHEDULES
Page 464 of 505

56,000 Miles (91,000 km) or
42 Months Maintenance
Service Schedule
❏Change the engine oil and engine oil
filter.
❏ Rotate the tires, rotate at the first sign of
irregular wear, even if it occurs before
56,000 miles (91 000 km).
Odometer Reading Date
Repair Order #Dealer Code
Signature, Authorized Service Center
64,000 Miles (104,000 km) or 48 Months Maintenance Service
Schedule
❏Change the engine oil and engine oil filter.
❏ Rotate the tires, rotate at the first sign of irregular wear, even if it occurs before
64,000 miles (104 000 km).
❏ Replace the spark plugs (2.4L Engine).
❏ Replace the engine air cleaner filter.
❏ Replace the air conditioning filter.
❏ Inspect the brake linings; replace if necessary.
❏ Adjust parking brake on all vehicles equipped with four wheel disc brakes.
❏ Change the automatic transmission fluid and filter(s) if using your vehicle for any of the
following: police, taxi, fleet, or frequent trailer towing.
❏ Inspect the front suspension, tie rod ends and boot seals for cracks or leaks and all parts for
damage, wear, improper looseness or end play; replace if necessary.
Odometer Reading Date
Repair Order #Dealer Code
Signature, Authorized Service Center
8
M
A I
N T
E
N A
N CE
S
C
H E
D
U L
E
S462 MAINTENANCE SCHEDULES