phone CHRYSLER 200 CONVERTIBLE 2011 1.G User Guide
[x] Cancel search | Manufacturer: CHRYSLER, Model Year: 2011, Model line: 200 CONVERTIBLE, Model: CHRYSLER 200 CONVERTIBLE 2011 1.GPages: 84, PDF Size: 2.9 MB
Page 3 of 84
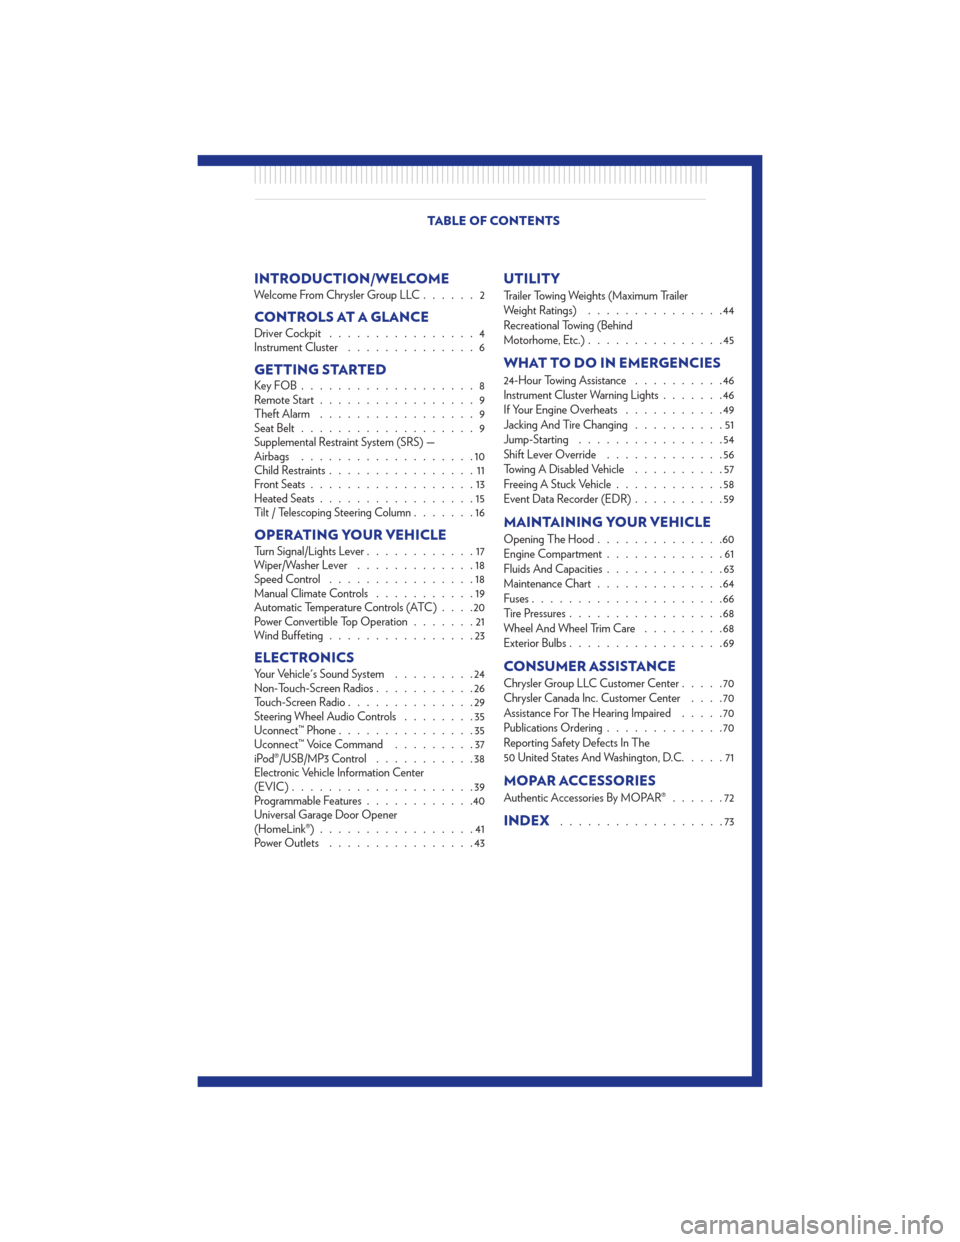
INTRODUCTION/WELCOMEWelcome From Chrysler Group LLC......2
CONTROLS AT A GLANCEDriver Cockpit................4
Instrument Cluster ..............6
GETTING STARTEDKeyFOB...................8
Remote Start.................9
Theft Alarm .................9
Seat Belt ...................9
Supplemental Restraint System (SRS) —
Airbags ...................10
Child Restraints ................11
Front Seats ..................13
Heated Seats .................15
Tilt / Telescoping Steering Column .......16
OPERATING YOUR VEHICLETurn Signal/Lights Lever............17
Wiper/Washer Lever .............18
Speed Control ................18
Manual Climate Controls ...........19
Automatic Temperature Controls (ATC) ....20
Power Convertible Top Operation .......21
Wind Buffeting ................23
ELECTRONICSYour Vehicle's Sound System .........24
Non-Touch-Screen Radios ...........26
Touch-Screen Radio ..............29
Steering Wheel Audio Controls ........35
Uconnect™ Phone ...............35
Uconnect™ Voice Command .........37
iPod®/USB/MP3 Control ...........38
Electronic Vehicle Information Center
(EVIC) ....................39
Programmable Features ............40
Universal Garage Door Opener
(HomeLink®) .................41
Power Outlets ................43
UTILITY
Trailer Towing Weights (Maximum Trailer
Weight Ratings) ...............44
Recreational Towing (Behind
Motorhome, Etc.) ...............45
WHAT TO DO IN EMERGENCIES
24-Hour Towing Assistance ..........46
Instrument Cluster Warning Lights .......46
If Your Engine Overheats ...........49
Jacking And Tire Changing ..........51
Jump-Starting ................54
Shift Lever Override .............56
Towing A Disabled Vehicle ..........57
Freeing A Stuck Vehicle ............58
Event Data Recorder (EDR) ..........59
MAINTAINING YOUR VEHICLE
Opening The Hood..............60
Engine Compartment .............61
Fluids And Capacities .............63
Maintenance Chart ..............64
Fuses .....................66
Tire Pressures .................68
Wheel And Wheel Trim Care .........68
Exterior Bulbs .................69
CONSUMER ASSISTANCE
Chrysler Group LLC Customer Center .....70
Chrysler Canada Inc. Customer Center ....70
Assistance For The Hearing Impaired .....70
Publications Ordering .............70
Reporting Safety Defects In The
50 United States And Washington, D.C. ....71
MOPAR ACCESSORIES
Authentic Accessories By MOPAR®......72
INDEX..................73
TABLE OF CONTENTS
Page 5 of 84
Vehicles Sold In Canada
With respect to any vehicles sold in Canada, the name Chrysler Group LLC shall be deemed to be
deleted and the name Chrysler Canada Inc. used in substitution therefore.
WARNING!
• Pedals that cannot move freely can cause loss of vehicle control and increase the risk ofserious personal injury.
• Always make sure that objects cannot fall into the driver foot well while the vehicle is moving. Objects can become trapped under the brake pedal and accelerator pedal
causing a loss of vehicle control.
• Failure to properly follow floor mat installation or mounting can cause interference with the brake pedal and accelerator pedal operation causing loss of control of the vehicle.
• Never use the ‘PARK’ position as a substitute for the parking brake. Always apply the parking brake fully when parked to guard against vehicle movement and possible injury
or damage.
• Refer to your Owner's Manual on the DVD for further details.
USE OF AFTERMARKET PRODUCTS (ELECTRONICS)
The use of aftermarket devices including cell phones, MP3 players, GPS systems, or chargers may
affect the performance of on-board wireless features including Keyless Enter-N-Go and Remote
Start range. If you are experiencing difficulties with any of your wireless features, try disconnecting
your aftermarket devices to see if the situation improves. If your symptoms persist, please see an
authorized dealer.
CHRYSLER, DODGE, JEEP, RAM TRUCK, ATF+4, MOPAR and Uconnect are registered
trademarks of Chrysler Group LLC. COPYRIGHT ©2011 CHRYSLER GROUP LLC
INTRODUCTION/WELCOME
03
Page 29 of 84
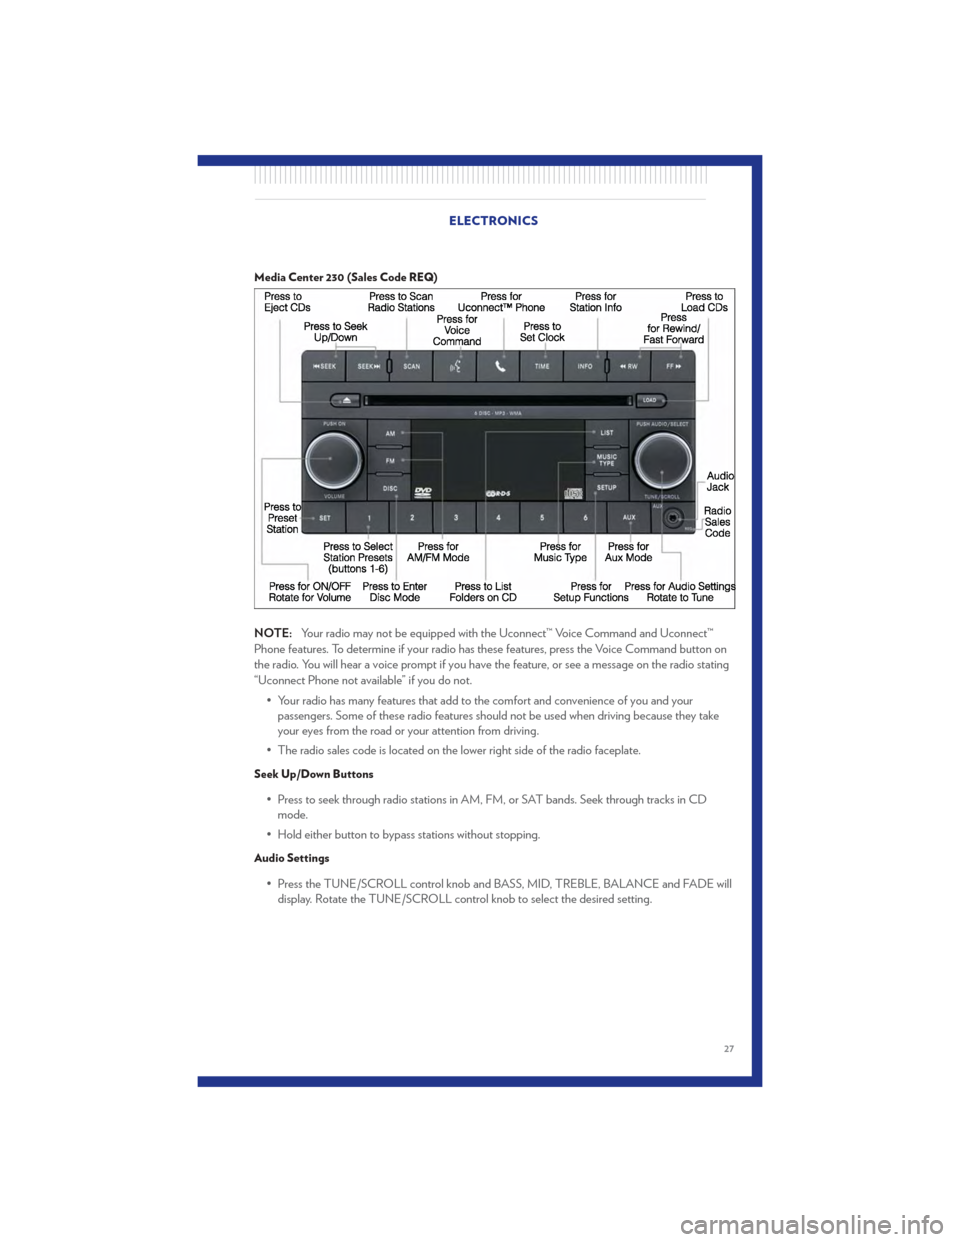
Media Center 230 (Sales Code REQ)
NOTE:Your radio may not be equipped with the Uconnect™ Voice Command and Uconnect™
Phone features. To determine if your radio has these features, press the Voice Command button on
the radio. You will hear a voice prompt if you have the feature, or see a message on the radio stating
“Uconnect Phone not available” if you do not.
• Your radio has many features that add to the comfort and convenience of you and yourpassengers. Some of these radio features should not be used when driving because they take
your eyes from the road or your attention from driving.
• The radio sales code is located on the lower right side of the radio faceplate.
Seek Up/Down Buttons
• Press to seek through radio stations in AM, FM, or SAT bands. Seek through tracks in CD mode.
• Hold either button to bypass stations without stopping.
Audio Settings
• Press the TUNE/SCROLL control knob and BASS, MID, TREBLE, BALANCE and FADE will display. Rotate the TUNE/SCROLL control knob to select the desired setting.
ELECTRONICS
27
Page 32 of 84
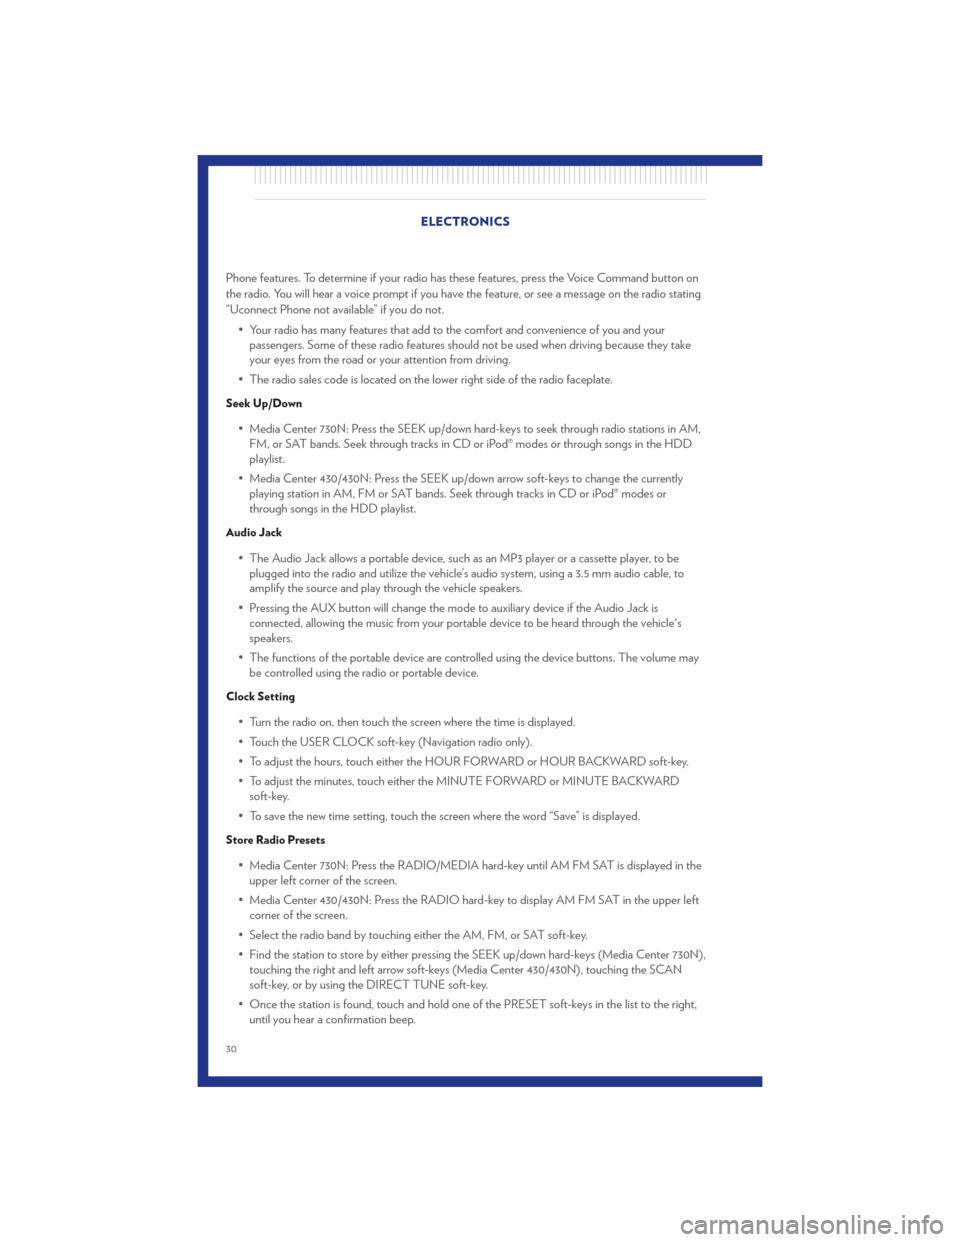
Phone features. To determine if your radio has these features, press the Voice Command button on
the radio. You will hear a voice prompt if you have the feature, or see a message on the radio stating
“Uconnect Phone not available” if you do not.• Your radio has many features that add to the comfort and convenience of you and yourpassengers. Some of these radio features should not be used when driving because they take
your eyes from the road or your attention from driving.
• The radio sales code is located on the lower right side of the radio faceplate.
Seek Up/Down
• Media Center 730N: Press the SEEK up/down hard-keys to seek through radio stations in AM, FM, or SAT bands. Seek through tracks in CD or iPod® modes or through songs in the HDD
playlist.
• Media Center 430/430N: Press the SEEK up/down arrow soft-keys to change the currently playing station in AM, FM or SAT bands. Seek through tracks in CD or iPod® modes or
through songs in the HDD playlist.
Audio Jack
• The Audio Jack allows a portable device, such as an MP3 player or a cassette player, to beplugged into the radio and utilize the vehicle’s audio system, using a 3.5 mm audio cable, to
amplify the source and play through the vehicle speakers.
• Pressing the AUX button will change the mode to auxiliary device if the Audio Jack is connected, allowing the music from your portable device to be heard through the vehicle's
speakers.
• The functions of the portable device are controlled using the device buttons. The volume may be controlled using the radio or portable device.
Clock Setting
• Turn the radio on, then touch the screen where the time is displayed.
• Touch the USER CLOCK soft-key (Navigation radio only).
• To adjust the hours, touch either the HOUR FORWARD or HOUR BACKWARD soft-key.
• To adjust the minutes, touch either the MINUTE FORWARD or MINUTE BACKWARDsoft-key.
• To save the new time setting, touch the screen where the word “Save” is displayed.
Store Radio Presets
• Media Center 730N: Press the RADIO/MEDIA hard-key until AM FM SAT is displayed in the upper left corner of the screen.
• Media Center 430/430N: Press the RADIO hard-key to display AM FM SAT in the upper left corner of the screen.
• Select the radio band by touching either the AM, FM, or SAT soft-key.
• Find the station to store by either pressing the SEEK up/down hard-keys (Media Center 730N), touching the right and left arrow soft-keys (Media Center 430/430N), touching the SCAN
soft-key, or by using the DIRECT TUNE soft-key.
• Once the station is found, touch and hold one of the PRESET soft-keys in the list to the right, until you hear a confirmation beep. ELECTRONICS
30
Page 37 of 84
•Movie Listings
• Check which movies (includes start times, ratings, run lengths and summaries) are playing at theaters near your current location.
• Sports Scores
• View scores and upcoming events for all major sports.
• Your favorite location, theater and sports teams can be stored for quick access.
• Refer to your Media Center 730N (RHR) User's Manual or Media Center 430/430N (RBZ/RHB) User's Manual for more details.
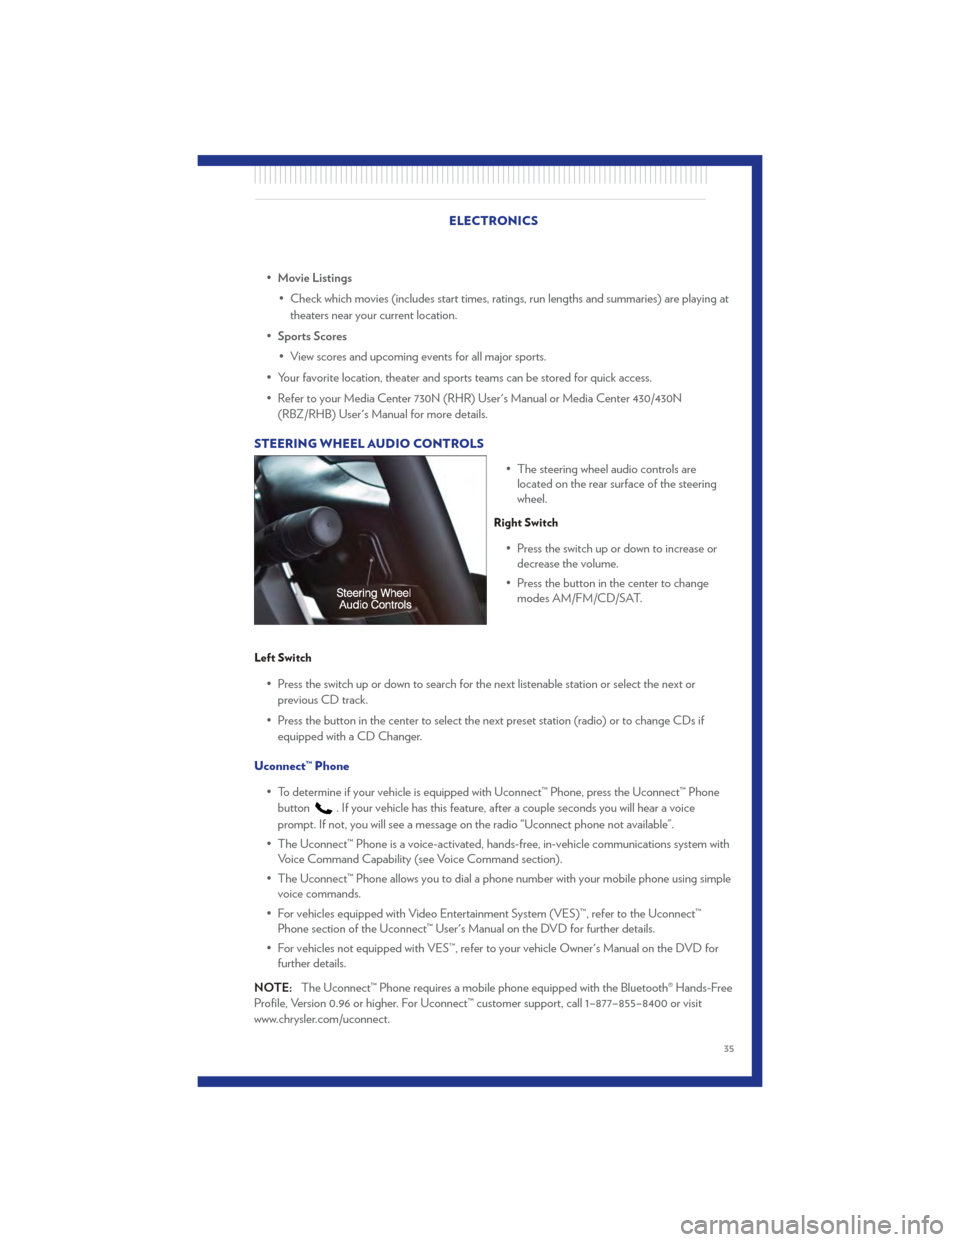
STEERING WHEEL AUDIO CONTROLS • The steering wheel audio controls arelocated on the rear surface of the steering
wheel.
Right Switch
• Press the switch up or down to increase ordecrease the volume.
• Press the button in the center to change modes AM/FM/CD/SAT.
Left Switch
• Press the switch up or down to search for the next listenable station or select the next or
previous CD track.
• Press the button in the center to select the next preset station (radio) or to change CDs if equipped with a CD Changer.
Uconnect™ Phone • To determine if your vehicle is equipped with Uconnect™ Phone, press the Uconnect™ Phonebutton
. If your vehicle has this feature, after a couple seconds you will hear a voice
prompt. If not, you will see a message on the radio “Uconnect phone not available”.
• The Uconnect™ Phone is a voice-activated, hands-free, in-vehicle communications system with Voice Command Capability (see Voice Command section).
• The Uconnect™ Phone allows you to dial a phone number with your mobile phone using simple voice commands.
• For vehicles equipped with Video Entertainment System (VES)™, refer to the Uconnect™ Phone section of the Uconnect™ User's Manual on the DVD for further details.
• For vehicles not equipped with VES™, refer to your vehicle Owner's Manual on the DVD for further details.
NOTE: The Uconnect™ Phone requires a mobile phone equipped with the Bluetooth® Hands-Free
Profile, Version 0.96 or higher. For Uconnect™ customer support, call 1–877–855–8400 or visit
www.chrysler.com/uconnect.
ELECTRONICS
35
Page 38 of 84
Phone Pairing
NOTE:Pairing is a one-time initial setup before using the phone. You will also need to follow the
Bluetooth® instructions in your cell phone user guide to complete the phone pairing setup.
• Press the Phone button
to begin.
• Wait for the “ready” prompt and BEEP.
• (After the BEEP), say “Uconnect setup”.
• (After the BEEP), say “phone pairing”.
• (After the BEEP), say “pair a phone”.
• Follow the audible prompts.
• You will be asked to enter a four-digit Personal Identification Number (PIN), which you will later need to enter into your mobile phone. You can enter any four-digit PIN. You will not need to
remember this PIN after the initial pairing process.
• You will then be prompted to give the phone pairing a name (each phone paired should have a unique name).
• Next you will be asked to give this new pairing a priority of 1 thru 7 (up to seven phones may be paired); 1 is the highest and 7 is the lowest priority. The system will only connect to the highest
priority phone that exists within the proximity of the vehicle.
Making A Phone Call
• Press the Phone button.
• (After the BEEP), say “dial” (or “call” a name).
• (After the BEEP), say number (or name).
Phonebook Edit
• Press the Phone button.
• (After the BEEP), say “phonebook”.
• (After the BEEP), say “new entry” or “list names” or “delete”.
• Follow the prompts.
Receiving A Call – Accept (And End)
• When an incoming call rings/is announced on Uconnect™, press the Phone button.
• To end a call, press the Phone button
.
Mute (Or Unmute) Microphone During Call
• During a call, press the Voice Command button.
• (After the BEEP), say “mute” (or “mute off ”).
Transfer Ongoing Call Between Handset And Vehicle
• During a call, press the Voice Command button.
• (After the BEEP), say “transfer call”. ELECTRONICS
36
Page 39 of 84
Changing The Volume
• Start a dialogue by pressing the Phone button, then adjust the volume during a normal
call.
• Use the radio ON/OFF VOLUME rotary knob to adjust the volume to a comfortable level while the Uconnect™ system is speaking. Please note the volume setting for Uconnect™ is
different than the audio system.
NOTE: To access the tutorial, press the Uconnect™ hard-key. After the BEEP, say “tutorial”. Press
any hard-key/button or touch the display (Touch-Screen radio) to cancel the tutorial.
WARNING!
• Any voice commanded system should be used only in safe driving conditions following local laws and phone use. All attention should be kept on the roadway ahead. Failure to
do so may result in a collision causing you and others to be severely injured or killed.
• In an emergency, to use Uconnect™ Phone, your mobile phone must be: • turned on,
• paired to Uconnect™ Phone,
• and have network coverage.
Uconnect™ VOICE COMMAND
• The Uconnect™ Voice Command system allows you to control your AM, FM radio, satelliteradio, disc player, Uconnect™ Phone, a memo recorder, and supported portable media devices.
• When you press the Voice Command button
located on the radio faceplate or
steering wheel, you will hear a beep. The beep is your signal to give a command. If you do not
say a command within a few seconds, the system will present you with a list of options. If you
ever wish to interrupt the system while it lists options, press the Voice Command
button
, listen for the BEEP, and say your command.
Voice Command for Text Messaging
• If equipped with Uconnect™ Voice Command, your Media Center 430N radio may be able to play incoming SMS messages through the vehicle sound system.
• It also allows you to respond by selecting from various pre-defined phrases.
• Not all phones are compatible with this feature. Refer to the phone compatibility list at www.chrysler.com/uconnect. Connected mobile phones must be bluetooth-compatible, and
paired with your radio.
Changing The Volume
• Start a dialogue by pressing the Voice Command button, then say a command (for
example, “tutorial”).
• Use the radio ON/OFF VOLUME rotary knob to adjust the volume to a comfortable level while the Voice Command system is speaking. The volume setting for Voice Command is
different than the audio system. ELECTRONICS
37
Page 40 of 84
• For vehicles equipped with Video Entertainment System (VES)™, refer to the Uconnect™ VoiceCommand section of the Uconnect™ User's Manual on the DVD for further details.
• For vehicles not equipped with VES™, refer to your vehicle Owner's Manual on the DVD for Uconnect™ Voice Command information.
NOTE: To access the tutorial, press the Voice Command button
. After the BEEP, say
“tutorial”. Press any hard-key/button or touch the display (Touch-Screen radio) to cancel the tutorial.
WARNING!
Any voice commanded system should be used only in safe driving conditions following
local laws and phone use. All attention should be kept on the roadway ahead. Failure to do
so may result in a collision causing you and others to be severely injured or killed.
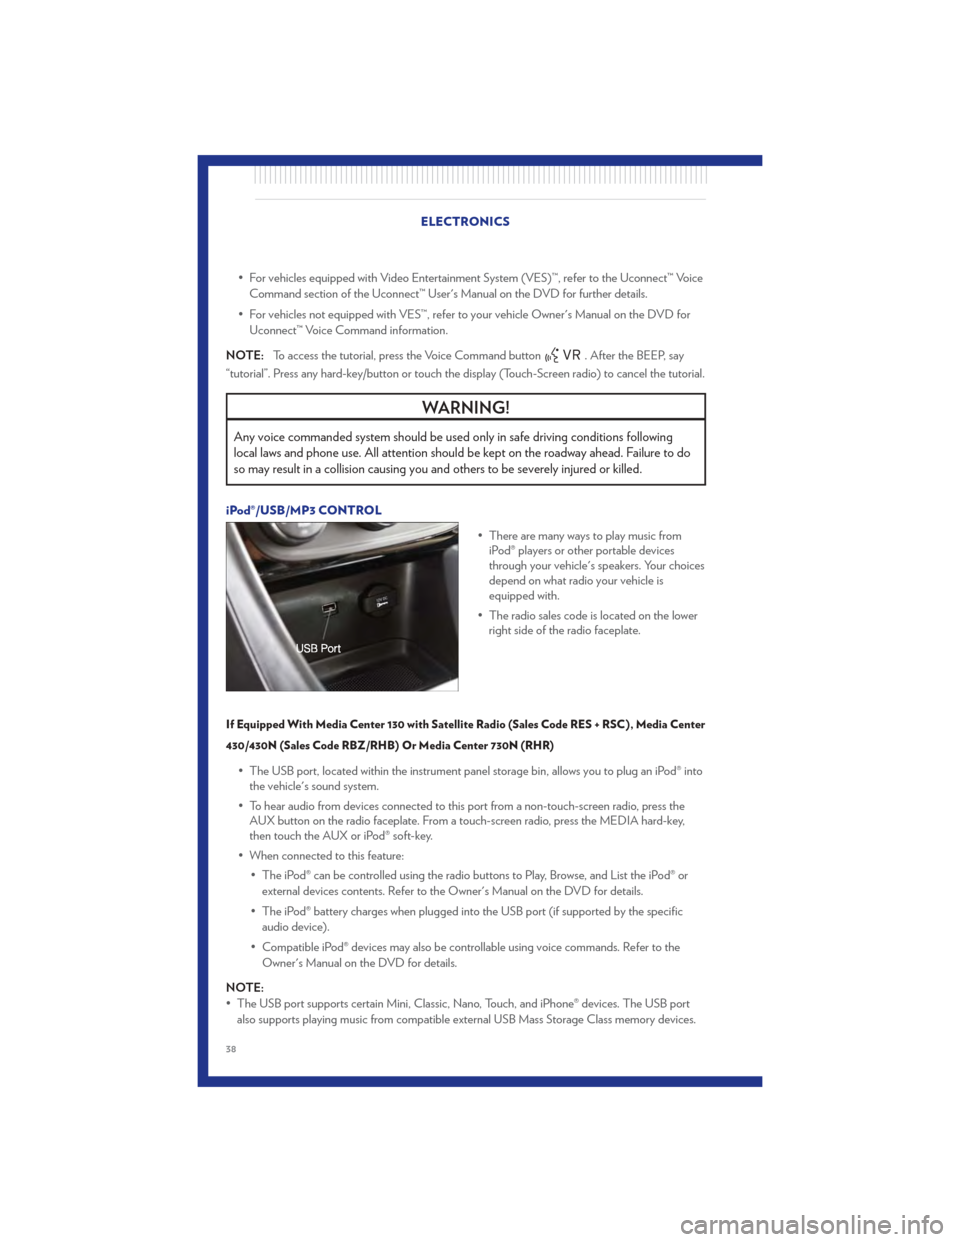
iPod®/USB/MP3 CONTROL
• There are many ways to play music fromiPod® players or other portable devices
through your vehicle's speakers. Your choices
depend on what radio your vehicle is
equipped with.
• The radio sales code is located on the lower right side of the radio faceplate.
If Equipped With Media Center 130 with Satellite Radio (Sales Code RES + RSC), Media Center
430/430N (Sales Code RBZ/RHB) Or Media Center 730N (RHR)
• The USB port, located within the instrument panel storage bin, allows you to plug an iPod® intothe vehicle's sound system.
• To hear audio from devices connected to this port from a non-touch-screen radio, press the AUX button on the radio faceplate. From a touch-screen radio, press the MEDIA hard-key,
then touch the AUX or iPod® soft-key.
• When connected to this feature: • The iPod® can be controlled using the radio buttons to Play, Browse, and List the iPod® orexternal devices contents. Refer to the Owner's Manual on the DVD for details.
• The iPod® battery charges when plugged into the USB port (if supported by the specific audio device).
• Compatible iPod® devices may also be controllable using voice commands. Refer to the Owner's Manual on the DVD for details.
NOTE:
• The USB port supports certain Mini, Classic, Nano, Touch, and iPhone® devices. The USB port also supports playing music from compatible external USB Mass Storage Class memory devices.
ELECTRONICS
38
Page 41 of 84
For supported audio file formats, refer to the USB Port section in the Owner's Manual on the
DVD. Refer to www.chrysler.com/uconnect website for a list of tested iPod®s. Some iPod®
software versions may not fully support the USB port features. Please visit Apple’s website for
iPod® software updates.
Bluetooth® Streaming Audio
• If equipped with Uconnect™ Voice Command, your Bluetooth-equipped iPod® devices, cellphones or other media players, may also be able to stream music to your vehicle's speakers.
Your connected device must be Bluetooth-compatible, and paired with your Media Center
radio (see Uconnect™ Phone for pairing instructions). Press the AUX button on the radio
faceplate until "BT" is displayed on the radio screen.
WARNING!
Do not plug in or remove the iPod® or external device while driving. Failure to follow this
warning could result in a collision.
ELECTRONIC VEHICLE INFORMATION CENTER (EVIC)
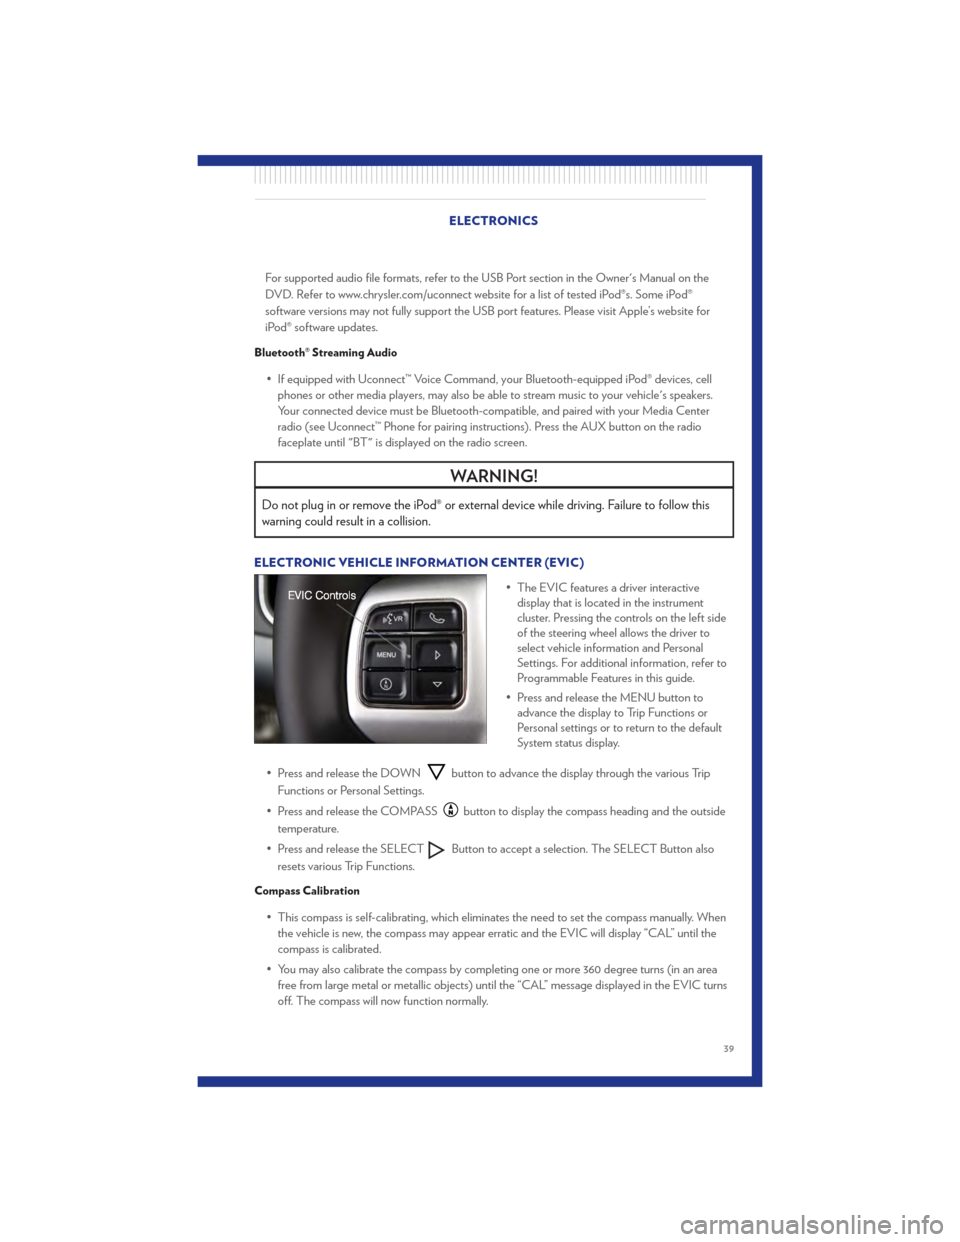
• The EVIC features a driver interactivedisplay that is located in the instrument
cluster. Pressing the controls on the left side
of the steering wheel allows the driver to
select vehicle information and Personal
Settings. For additional information, refer to
Programmable Features in this guide.
• Press and release the MENU button to advance the display to Trip Functions or
Personal settings or to return to the default
System status display.
• Press and release the DOWN
button to advance the display through the various Trip
Functions or Personal Settings.
• Press and release the COMPASS
button to display the compass heading and the outside
temperature.
• Press and release the SELECT
Button to accept a selection. The SELECT Button also
resets various Trip Functions.
Compass Calibration
• This compass is self-calibrating, which eliminates the need to set the compass manually. When the vehicle is new, the compass may appear erratic and the EVIC will display “CAL” until the
compass is calibrated.
• You may also calibrate the compass by completing one or more 360 degree turns (in an area free from large metal or metallic objects) until the “CAL” message displayed in the EVIC turns
off. The compass will now function normally.
ELECTRONICS
39
Page 48 of 84
24-HOUR TOWING ASSISTANCE• Dial toll-free 1-800-521-2779 or 1-800-363-4869 for Canadian residents.
• Provide your name, vehicle identification number and license plate number.
• Provide your location, including telephone number, from which you are calling.
• Briefly describe the nature of the problem and answer a few simple questions.
• You will be given the name of the service provider and an estimated time of arrival. If you feelyou are in an “unsafe situation”, please let us know. With your consent, we will contact local
police or safety authorities.
INSTRUMENT CLUSTER WARNING LIGHTS
- Electronic Stability Control (ESC) Activation/Malfunction Indicator Light
• If the “ESC Activation/Malfunction Indicator Light” comes on continuously with the engine running, a malfunction has been detected in the ESC system. If this light remains on after
several ignition cycles, and the vehicle has b een driven several miles (kilometers) at speeds
greater than 30 mph (48 km/h), we recommend you do not operate the vehicle. Have the
vehicle serviced immediately.
• The “ESC Activation/Malfunction Indicator Light” starts to flash as soon as the tires lose traction and the ESC system becomes active. If the light begins to flash during acceleration,
ease up on the accelerator and apply as little throttle as possible. Be sure to adapt your speed
and driving to the prevailing road conditions. The light also flashes when TCS is active. To
improve the vehicle's traction when starting off in deep snow, sand or gravel, it may be
desirable to switch the ESC system to Partial Off mode by momentarily pressing the ESC
Off
switch.
- Tire Pressure Monitoring System (TPMS) Light
• Each tire, including the spare (if provided), should be checked monthly, when cold and inflatedto the inflation pressure recommended by the vehicle manufacturer on the vehicle placard or
tire inflation pressure label. (If your vehicle has tires of a different size than the size indicated on
the vehicle placard or tire inflation pressure label, you should determine the proper tire inflation
pressure for those tires.)
• As an added safety feature, your vehicle has been equipped with a Tire Pressure Monitoring System (TPMS) that illuminates a low tire pressure telltale when one or more of your tires is
significantly under-inflated. Accordingly, when the low tire pressure telltale illuminates, you
should stop and check your tires as soon as possible, and inflate them to the proper pressure.
Driving on a significantly under-inflated tire causes the tire to overheat and can lead to tire
failure. Under-inflation also reduces fuel efficiency and tire tread life, and may affect the
vehicle’s handling and stopping ability.
• IF THE LIGHT STARTS FLASHING INDICATING A LOW TIRE PRESSURE, ADJUST
THE AIR PRESSURE IN THE LOW TIRE TO THE AIR PRESSURE SHOWN ON THE
VEHICLE PLACARD OR TIRE INFLATION PRESSURE LABEL LOCATED ON THE
DRIVER'S DOOR. NOTE: AFTER INFLATION, THE VEHICLE MAY NEED TO BE
DRIVEN FOR 20 MINUTES BEFORE THE FLASHING LIGHT WILL TURN OFF.
• Please note that the TPMS is not a substitute for proper tire maintenance, and it is the driver’s responsibility to maintain correct tire pressure, even if under-inflation has not reached the level
to trigger illumination of the TPMS low tire pressure telltale. WHAT TO DO IN EMERGENCIES
46