mileage CHRYSLER 200 CONVERTIBLE 2014 1.G Owners Manual
[x] Cancel search | Manufacturer: CHRYSLER, Model Year: 2014, Model line: 200 CONVERTIBLE, Model: CHRYSLER 200 CONVERTIBLE 2014 1.GPages: 522, PDF Size: 3.09 MB
Page 224 of 522
off unless the parking brake is applied or a brake fault is
detected. If the light does not illuminate, have the light
inspected by an authorized dealer.
The light also will turn on when the parking brake is
applied with the ignition switch in the ON/RUN posi-
tion.
NOTE:This light shows only that the parking brake is
applied. It does not show the degree of brake application.
12. Tachometer
The silver area of the scale shows the permissible engine
revolutions-per-minute (RPM x 1000) for each gear range.
Before reaching the red area, ease up on the accelerator to
prevent engine damage.
13. Shift Lever Indicator
The Shift Lever Indicator is self-contained within the
instrument cluster. It displays the gear position of the
automatic transmission. NOTE:
You must apply the brakes before shifting from
PARK.
14. Odometer / Trip Odometer Display Area
The odometer display shows the total distance the ve-
hicle has been driven.
U.S. Federal regulations require that upon transfer of
vehicle ownership, the seller certify to the purchaser the
correct mileage that the vehicle has been driven. If your
odometer needs to be repaired or serviced, the repair
technician should leave the odometer reading the same
as it was before the repair or service. If s/he cannot do so,
then the odometer must be set at zero, and a sticker must
be placed in the door jamb stating what the mileage was
before the repair or service. It is a good idea for you to
make a record of the odometer reading before the repair/
service, so that you can be sure that it is properly reset, or
that the door jamb sticker is accurate if the odometer
must be reset at zero.
222 UNDERSTANDING YOUR INSTRUMENT PANEL
Page 225 of 522
The two trip odometers show individual trip mileage. To
switch from odometer to trip odometers, press and
release the Trip Odometer button. To reset a trip odom-
eter, display the desired trip odometer to be reset then
push and hold the button until the display resets (ap-
proximately two seconds). Refer to “Trip Odometer But-
ton” for additional information.
Vehicle Odometer Messages
When the appropriate conditions exist, the odometer will
display the following messages:
door............................. Door Ajar
dECK ...........................Trunk Ajar
TOP ................. Convertible Top Up/Down
TOP FAIL ..
Convertible Top Up/Down Operation Failed
SET CARgO SHIELd ....TheConvertible Top Cargo
Shield Must Be Put In The Stowed Position
SPEEd TOO HIgH ....Vehicle Speed Is Too High For
Convertible Top Up/Down Operation
TOP donE . . . Convertible Top Up/Down Operation Is
Complete
TOP nOT SECUrE . . . Convertible Top Is Not Secured
LoW tirE ....................LowTirePr essure
HOTOIL ................ Engine Oil Temperature
Exceeds Safe Threshold
gASCAP ...................... Fuel Cap Fault
CHANgE OIL ..............Oil Change Required
4
UNDERSTANDING YOUR INSTRUMENT PANEL 223
Page 228 of 522
15. Cruise Indicator — If EquippedThis indicator shows that the Electronic Speed
Control System is ON.
16. Odometer/Trip Odometer Reset Button
Trip Odometer
Press and release this button to change the display from
odometer to “Trip A.” Press and release it a second time
to change the display to “Trip B.” Press and release it a
third time to change the display back to the odometer.
To reset the trip odometer, first display the trip mileage
that you want to reset, “Trip A” or “Trip B.” Then push
and hold the button (approximately 2 seconds) until the
display resets to 0 miles (kilometers). The odometer must
be in Trip Mode to reset the trip odometer. 17. Electronic Throttle Control (ETC) Indicator Light
This light informs you of a problem with the
Electronic Throttle Control (ETC) system. If a
problem is detected, the light will come on
while the engine is running. If the light remains
lit with the engine running, your vehicle will usually be
drivable and not need towing, however see your autho-
rized dealer for service as soon as possible.
If the light is flashing when the engine is running you
may experience power loss, an elevated/rough idle, and
increased brake pedal effort, and your vehicle may
require towing. Immediate service is required.
The light will come on when the ignition switch is first
turned on and remain on briefly as a bulb check. This is
normal. If the light does not come on during starting,
have the system checked by an authorized dealer.
226 UNDERSTANDING YOUR INSTRUMENT PANEL
Page 237 of 522
ELECTRONIC VEHICLE INFORMATION CENTER
(EVIC) — IF EQUIPPED
The Electronic Vehicle Information Center (EVIC) fea-
tures a driver-interactive display that is located in the
instrument cluster.The EVIC consists of the following:
•
Compass Heading Display (N, S, E, W, NE, NW, SE,
SW)
• Mileage (Avg/MPG)
• Miles To Empty
• Low Tire Information (Tire Pressure Monitor System
(TPMS) Displays) — if equipped
• Timer
• Units
• System Warnings (Door Ajar, etc.)
• Personal Settings (Customer-Programmable Features)
• Outside Temperature Display (°F or °C)
• Audio Mode Displays – 12 preset Radio Stations or CD
Title and Track number when playing
Electronic Vehicle Information Center (EVIC)
4
UNDERSTANDING YOUR INSTRUMENT PANEL 235
Page 450 of 522
result in unsatisfactory engine coolant (antifreeze)
performance, poor gas mileage, and increased emis-
sions.
Brake System
In order to assure brake system performance, all brake
system components should be inspected periodically.
Refer to the “Maintenance Schedule” for the proper
maintenance intervals.
WARNING!
Riding the brakes can lead to brake failure and
possibly a collision. Driving with your foot resting or
riding on the brake pedal can result in abnormally
high brake temperatures, excessive lining wear, and
possible brake damage. You would not have your full
braking capacity in an emergency.
Master Cylinder – Brake Fluid Level Check
Check the fluid level in the master cylinder immediately
if the brake system warning light indicates system fail-
ure.
Check the fluid level in the master cylinder when per-
forming underhood services.
Clean the top of the master cylinder area before removing
the cap. If necessary, add fluid to bring the fluid level up
to the requirements described on the brake fluid reser-
voir.
Overfilling of fluid is not recommended because it may
cause leaking in the system.
Fluid level can be expected to fall as the brake pads wear.
Brake fluid level should be checked when pads are
replaced. However, low fluid level may be caused by a
leak and a checkup may be needed.
448 MAINTAINING YOUR VEHICLE
Page 486 of 522
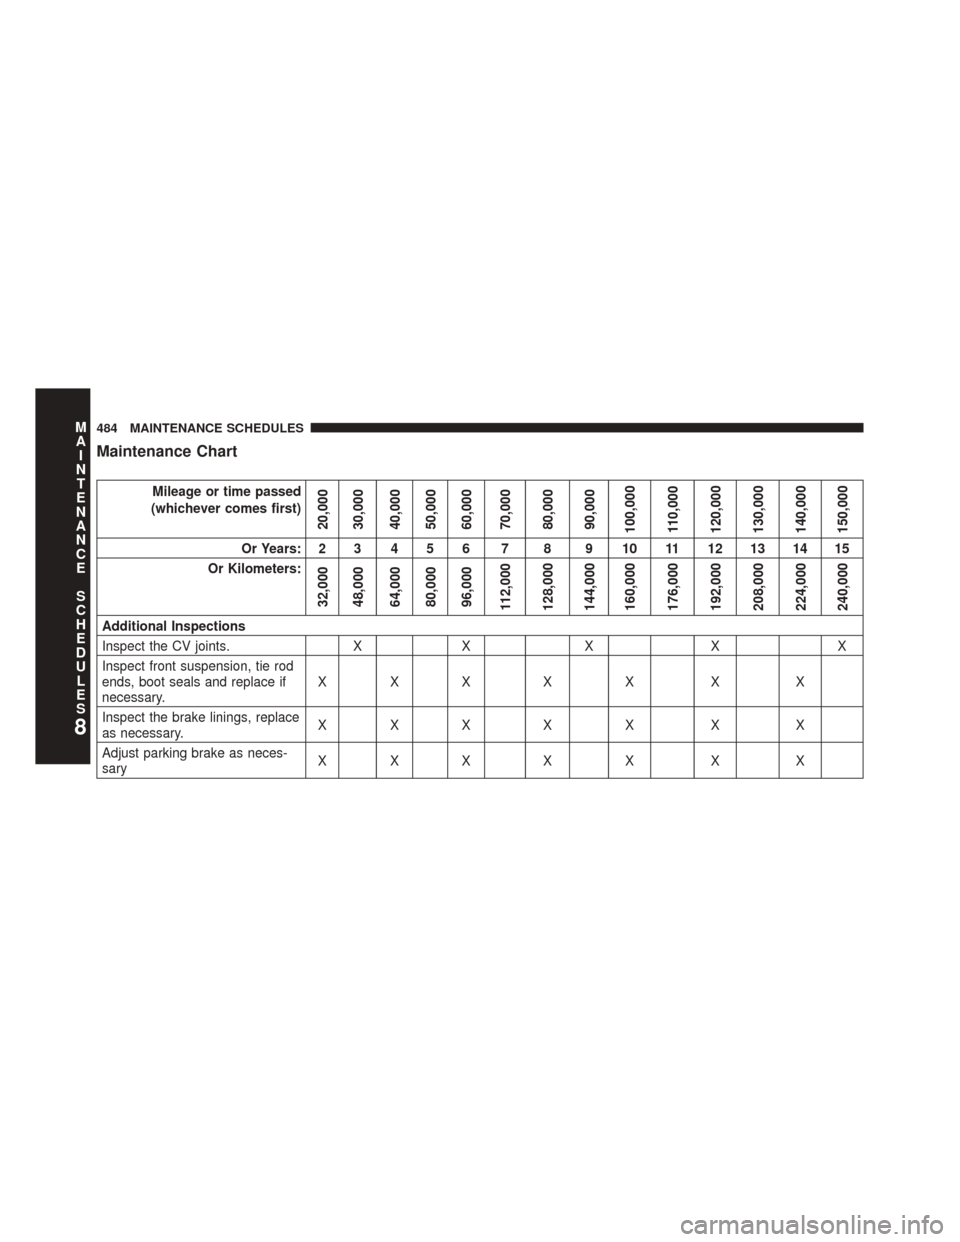
Maintenance Chart
Mileage or time passed
(whichever comes first)
20,000
30,000
40,000
50,000
60,000
70,000
80,000
90,000
100,000
110,000
120,000
130,000
140,000
150,000
Or Years: 2 3 4 5 6 7 8 9 10 11 12 13 14 15
Or Kilometers:
32,000
48,000
64,000
80,000
96,000
112,000
128,000
144,000
160,000
176,000
192,000
208,000
224,000
240,000
Additional Inspections
Inspect the CV joints. XX X X X
Inspect front suspension, tie rod
ends, boot seals and replace if
necessary. XXX X X X X
Inspect the brake linings, replace
as necessary. XXX X X X X
Adjust parking brake as neces-
sary XXX X X X X
8
M
A I
N T
E
N
A
N
C E
S
C
H E
D
U L
E
S484 MAINTENANCE SCHEDULES
Page 487 of 522
Mileage or time passed
(whichever comes first)
20,000
30,000
40,000
50,000
60,000
70,000
80,000
90,000
100,000
110,000
120,000
130,000
140,000
150,000
Or Years: 2 3 4 5 6 7 8 9 10 11 12 13 14 15
Or Kilometers:
32,000
48,000
64,000
80,000
96,000
112,000
128,000
144,000
160,000
176,000
192,000
208,000
224,000
240,000
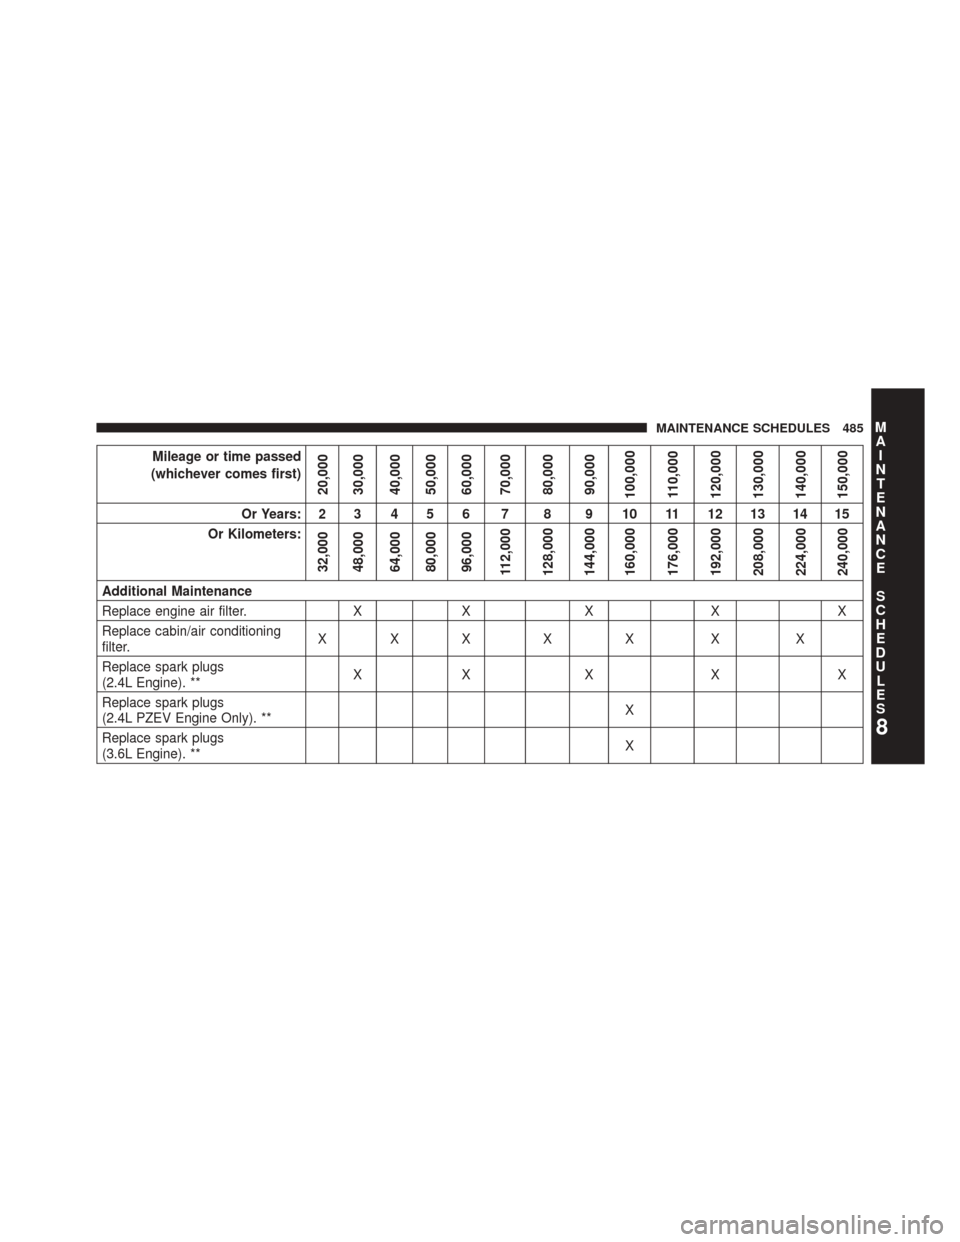
Additional Maintenance
Replace engine air filter. XX X X X
Replace cabin/air conditioning
filter. XXX X X X X
Replace spark plugs
(2.4L Engine). ** XX X X X
Replace spark plugs
(2.4L PZEV Engine Only). ** X
Replace spark plugs
(3.6L Engine). ** X
8
M
A I
N T
E
N
A
N
C E
S
C
H E
D
U L
E
SMAINTENANCE SCHEDULES 485
Page 488 of 522
Mileage or time passed
(whichever comes first)
20,000
30,000
40,000
50,000
60,000
70,000
80,000
90,000
100,000
110,000
120,000
130,000
140,000
150,000
Or Years: 2 3 4 5 6 7 8 9 10 11 12 13 14 15
Or Kilometers:
32,000
48,000
64,000
80,000
96,000
112,000
128,000
144,000
160,000
176,000
192,000
208,000
224,000
240,000
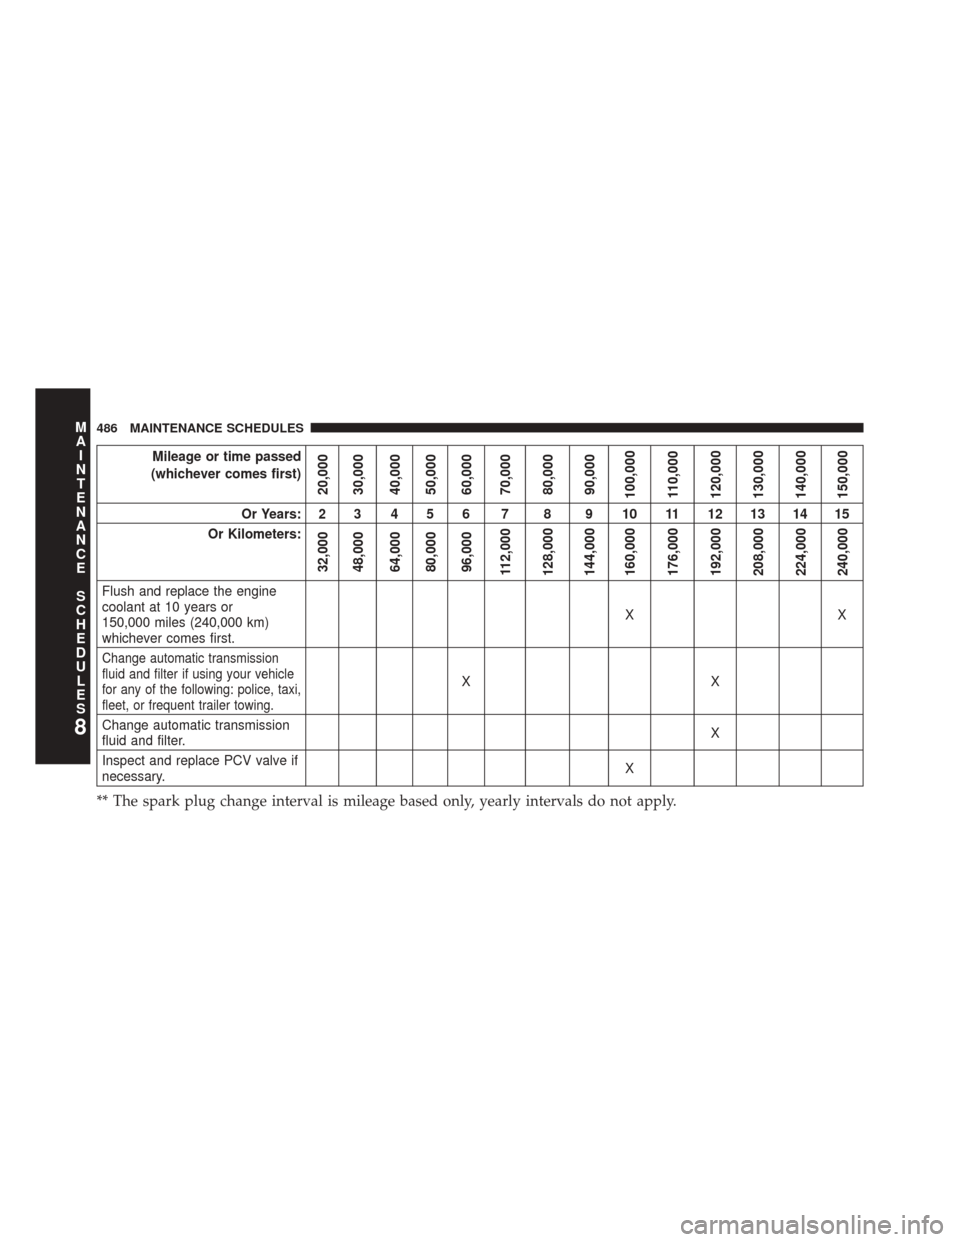
Flush and replace the engine
coolant at 10 years or
150,000 miles (240,000 km)
whichever comes first. XX
Change automatic transmission
fluid and filter if using your vehicle
for any of the following: police, taxi,
fleet, or frequent trailer towing.
XX
Change automatic transmission
fluid and filter. X
Inspect and replace PCV valve if
necessary. X
** The spark plug change interval is mileage based only, yearly intervals do not apply.
8
M
A I
N T
E
N
A
N
C E
S
C
H E
D
U L
E
S486 MAINTENANCE SCHEDULES
Page 494 of 522
facilities, factory-trained technicians, special tools, and
the latest information to ensure the vehicle is fixed
correctly and in a timely manner.
This is why you should always talk to an authorized
dealer service manager first. Most matters can be re-
solved with this process.
•If for some reason you are still not satisfied, talk to the
general manager or owner of the authorized dealer.
They want to know if you need assistance.
• If an authorized dealer is unable to resolve the con-
cern, you may contact the manufacturer’s customer
center.
Any communication to the manufacturer’s customer cen-
ter should include the following information:
• Owner’s name and address •
Owner’s telephone number (home and office)
• Authorized dealer name
• Vehicle Identification Number (VIN)
• Vehicle delivery date and mileage
Chrysler Group LLC Customer Center
P.O. Box 21–8004
Auburn Hills, MI 48321–8004
Phone: (800) 247–9753
Chrysler Canada Inc. Customer Center
P.O. Box 1621
Windsor, Ontario N9A 4H6
Phone: (800) 465–2001 English / (800) 387–9983 French
492 IF YOU NEED CONSUMER ASSISTANCE