wheel CHRYSLER 300 2010 1.G Owner's Manual
[x] Cancel search | Manufacturer: CHRYSLER, Model Year: 2010, Model line: 300, Model: CHRYSLER 300 2010 1.GPages: 88, PDF Size: 11.01 MB
Page 56 of 88

• Finish tightening the lug nuts. Push down on the wrench while tightening forincreased leverage. Alternate nuts until each one has been tightened twice. The
correct wheel nut tightness is 100 ft lbs (135 N•m). If in doubt about the correct
tightness, have them checked with a torque wrench by your authorized dealer or at
a service station.
WARNING!
To assure that spare tires, flat or inflated, are securely stowed, spares must be
stowed with the valve stem facing the ground.
• Secure the tire, jack (base of jack faces rear of vehicle), and tools in their proper locations.
TIREFIT Instructions
TIREFIT will temporarily seal small punctures up to1⁄4in.(6 mm) in the tire tread
allowing you to drive your vehicle up to 100 mi (160 km) with a maximum speed of
55 mph (88 km/hr). TIREFIT can be used in outside temperatures down to
approximately -4°F (-20°C).
NOTE: Do not remove foreign objects (e.g., screws or nails) from the tire.
The TIREFIT kit is located in the trunk.
• Verify that the valve stem is close to the ground.
• Put on the gloves from the TIREFIT Kit Accessory Storage Compartment.
• Turn the Mode Select knob to the Sealant Mode position
.
• Remove the Yellow Cap from the fitting at the end of the Clear Sealant Hose.
• Remove the valve stem cap and screw the fitting at the end of the Clear Sealant Hose onto the valve stem.
• Insert the Power Plug into the vehicle’s 12-volt power outlet.
• Start the engine and then press the Power button
. The sealant (white fluid) will
flow from the Sealant Bottle through the Clear Sealant Hose and into the tire.
NOTE:
• Sealant may leak out through the puncture in the tire.
• If the sealant (white fluid) does not flow withi n0–10seconds through the Clear
Sealant Hose: • Press the Power button
to turn OFF the TIREFIT kit.
• Disconnect the Clear Sealant Hose and make sure the valve stem is free of debris.
• Repeat previous steps to verify sealant will flow, making sure the Mode Select knob is in Sealant Mode
.
WHAT TO DO IN EMERGENCIES
54
Page 57 of 88

• Continue to operate the pump until sealant is no longer flowing through the hose(typically takes 30 - 70 seconds). As the sealant flows through the Clear Sealant
Hose, the pressure gauge can read as high as 70 psi. The pressure gauge will
decrease quickly from approximately 70 psi to the actual tire pressure when the
sealant bottle is empty.
• The pump will start to inject air into the tire immediately after the sealant bottle is empty. Continue to operate the pump and inflate the tire to the pressure indicated
on the Tire and Loading Information label on the driver’s side door opening. Check
the tire pressure by looking at the pressure gauge.
NOTE: If the tire does not inflate to at least 26 psi pressure within 15 minutes, the
tire is too badly damaged. Do not attempt to drive the vehicle further. Call for
assistance.
• If the tire inflates to the recommended pressure or is at least 26 psi pressure within 15 minutes, press the Power button
to turn off the TIREFIT kit.
• Remove the Speed Limit sticker from the top of the Sealant Bottle and place the sticker on the steering wheel.
• Immediately disconnect the Clear Sealant Hose from the valve stem, reinstall the Yellow Cap on the fitting at the end of the hose, and place the TIREFIT kit in the
vehicle storage location. Quickly proceed to the next step.
CAUTION!
• The metal end fitting from the Power Plug and Cable may get hot after use andshould be handled carefully.
• Failure to reinstall the Yellow Cap on the fitting at the end of the Clear Sealant Hose can result in sealant contacting your skin, clothing, and the vehicle’s
interior. It can also result in sealan t contacting internal TIREFIT kit components
which may cause permanent damage to the kit.
• Immediately after injecting sealant and inflating the tire, drive the vehicle 5 mi (8 km) or 10 minutes to ensure distribution of the TIREFIT Sealant within the tire.
Do not exceed 55 mph (88 km/h).
• Pull over and repeat Preparations for Jacking or Tire Repair.
• Turn the Mode Select knob to the Air Mode position
.
• Connect the Black Air Pump Hose to the valve stem.
• Check the pressure in the tire by reading the Pressure Gauge.
NOTE: If tire pressure is less than 19 psi, the tire is too badly damaged. Do not
attempt to drive the vehicle further. Call for assistance.
• If the tire pressure is 19 psi or higher, press the Power button
and inflate the tire
to the pressure indicated on the Tire and Loading Information label on the driver’s
side door opening.
• Disconnect the TIREFIT kit from the valve stem and then reinstall the valve stem cap.
55
WHAT TO DO IN EMERGENCIES
Page 58 of 88

• Place the TIREFIT kit in its proper storage area in the vehicle.
• Have the tire inspected and repaired or replaced at the earliest opportunity at anauthorized service center.
NOTE: When having the tire serviced, advise the authorized dealer or service center
that the tire has been sealed using the TIREFIT service kit.
• Refer to the Owner’s Manual on the DVD for Sealant Bottle and Hose Replacement.
WARNING!
Do not use TIREFIT or drive the vehicle under the following circumstances:
• If the cut or puncture in the tire tread is approximately 0.24 in (6 mm) or larger.
• If the tire has any sidewall damage.
• If the tire has any damage from driving with extremely low tire pressure.
• If the tire has any damage from driving on a flat tire.
• If the wheel has any damage.
• If you are unsure of the condition of the tire or the wheel.
WARNING!
• Keep TIREFIT away from any open flames or heat sources.
• TIREFIT is not a permanent flat tire repair. Have the tire inspected and repaired or replaced after using TIREFIT. Do not exceed 55 mph (90 km/h) until having
the tire repaired or replaced.
• Take care not to allow the contents of TIREFIT to come in contact with hair, eyes, or clothing. TIREFIT is harmful if inhaled, swallowed, or absorbed through the
skin; it causes skin, eye, and respiratory irritation. Flush immediately with plenty
of water if there is any contact with eyes or skin. Change clothing as soon as
possible if there is any contact with clothing.
• TIREFIT Sealant solution contains latex. In case of allergic reaction or rash, consult a physician immediately. Keep TIREFIT out of the reach of children. If
swallowed, rinse mouth immediately with plenty of water and drink plenty of
water. Do not induce vomiting! Consult a physician immediately.
• Use the gloves provided in the Accessory Storage Compartment when operating
the TIREFIT kit.
WHAT TO DO IN EMERGENCIES
56
Page 62 of 88

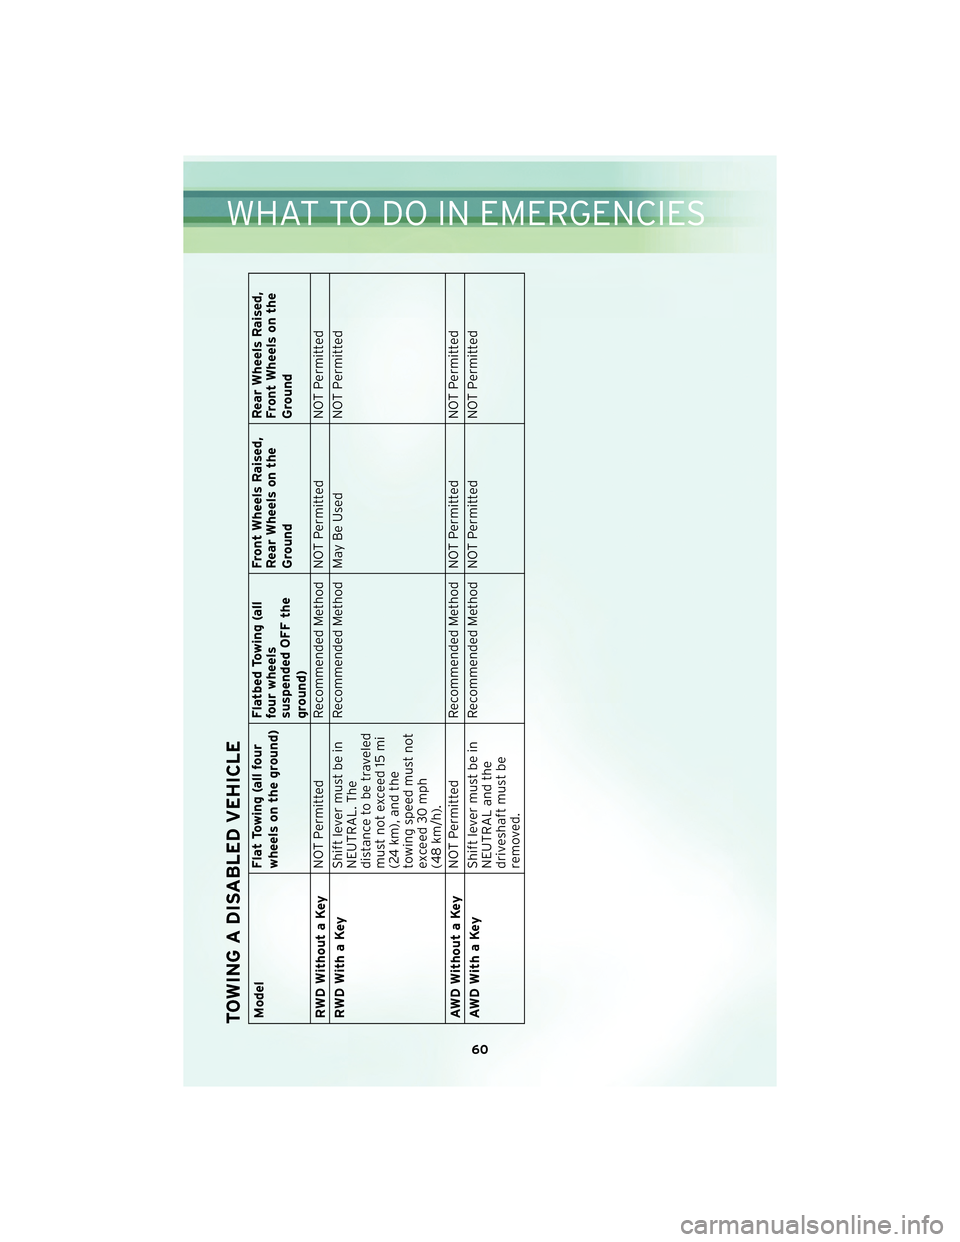
TOWING A DISABLED VEHICLEModelFlat Towing (all four
wheels on the ground)Flatbed Towing (all
four wheels
suspended OFF the
ground)Front Wheels Raised,
Rear Wheels on the
Ground
Rear Wheels Raised,
Front Wheels on the
Ground
RWD Without a Key NOT Permitted Recommended Method NOT Permitted NOT Permitted
RWDWithaKey Shift lever must be in
NEUTRAL. The
distance to be traveled
must not exceed 15 mi
(24 km), and the
towing speed must not
exceed 30 mph
(48 km/h).Recommended Method May Be Used
NOT Permitted
AWD Without a Key NOT Permitted Recommended Method NOT Permitted NOT Permitted
AWDWithaKey Shift lever must be in
NEUTRAL and the
driveshaft must be
removed.Recommended Method NOT Permitted NOT Permitted
60
WHAT TO DO IN EMERGENCIES
Page 63 of 88

FREEING A STUCK VEHICLE
• If your vehicle becomes stuck in mud, sand or snow, it can often be moved by arocking motion. Turn your steering wheel right and left to clear the area around the
front wheels. Then, move the shift lever back and forth between REVERSE and 1st
gear. Using minimal accelerator pedal pressure to maintain the rocking motion,
without spinning the wheels, is most effective.
NOTE: If your vehicle is equipped with Electronic Stability Program (ESP) or
Traction Control
, turn the system off before attempting to “rock” the vehicle.
WARNING!
Fast spinning tires can be dangerous. Forces generated by excessive wheel speeds
may cause tire damage or failure. A tire could explode and injure someone. Do not
spin your vehicle’s wheels faster than 30 mph (48 km/h) when you are stuck. Do
not let anyone near a spinning wheel, no matter what the speed.
CAUTION!
• When “rocking” a stuck vehicle by moving between 1st and REVERSE, do not spin the wheels faster than 15 mph (24 km/h), or drivetrain damage may result.
• Revving the engine or spinning the wheels too fast may lead to transmission overheating and failure. It can also damage the tires. Do not spin the wheels
above 30 mph (48 km/h) while in gear (no transmission shifting occurring).
61
WHAT TO DO IN EMERGENCIES
Page 66 of 88

OPENING THE HOOD
• Pull the hood release lever located below the steering wheel at the base of theinstrument panel.
• Reach into the opening beneath the center of the hood and move the safety latch lever while lifting the hood at the same time.
WARNING!
Be sure the hood is fully latched before driving your vehicle. If the hood is not fully
latched, it could open when the vehicle is in motion and block your vision. Failure
to follow this warning could result in serious injury or death.
MAINTAINING YOUR VEHICLE
64
Page 71 of 88

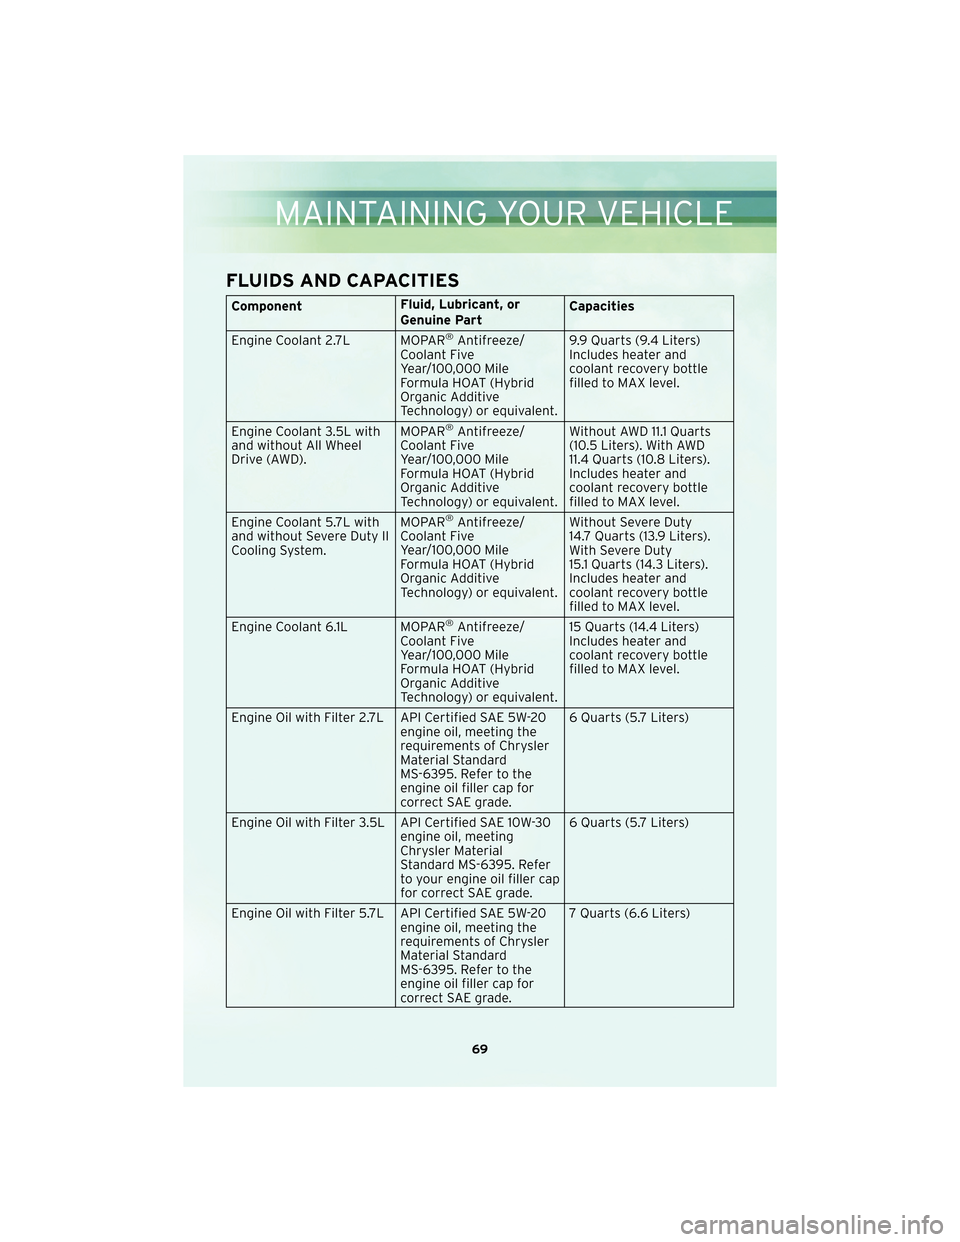
FLUIDS AND CAPACITIES
ComponentFluid, Lubricant, or
Genuine PartCapacities
Engine Coolant 2.7L MOPAR
®Antifreeze/
Coolant Five
Year/100,000 Mile
Formula HOAT (Hybrid
Organic Additive
Technology) or equivalent. 9.9 Quarts (9.4 Liters)
Includes heater and
coolant recovery bottle
filled to MAX level.
Engine Coolant 3.5L with
and without All Wheel
Drive (AWD). MOPAR
®Antifreeze/
Coolant Five
Year/100,000 Mile
Formula HOAT (Hybrid
Organic Additive
Technology) or equivalent. Without AWD 11.1 Quarts
(10.5 Liters). With AWD
11.4 Quarts (10.8 Liters).
Includes heater and
coolant recovery bottle
filled to MAX level.
Engine Coolant 5.7L with
and without Severe Duty II
Cooling System. MOPAR
®Antifreeze/
Coolant Five
Year/100,000 Mile
Formula HOAT (Hybrid
Organic Additive
Technology) or equivalent. Without Severe Duty
14.7 Quarts (13.9 Liters).
With Severe Duty
15.1 Quarts (14.3 Liters).
Includes heater and
coolant recovery bottle
filled to MAX level.
Engine Coolant 6.1L MOPAR
®Antifreeze/
Coolant Five
Year/100,000 Mile
Formula HOAT (Hybrid
Organic Additive
Technology) or equivalent. 15 Quarts (14.4 Liters)
Includes heater and
coolant recovery bottle
filled to MAX level.
Engine Oil with Filter 2.7L API Certified SAE 5W-20 engine oil, meeting the
requirements of Chrysler
Material Standard
MS-6395. Refer to the
engine oil filler cap for
correct SAE grade.6 Quarts (5.7 Liters)
Engine Oil with Filter 3.5L API Certified SAE 10W-30 engine oil, meeting
Chrysler Material
Standard MS-6395. Refer
to your engine oil filler cap
for correct SAE grade.6 Quarts (5.7 Liters)
Engine Oil with Filter 5.7L API Certified SAE 5W-20 engine oil, meeting the
requirements of Chrysler
Material Standard
MS-6395. Refer to the
engine oil filler cap for
correct SAE grade.7 Quarts (6.6 Liters)
69
MAINTAINING YOUR VEHICLE
Page 74 of 88

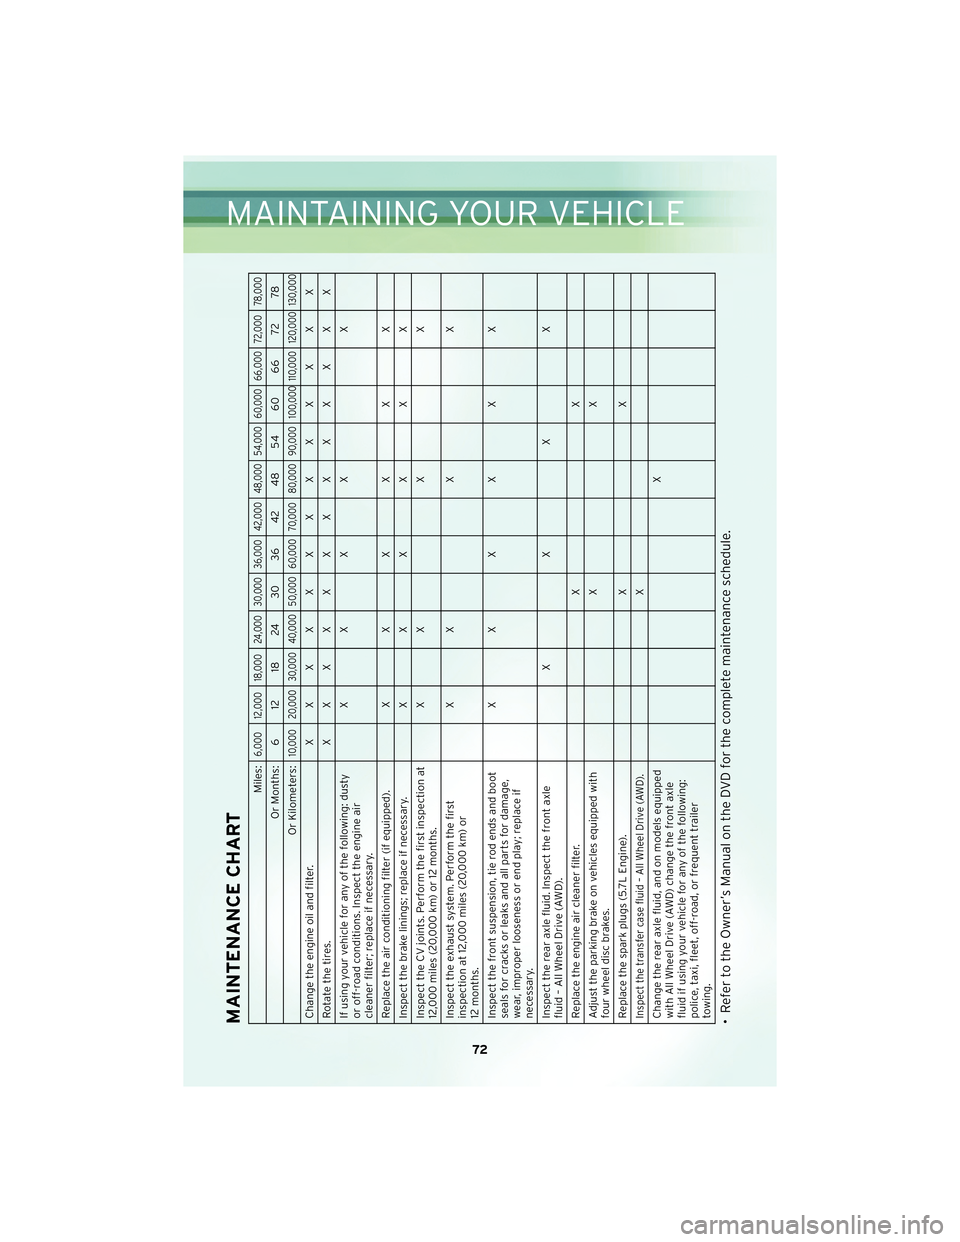
MAINTENANCE CHART
Miles:
6,000 12,000 18,000 24,000 30,000 36,000 42,000 48,000 54,000 60,000 66,000 72,000 78,000
Or Months: 6 12 18 24 30 36 42 48 54 60 66 72 78
Or Kilometers:
10,000 20,000 30,000 40,000 50,000 60,000 70,000 80,000 90,000 100,000 110,000 120,000 130,000
Change the engine oil and filter. XXXXXXXXXXXXX
Rotatethetires. XXXXXXXXXXXXX
If using your vehicle for any of the following: dusty
or off-road conditions. Inspect the engine air
cleaner filter; replace if necessary. XXXX X
Replace the air conditioning filter (if equipped). X X X X X X
Inspect the brake linings; replace if necessary. X X X X X X
Inspect the CV joints. Perform the first inspection at
12,000 miles (20,000 km) or 12 months. XXXX
Inspect the exhaust system. Perform the first
inspection at 12,000 miles (20,000 km) or
12 months. XXXX
Inspect the front suspension, tie rod ends and boot
seals for cracks or leaks and all parts for damage,
wear, improper looseness or end play; replace if
necessary. XXXXXX
Inspect the rear axle fluid. Inspect the front axle
fluid – All Wheel Drive (AWD). XXXX
Replace the engine air cleaner filter. X X
Adjust the parking brake on vehicles equipped with
four wheel disc brakes. XX
Replace the spark plugs (5.7L Engine). X XInspect the transfer case fluid – All Wheel Drive (AWD).
X
Change the rear axle fluid, and on models equipped
with All Wheel Drive (AWD) change the front axle
fluid if using your vehicle for any of the following:
police, taxi, fleet, off-road, or frequent trailer
towing. X
• Refer to the Owner’s Manual on the DVD for the complete maintenance schedule.
72
MAINTAINING YOUR VEHICLE
Page 80 of 88

WHEEL AND WHEEL TRIM CARE
• All wheels and wheel trim, especially aluminum and chrome plated wheels, shouldbe cleaned regularly with a mild soap and water to prevent corrosion.
• To remove heavy soil and/or excessive brake dust, use MOPAR
®Wheel Cleaner or
equivalent or select a non-abrasive, non-acidic cleaner.
CAUTION!
Do not use scouring pads, steel wool, a bristle brush, or metal polishes. Do not use
oven cleaner. These products may damage the wheel’s protective finish. Avoid
automatic car washes that use acidic solutions or harsh brushes that may damage
the wheel’s protective finish. Only MOPAR
®Wheel Cleaner or equivalent is
recommended.
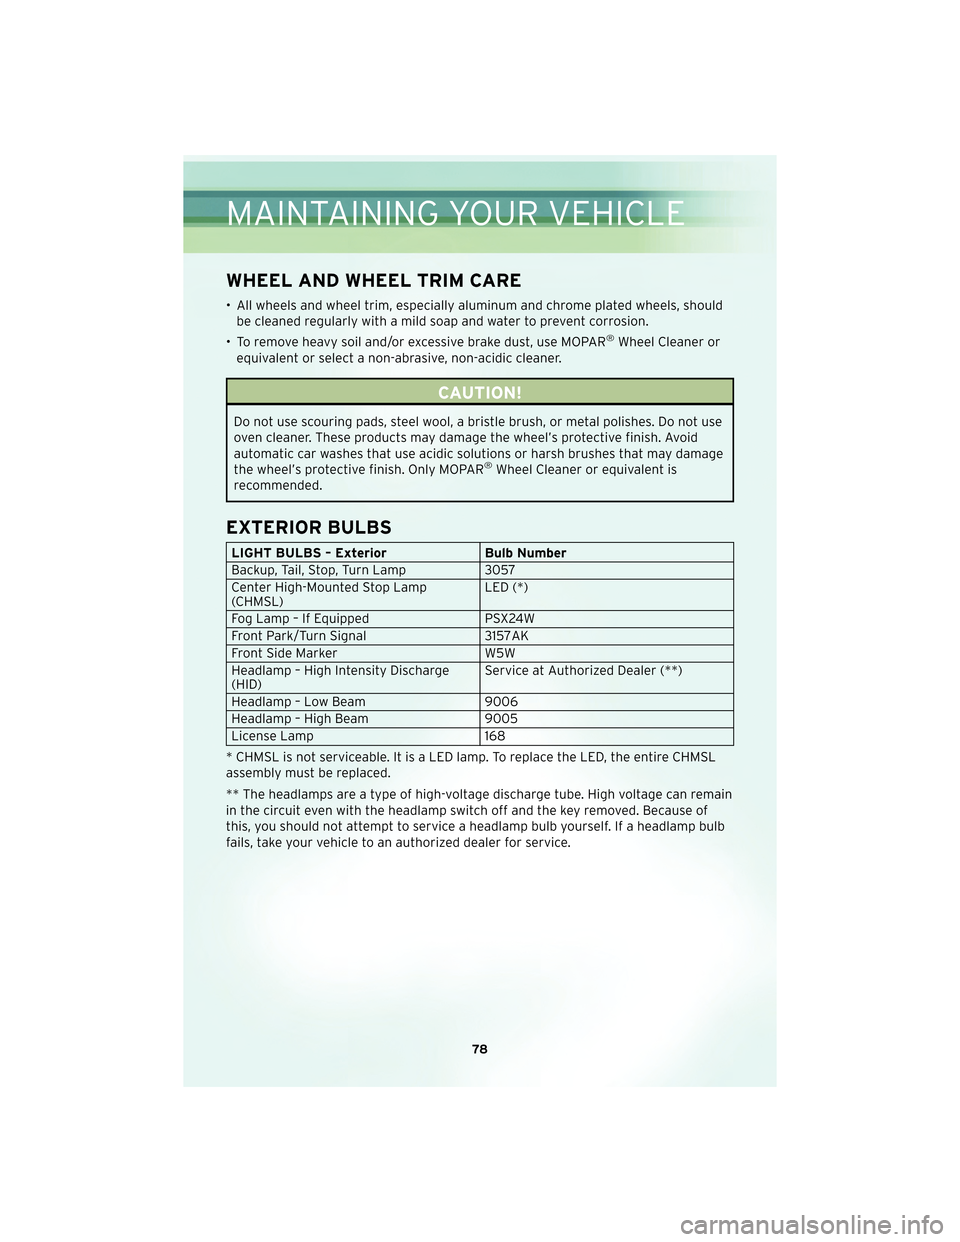
EXTERIOR BULBS
LIGHT BULBS – Exterior Bulb Number
Backup, Tail, Stop, Turn Lamp 3057
Center High-Mounted Stop Lamp
(CHMSL) LED (*)
Fog Lamp – If Equipped PSX24W
Front Park/Turn Signal 3157AK
Front Side Marker W5W
Headlamp – High Intensity Discharge
(HID) Service at Authorized Dealer (**)
Headlamp – Low Beam 9006
Headlamp – High Beam 9005
License Lamp 168
* CHMSL is not serviceable. It is a LED lamp. To replace the LED, the entire CHMSL
assembly must be replaced.
** The headlamps are a type of high-voltage discharge tube. High voltage can remain
in the circuit even with the headlamp switch off and the key removed. Because of
this, you should not attempt to service a headlamp bulb yourself. If a headlamp bulb
fails, take your vehicle to an authorized dealer for service.
MAINTAINING YOUR VEHICLE
78
Page 85 of 88

MOPAR®ACCESSORIES
• The following highlights just some ofthe authentic Chrysler Accessories by
MOPAR®that have been engineered to customize your Chrysler 300.
• To see the full line of acc essories, stop by your Chry sler dealer or visit MOPAR.com.
CHROME:
• 17-Inch Chrome Aluminum Wheel • 18-Inch Chrome
Aluminum Wheel • 20-Inch Chrome
Aluminum Wheel
• Chrome Mesh Grille • Premium Chrome Grille
EXTERIOR:
• Side Window Air Deflectors • Sunroof Air Deflector • Front Air Deflector
• Fog Lights • Front End Cover • Molded Splash Guards
INTERIOR:
• Premium Carpet Floor Mats • Illuminated Door Sill
Guards • Premium Carpet Cargo
Mat
• Slush Mats • Ambient Light Kit • Katzkin Leather Seats
ELECTRONICS:
• Portable Navigation Systems • Uconnect™ Web (WiFi) • Uconnect™ Phone
•iPod
®Adapter • Media Center 430
(REN/RBZ Multimedia
Radio) • DVD Rear Seat Video™
• Kicker
®Sound System • Media Center 730 (RER Navigation Radio) • Head Restraint DVD Rear
Seat Video™
• Remote Start • Heated Seats
CARRIERS:
• Hitch-mount Bike Carrier • Roof Mount Bike Carrier • Roof Box Cargo Carrier
• Roof Mount Ski and Snowboard Carrier • Roof Mount Water
Sports Carrier • Roof Mount Canoe
Carrier
•iPod
®is a registered trademark of Apple, Inc.
• Kicker®is a registered trademark of Stillwater Designs and Audio, Inc.
83
MOPAR ACCESSORIES