towing CHRYSLER 300 2010 1.G User Guide
[x] Cancel search | Manufacturer: CHRYSLER, Model Year: 2010, Model line: 300, Model: CHRYSLER 300 2010 1.GPages: 88, PDF Size: 11.01 MB
Page 3 of 88
INTRODUCTION/WELCOME
WELCOME FROM CHRYSLER
GROUPLLC ................ 2
CONTROLS AT A GLANCE
DRIVER COCKPIT.............4
INSTRUMENT CLUSTER .........6
GETTING STARTED
KEYFOB ..................8
PASSIVEENTRY .............9
KEYLESSGO™ ..............11
THEFT ALARM..............12
SEATBELT ................12
CHILD RESTRAINTS ...........12
FRONTSEATS...............14
REARSEAT ................16
HEATEDSEATS..............17
ADJUSTABLE PEDALS ..........18
TILT / TELESCOPING STEERING
COLUMN ..................19
PROGRAMMABLE FEATURES ..... 20
OPERATING YOUR VEHICLE
TURN SIGNAL/WIPER/WASHER/HIGH
BEAMLEVER ...............22
HEADLIGHT SWITCH...........23
SPEED CONTROL LEVER ........24
MANUAL CLIMATE CONTROLS .....27
AUTOMATIC TEMPERATURE
CONTROLS(ATC)............ 28
POWERSUNROOF ........... 28
WIND BUFFETING ............ 29
ELECTRONICS
NON-TOUCH-SCREEN RADIOS .... 30
TOUCH-SCREEN RADIOS .........32
REMOTE AUDIO CONTROLS .......37
UNIVERSAL CONSUMER
INTERFACE ................37
ELECTRONIC VEHICLE INFORMATION
CENTER (EVIC) ............. 38
UNIVERSAL GARAGE DOOR
OPENER ................. 38
POWER OUTLET ............ 39
UCONNECT™ PHONE .......... 40 VOICE COMMAND
............ 42
UTILITY
TRAILER TOWING WEIGHTS (MAXIMUM
TRAILER WEIGHT RATINGS) ...... 43
RECREATIONAL TOWING (BEHIND
MOTORHOME, ETC.) .......... 44
BRAKE/TRANSMISSION INTERLOCK
MANUAL OVERRIDE .......... 44
WHAT TO DO IN EMERGENCIES
24 HOUR TOWING ASSISTANCE
- U.S. ONLY............... 46
INSTRUMENT CLUSTER WARNING
LIGHTS .................. 46
IF YOUR ENGINE OVERHEATS .... 49
JACKING, TIRE CHANGING AND
TIREFIT TIRE REPAIR ......... 50
JUMP-STARTING ............ 57
TOWING A DISABLED VEHICLE .... 60
FREEING A STUCK VEHICLE .......61
EVENT DATA RECORDER (EDR) . . . 62
MAINTAINING YOUR VEHICLE
OPENING THE HOOD .......... 64
ENGINE COMPARTMENT ....... 65
FLUIDS AND CAPACITIES ....... 69
MAINTENANCE CHART .........72
FUSES ...................74
TIREPRESSURES.............77
WHEEL AND WHEEL TRIM CARE ....78
EXTERIOR BULBS .............78
CONSUMER ASSISTANCE
CHRYSLER GROUP LLC CUSTOMER
CENTER ..................79
CHRYSLER CANADA INC. CUSTOMER
CENTER ..................79
ASSISTANCE FOR THE HEARING
IMPAIRED .................79
PUBLICATIONS ORDERING .......79
REPORTING SAFETY DEFECTS IN
THE 50 UNITED STATES AND
WASHINGTON, D.C. ........... 80
TIREWARRANTY ............ 80
MOPAR ACCESSORIES
MOPAR®ACCESSORIES ........ 83
TABLE OF CONTENTS
Page 45 of 88

TRAILER TOWING WEIGHTS (MAXIMUM TRAILER WEIGHT RATINGS)
Engine/TransmissionFrontal AreaMax. GTW
(Gross Trailer Wt.) Max. Tongue Wt.
(see note)
2.7L & 3.5L Rear Wheel
Drive (RWD) Automatic 22 sq ft (2.04 sq m)
1,000 lbs (454 kg) 100 lbs (45 kg)
3.5L All Wheel Drive (AWD)
& 5.7L Automatic 32 sq ft (2.97 sq m)
2,000 lbs (907 kg) 200 lbs (91 kg)
Refer to local laws for maximum trailer towing speeds.
NOTE: The trailer tongue weight must be considered as part of the combined weight of occupants and cargo, and it should
never exceed the weight referenced on the “Tire and Loading Information” placard.
43
UTILITY
Page 46 of 88
RECREATIONAL TOWING
(BEHIND MOTORHOME,
ETC.)
Two-Wheel Drive And
All-Wheel Drive
• Recreational towing (with all fourwheels on the ground) is allowed
ONLY if the rear driveshaft is
removed and the transmission is in
NEUTRAL (for both RWD and AWD
vehicles).
• Refer to your Owner’s Manual on the DVD for further details.
WARNING!
If the driveshaft is removed, the
vehicle can roll even if the
transmission is in PARK, which
could cause serious injury or death.
• The parking brake must be firmly engaged and the wheels chocked
during driveshaft removal and
installation. The parking brake must
remain engaged unless the vehicle is
securely and properly connected to
the tow vehicle, or the driveshaft is
completely reinstalled. See your
authorized dealer for proper
driveshaft removal and reinstallation
procedures, including flange
orientation/alignment, use of
thread-locking compound, proper
bolt torque specifications, etc.
CAUTION!
Towing this vehicle in violation of
the above requirements can cause
severe transmission and/or transfer
case damage. Damage from
improper towing is not covered
under your new vehicle warranties.
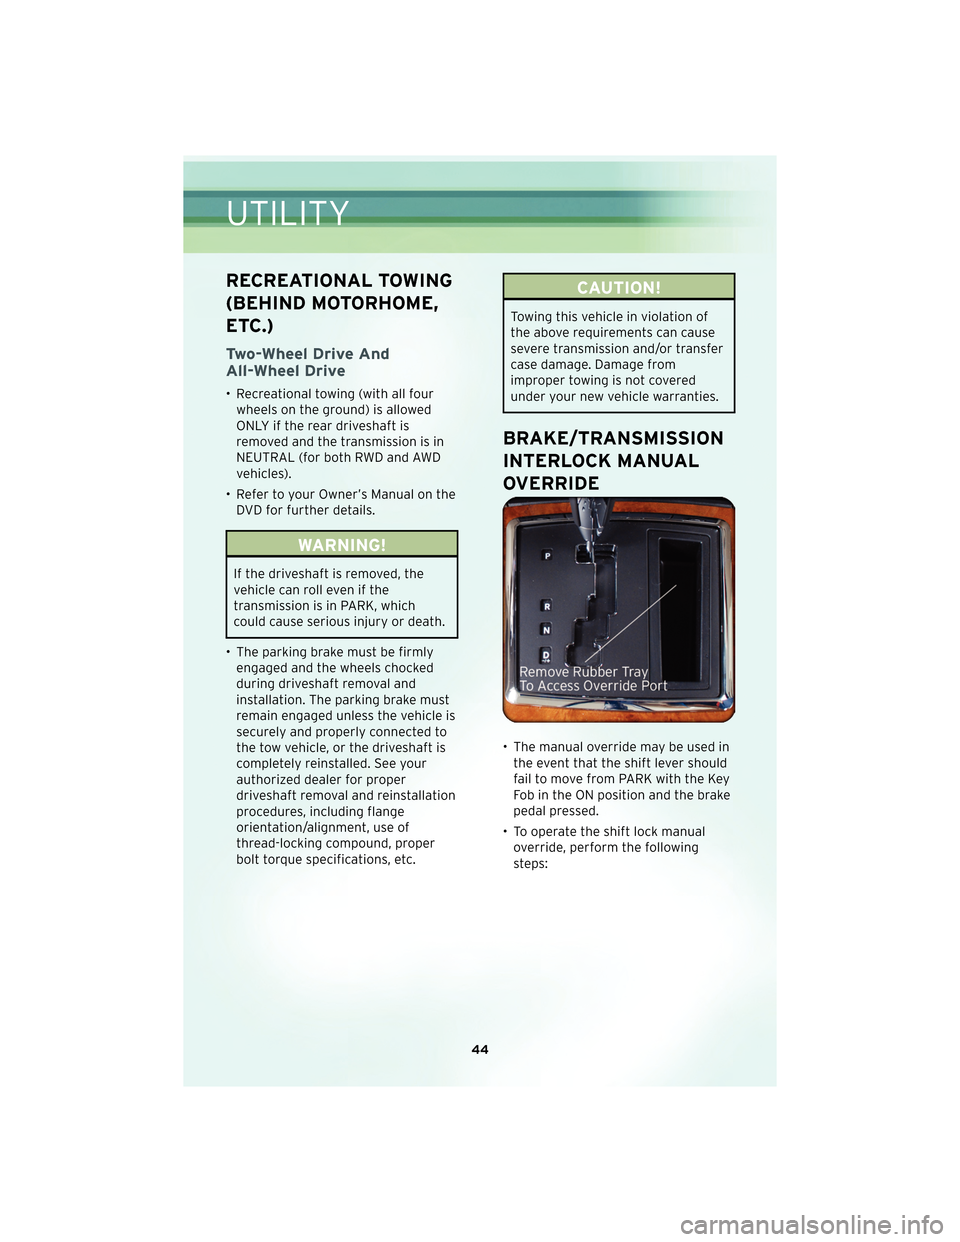
BRAKE/TRANSMISSION
INTERLOCK MANUAL
OVERRIDE
• The manual override may be used inthe event that the shift lever should
fail to move from PARK with the Key
Fob in the ON position and the brake
pedal pr essed.
• To operate the shift lock manual override, perform the following
steps:
UTILITY
44
Page 48 of 88

24 HOUR TOWING ASSISTANCE - U.S. ONLY
• Dial toll-free 1-800-521-2779 or 1-800-363-4869 for Canadian residents.
• Provide your name, vehicle identification number and license plate number.
• Provide your location, including telephone number, from which you are calling.
• Briefly describe the nature of the problem and answer a few simple questions.
• You will be given the name of the service provider and an estimated time of arrival.If you feel you are in an “unsafe situation”, please let us know. With your consent,
we will contact local police or safety authorities.
INSTRUMENT CLUSTER WARNING LIGHTS
- Electronic Stability Program (ESP) Indicator Light
• If this indicator light flashes during acceleration, apply as little throttle as possible.While driving, ease up on the accelerator. Adapt your speed and driving to the
prevailing road conditions. To improve the vehicle’s traction when starting off in
deep snow, sand or gravel, it may be desirable to switch the ESP system off.
- Tire Pressure Monitoring System (TPMS) Light
• A Tire Pressure Monitoring Light and a “low tire” message will display in yourinstrument cluster along with an audible chime if one or more of your vehicle’s four
road tires are significantly under-inflated.
• Check the inflation pressure of each tire and inflate to the recommended pressure for your vehicle. The tire pressures recommended for your vehicle are found on the
“Tire and Loading Information” label located on the driver’s side door opening. The
TPMS light should not be used as a tire pressure gauge when adjusting your tire
pressure.
• It is recommended that you check the tire pressure in the morning when tires are cool; inflate each tire to the recommended pressure for your vehicle. The light will
turn off after your vehicle’s tire pressures are properly inflated and the pressure
has been recognized. The vehicle may need to be driven for up to 20 minutes
above 15 mph (25 km/h) before the light will turn off.
• Temperature changes can affect tire pressure, causing the TPMS light to turn on. Tire pressures will also increase as the vehicle is driven – this is normal and you
should not adjust for this increased pressure.
• Driving on under-inflated tires reduces your vehicle’s fuel efficiency and tire tread life. If a spare tire is in use on the vehicle, the TPMS light may turn on.
- Engine Temperature Warning Light
• This light warns of an overheated engine condition.
• If the light turns on or flashes continuously while driving, safely pull over and stopthe vehicle. If the A/C system is on, turn it off. Also, shift the transmission into
NEUTRAL and idle the vehicle. If the temperature reading does not return to
normal, turn the engine off immediately.
WHAT TO DO IN EMERGENCIES
46
Page 49 of 88

• We recommend that you do not operate the vehicle or engine damage will occur.Have the vehicle serviced immediately.
WARNING!
A hot engine cooling system is dangerous. You or others could be badly burned by
steam or boiling coolant. You may want to call an authorized dealership for service
if your vehicle overheats.
- Brake Warning Light
• The Brake Warning light illuminates when there is either a system malfunction orthe parking brake is applied. If the light is on and the parking brake is not applied, it
indicates a possible brake hydraulic malfunction, brake booster problem or an
Anti-Lock Brake System problem.
• We recommend you do not operate the vehicle. Have the vehicle serviced immediately.
WARNING!
Driving a vehicle with the red brake light on is dangerous. Part of the brake system
may have failed. It will take longer to stop the vehicle. You could have an accident.
Have the vehicle checked immediately.
- Malfunction Indicator Light (MIL)
• Certain conditions, such as a loose or missing gas cap, poor fuel quality, etc., mayilluminate the MIL after engine start. The vehicle should be serviced if the light
stays on through several typical driving cycles. In most situations, the vehicle will
drive normally and not require towing.
• If the MIL flashes when the engine is running, serious conditions may exist that could lead to immediate loss of power or severe catalytic converter damage. We
recommend you do not operate the vehicle. Have the vehicle serviced immediately.
- Electronic Stability Program (ESP) Indicator Light/Brake
Assist System (BAS) Warning Light
• If the ESP/BAS warning light comes on continuously with the engine running, a
malfunction has been detected.
• If this light remains on after several ignition cycles, and the vehicle has been driven several miles (kilometers) at speeds greater than 30 mph (48 km/h), we
recommend you do not operate the vehicle. Have the vehicle serviced immediately.
- Charging System Light
• This light shows the status of the electrical charging system. If the charging systemlight remains on, it means that the vehicle is experiencing a problem with the
charging system.
47
WHAT TO DO IN EMERGENCIES
Page 50 of 88
• We recommend you do not continue driving if the charging system light is on. Havethe vehicle serviced immediately.
- Oil Pressure Warning Light
• This light indicates low engine oil pressure. If the light turns on while driving, stopthe vehicle and shut off the engine as soon as possible. A chime will sound for four
minutes when this light turns on.
• We recommend you do not operate the vehicle or engine damage will occur. Have the vehicle serviced immediately.
- Anti-Lock Brake (ABS) Light
• This light monitors the Anti-Lock Brake System (ABS).
• If the light is not on during starting, stays on, or turns on while driving, werecommend you do not operate the vehicle. Have the vehicle serviced immediately.
- Electronic Throttle Control (ETC) Light
• This light informs you of a problem with the Electronic Throttle Control (ETC)system.
• If a problem is detected, the light will come on while the engine is running. Cycle the ignition when the vehicle has completely stopped and the shift lever is placed
in the PARK position; the light should turn off.
• If the light remains lit with the engine running, your vehicle will usually be drivable; however, see an authorized dealer for service as soon as possible. If the light is
flashing when the engine is running, immediate service is required and you may
experience reduced performance, an elevated/rough idle or engine stall and your
vehicle may require towing. We recommend you do not operate the vehicle. Have
the vehicle serviced immediately.
- Airbag Warning Light
• If the light is not on during starting, stays on, or turns on while driving, werecommend you do not operate the vehicle. Have the vehicle serviced immediately.
tCASE Message
• If the tCASE message appears after engine start up, or during driving, it means theAWD system is not functioning properly. We recommend you do not operate the
vehicle. Have the vehicle serviced immediately.
SERVICE AWD SYSTEM Message
• If the SERVICE AWD SYSTEM warning message appears after engine start up, orduring driving, it means the AWD system is not functioning properly. We
recommend you do not operate the vehicle. Have the vehicle serviced immediately.
Fuel Cap/Loose Gas Cap Message
• If a “gas cap” message (shown as gASCAP) appears, tighten the gas cap until a“clicking” sound is heard.
• Press the odometer reset button to turn the message off.
WHAT TO DO IN EMERGENCIES
48
Page 62 of 88
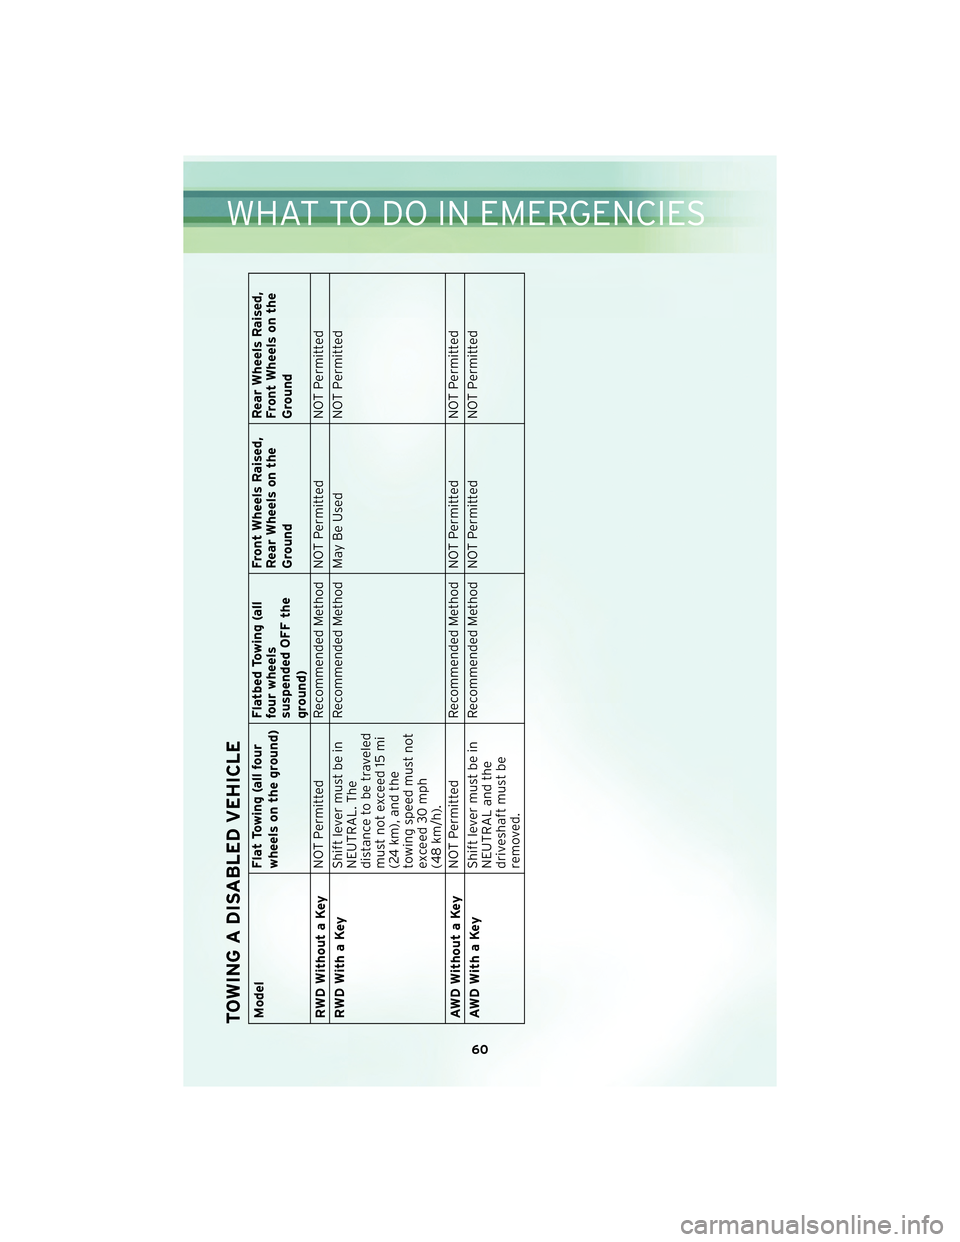
TOWING A DISABLED VEHICLEModelFlat Towing (all four
wheels on the ground)Flatbed Towing (all
four wheels
suspended OFF the
ground)Front Wheels Raised,
Rear Wheels on the
Ground
Rear Wheels Raised,
Front Wheels on the
Ground
RWD Without a Key NOT Permitted Recommended Method NOT Permitted NOT Permitted
RWDWithaKey Shift lever must be in
NEUTRAL. The
distance to be traveled
must not exceed 15 mi
(24 km), and the
towing speed must not
exceed 30 mph
(48 km/h).Recommended Method May Be Used
NOT Permitted
AWD Without a Key NOT Permitted Recommended Method NOT Permitted NOT Permitted
AWDWithaKey Shift lever must be in
NEUTRAL and the
driveshaft must be
removed.Recommended Method NOT Permitted NOT Permitted
60
WHAT TO DO IN EMERGENCIES
Page 74 of 88
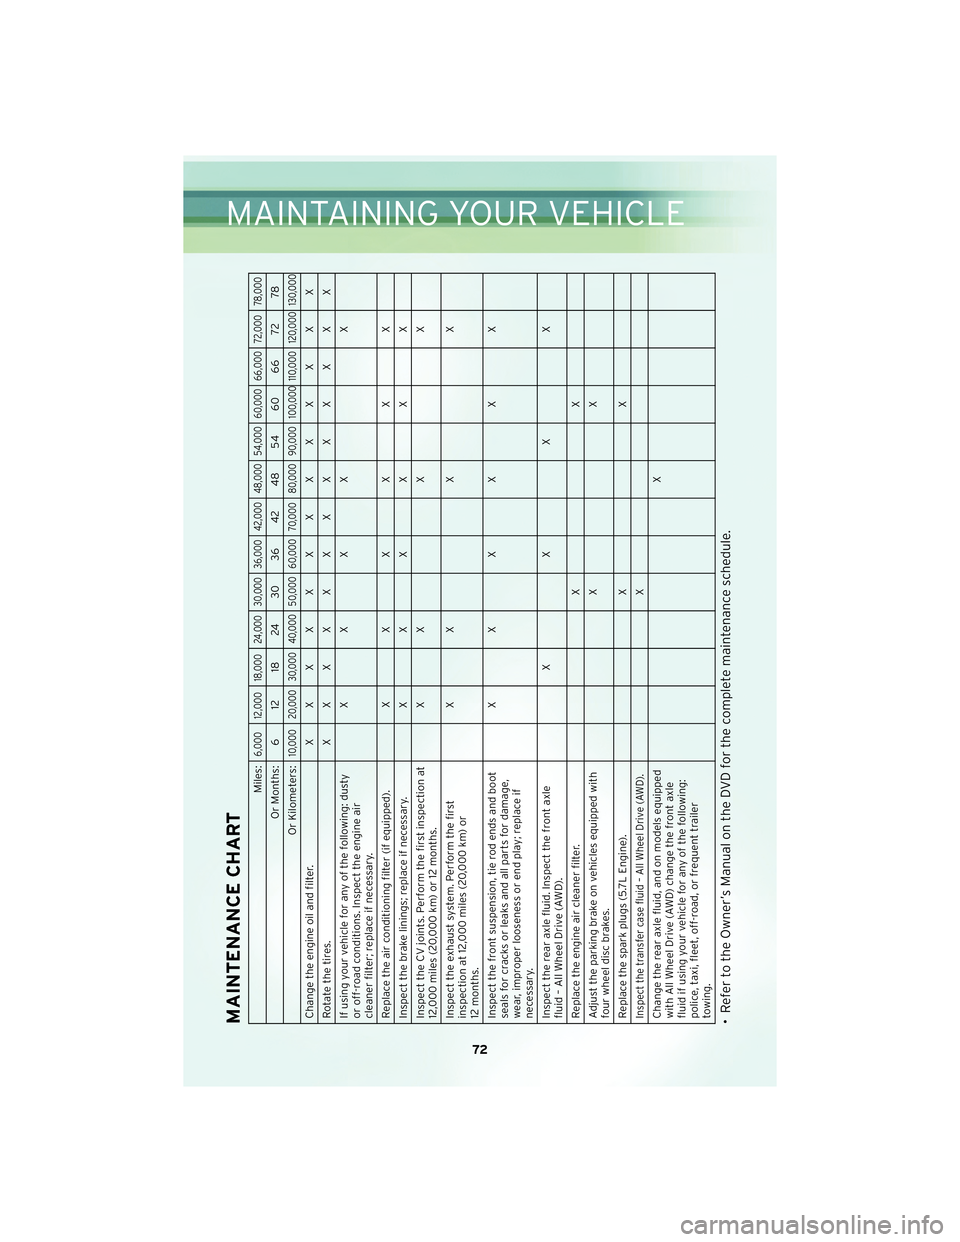
MAINTENANCE CHART
Miles:
6,000 12,000 18,000 24,000 30,000 36,000 42,000 48,000 54,000 60,000 66,000 72,000 78,000
Or Months: 6 12 18 24 30 36 42 48 54 60 66 72 78
Or Kilometers:
10,000 20,000 30,000 40,000 50,000 60,000 70,000 80,000 90,000 100,000 110,000 120,000 130,000
Change the engine oil and filter. XXXXXXXXXXXXX
Rotatethetires. XXXXXXXXXXXXX
If using your vehicle for any of the following: dusty
or off-road conditions. Inspect the engine air
cleaner filter; replace if necessary. XXXX X
Replace the air conditioning filter (if equipped). X X X X X X
Inspect the brake linings; replace if necessary. X X X X X X
Inspect the CV joints. Perform the first inspection at
12,000 miles (20,000 km) or 12 months. XXXX
Inspect the exhaust system. Perform the first
inspection at 12,000 miles (20,000 km) or
12 months. XXXX
Inspect the front suspension, tie rod ends and boot
seals for cracks or leaks and all parts for damage,
wear, improper looseness or end play; replace if
necessary. XXXXXX
Inspect the rear axle fluid. Inspect the front axle
fluid – All Wheel Drive (AWD). XXXX
Replace the engine air cleaner filter. X X
Adjust the parking brake on vehicles equipped with
four wheel disc brakes. XX
Replace the spark plugs (5.7L Engine). X XInspect the transfer case fluid – All Wheel Drive (AWD).
X
Change the rear axle fluid, and on models equipped
with All Wheel Drive (AWD) change the front axle
fluid if using your vehicle for any of the following:
police, taxi, fleet, off-road, or frequent trailer
towing. X
• Refer to the Owner’s Manual on the DVD for the complete maintenance schedule.
72
MAINTAINING YOUR VEHICLE