wheel CHRYSLER 300 2011 2.G Owner's Manual
[x] Cancel search | Manufacturer: CHRYSLER, Model Year: 2011, Model line: 300, Model: CHRYSLER 300 2011 2.GPages: 92, PDF Size: 3.35 MB
Page 50 of 92
Common Voice Commands (Examples)
Switch Modes“AM”
“FM”
“Satellite”
Radio (FM, AM) “95.5”
“95.5 FM”
SIRIUS Satellite Radio “39”
“Tune to Satellite channel 39”
“Foxxhole”
SIRIUS Travel Link “Show fuel prices”
“Show movie listings”
“Show current weather”
“Show extended weather”
“Show Travel Link favorites”
“Show NFL headlines”
“Show NBA rankings”
“Show NFL schedules”
“Show NBA scores”
Navigation “Repeat guidance”
WARNING!
Any voice commanded system should be used only in safe driving conditions following
local laws and phone use. All attention should be kept on the roadway ahead. Failure to do
so may result in a collision causing you and others to be severely injured or killed.
ELECTRONIC VEHICLE INFORMATION CENTER (EVIC)
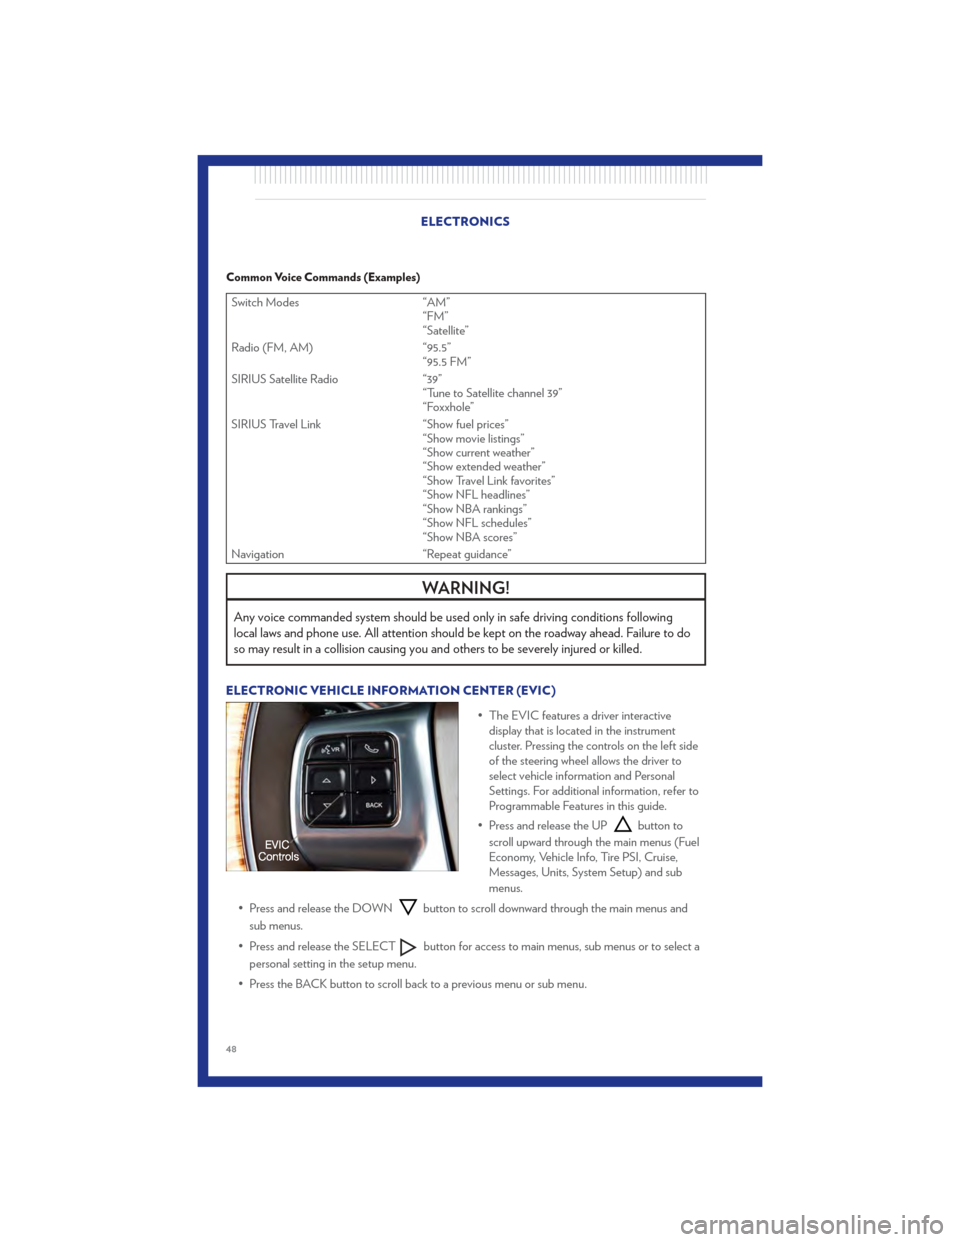
• The EVIC features a driver interactivedisplay that is located in the instrument
cluster. Pressing the controls on the left side
of the steering wheel allows the driver to
select vehicle information and Personal
Settings. For additional information, refer to
Programmable Features in this guide.
• Press and release the UP
button to
scroll upward through the main menus (Fuel
Economy, Vehicle Info, Tire PSI, Cruise,
Messages, Units, System Setup) and sub
menus.
• Press and release the DOWN
button to scroll downward through the main menus and
sub menus.
• Press and release the SELECT
button for access to main menus, sub menus or to select a
personal setting in the setup menu.
• Press the BACK button to scroll back to a previous menu or sub menu.
ELECTRONICS
48
Page 56 of 92
RECREATIONAL TOWING (BEHIND
MOTORHOME, ETC.)
Two-Wheel Drive and All-Wheel Drive
• Recreational towing (with all four wheelson the ground, or using a tow dolly) is
NOT ALLOWED. The only acceptable
method for towing this vehicle (behind
another vehicle) is on a vehicle trailer with
all four wheels OFFthe ground.
CAUTION!
Towing this vehicle in violation of the
above requirements can cause severe
transmission and/or transfer case damage.
Such damage is not covered by the New
Vehicle Limited Warranty.
UTILITY
54
Page 58 of 92

• Your vehicle has also been equipped with a TPMS malfunction indicator to indicate when thesystem is not operating properly. The TPMS malfunction indicator is combined with the low tire
pressure telltale. When the system detects a malfunction, the telltale will flash for approximately
one minute and then remain continuously illuminated. This sequence will continue each time
the vehicle is restarted as long as the malfunction exists.
• When the malfunction indicator is illuminated, the system may not be able to detect or signal low tire pressure as intended. TPMS malfunctions may occur for a variety of reasons, including
the installation of replacement or alternate tires or wheels on the vehicle that prevent the TPMS
from functioning properly. Always check the TPMS malfunction telltale after replacing one or
more tires or wheels on your vehicle, to ensure that the replacement or alternate tires and
wheels allow the TPMS to continue to function properly.
CAUTION!
The TPMS has been optimized for the original equipment tires and wheels. TPMS
pressures and warning have been established for the tire size equipped on your vehicle.
Undesirable system operation or sensor damage may result when using replacement
equipment that is not of the same size, type, and/or style. Aftermarket wheels can cause
sensor damage. Do not use tire sealant from a can, or balance beads if your vehicle is
equipped with a TPMS, as damage to the sensors may result.
- Engine Temperature Warning Light
• This light warns of an overheated engine condition.
• If the light turns on or flashes continuously while driving, safely pull over and stop the vehicle. Ifthe A/C system is on, turn it off. Also, shift the transmission into NEUTRAL and idle the
vehicle. If the temperature reading does not return to normal, turn the engine off immediately.
• We recommend that you do not operate the vehicle or engine damage will occur. Have the vehicle serviced immediately.
WARNING!
A hot engine cooling system is dangerous. You or others could be badly burned by steam
or boiling coolant. You may want to call an authorized service center for service if your
vehicle overheats.
BRAKE- Brake Warning Light
• The Brake Warning light illuminates when there is either a system malfunction or the parkingbrake is applied. If the light is on and the parking brake is not applied, it indicates a possible
brake hydraulic malfunction, brake booster problem or an Anti-Lock Brake System problem.
• We recommend you drive to the nearest service center and have the vehicle serviced immediately. WHAT TO DO IN EMERGENCIES
56
Page 62 of 92
JACKING, TIRE CHANGING
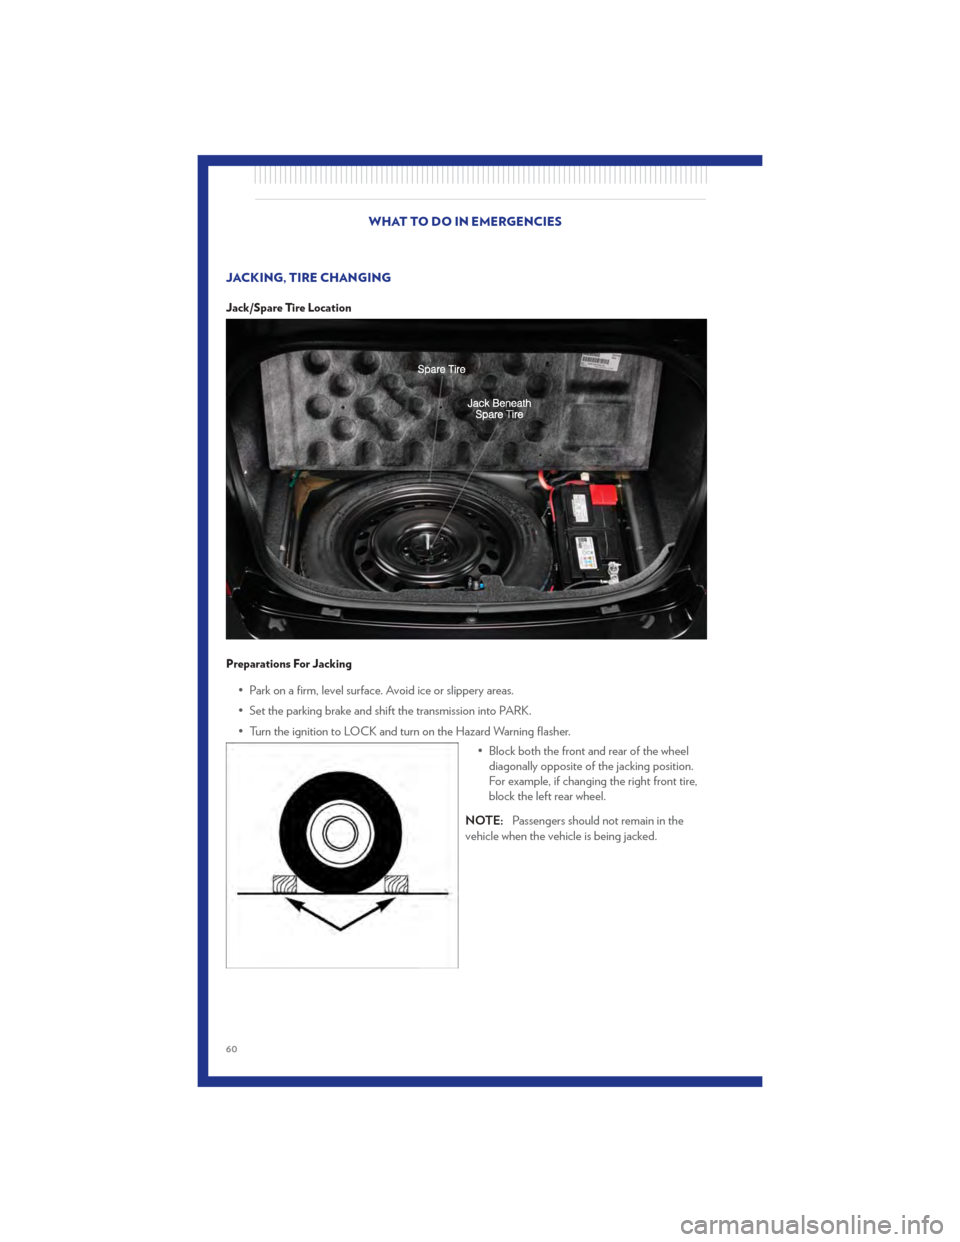
Jack/Spare Tire Location
Preparations For Jacking
• Park on a firm, level surface. Avoid ice or slippery areas.
• Set the parking brake and shift the transmission into PARK.
• Turn the ignition to LOCK and turn on the Hazard Warning flasher.• Block both the front and rear of the wheeldiagonally opposite of the jacking position.
For example, if changing the right front tire,
block the left rear wheel.
NOTE: Passengers should not remain in the
vehicle when the vehicle is being jacked.
WHAT TO DO IN EMERGENCIES
60
Page 63 of 92
Jacking And Tire Changing Instructions
• Remove the spare tire, jack and lug wrench.
• If equipped with steel wheels, do not remove the wheel cover at this time. If equipped withaluminum wheels where the center cap covers the lug nuts, use the lug wrench to pry the center
cap off carefully before raising the vehicle.
• Loosen (but do not remove) the wheel lug nuts by turning them counterclockwise one turn while the wheel is still on the ground.
• Assemble the jack and jacking tools. Connect the jack handle driver to the extension, then to the lug wrench.
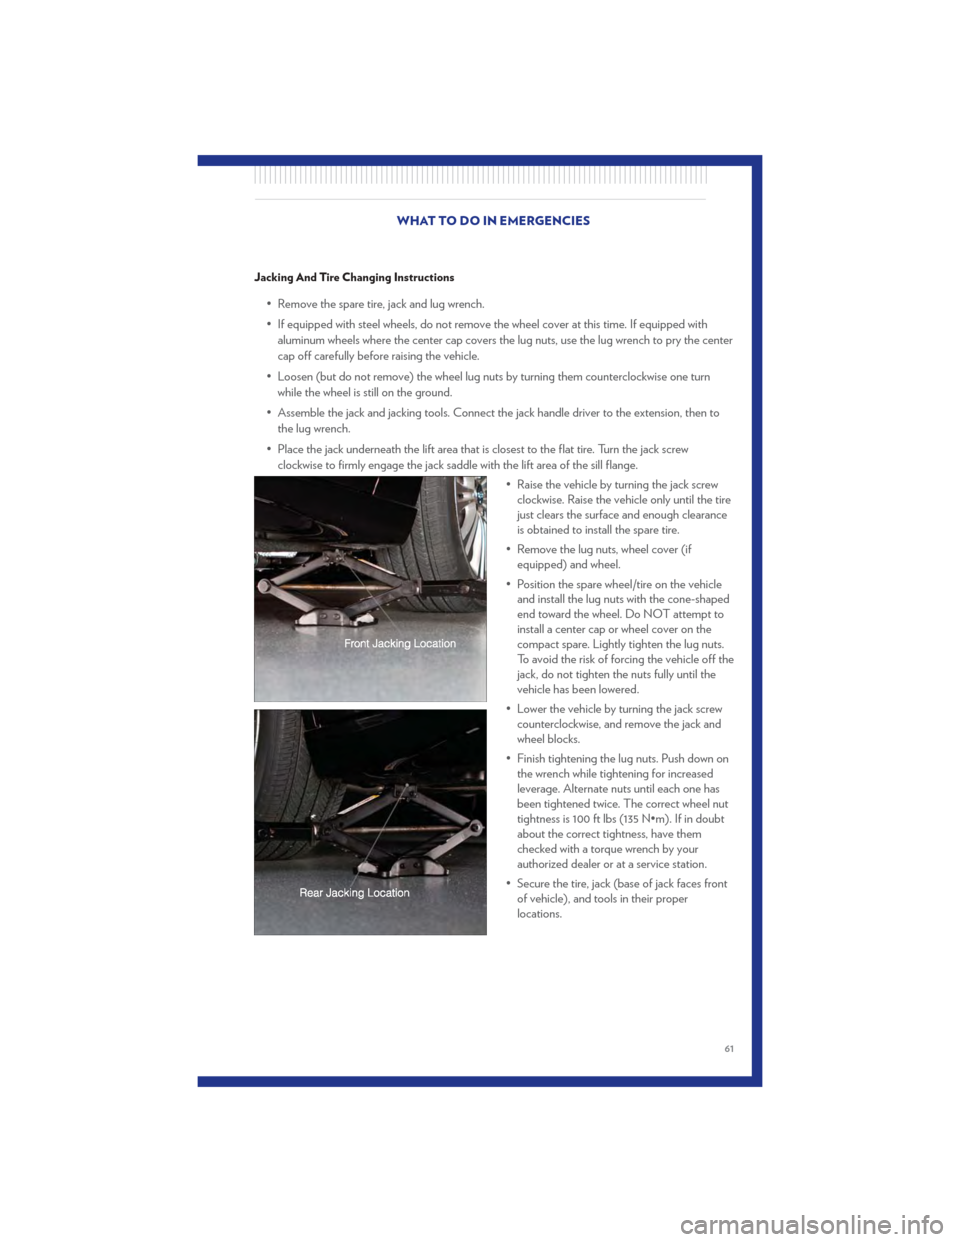
• Place the jack underneath the lift area that is closest to the flat tire. Turn the jack screw clockwise to firmly engage the jack saddle with the lift area of the sill flange.
• Raise the vehicle by turning the jack screwclockwise. Raise the vehicle only until the tire
just clears the surface and enough clearance
is obtained to install the spare tire.
• Remove the lug nuts, wheel cover (if equipped) and wheel.
• Position the spare wheel/tire on the vehicle and install the lug nuts with the cone-shaped
end toward the wheel. Do NOT attempt to
install a center cap or wheel cover on the
compact spare. Lightly tighten the lug nuts.
To avoid the risk of forcing the vehicle off the
jack, do not tighten the nuts fully until the
vehicle has been lowered.
• Lower the vehicle by turning the jack screw counterclockwise, and remove the jack and
wheel blocks.
• Finish tightening the lug nuts. Push down on the wrench while tightening for increased
leverage. Alternate nuts until each one has
been tightened twice. The correct wheel nut
tightness is 100 ft lbs (135 N•m). If in doubt
about the correct tightness, have them
checked with a torque wrench by your
authorized dealer or at a service station.
• Secure the tire, jack (base of jack faces front of vehicle), and tools in their proper
locations.
WHAT TO DO IN EMERGENCIES
61
Page 64 of 92
WARNING!
• Do not attempt to change a tire on the side of the vehicle close to moving traffic. Pull farenough off the road to avoid the danger of being hit when operating the jack or
changing the wheel.
• Getting under a jacked-up vehicle is dangerous. The vehicle could slip off the jack and fall on you. You could be crushed. Never get any part of your body under a vehicle that is
on a jack. If you need to get under a raised vehicle, take it to a service center where it can
be raised on a lift.
• The jack is designed to use as a tool for changing tires only. The jack should not be used to lift the vehicle for service purposes. The vehicle should be jacked on a firm, level
surface only. Avoid ice or slippery areas.
• Carefully follow these tire changing procedures to help prevent personal injury or damage to your vehicle: Always park on a firm, level surface as far from the edge of the
roadway as possible before raising the vehicle.
• Raising the vehicle higher than necessary can make the vehicle less stable and could cause it to slip off the jack and hurt someone near it. Raise the vehicle only enough to
remove the tire.
• A loose tire or jack, thrown forward in a collision or hard stop, could endanger the occupants of the vehicle. Always stow the jack parts and the spare tire in the places
provided.
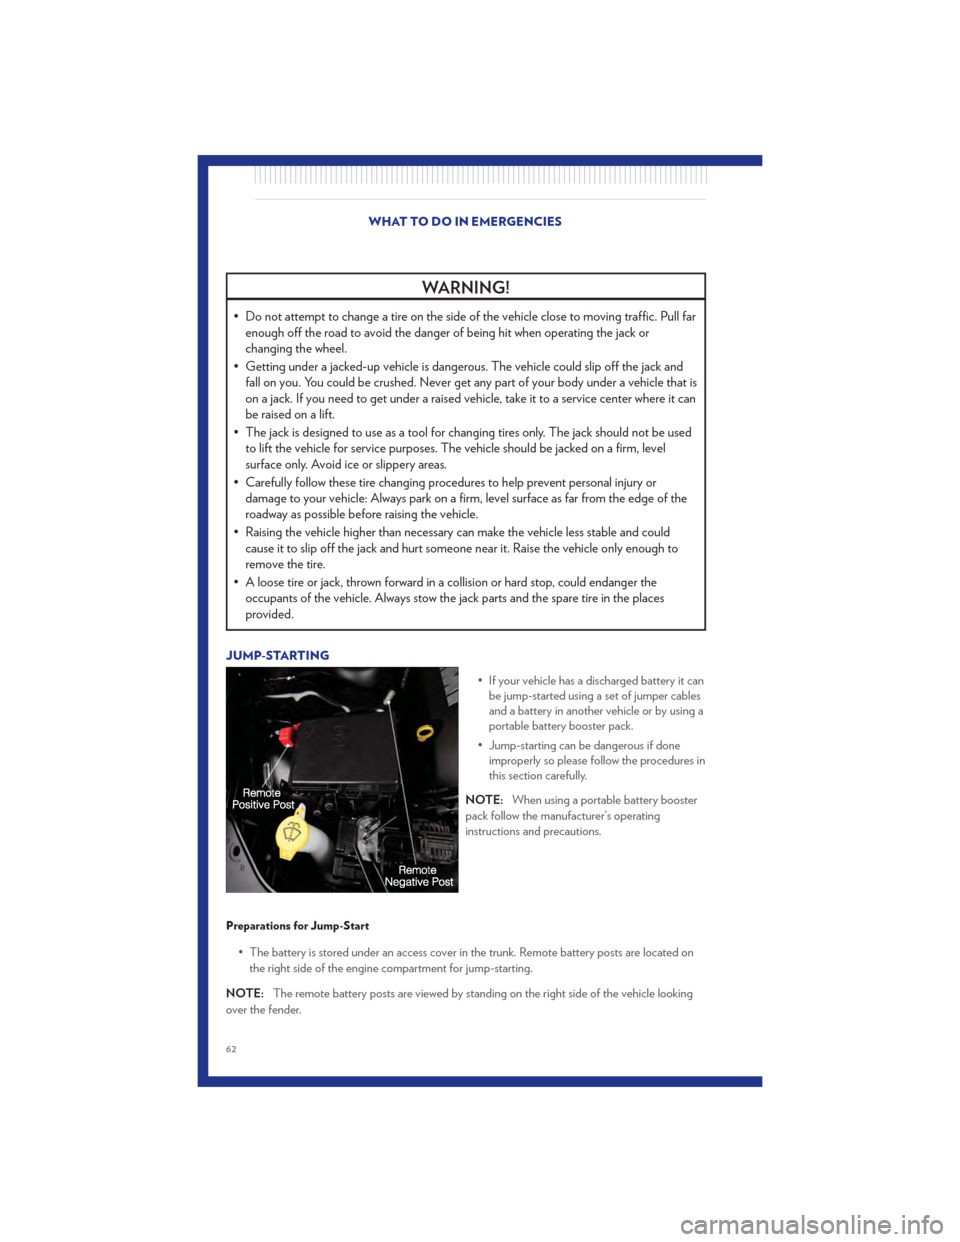
JUMP-STARTING
• If your vehicle has a discharged battery it canbe jump-started using a set of jumper cables
and a battery in another vehicle or by using a
portable battery booster pack.
• Jump-starting can be dangerous if done improperly so please follow the procedures in
this section carefully.
NOTE: When using a portable battery booster
pack follow the manufacturer’s operating
instructions and precautions.
Preparations for Jump-Start
• The battery is stored under an access cover in the trunk. Remote battery posts are located on
the right side of the engine compartment for jump-starting.
NOTE: The remote battery posts are viewed by standing on the right side of the vehicle looking
over the fender.
WHAT TO DO IN EMERGENCIES
62
Page 67 of 92
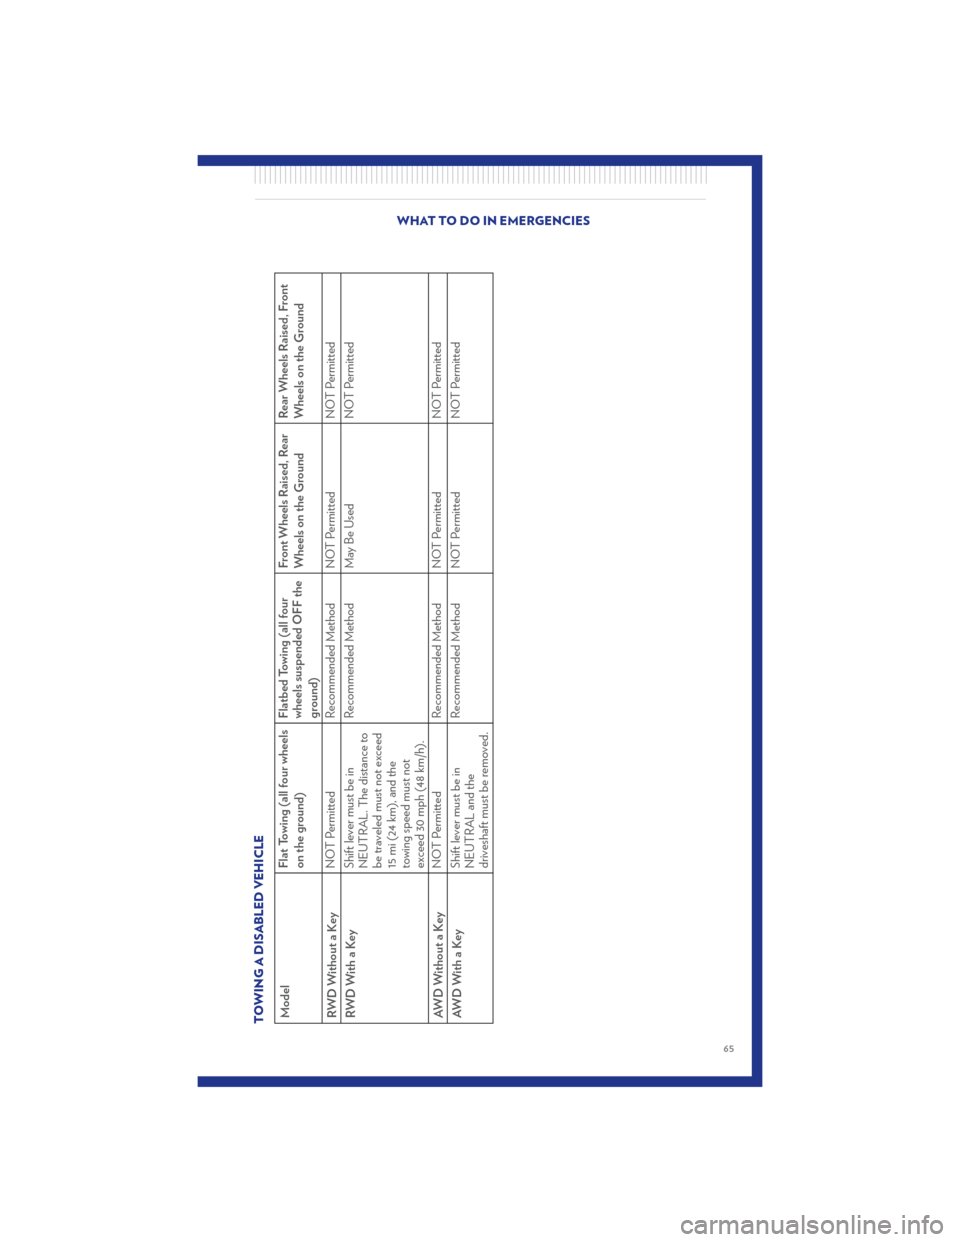
TOWING A DISABLED VEHICLEModelFlat Towing (all four wheels
on the ground)Flatbed Towing (all four
wheels suspended OFF the
ground)Front Wheels Raised, Rear
Wheels on the Ground
Rear Wheels Raised, Front
Wheels on the Ground
RWDWithoutaKey NOT Permitted
Recommended Method NOT Permitted NOT Permitted
RWDWithaKey Shift lever must be in
NEUTRAL. The distance to
be traveled must not exceed
15 mi (24 km), and the
towing speed must not
exceed 30 mph (48 km/h).Recommended Method May Be Used
NOT Permitted
AWD Without a Key NOT Permitted
Recommended Method NOT Permitted NOT Permitted
AWDWithaKey Shift lever must be in
NEUTRAL and the
driveshaft must be removed.Recommended Method NOT Permitted
NOT Permitted
WHAT TO DO IN EMERGENCIES
65
Page 68 of 92
FREEING A STUCK VEHICLE• If your vehicle becomes stuck in mud, sand or snow, it can often be moved by a rocking motion.Turn your steering wheel right and left to clear the area around the front wheels. Then, move
the shift lever back and forth between REVERSE and DRIVE. Using minimal accelerator pedal
pressure to maintain the rocking motion, without spinning the wheels, is most effective.
NOTE: If your vehicle is equipped with Electronic Stability Control (ESC) or Traction
Control
, turn the system off before attempting to “rock” the vehicle.
CAUTION!
• When “rocking” a stuck vehicle by moving between REVERSE and DRIVE, do not spin the wheels faster than 15 mph (24 km/h), or drivetrain damage may result.
• Revving the engine or spinning the wheels too fast may lead to transmission overheating and failure. It can also damage the tires. Do not spin the wheels above 30 mph (48 km/h)
while in gear (no transmission shifting occurring).
WARNING!
Fast spinning tires can be dangerous. Forces generated by excessive wheel speeds may
cause tire damage or failure. A tire could explode and injure someone. Do not spin your
vehicle's wheels faster than 30 mph (48 km/h) when you are stuck. Do not let anyone near
a spinning wheel, no matter what the speed.
WHAT TO DO IN EMERGENCIES
66
Page 75 of 92
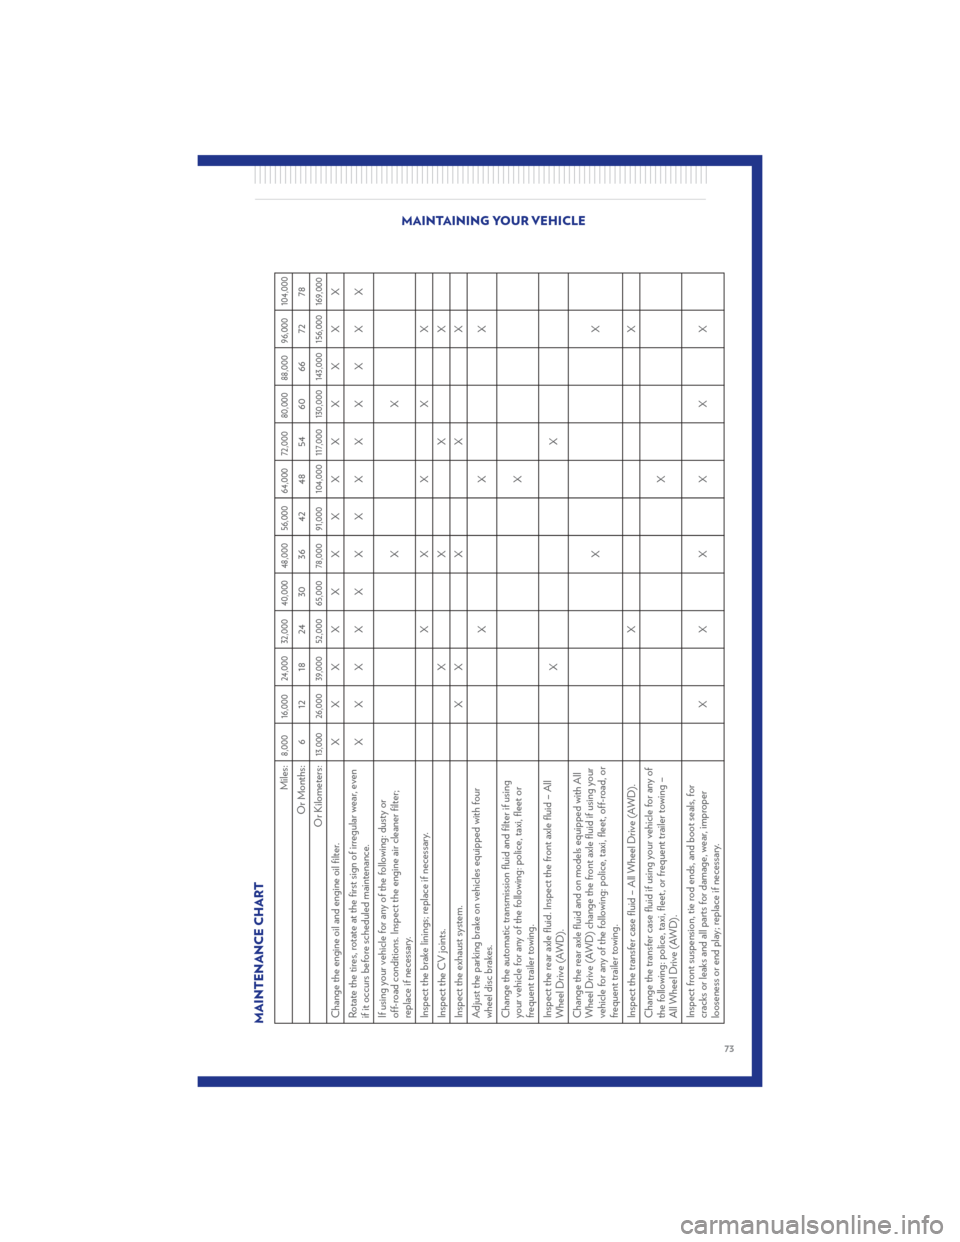
MAINTENANCE CHART
Miles:
8,000 16,000 24,000 32,000 40,000 48,000 56,000 64,000 72,000 80,000 88,000 96,000 104,000
Or Months: 6 12 18 24 30 36 42 48 54 60 66 72 78
Or Kilometers:
13,000 26,000 39,000 52,000 65,000 78,000 91,000 104,000 117,000 130,000 143,000 156,000 169,000
Change the engine oil and engine oil filter. XXXXXXXXXXXXX
Rotate the tires, rotate at the first sign of irregular wear, even
if it occurs before scheduled maintenance. XXXXXXXXXXXXX
If using your vehicle for any of the following: dusty or
off-road conditions. Inspect the engine air cleaner filter;
replace if necessary. XX
Inspect the brake linings; replace if necessary. XXXXX
Inspect the CV joints. XXXX
Inspect the exhaust system. X XXXX
Adjust the parking brake on vehicles equipped with four
wheel disc brakes. XXX
Change the automatic transmission fluid and filter if using
your vehicle for any of the following: police, taxi, fleet or
frequent trailer towing. X
Inspect the rear axle fluid. Inspect the front axle fluid – All
Wheel Drive (AWD). XX
Change the rear axle fluid and on models equipped with All
Wheel Drive (AWD) change the front axle fluid if using your
vehicle for any of the following: police, taxi, fleet, off-road, or
frequent trailer towing. XX
Inspect the transfer case fluid – All Wheel Drive (AWD). XX
Change the transfer case fluid if using your vehicle for any of
the following: police, taxi, fleet, or frequent trailer towing –
All Wheel Drive (AWD). X
Inspect front suspension, tie rod ends, and boot seals, for
cracks or leaks and all parts for damage, wear, improper
looseness or end play; replace if necessary. XXXXXX
MAINTAINING YOUR VEHICLE
73
Page 78 of 92
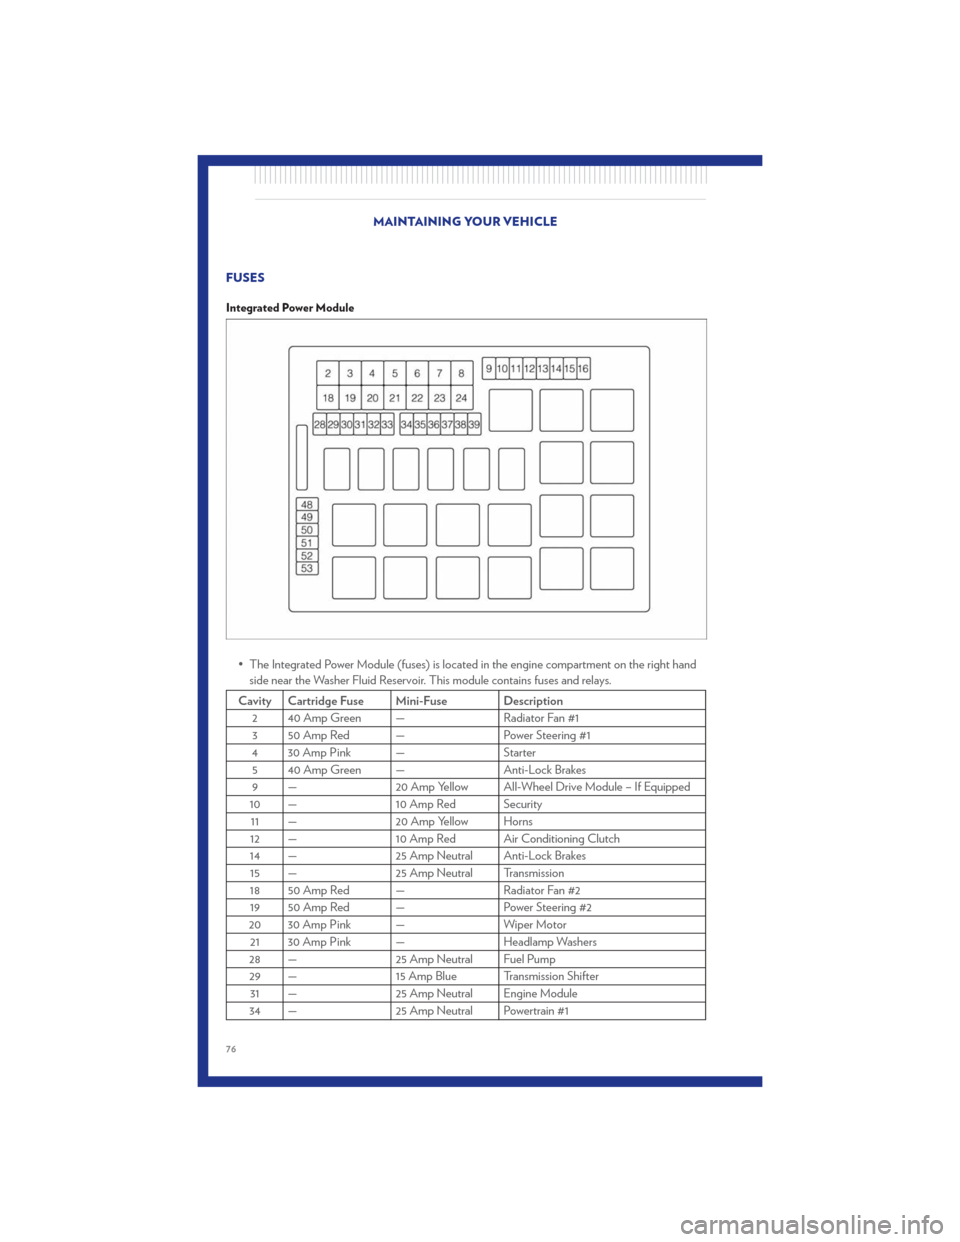
FUSES
Integrated Power Module
• The Integrated Power Module (fuses) is located in the engine compartment on the right handside near the Washer Fluid Reservoir. This module contains fuses and relays.
Cavity Cartridge Fuse Mini-Fuse Description
2 40 Amp Green — Radiator Fan #13 50 Amp Red — Power Steering #1
4 30 Amp Pink — Starter 5 40 Amp Green — Anti-Lock Brakes
9 — 20 Amp Yellow All-Wheel Drive Module – If Equipped
10 — 10 Amp Red Security 11 — 20 Amp Yellow Horns
12 — 10 Amp Red Air Conditioning Clutch
14 — 25 Amp Neutral Anti-Lock Brakes 15 — 25 Amp Neutral Transmission
18 50 Amp Red — Radiator Fan #2 19 50 Amp Red — Power Steering #2
20 30 Amp Pink — Wiper Motor
21 30 Amp Pink — Headlamp Washers
28 — 25 Amp Neutral Fuel Pump
29 — 15 Amp Blue Transmission Shifter
31 — 25 Amp Neutral Engine Module
34 — 25 Amp Neutral Powertrain #1
MAINTAINING YOUR VEHICLE
76