engine CHRYSLER 300 2011 2.G User Guide
[x] Cancel search | Manufacturer: CHRYSLER, Model Year: 2011, Model line: 300, Model: CHRYSLER 300 2011 2.GPages: 92, PDF Size: 3.35 MB
Page 3 of 92
INTRODUCTION/WELCOMEWelcome From Chrysler Group LLC......2
CONTROLS AT A GLANCEDriver Cockpit................4
Instrument Cluster ..............6
GETTING STARTEDKeyFOB...................8
Remote Start.................8
Keyless Enter-N-Go .............9
Theft Alarm .................11
Seat Belt ...................11
Supplemental Restraint System (SRS) —
Airbags ...................12
Child Restraints ................13
Front Seats ..................15
Rear Seat ...................17
Heated Seats .................18
Heated And Cooled Cupholders .......19
Adjustable Pedals ...............19
Tilt/Telescoping Steering Column .......20
OPERATING YOUR VEHICLETurn Signal/Wiper/Washer/High Beam Lever . . 21
Headlight Switch...............22
Speed Control ................23
Climate Controls ...............26
Power Sunroof ................28
Wind Buffeting ................29
ELECTRONICSYour Vehicle's Sound System .........30
Identifying Your Radio .............32
Uconnect Touch™ 8.4 & 8.4N At A Glance . . . 32
Radio ....................34
Sirius Satellite Radio ..............35
Player ....................37
Garmin® Navigation (8.4N Only) .......37
Sirius Travel Link (8.4N Only) .........41
Playing iPod/USB/MP3 Devices ........42
Uconnect™ Phone (Bluetooth® Hands
Free Calling) .................43
Uconnect™ Voice Command .........47
Electronic Vehicle Information Center
(EVIC) ....................48 Programmable Features
............49
Universal Garage Door Opener
(HomeLink®) .................50
Power Outlet .................52
UTILITY
Trailer Towing Weights (Maximum Trailer
Weight Ratings) ...............53
Recreational Towing
(Behind Motorhome, Etc.) ...........54
WHAT TO DO IN EMERGENCIES
24-Hour Towing Assistance ..........55
Instrument Cluster Warning Lights .......55
If Your Engine Overheats ...........59
Jacking, Tire Changing ............60
Jump-Starting ................62
Shift Lever Override .............64
Towing A Disabled Vehicle ..........65
Freeing A Stuck Vehicle ............66
Event Data Recorder (EDR) ..........67
MAINTAINING YOUR VEHICLE
Opening The Hood..............68
Engine Compartment .............69
Fluids And Capacities .............71
Maintenance Chart ..............73
Fuses .....................76
Tire Pressures .................80
Wheel And Wheel Trim Care .........80
Exterior Bulbs .................81
CONSUMER ASSISTANCE
Chrysler Group LLC Customer Center .....82
Chrysler Canada Inc. Customer Center ....82
Assistance For The Hearing Impaired .....82
Publications Ordering .............82
Reporting Safety Defects In The
50 United States And Washington, D.C. ....83
MOPAR ACCESSORIES
Authentic Accessories By MOPAR®......84
INDEX..................85
TABLE OF CONTENTS
Page 8 of 92
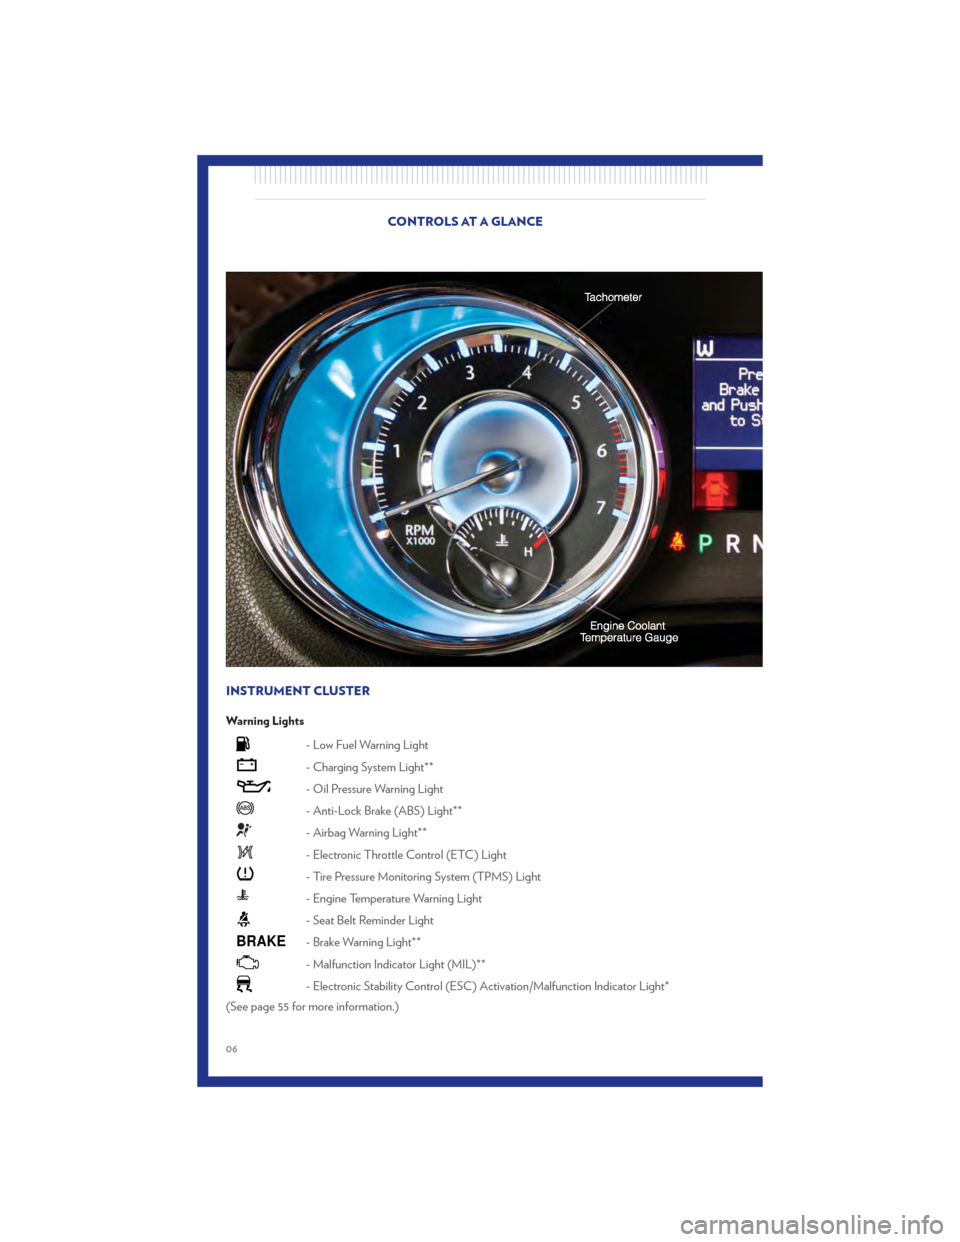
INSTRUMENT CLUSTER
Warning Lights
- Low Fuel Warning Light
- Charging System Light**
- Oil Pressure Warning Light
- Anti-Lock Brake (ABS) Light**
- Airbag Warning Light**
- Electronic Throttle Control (ETC) Light
- Tire Pressure Monitoring System (TPMS) Light
- Engine Temperature Warning Light
- Seat Belt Reminder Light
BRAKE- Brake Warning Light**
- Malfunction Indicator Light (MIL)**
- Electronic Stability Control (ESC) Activation/Malfunction Indicator Light*
(See page 55 for more information.)
CONTROLS AT A GLANCE
06
Page 10 of 92
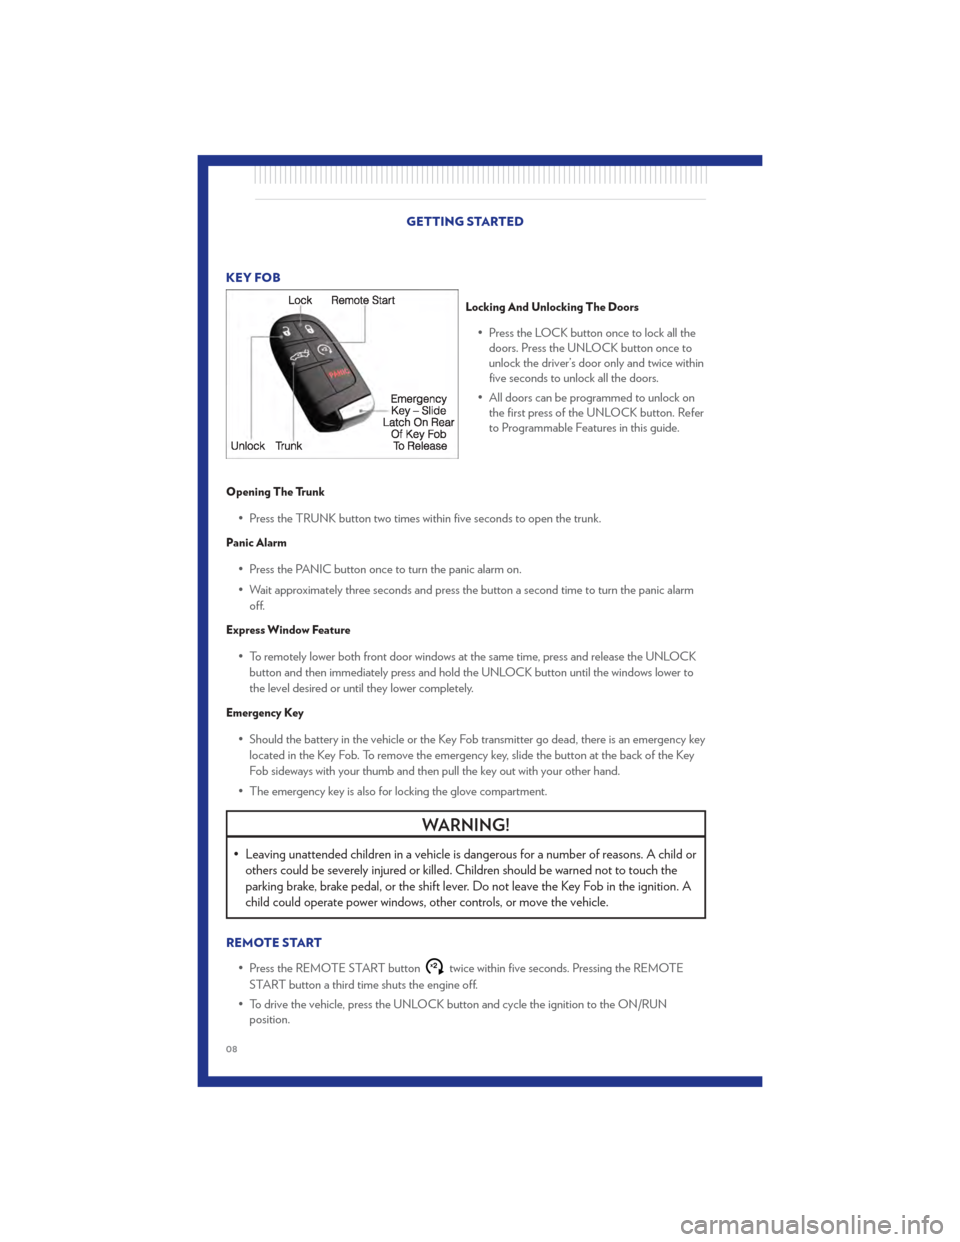
KEY FOB
Locking And Unlocking The Doors
• Press the LOCK button once to lock all thedoors. Press the UNLOCK button once to
unlock the driver’s door only and twice within
five seconds to unlock all the doors.
• All doors can be programmed to unlock on the first press of the UNLOCK button. Refer
to Programmable Features in this guide.
Opening The Trunk
• Press the TRUNK button two times within five seconds to open the trunk.
Panic Alarm
• Press the PANIC button once to turn the panic alarm on.
• Wait approximately three seconds and press the button a second time to turn the panic alarm
off.
Express Window Feature
• To remotely lower both front door windows at the same time, press and release the UNLOCKbutton and then immediately press and hold the UNLOCK button until the windows lower to
the level desired or until they lower completely.
Emergency Key
• Should the battery in the vehicle or the Key Fob transmitter go dead, there is an emergency keylocated in the Key Fob. To remove the emergency key, slide the button at the back of the Key
Fob sideways with your thumb and then pull the key out with your other hand.
• The emergency key is also for locking the glove compartment.
WARNING!
• Leaving unattended children in a vehicle is dangerous for a number of reasons. A child or others could be severely injured or killed. Children should be warned not to touch the
parking brake, brake pedal, or the shift lever. Do not leave the Key Fob in the ignition. A
child could operate power windows, other controls, or move the vehicle.
REMOTE START
• Press the REMOTE START button
x2twice within five seconds. Pressing the REMOTE
START button a third time shuts the engine off.
• To drive the vehicle, press the UNLOCK button and cycle the ignition to the ON/RUN position.
GETTING STARTED
08
Page 11 of 92
• With remote start, the engine will only run for 15 minutes (timeout) unless the ignition is cycledto the ON/RUN position.
• The vehicle must be cycled to the ON/RUN position after two consecutive timeouts.
WARNING!
• Do not start or run an engine in a closed garage or confined area. Exhaust gas contains Carbon Monoxide (CO) which is odorless and colorless. Carbon Monoxide is poisonous
and can cause you or others to be severely injured or killed when inhaled.
• Keep Key Fob transmitters away from children. Operation of the Remote Start System, windows, door locks or other controls could cause you and others to be severely injured
or killed.
KEYLESS ENTER-N-GO
• The Keyless Enter-N-Go system is an enhancement to the vehicle's Key Fob. This featureallows you to lock and unlock the vehicle's door(s) and trunk without having to press the Key
Fob lock or unlock buttons, as well as starting and stopping the vehicle with the press of a
button.
To Unlock From The Driver or Passenger Side:
• With a valid Keyless Enter-N-Go Key Fob located outside the vehicle and within 5 ft (1.5m) ofthe driver or passenger side door handle, grab either front door handle to unlock the door
automatically.
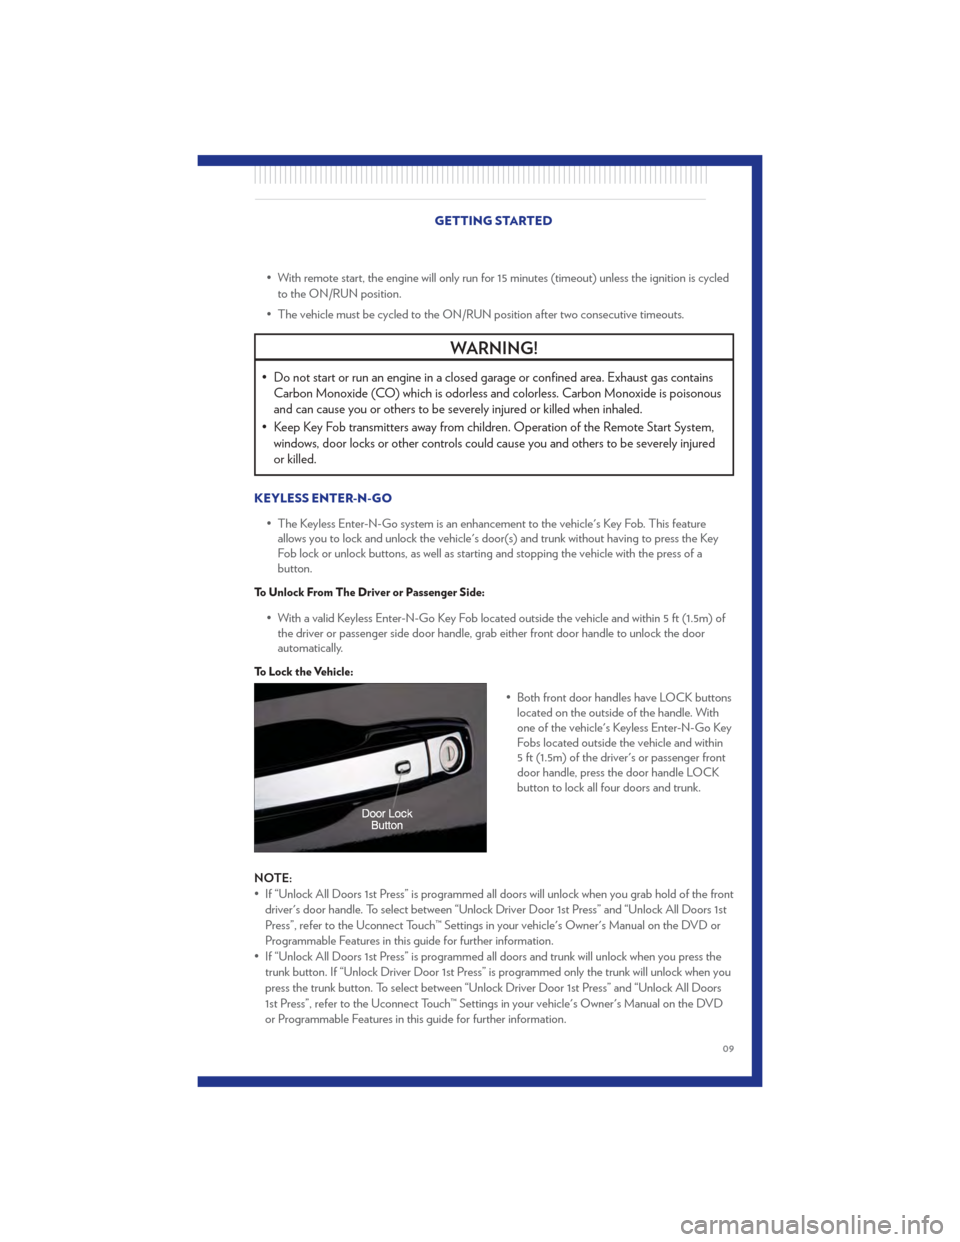
To Lock the Vehicle:
• Both front door handles have LOCK buttonslocated on the outside of the handle. With
one of the vehicle's Keyless Enter-N-Go Key
Fobs located outside the vehicle and within
5 ft (1.5m) of the driver's or passenger front
door handle, press the door handle LOCK
button to lock all four doors and trunk.
NOTE:
• If “Unlock All Doors 1st Press” is programmed all doors will unlock when you grab hold of the front driver's door handle. To select between “Unlock Driver Door 1st Press” and “Unlock All Doors 1st
Press”, refer to the Uconnect Touch™ Settings in your vehicle's Owner's Manual on the DVD or
Programmable Features in this guide for further information.
• If “Unlock All Doors 1st Press” is programmed all doors and trunk will unlock when you press the trunk button. If “Unlock Driver Door 1st Press” is programmed only the trunk will unlock when you
press the trunk button. To select between “Unlock Driver Door 1st Press” and “Unlock All Doors
1st Press”, refer to the Uconnect Touch™ Settings in your vehicle's Owner's Manual on the DVD
or Programmable Features in this guide for further information.
GETTING STARTED
09
Page 12 of 92
• If a Key Fob is detected in the vehicle when locking the vehicle using the power door lock switch,the doors and trunk will unlock and the horn will chirp three times. On the third attempt, your Key
Fob can be locked inside the vehicle.
• After pressing the Keyless Enter-N-Go LOCK button, you must wait 2 seconds before you can lock or unlock the vehicle using the door handle.
• If a Keyless Enter-N-Go door handle has not been used for 72 hours, the Keyless Enter-N-Go feature for that handle may time out. Pulling the deactivated front door handle will reactivate the
door handle's Keyless Enter-N-Go feature.
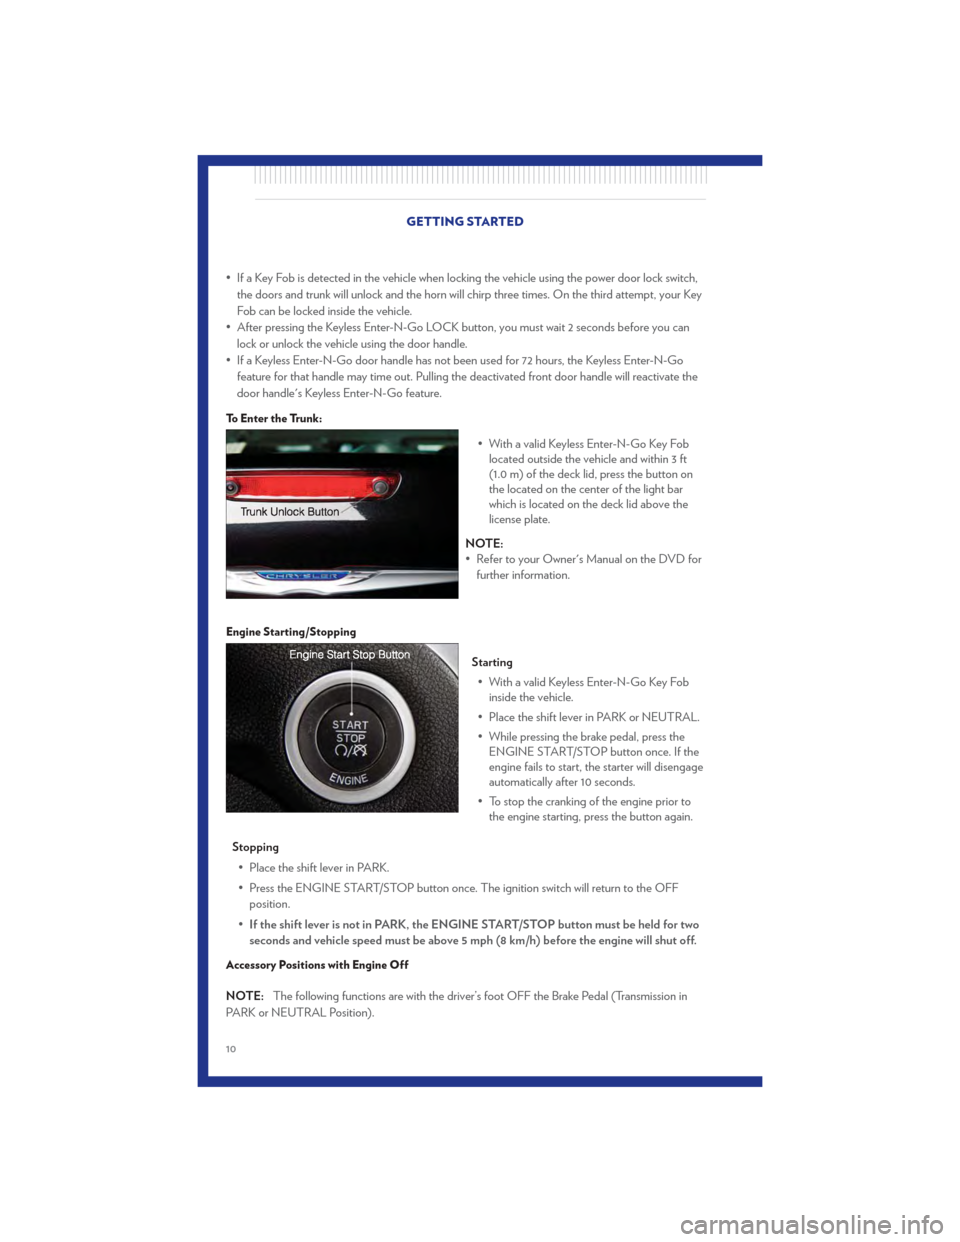
To Enter the Trunk:
• With a valid Keyless Enter-N-Go Key Foblocated outside the vehicle and within 3 ft
(1.0 m) of the deck lid, press the button on
the located on the center of the light bar
which is located on the deck lid above the
license plate.
NOTE:
• Refer to your Owner's Manual on the DVD for further information.
Engine Starting/Stopping
Starting
• With a valid Keyless Enter-N-Go Key Fob inside the vehicle.
• Place the shift lever in PARK or NEUTRAL.
• While pressing the brake pedal, press the ENGINE START/STOP button once. If the
engine fails to start, the starter will disengage
automatically after 10 seconds.
• To stop the cranking of the engine prior to the engine starting, press the button again.
Stopping • Place the shift lever in PARK.
• Press the ENGINE START/STOP button once. The ignition switch will return to the OFF position.
• If the shift lever is not in PARK, the ENGINE START/STOP button must be held for two
seconds and vehicle speed must be above 5 mph (8 km/h) before the engine will shut off.
Accessory Positions with Engine Off
NOTE: The following functions are with the driver’s foot OFF the Brake Pedal (Transmission in
PARK or NEUTRAL Position).
GETTING STARTED
10
Page 13 of 92
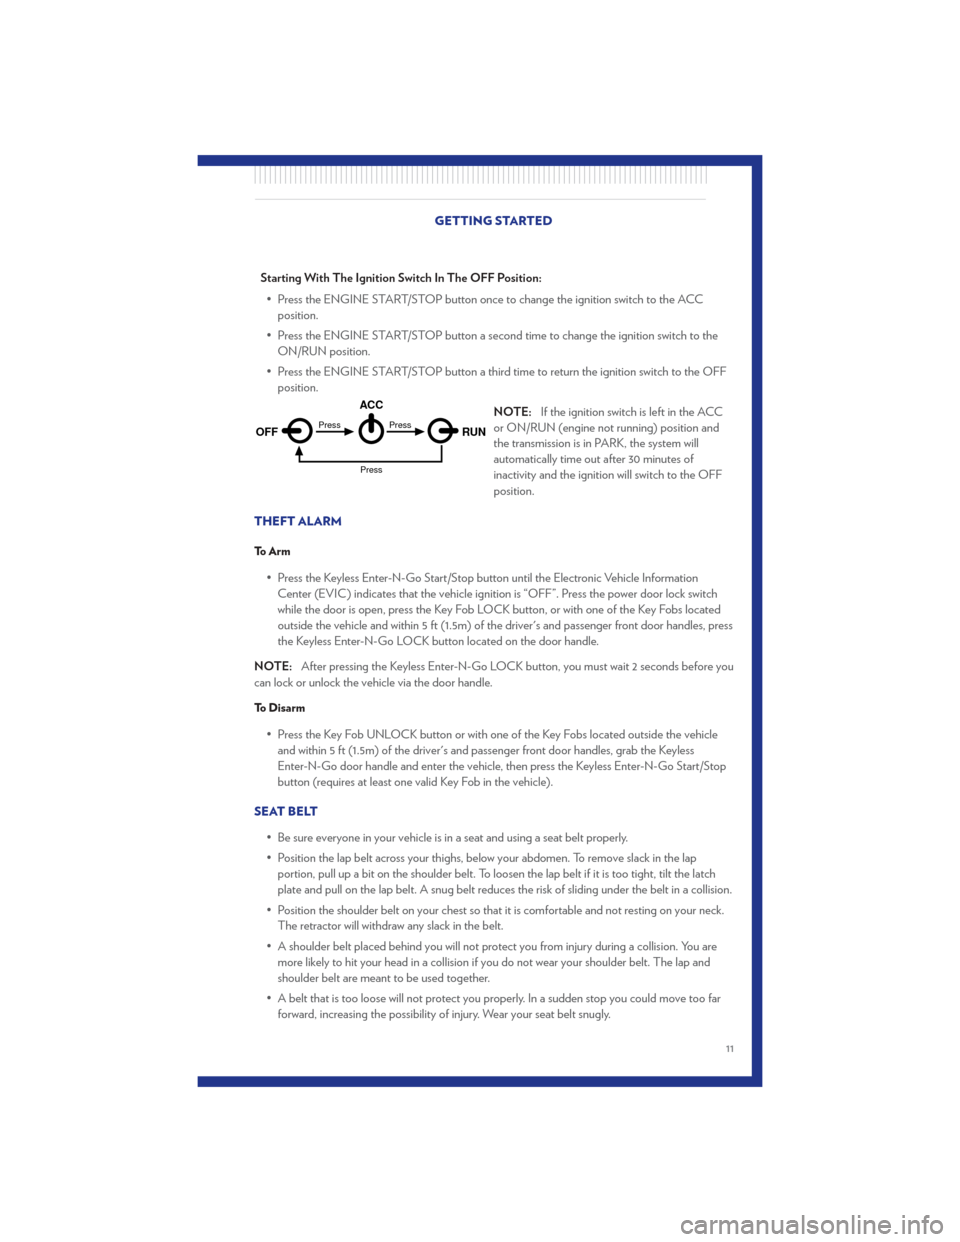
Starting With The Ignition Switch In The OFF Position:• Press the ENGINE START/STOP button once to change the ignition switch to the ACC position.
• Press the ENGINE START/STOP button a second time to change the ignition switch to the ON/RUN position.
• Press the ENGINE START/STOP button a third time to return the ignition switch to the OFF position.
NOTE:If the ignition switch is left in the ACC
or ON/RUN (engine not running) position and
the transmission is in PARK, the system will
automatically time out after 30 minutes of
inactivity and the ignition will switch to the OFF
position.
THEFT ALARM
To Arm
• Press the Keyless Enter-N-Go Start/Stop button until the Electronic Vehicle Information Center (EVIC) indicates that the vehicle ignition is “OFF”. Press the power door lock switch
while the door is open, press the Key Fob LOCK button, or with one of the Key Fobs located
outside the vehicle and within 5 ft (1.5m) of the driver's and passenger front door handles, press
the Keyless Enter-N-Go LOCK button located on the door handle.
NOTE: After pressing the Keyless Enter-N-Go LOCK button, you must wait 2 seconds before you
can lock or unlock the vehicle via the door handle.
To Disarm
• Press the Key Fob UNLOCK button or with one of the Key Fobs located outside the vehicle and within 5 ft (1.5m) of the driver's and passenger front door handles, grab the Keyless
Enter-N-Go door handle and enter the vehicle, then press the Keyless Enter-N-Go Start/Stop
button (requires at least one valid Key Fob in the vehicle).
SEAT BELT • Be sure everyone in your vehicle is in a seat and using a seat belt properly.
• Position the lap belt across your thighs, below your abdomen. To remove slack in the lapportion, pull up a bit on the shoulder belt. To loosen the lap belt if it is too tight, tilt the latch
plate and pull on the lap belt. A snug belt reduces the risk of sliding under the belt in a collision.
• Position the shoulder belt on your chest so that it is comfortable and not resting on your neck. The retractor will withdraw any slack in the belt.
• A shoulder belt placed behind you will not protect you from injury during a collision. You are more likely to hit your head in a collision if you do not wear your shoulder belt. The lap and
shoulder belt are meant to be used together.
• A belt that is too loose will not protect you properly. In a sudden stop you could move too far forward, increasing the possibility of injury. Wear your seat belt snugly.
OFF RUN
ACCPress
Press
Press
GETTING STARTED
11
Page 51 of 92
Compass Calibration
• This compass is self-calibrating, which eliminates the need to set the compass manually. Whenthe vehicle is new, the compass may appear erratic and the EVIC will display “CAL” until the
compass is calibrated.
• You may also calibrate the compass by completing one or more 360 degree turns (in an area free from large metal or metallic objects) until the “CAL” message displayed in the EVIC turns
off. The compass will now function normally.
ECO
• The ECO message will appear in your EVIC display whenever you are driving in a fuel efficientmanner.
• This feature allows you to monitor when you are driving in a fuel efficient manner, and it can be used to modify driving habits in order to increase fuel economy.
PROGRAMMABLE FEATURES
Electronic Vehicle Information Center (EVIC) – If Equipped
• The EVIC can be used to view or change the following settings. Press the UPor
DOWN
button until System Setup displays, then press the SELECTbutton. Scroll
through the settings using the UP or DOWN buttons. Press the SELECT
button to
change the setting. Press the BACK button to scroll back to a previous menu or sub menu.
• Fuel Economy: • Average Fuel Economy/Fuel Saver Mode
• Distance To Empty (DTE)
• Miles Per Gallon (MPG) • Trip Info
• Trip A
• Trip B
• Elapsed Time
• Vehicle Speed • Units
• To Reset The Display • Vehicle Info (Customer Information Features)
Uconnect Touch™ Customer Programmable Features
• The Uconnect Touch™ 8.4 system allows you to access Customer Programmable feature
settings such as Display, Clock, Safety/Assistance, Lights, Doors & Locks, Heated Seats, Engine
Off Operation, Compass Settings, Audio, Phone/ Bluetooth and SIRIUS Setup through
soft-keys.
• Touch the More soft-key to on the bottom of the screen, then touch the Settings soft-key to access the Settings screen. When making a selection, scroll up or down until the preferred
setting is highlighted, then press and release the preferred setting until a check-mark appears
next to the setting, showing that setting has been selected. The following feature settings are
available:
• Display • Clock
• Safety / Assistance • Doors & Locks
• Auto-On Comfort & Remote Start • Engine Off Options
• Compass Settings • Audio
• Phone / Bluetooth • SIRIUS Setup
ELECTRONICS
49
Page 54 of 92
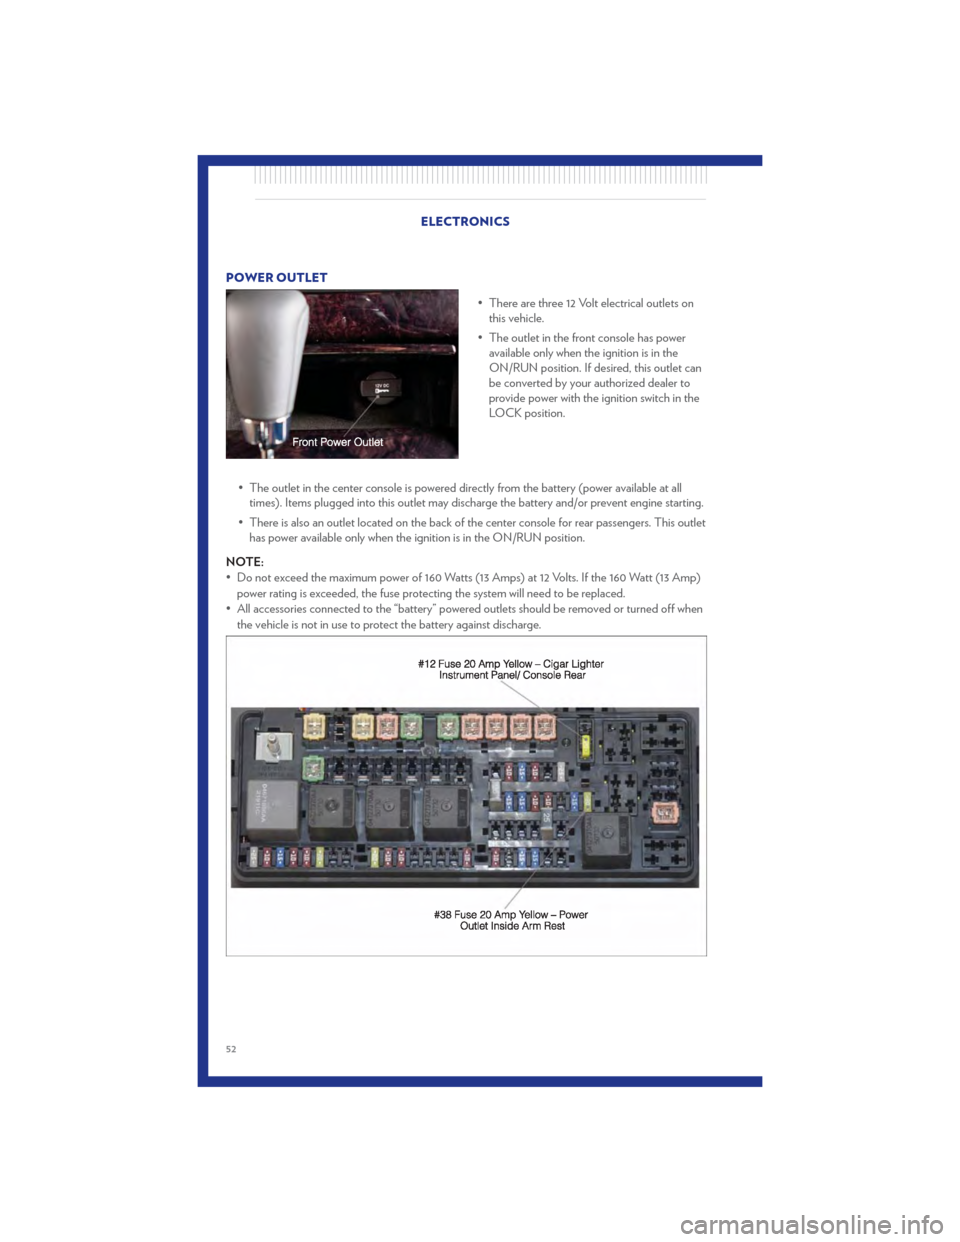
POWER OUTLET• There are three 12 Volt electrical outlets onthis vehicle.
• The outlet in the front console has power available only when the ignition is in the
ON/RUN position. If desired, this outlet can
be converted by your authorized dealer to
provide power with the ignition switch in the
LOCK position.
• The outlet in the center console is powered directly from the battery (power available at all times). Items plugged into this outlet may discharge the battery and/or prevent engine starting.
• There is also an outlet located on the back of the center console for rear passengers. This outlet has power available only when the ignition is in the ON/RUN position.
NOTE:
• Do not exceed the maximum power of 160 Watts (13 Amps) at 12 Volts. If the 160 Watt (13 Amp) power rating is exceeded, the fuse protecting the system will need to be replaced.
• All accessories connected to the “battery” powered outlets should be removed or turned off when the vehicle is not in use to protect the battery against discharge.
ELECTRONICS
52
Page 55 of 92
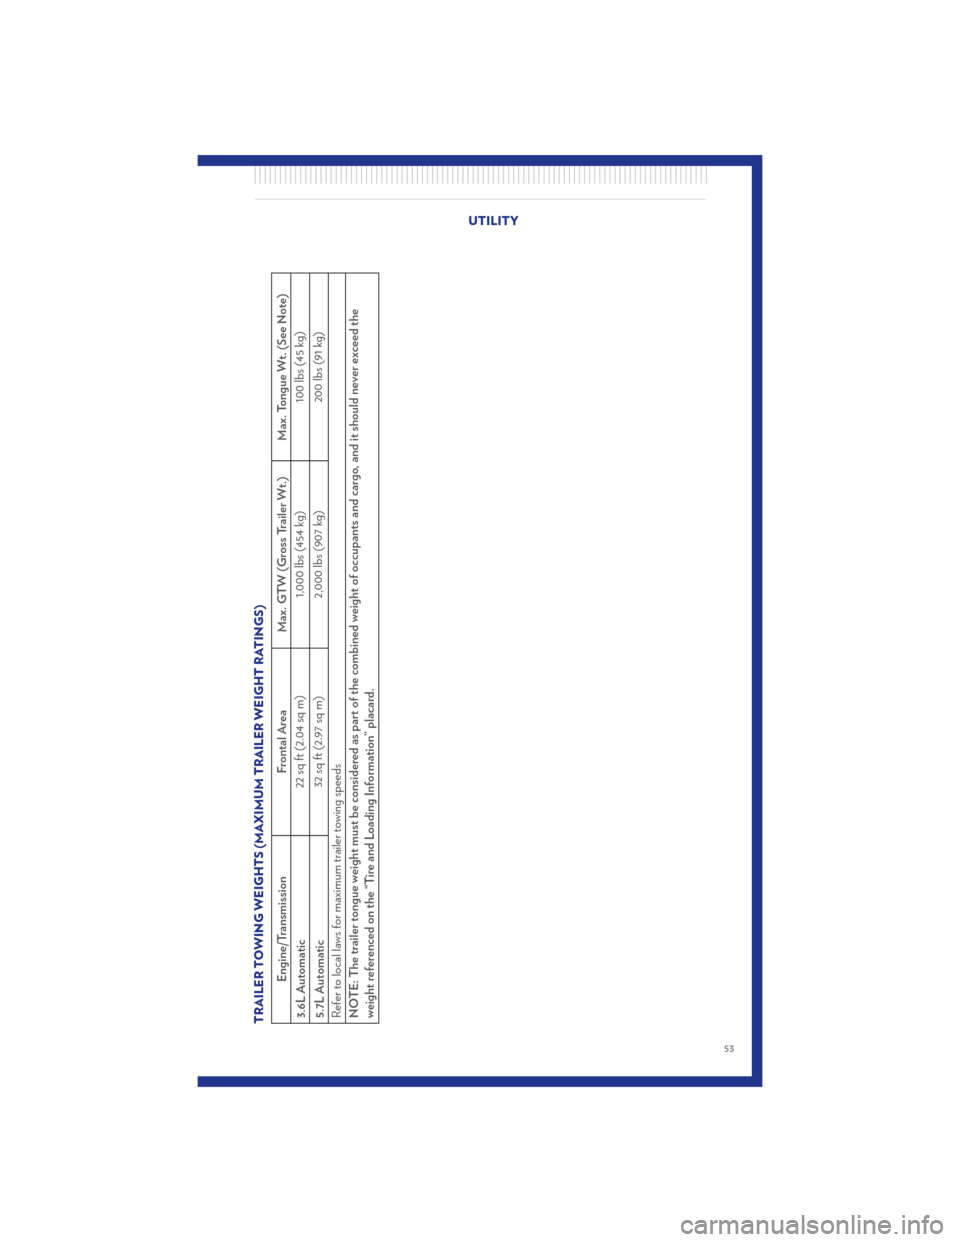
TRAILER TOWING WEIGHTS (MAXIMUM TRAILER WEIGHT RATINGS)
Engine/TransmissionFrontal AreaMax. GTW (Gross Trailer Wt.) Max. Tongue Wt. (See Note)
3.6L Automatic 22 sq ft (2.04 sq m)
1,000 lbs (454 kg) 100 lbs (45 kg)
5.7L Automatic 32 sq ft (2.97 sq m)
2,000 lbs (907 kg) 200 lbs (91 kg)
Refer to local laws for maximum trailer towing speeds
NOTE: The trailer tongue weight must be considered as part of the combined weight of occupants and cargo, and it should never exceed the
weight referenced on the “Tire and Loading Information” placard.
UTILITY
53
Page 57 of 92
24-HOUR TOWING ASSISTANCE• Dial toll-free 1-800-521-2779 or 1-800-363-4869 for Canadian residents.
• Provide your name, vehicle identification number and license plate number.
• Provide your location, including telephone number, from which you are calling.
• Briefly describe the nature of the problem and answer a few simple questions.
• You will be given the name of the service provider and an estimated time of arrival. If you feelyou are in an “unsafe situation”, please let us know. With your consent, we will contact local
police or safety authorities.
INSTRUMENT CLUSTER WARNING LIGHTS
- Electronic Stability Control (ESC) Activation/Malfunction Indicator Light
• The “ESC Activation/Malfunction Indicator Light” in the instrument cluster will come on when the ignition switch is turned to the ON/RUN position. It should go out with the engine running.
If the “ESC Activation/Malfunction Indicator Light” comes on continuously with the engine
running, a malfunction has been detected in the ESC system.
• If this light remains on after several ignition cycles, and the vehicle has been driven several miles (kilometers) at speeds greater than 30 mph (48 km/h), we recommend you drive to the nearest
service center and have the vehicle serviced immediately.
- Tire Pressure Monitoring System (TPMS) Light
• Each tire, including the spare (if provided), should be checked monthly, when cold and inflatedto the inflation pressure recommended by the vehicle manufacturer on the vehicle placard or
tire inflation pressure label. (If your vehicle has tires of a different size than the size indicated on
the vehicle placard or tire inflation pressure label, you should determine the proper tire inflation
pressure for those tires.)
• As an added safety feature, your vehicle has been equipped with a Tire Pressure Monitoring System (TPMS) that illuminates a low tire pressure telltale when one or more of your tires is
significantly under-inflated. Accordingly, when the low tire pressure telltale illuminates, you
should stop and check your tires as soon as possible, and inflate them to the proper pressure.
Driving on a significantly under-inflated tire causes the tire to overheat and can lead to tire
failure. Under-inflation also reduces fuel efficiency and tire tread life, and may affect the
vehicle’s handling and stopping ability.
• IF THE LIGHT STARTS FLASHING INDICATING A LOW TIRE PRESSURE, ADJUST
THE AIR PRESSURE IN THE LOW TIRE TO THE AIR PRESSURE SHOWN ON THE
VEHICLE PLACARD OR TIRE INFLATION PRESSURE LABEL LOCATED ON THE
DRIVER'S DOOR. NOTE: AFTER INFLATION, THE VEHICLE MAY NEED TO BE
DRIVEN FOR 20 MINUTES BEFORE THE FLASHING LIGHT WILL TURN OFF.
• Please note that the TPMS is not a substitute for proper tire maintenance, and it is the driver’s responsibility to maintain correct tire pressure, even if under-inflation has not reached the level
to trigger illumination of the TPMS low tire pressure telltale. WHAT TO DO IN EMERGENCIES
55