ignition CHRYSLER 300 2011 2.G User Guide
[x] Cancel search | Manufacturer: CHRYSLER, Model Year: 2011, Model line: 300, Model: CHRYSLER 300 2011 2.GPages: 92, PDF Size: 3.35 MB
Page 10 of 92
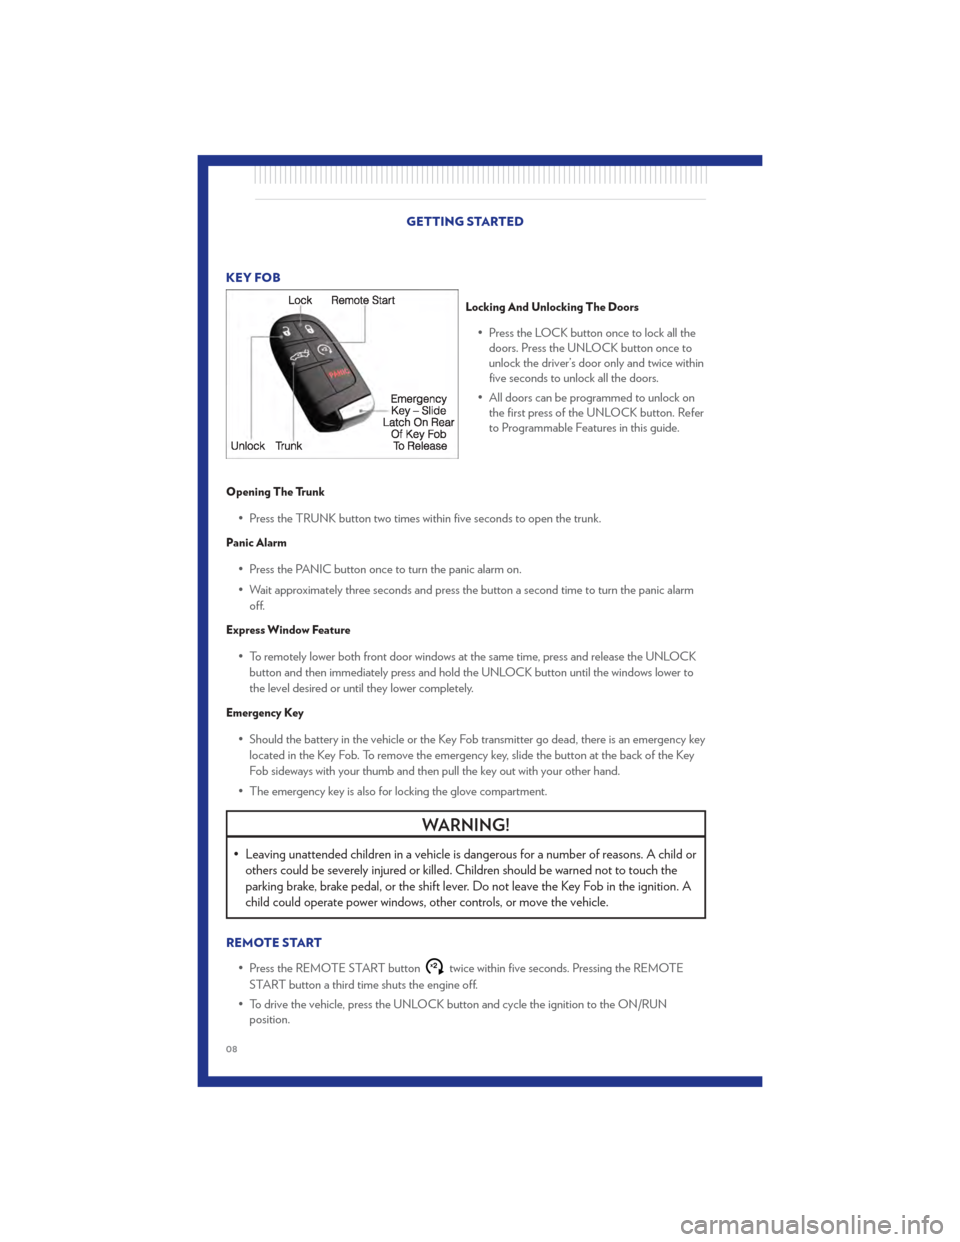
KEY FOB
Locking And Unlocking The Doors
• Press the LOCK button once to lock all thedoors. Press the UNLOCK button once to
unlock the driver’s door only and twice within
five seconds to unlock all the doors.
• All doors can be programmed to unlock on the first press of the UNLOCK button. Refer
to Programmable Features in this guide.
Opening The Trunk
• Press the TRUNK button two times within five seconds to open the trunk.
Panic Alarm
• Press the PANIC button once to turn the panic alarm on.
• Wait approximately three seconds and press the button a second time to turn the panic alarm
off.
Express Window Feature
• To remotely lower both front door windows at the same time, press and release the UNLOCKbutton and then immediately press and hold the UNLOCK button until the windows lower to
the level desired or until they lower completely.
Emergency Key
• Should the battery in the vehicle or the Key Fob transmitter go dead, there is an emergency keylocated in the Key Fob. To remove the emergency key, slide the button at the back of the Key
Fob sideways with your thumb and then pull the key out with your other hand.
• The emergency key is also for locking the glove compartment.
WARNING!
• Leaving unattended children in a vehicle is dangerous for a number of reasons. A child or others could be severely injured or killed. Children should be warned not to touch the
parking brake, brake pedal, or the shift lever. Do not leave the Key Fob in the ignition. A
child could operate power windows, other controls, or move the vehicle.
REMOTE START
• Press the REMOTE START button
x2twice within five seconds. Pressing the REMOTE
START button a third time shuts the engine off.
• To drive the vehicle, press the UNLOCK button and cycle the ignition to the ON/RUN position.
GETTING STARTED
08
Page 11 of 92
• With remote start, the engine will only run for 15 minutes (timeout) unless the ignition is cycledto the ON/RUN position.
• The vehicle must be cycled to the ON/RUN position after two consecutive timeouts.
WARNING!
• Do not start or run an engine in a closed garage or confined area. Exhaust gas contains Carbon Monoxide (CO) which is odorless and colorless. Carbon Monoxide is poisonous
and can cause you or others to be severely injured or killed when inhaled.
• Keep Key Fob transmitters away from children. Operation of the Remote Start System, windows, door locks or other controls could cause you and others to be severely injured
or killed.
KEYLESS ENTER-N-GO
• The Keyless Enter-N-Go system is an enhancement to the vehicle's Key Fob. This featureallows you to lock and unlock the vehicle's door(s) and trunk without having to press the Key
Fob lock or unlock buttons, as well as starting and stopping the vehicle with the press of a
button.
To Unlock From The Driver or Passenger Side:
• With a valid Keyless Enter-N-Go Key Fob located outside the vehicle and within 5 ft (1.5m) ofthe driver or passenger side door handle, grab either front door handle to unlock the door
automatically.
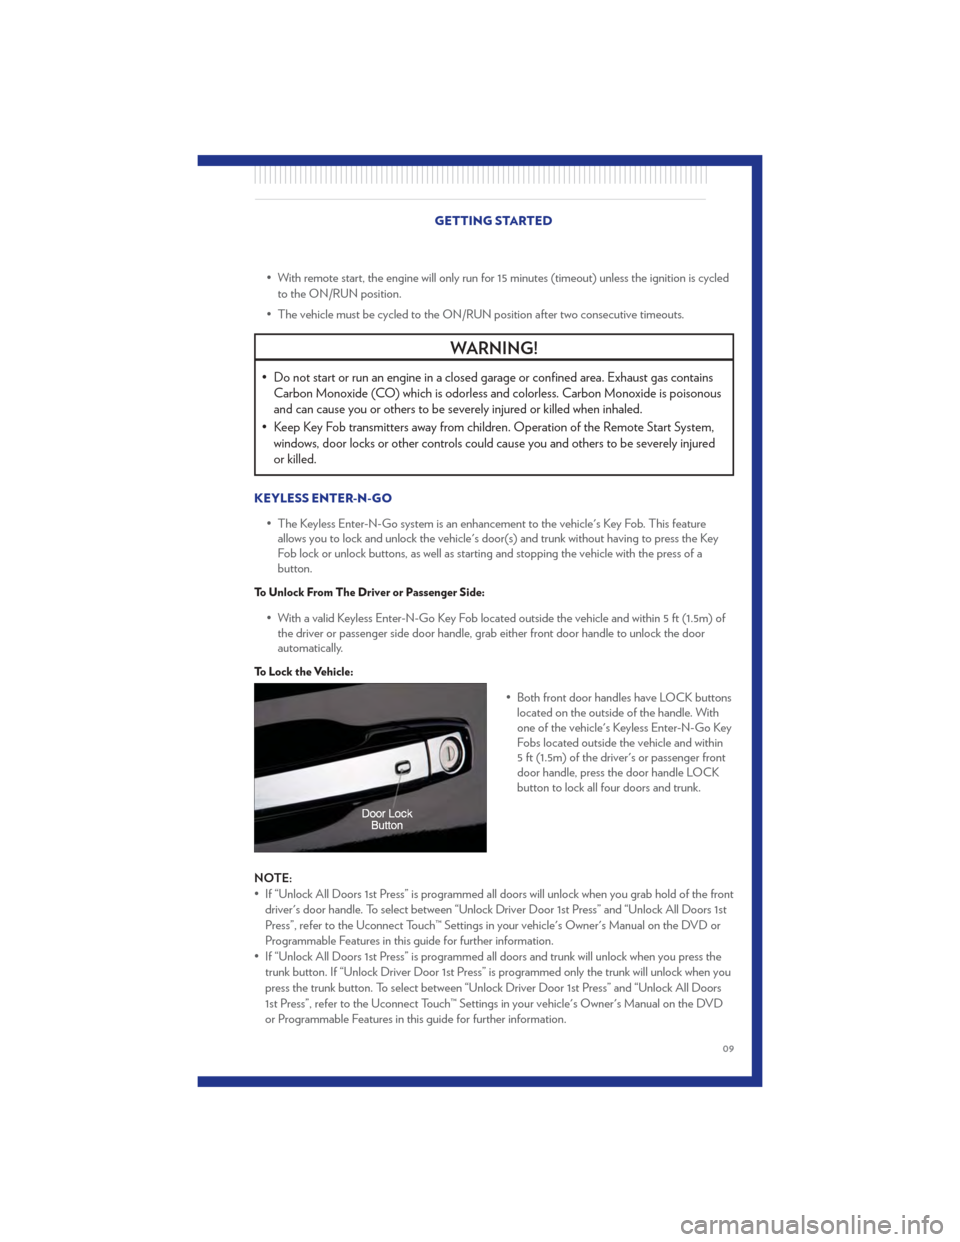
To Lock the Vehicle:
• Both front door handles have LOCK buttonslocated on the outside of the handle. With
one of the vehicle's Keyless Enter-N-Go Key
Fobs located outside the vehicle and within
5 ft (1.5m) of the driver's or passenger front
door handle, press the door handle LOCK
button to lock all four doors and trunk.
NOTE:
• If “Unlock All Doors 1st Press” is programmed all doors will unlock when you grab hold of the front driver's door handle. To select between “Unlock Driver Door 1st Press” and “Unlock All Doors 1st
Press”, refer to the Uconnect Touch™ Settings in your vehicle's Owner's Manual on the DVD or
Programmable Features in this guide for further information.
• If “Unlock All Doors 1st Press” is programmed all doors and trunk will unlock when you press the trunk button. If “Unlock Driver Door 1st Press” is programmed only the trunk will unlock when you
press the trunk button. To select between “Unlock Driver Door 1st Press” and “Unlock All Doors
1st Press”, refer to the Uconnect Touch™ Settings in your vehicle's Owner's Manual on the DVD
or Programmable Features in this guide for further information.
GETTING STARTED
09
Page 12 of 92
• If a Key Fob is detected in the vehicle when locking the vehicle using the power door lock switch,the doors and trunk will unlock and the horn will chirp three times. On the third attempt, your Key
Fob can be locked inside the vehicle.
• After pressing the Keyless Enter-N-Go LOCK button, you must wait 2 seconds before you can lock or unlock the vehicle using the door handle.
• If a Keyless Enter-N-Go door handle has not been used for 72 hours, the Keyless Enter-N-Go feature for that handle may time out. Pulling the deactivated front door handle will reactivate the
door handle's Keyless Enter-N-Go feature.
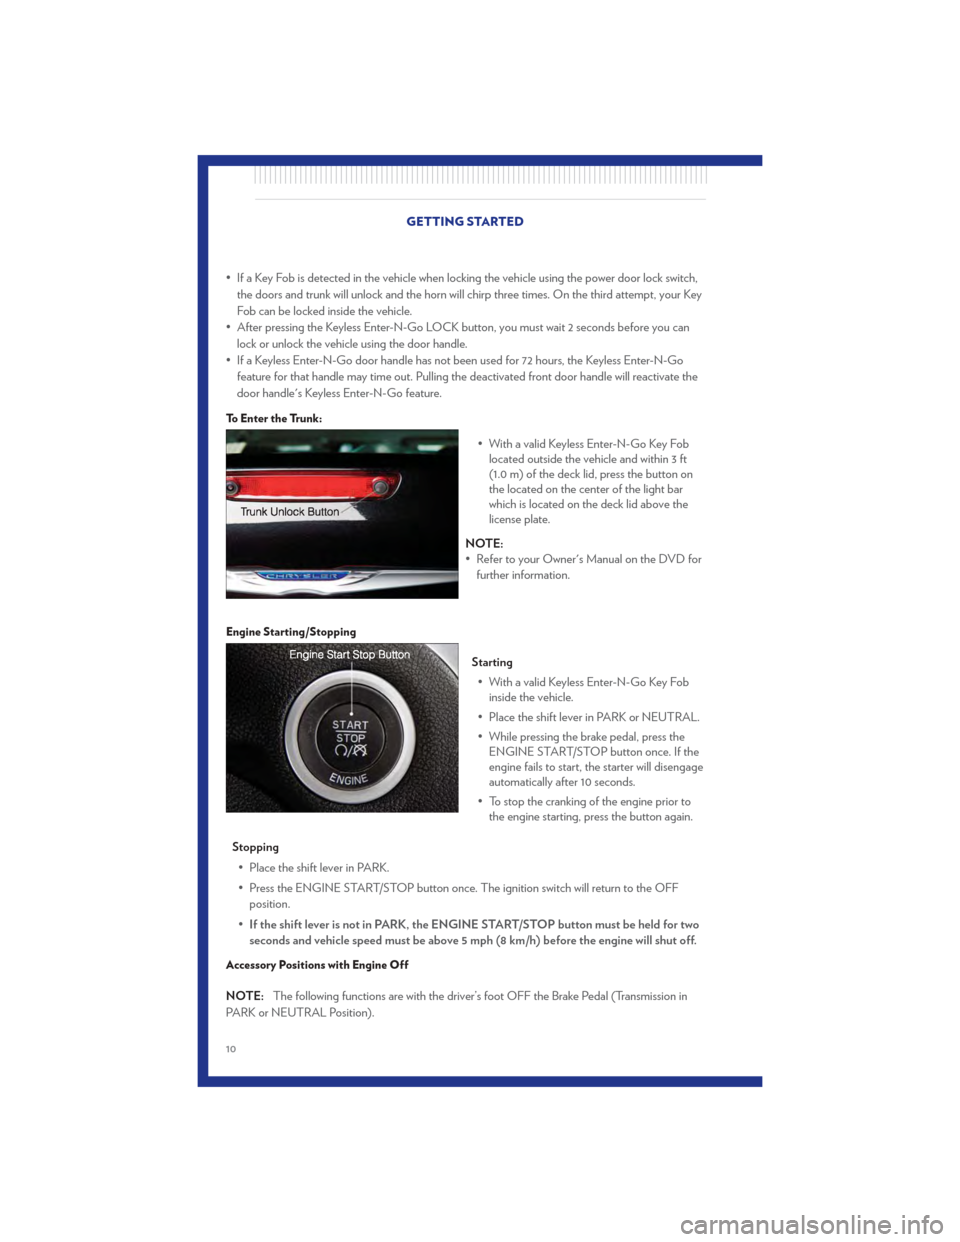
To Enter the Trunk:
• With a valid Keyless Enter-N-Go Key Foblocated outside the vehicle and within 3 ft
(1.0 m) of the deck lid, press the button on
the located on the center of the light bar
which is located on the deck lid above the
license plate.
NOTE:
• Refer to your Owner's Manual on the DVD for further information.
Engine Starting/Stopping
Starting
• With a valid Keyless Enter-N-Go Key Fob inside the vehicle.
• Place the shift lever in PARK or NEUTRAL.
• While pressing the brake pedal, press the ENGINE START/STOP button once. If the
engine fails to start, the starter will disengage
automatically after 10 seconds.
• To stop the cranking of the engine prior to the engine starting, press the button again.
Stopping • Place the shift lever in PARK.
• Press the ENGINE START/STOP button once. The ignition switch will return to the OFF position.
• If the shift lever is not in PARK, the ENGINE START/STOP button must be held for two
seconds and vehicle speed must be above 5 mph (8 km/h) before the engine will shut off.
Accessory Positions with Engine Off
NOTE: The following functions are with the driver’s foot OFF the Brake Pedal (Transmission in
PARK or NEUTRAL Position).
GETTING STARTED
10
Page 13 of 92
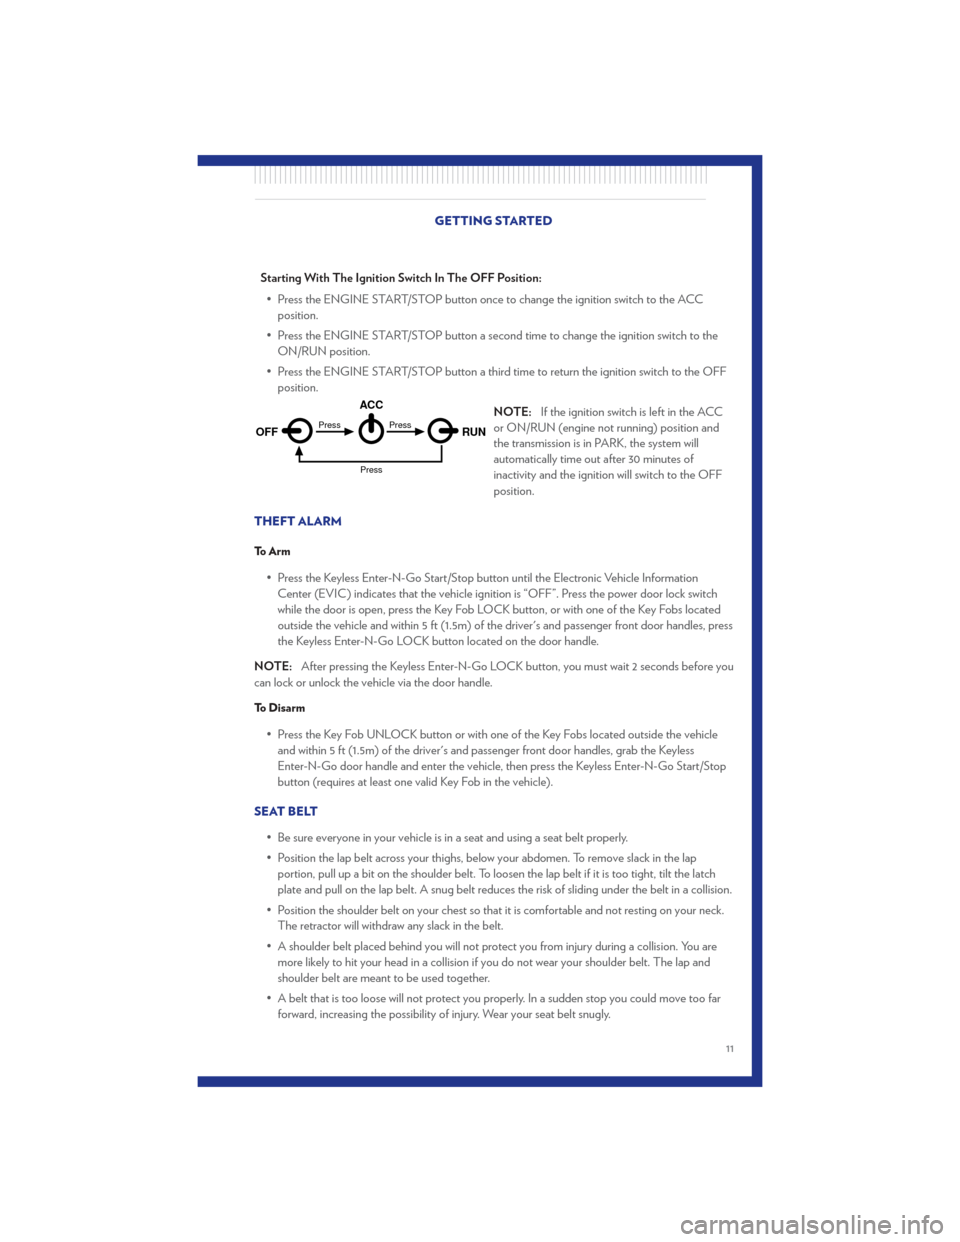
Starting With The Ignition Switch In The OFF Position:• Press the ENGINE START/STOP button once to change the ignition switch to the ACC position.
• Press the ENGINE START/STOP button a second time to change the ignition switch to the ON/RUN position.
• Press the ENGINE START/STOP button a third time to return the ignition switch to the OFF position.
NOTE:If the ignition switch is left in the ACC
or ON/RUN (engine not running) position and
the transmission is in PARK, the system will
automatically time out after 30 minutes of
inactivity and the ignition will switch to the OFF
position.
THEFT ALARM
To Arm
• Press the Keyless Enter-N-Go Start/Stop button until the Electronic Vehicle Information Center (EVIC) indicates that the vehicle ignition is “OFF”. Press the power door lock switch
while the door is open, press the Key Fob LOCK button, or with one of the Key Fobs located
outside the vehicle and within 5 ft (1.5m) of the driver's and passenger front door handles, press
the Keyless Enter-N-Go LOCK button located on the door handle.
NOTE: After pressing the Keyless Enter-N-Go LOCK button, you must wait 2 seconds before you
can lock or unlock the vehicle via the door handle.
To Disarm
• Press the Key Fob UNLOCK button or with one of the Key Fobs located outside the vehicle and within 5 ft (1.5m) of the driver's and passenger front door handles, grab the Keyless
Enter-N-Go door handle and enter the vehicle, then press the Keyless Enter-N-Go Start/Stop
button (requires at least one valid Key Fob in the vehicle).
SEAT BELT • Be sure everyone in your vehicle is in a seat and using a seat belt properly.
• Position the lap belt across your thighs, below your abdomen. To remove slack in the lapportion, pull up a bit on the shoulder belt. To loosen the lap belt if it is too tight, tilt the latch
plate and pull on the lap belt. A snug belt reduces the risk of sliding under the belt in a collision.
• Position the shoulder belt on your chest so that it is comfortable and not resting on your neck. The retractor will withdraw any slack in the belt.
• A shoulder belt placed behind you will not protect you from injury during a collision. You are more likely to hit your head in a collision if you do not wear your shoulder belt. The lap and
shoulder belt are meant to be used together.
• A belt that is too loose will not protect you properly. In a sudden stop you could move too far forward, increasing the possibility of injury. Wear your seat belt snugly.
OFF RUN
ACCPress
Press
Press
GETTING STARTED
11
Page 18 of 92
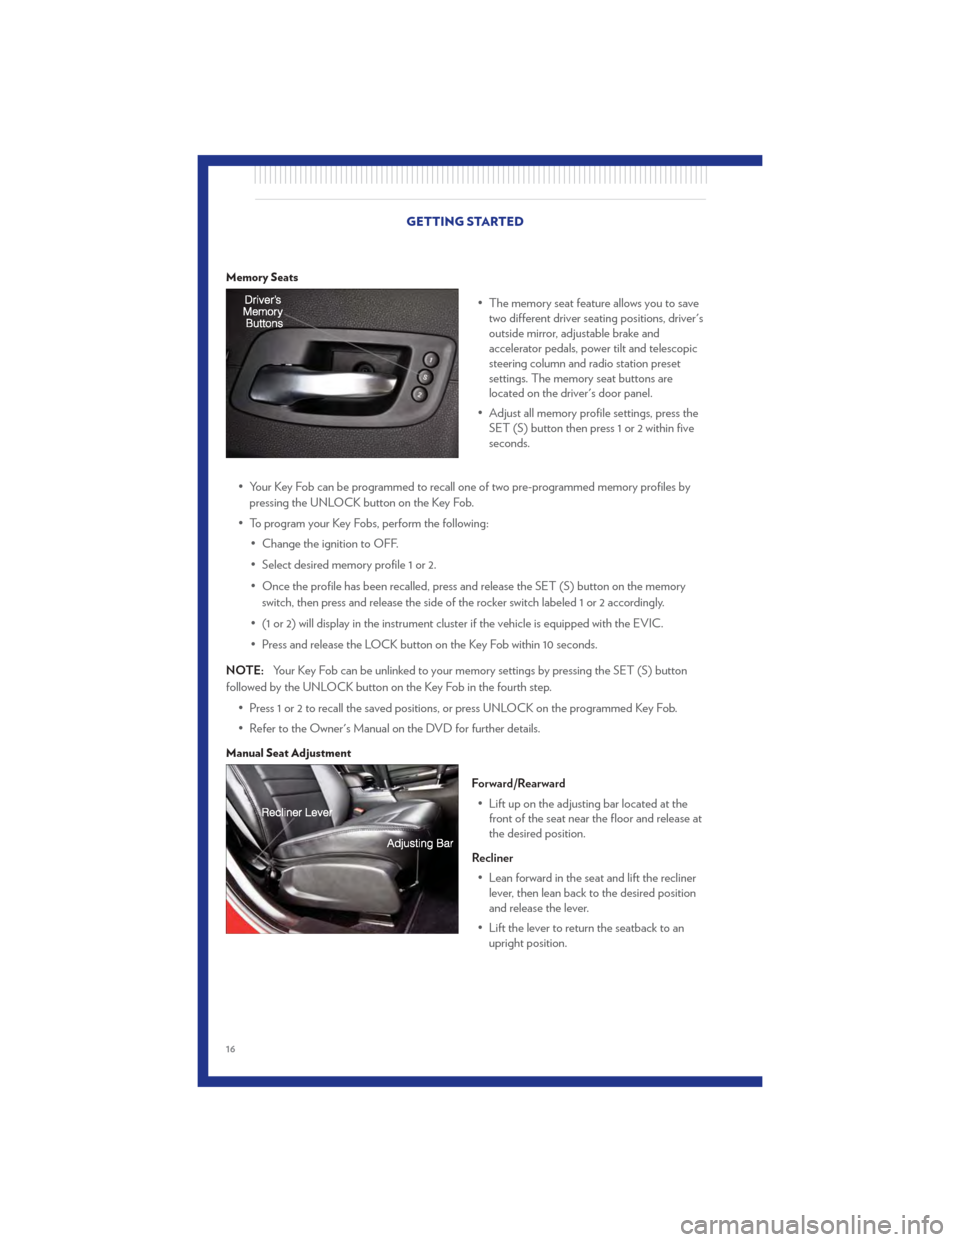
Memory Seats
• The memory seat feature allows you to savetwo different driver seating positions, driver's
outside mirror, adjustable brake and
accelerator pedals, power tilt and telescopic
steering column and radio station preset
settings. The memory seat buttons are
located on the driver's door panel.
• Adjust all memory profile settings, press the SET (S) button then press 1 or 2 within five
seconds.
• Your Key Fob can be programmed to recall one of two pre-programmed memory profiles by pressing the UNLOCK button on the Key Fob.
• To program your Key Fobs, perform the following: • Change the ignition to OFF.
• Select desired memory profile 1 or 2.
• Once the profile has been recalled, press and release the SET (S) button on the memoryswitch, then press and release the side of the rocker switch labeled 1 or 2 accordingly.
• (1 or 2) will display in the instrument cluster if the vehicle is equipped with the EVIC.
• Press and release the LOCK button on the Key Fob within 10 seconds.
NOTE: Your Key Fob can be unlinked to your memory settings by pressing the SET (S) button
followed by the UNLOCK button on the Key Fob in the fourth step.
• Press 1 or 2 to recall the saved positions, or press UNLOCK on the programmed Key Fob.
• Refer to the Owner's Manual on the DVD for further details.
Manual Seat Adjustment
Forward/Rearward• Lift up on the adjusting bar located at the front of the seat near the floor and release at
the desired position.
Recliner • Lean forward in the seat and lift the recliner lever, then lean back to the desired position
and release the lever.
• Lift the lever to return the seatback to an upright position.
GETTING STARTED
16
Page 30 of 92
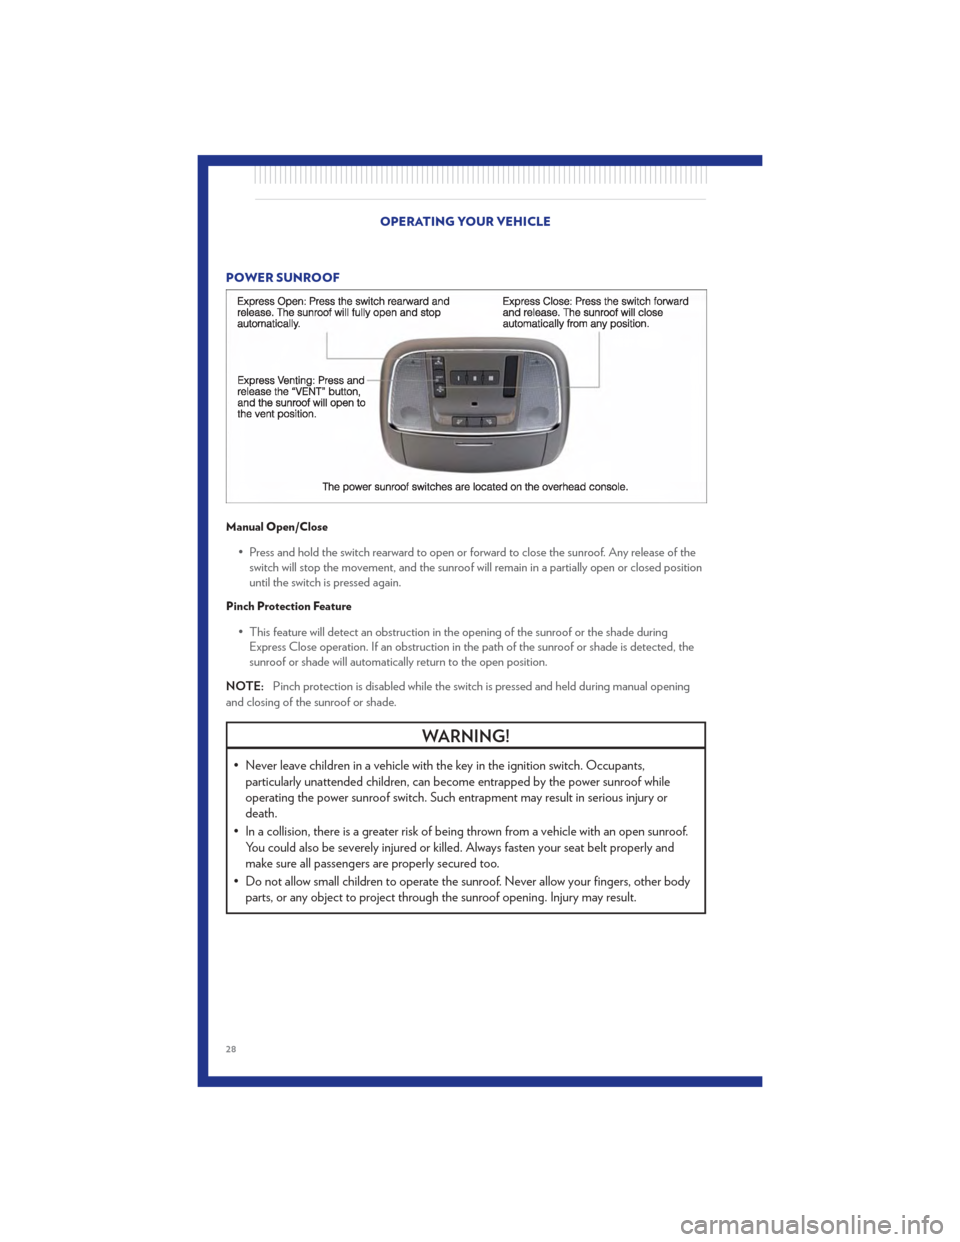
POWER SUNROOF
Manual Open/Close
• Press and hold the switch rearward to open or forward to close the sunroof. Any release of theswitch will stop the movement, and the sunroof will remain in a partially open or closed position
until the switch is pressed again.
Pinch Protection Feature
• This feature will detect an obstruction in the opening of the sunroof or the shade duringExpress Close operation. If an obstruction in the path of the sunroof or shade is detected, the
sunroof or shade will automatically return to the open position.
NOTE: Pinch protection is disabled while the switch is pressed and held during manual opening
and closing of the sunroof or shade.
WARNING!
• Never leave children in a vehicle with the key in the ignition switch. Occupants, particularly unattended children, can become entrapped by the power sunroof while
operating the power sunroof switch. Such entrapment may result in serious injury or
death.
• In a collision, there is a greater risk of being thrown from a vehicle with an open sunroof. You could also be severely injured or killed. Always fasten your seat belt properly and
make sure all passengers are properly secured too.
• Do not allow small children to operate the sunroof. Never allow your fingers, other body parts, or any object to project through the sunroof opening. Injury may result.
OPERATING YOUR VEHICLE
28
Page 52 of 92
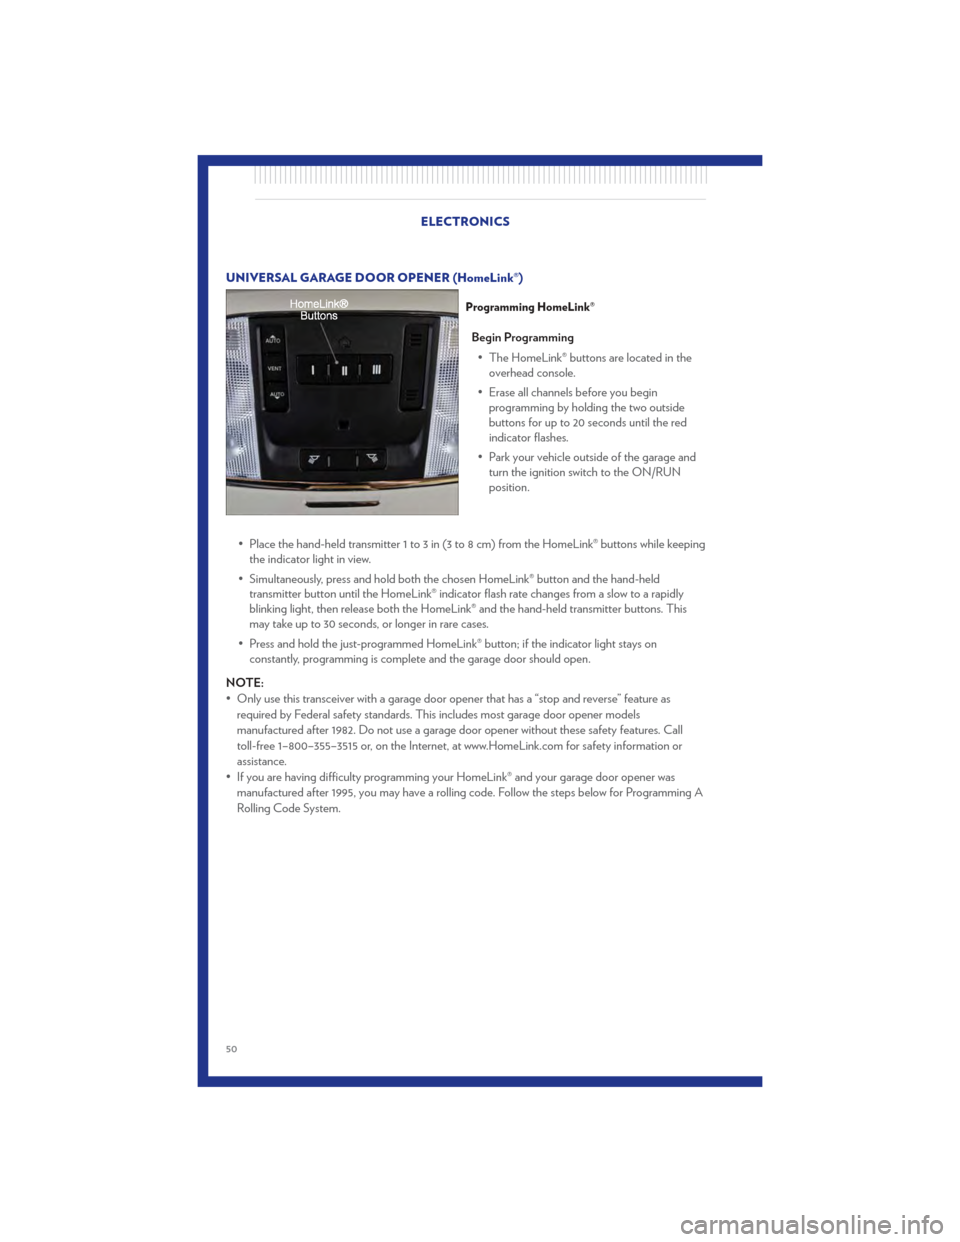
UNIVERSAL GARAGE DOOR OPENER (HomeLink®)
Programming HomeLink®
Begin Programming• The HomeLink® buttons are located in the overhead console.
• Erase all channels before you begin programming by holding the two outside
buttons for up to 20 seconds until the red
indicator flashes.
• Park your vehicle outside of the garage and turn the ignition switch to the ON/RUN
position.
• Place the hand-held transmitter 1 to 3 in (3 to 8 cm) from the HomeLink® buttons while keeping the indicator light in view.
• Simultaneously, press and hold both the chosen HomeLink® button and the hand-held transmitter button until the HomeLink® indicator flash rate changes from a slow to a rapidly
blinking light, then release both the HomeLink® and the hand-held transmitter buttons. This
may take up to 30 seconds, or longer in rare cases.
• Press and hold the just-programmed HomeLink® button; if the indicator light stays on constantly, programming is complete and the garage door should open.
NOTE:
• Only use this transceiver with a garage door opener that has a “stop and reverse” feature as required by Federal safety standards. This includes most garage door opener models
manufactured after 1982. Do not use a garage door opener without these safety features. Call
toll-free 1–800–355–3515 or, on the Internet, at www.HomeLink.com for safety information or
assistance.
• If you are having difficulty programming your HomeLink® and your garage door opener was manufactured after 1995, you may have a rolling code. Follow the steps below for Programming A
Rolling Code System.
ELECTRONICS
50
Page 54 of 92
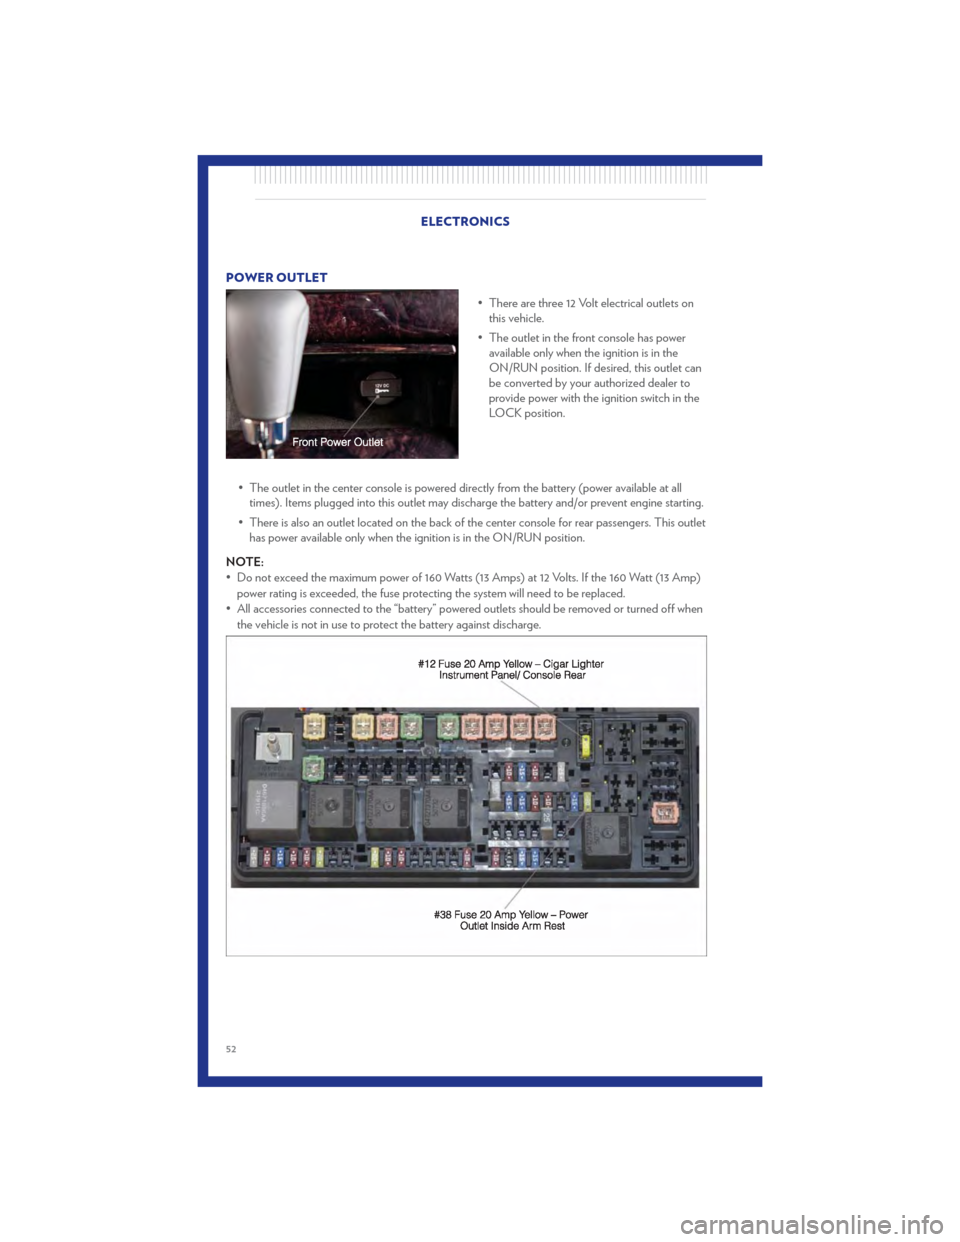
POWER OUTLET• There are three 12 Volt electrical outlets onthis vehicle.
• The outlet in the front console has power available only when the ignition is in the
ON/RUN position. If desired, this outlet can
be converted by your authorized dealer to
provide power with the ignition switch in the
LOCK position.
• The outlet in the center console is powered directly from the battery (power available at all times). Items plugged into this outlet may discharge the battery and/or prevent engine starting.
• There is also an outlet located on the back of the center console for rear passengers. This outlet has power available only when the ignition is in the ON/RUN position.
NOTE:
• Do not exceed the maximum power of 160 Watts (13 Amps) at 12 Volts. If the 160 Watt (13 Amp) power rating is exceeded, the fuse protecting the system will need to be replaced.
• All accessories connected to the “battery” powered outlets should be removed or turned off when the vehicle is not in use to protect the battery against discharge.
ELECTRONICS
52
Page 57 of 92
24-HOUR TOWING ASSISTANCE• Dial toll-free 1-800-521-2779 or 1-800-363-4869 for Canadian residents.
• Provide your name, vehicle identification number and license plate number.
• Provide your location, including telephone number, from which you are calling.
• Briefly describe the nature of the problem and answer a few simple questions.
• You will be given the name of the service provider and an estimated time of arrival. If you feelyou are in an “unsafe situation”, please let us know. With your consent, we will contact local
police or safety authorities.
INSTRUMENT CLUSTER WARNING LIGHTS
- Electronic Stability Control (ESC) Activation/Malfunction Indicator Light
• The “ESC Activation/Malfunction Indicator Light” in the instrument cluster will come on when the ignition switch is turned to the ON/RUN position. It should go out with the engine running.
If the “ESC Activation/Malfunction Indicator Light” comes on continuously with the engine
running, a malfunction has been detected in the ESC system.
• If this light remains on after several ignition cycles, and the vehicle has been driven several miles (kilometers) at speeds greater than 30 mph (48 km/h), we recommend you drive to the nearest
service center and have the vehicle serviced immediately.
- Tire Pressure Monitoring System (TPMS) Light
• Each tire, including the spare (if provided), should be checked monthly, when cold and inflatedto the inflation pressure recommended by the vehicle manufacturer on the vehicle placard or
tire inflation pressure label. (If your vehicle has tires of a different size than the size indicated on
the vehicle placard or tire inflation pressure label, you should determine the proper tire inflation
pressure for those tires.)
• As an added safety feature, your vehicle has been equipped with a Tire Pressure Monitoring System (TPMS) that illuminates a low tire pressure telltale when one or more of your tires is
significantly under-inflated. Accordingly, when the low tire pressure telltale illuminates, you
should stop and check your tires as soon as possible, and inflate them to the proper pressure.
Driving on a significantly under-inflated tire causes the tire to overheat and can lead to tire
failure. Under-inflation also reduces fuel efficiency and tire tread life, and may affect the
vehicle’s handling and stopping ability.
• IF THE LIGHT STARTS FLASHING INDICATING A LOW TIRE PRESSURE, ADJUST
THE AIR PRESSURE IN THE LOW TIRE TO THE AIR PRESSURE SHOWN ON THE
VEHICLE PLACARD OR TIRE INFLATION PRESSURE LABEL LOCATED ON THE
DRIVER'S DOOR. NOTE: AFTER INFLATION, THE VEHICLE MAY NEED TO BE
DRIVEN FOR 20 MINUTES BEFORE THE FLASHING LIGHT WILL TURN OFF.
• Please note that the TPMS is not a substitute for proper tire maintenance, and it is the driver’s responsibility to maintain correct tire pressure, even if under-inflation has not reached the level
to trigger illumination of the TPMS low tire pressure telltale. WHAT TO DO IN EMERGENCIES
55
Page 60 of 92
- Electronic Throttle Control (ETC) Light
• This light informs you of a problem with the Electronic Throttle Control (ETC) system.
• If a problem is detected, the light will come on while the engine is running. Cycle the ignitionwhen the vehicle has completely stopped and the shift lever is placed in the PARK position; the
light should turn off.
• If the light remains lit with the engine running, your vehicle will usually be drivable; however, see an authorized service center immediately. If the light is flashing when the engine is running,
immediate service is required and you may experience reduced performance, an
elevated/rough idle or engine stall and your vehicle may require towing.
- Airbag Warning Light
• If the light is not on during starting, stays on, or turns on while driving, have the vehicle servicedby an authorized service center immediately.
SERVICE AWD SYSTEM Message
• If the SERVICE AWD SYSTEM warning message appears after engine start up, or duringdriving, it means the AWD system is not functioning properly. We recommend you do not
operate the vehicle. Have the vehicle serviced immediately.
Oil Change Indicator
Message
• If an “oil change” message (shown as Oil Change Required) appears and a single chime sounds, it is time for your next required oil change.
Resetting The Light After Servicing
• Without pressing the brake pedal, push the ENGINE START/STOP button and cycle the ignition to the ON/RUN position (Do not start the engine.)
• Fully depress the accelerator pedal three times within 10 seconds.
• Without pressing the brake pedal, push the ENGINE START/STOP button once to return the ignition to the OFF/LOCK position. WHAT TO DO IN EMERGENCIES
58