sensor CHRYSLER 300 2011 2.G User Guide
[x] Cancel search | Manufacturer: CHRYSLER, Model Year: 2011, Model line: 300, Model: CHRYSLER 300 2011 2.GPages: 92, PDF Size: 3.35 MB
Page 25 of 92

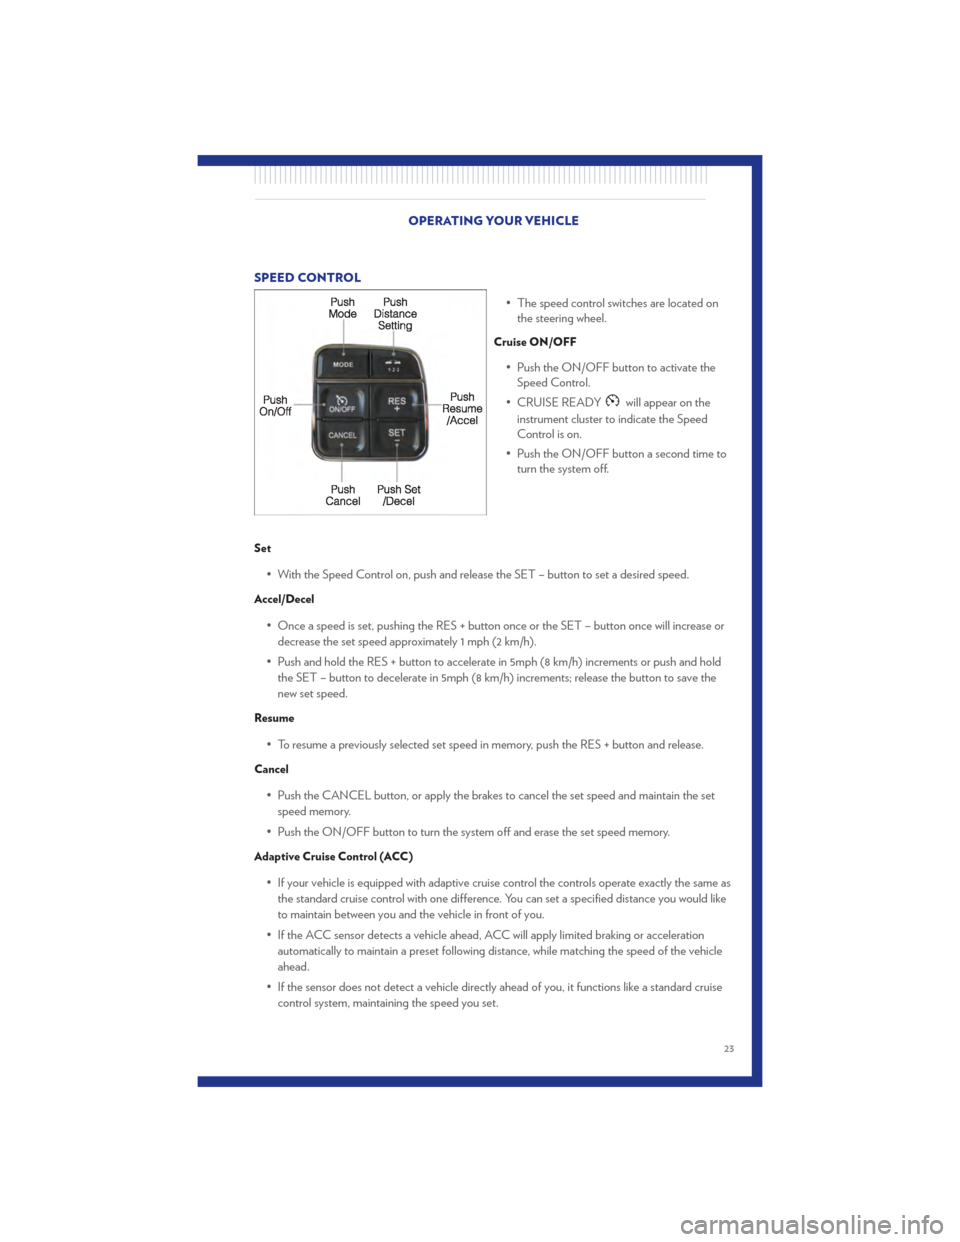
SPEED CONTROL• The speed control switches are located onthe steering wheel.
Cruise ON/OFF
• Push the ON/OFF button to activate theSpeed Control.
• CRUISE READY
will appear on the
instrument cluster to indicate the Speed
Control is on.
• Push the ON/OFF button a second time to turn the system off.
Set
• With the Speed Control on, push and release the SET – button to set a desired speed.
Accel/Decel
• Once a speed is set, pushing the RES + button once or the SET – button once will increase or
decrease the set speed approximately 1 mph (2 km/h).
• Push and hold the RES + button to accelerate in 5mph (8 km/h) increments or push and hold the SET – button to decelerate in 5mph (8 km/h) increments; release the button to save the
new set speed.
Resume
• To resume a previously selected set speed in memory, push the RES + button and release.
Cancel
• Push the CANCEL button, or apply the brakes to cancel the set speed and maintain the setspeed memory.
• Push the ON/OFF button to turn the system off and erase the set speed memory.
Adaptive Cruise Control (ACC)
• If your vehicle is equipped with adaptive cruise control the controls operate exactly the same as the standard cruise control with one difference. You can set a specified distance you would like
to maintain between you and the vehicle in front of you.
• If the ACC sensor detects a vehicle ahead, ACC will apply limited braking or acceleration automatically to maintain a preset following distance, while matching the speed of the vehicle
ahead.
• If the sensor does not detect a vehicle directly ahead of you, it functions like a standard cruise control system, maintaining the speed you set.
OPERATING YOUR VEHICLE
23
Page 58 of 92

• Your vehicle has also been equipped with a TPMS malfunction indicator to indicate when thesystem is not operating properly. The TPMS malfunction indicator is combined with the low tire
pressure telltale. When the system detects a malfunction, the telltale will flash for approximately
one minute and then remain continuously illuminated. This sequence will continue each time
the vehicle is restarted as long as the malfunction exists.
• When the malfunction indicator is illuminated, the system may not be able to detect or signal low tire pressure as intended. TPMS malfunctions may occur for a variety of reasons, including
the installation of replacement or alternate tires or wheels on the vehicle that prevent the TPMS
from functioning properly. Always check the TPMS malfunction telltale after replacing one or
more tires or wheels on your vehicle, to ensure that the replacement or alternate tires and
wheels allow the TPMS to continue to function properly.
CAUTION!
The TPMS has been optimized for the original equipment tires and wheels. TPMS
pressures and warning have been established for the tire size equipped on your vehicle.
Undesirable system operation or sensor damage may result when using replacement
equipment that is not of the same size, type, and/or style. Aftermarket wheels can cause
sensor damage. Do not use tire sealant from a can, or balance beads if your vehicle is
equipped with a TPMS, as damage to the sensors may result.
- Engine Temperature Warning Light
• This light warns of an overheated engine condition.
• If the light turns on or flashes continuously while driving, safely pull over and stop the vehicle. Ifthe A/C system is on, turn it off. Also, shift the transmission into NEUTRAL and idle the
vehicle. If the temperature reading does not return to normal, turn the engine off immediately.
• We recommend that you do not operate the vehicle or engine damage will occur. Have the vehicle serviced immediately.
WARNING!
A hot engine cooling system is dangerous. You or others could be badly burned by steam
or boiling coolant. You may want to call an authorized service center for service if your
vehicle overheats.
BRAKE- Brake Warning Light
• The Brake Warning light illuminates when there is either a system malfunction or the parkingbrake is applied. If the light is on and the parking brake is not applied, it indicates a possible
brake hydraulic malfunction, brake booster problem or an Anti-Lock Brake System problem.
• We recommend you drive to the nearest service center and have the vehicle serviced immediately. WHAT TO DO IN EMERGENCIES
56
Page 81 of 92

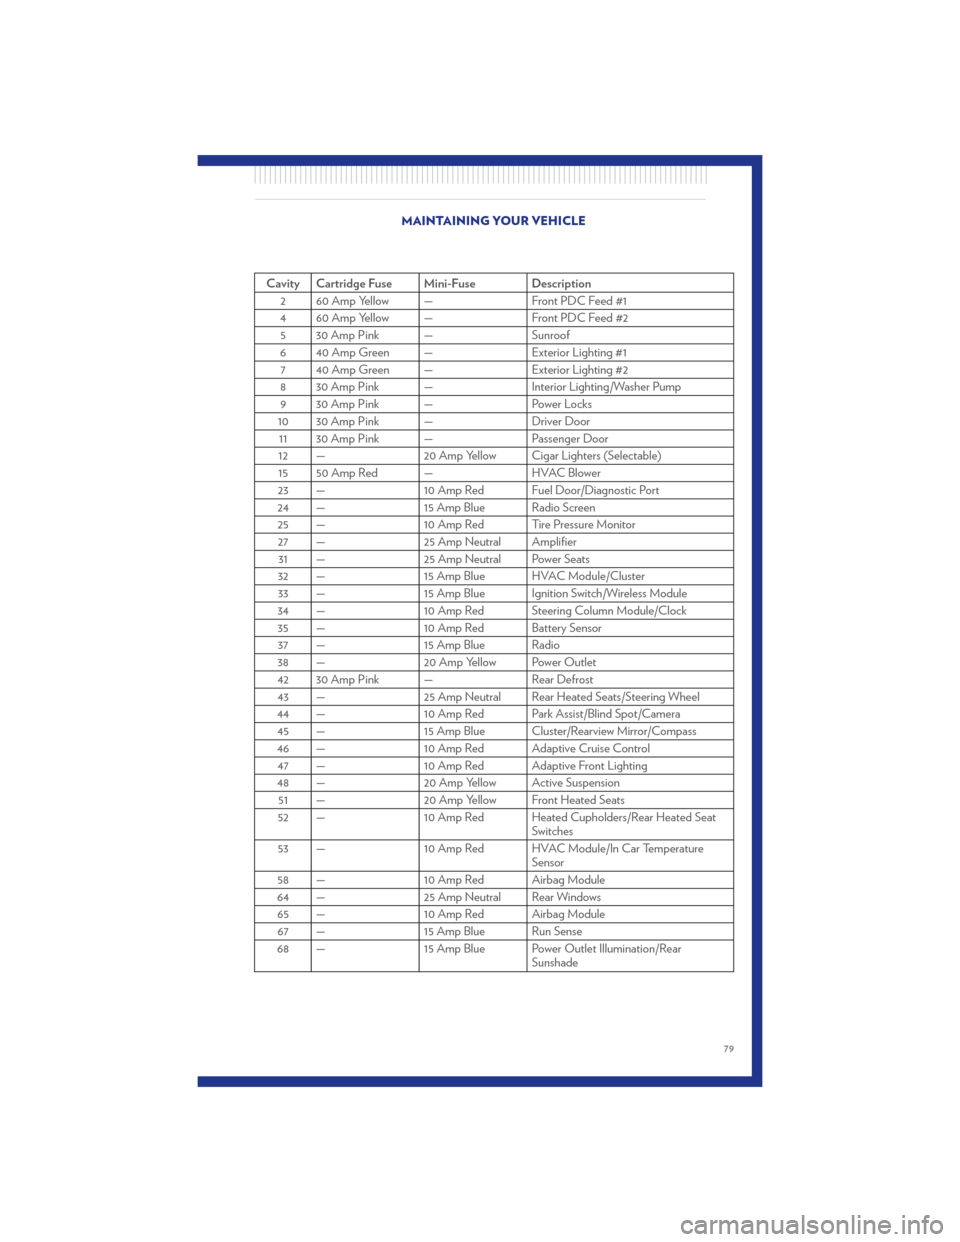
Cavity Cartridge Fuse Mini-Fuse Description2 60 Amp Yellow — Front PDC Feed #1
4 60 Amp Yellow — Front PDC Feed #2 5 30 Amp Pink — Sunroof
6 40 Amp Green — Exterior Lighting #1 7 40 Amp Green — Exterior Lighting #2
8 30 Amp Pink — Interior Lighting/Washer Pump 9 30 Amp Pink — Power Locks
10 30 Amp Pink — Driver Door 11 30 Amp Pink — Passenger Door
12 — 20 Amp Yellow Cigar Lighters (Selectable)
15 50 Amp Red — HVAC Blower
23 — 10 Amp Red Fuel Door/Diagnostic Port
24 — 15 Amp Blue Radio Screen 25 — 10 Amp Red Tire Pressure Monitor 27 — 25 Amp Neutral Amplifier 31 — 25 Amp Neutral Power Seats
32 — 15 Amp Blue HVAC Module/Cluster 33 — 15 Amp Blue Ignition Switch/Wireless Module
34 — 10 Amp Red Steering Column Module/Clock 35 — 10 Amp Red Battery Sensor 37 — 15 Amp Blue Radio
38 — 20 Amp Yellow Power Outlet
42 30 Amp Pink — Rear Defrost 43 — 25 Amp Neutral Rear Heated Seats/Steering Wheel
44 — 10 Amp Red Park Assist/Blind Spot/Camera 45 — 15 Amp Blue Cluster/Rearview Mirror/Compass
46 — 10 Amp Red Adaptive Cruise Control 47 — 10 Amp Red Adaptive Front Lighting
48 — 20 Amp Yellow Active Suspension 51 — 20 Amp Yellow Front Heated Seats
52 — 10 Amp Red Heated Cupholders/Rear Heated Seat Switches
53 — 10 Amp Red HVAC Module/In Car Temperature
Sensor
58 — 10 Amp Red Airbag Module
64 — 25 Amp Neutral Rear Windows
65 — 10 Amp Red Airbag Module
67 — 15 Amp Blue Run Sense
68 — 15 Amp Blue Power Outlet Illumination/Rear
Sunshade
MAINTAINING YOUR VEHICLE
79