tow CHRYSLER 300 2011 2.G User Guide
[x] Cancel search | Manufacturer: CHRYSLER, Model Year: 2011, Model line: 300, Model: CHRYSLER 300 2011 2.GPages: 92, PDF Size: 3.35 MB
Page 3 of 92
INTRODUCTION/WELCOMEWelcome From Chrysler Group LLC......2
CONTROLS AT A GLANCEDriver Cockpit................4
Instrument Cluster ..............6
GETTING STARTEDKeyFOB...................8
Remote Start.................8
Keyless Enter-N-Go .............9
Theft Alarm .................11
Seat Belt ...................11
Supplemental Restraint System (SRS) —
Airbags ...................12
Child Restraints ................13
Front Seats ..................15
Rear Seat ...................17
Heated Seats .................18
Heated And Cooled Cupholders .......19
Adjustable Pedals ...............19
Tilt/Telescoping Steering Column .......20
OPERATING YOUR VEHICLETurn Signal/Wiper/Washer/High Beam Lever . . 21
Headlight Switch...............22
Speed Control ................23
Climate Controls ...............26
Power Sunroof ................28
Wind Buffeting ................29
ELECTRONICSYour Vehicle's Sound System .........30
Identifying Your Radio .............32
Uconnect Touch™ 8.4 & 8.4N At A Glance . . . 32
Radio ....................34
Sirius Satellite Radio ..............35
Player ....................37
Garmin® Navigation (8.4N Only) .......37
Sirius Travel Link (8.4N Only) .........41
Playing iPod/USB/MP3 Devices ........42
Uconnect™ Phone (Bluetooth® Hands
Free Calling) .................43
Uconnect™ Voice Command .........47
Electronic Vehicle Information Center
(EVIC) ....................48 Programmable Features
............49
Universal Garage Door Opener
(HomeLink®) .................50
Power Outlet .................52
UTILITY
Trailer Towing Weights (Maximum Trailer
Weight Ratings) ...............53
Recreational Towing
(Behind Motorhome, Etc.) ...........54
WHAT TO DO IN EMERGENCIES
24-Hour Towing Assistance ..........55
Instrument Cluster Warning Lights .......55
If Your Engine Overheats ...........59
Jacking, Tire Changing ............60
Jump-Starting ................62
Shift Lever Override .............64
Towing A Disabled Vehicle ..........65
Freeing A Stuck Vehicle ............66
Event Data Recorder (EDR) ..........67
MAINTAINING YOUR VEHICLE
Opening The Hood..............68
Engine Compartment .............69
Fluids And Capacities .............71
Maintenance Chart ..............73
Fuses .....................76
Tire Pressures .................80
Wheel And Wheel Trim Care .........80
Exterior Bulbs .................81
CONSUMER ASSISTANCE
Chrysler Group LLC Customer Center .....82
Chrysler Canada Inc. Customer Center ....82
Assistance For The Hearing Impaired .....82
Publications Ordering .............82
Reporting Safety Defects In The
50 United States And Washington, D.C. ....83
MOPAR ACCESSORIES
Authentic Accessories By MOPAR®......84
INDEX..................85
TABLE OF CONTENTS
Page 21 of 92
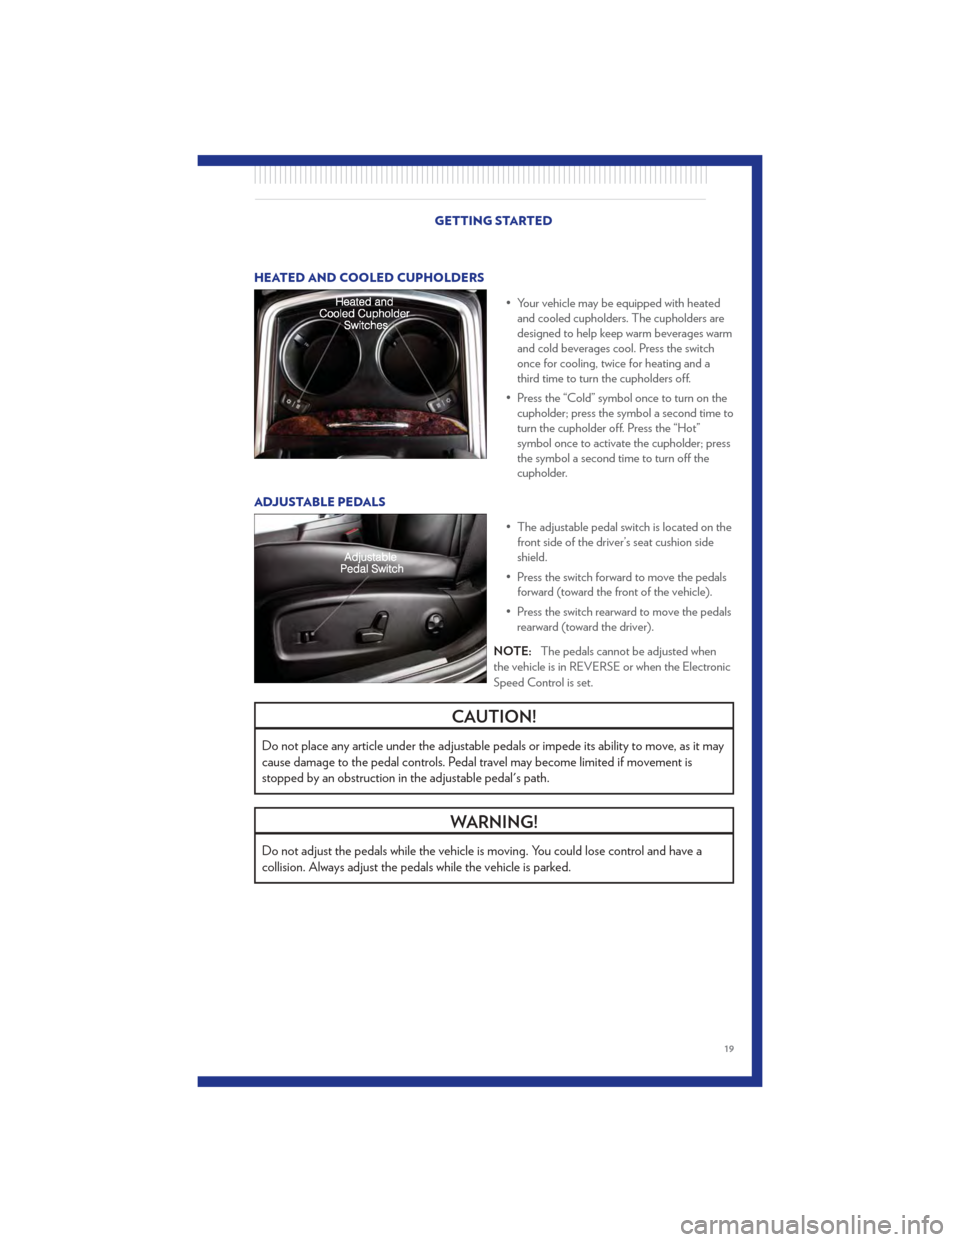
HEATED AND COOLED CUPHOLDERS• Your vehicle may be equipped with heatedand cooled cupholders. The cupholders are
designed to help keep warm beverages warm
and cold beverages cool. Press the switch
once for cooling, twice for heating and a
third time to turn the cupholders off.
• Press the “Cold” symbol once to turn on the cupholder; press the symbol a second time to
turn the cupholder off. Press the “Hot”
symbol once to activate the cupholder; press
the symbol a second time to turn off the
cupholder.
ADJUSTABLE PEDALS • The adjustable pedal switch is located on thefront side of the driver’s seat cushion side
shield.
• Press the switch forward to move the pedals forward (toward the front of the vehicle).
• Press the switch rearward to move the pedals rearward (toward the driver).
NOTE: The pedals cannot be adjusted when
the vehicle is in REVERSE or when the Electronic
Speed Control is set.
CAUTION!
Do not place any article under the adjustable pedals or impede its ability to move, as it may
cause damage to the pedal controls. Pedal travel may become limited if movement is
stopped by an obstruction in the adjustable pedal's path.
WARNING!
Do not adjust the pedals while the vehicle is moving. You could lose control and have a
collision. Always adjust the pedals while the vehicle is parked.
GETTING STARTED
19
Page 22 of 92
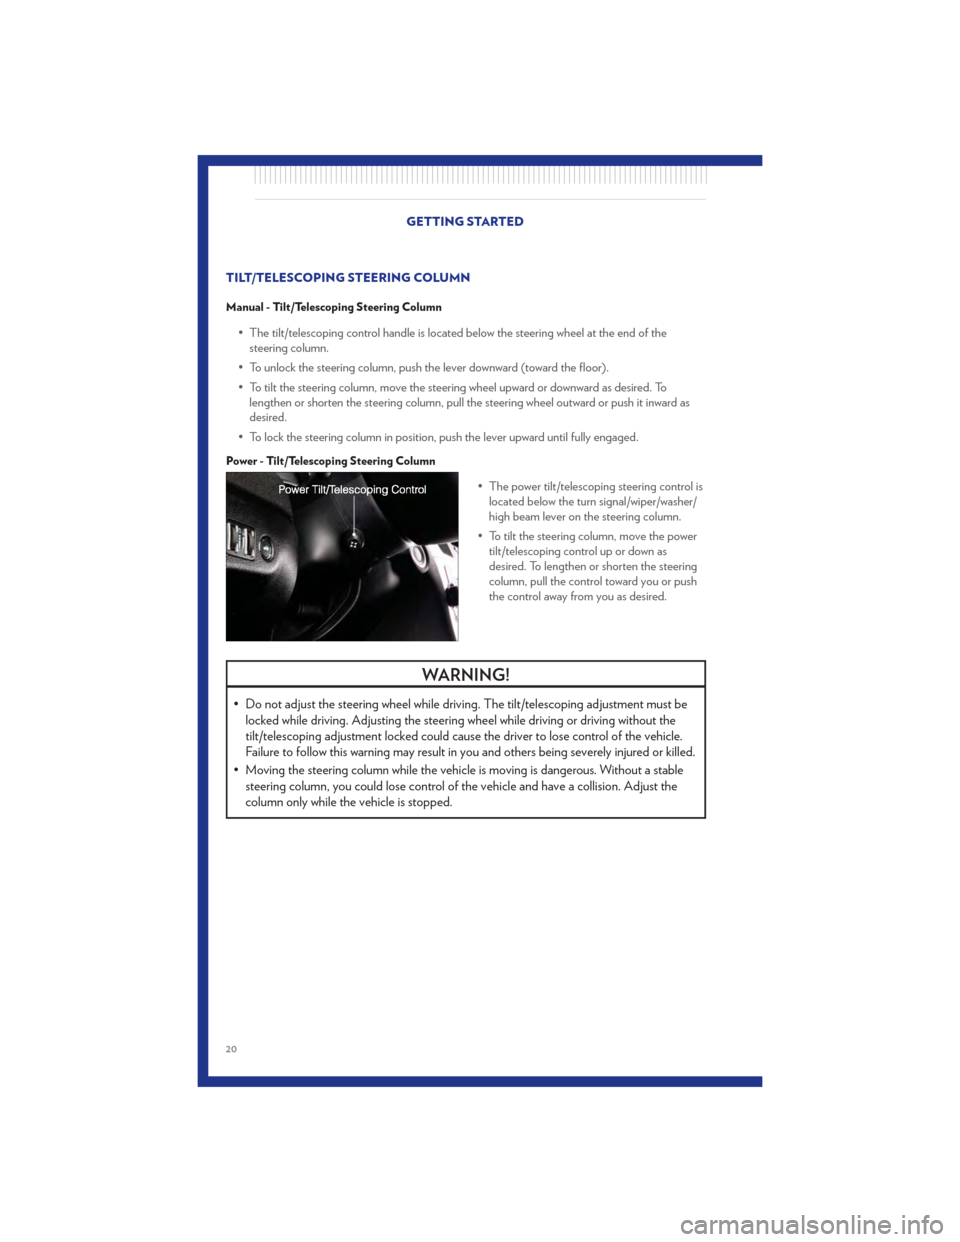
TILT/TELESCOPING STEERING COLUMN
Manual - Tilt/Telescoping Steering Column
• The tilt/telescoping control handle is located below the steering wheel at the end of thesteering column.
• To unlock the steering column, push the lever downward (toward the floor).
• To tilt the steering column, move the steering wheel upward or downward as desired. To lengthen or shorten the steering column, pull the steering wheel outward or push it inward as
desired.
• To lock the steering column in position, push the lever upward until fully engaged.
Power - Tilt/Telescoping Steering Column
• The power tilt/telescoping steering control is located below the turn signal/wiper/washer/
high beam lever on the steering column.
• To tilt the steering column, move the power tilt/telescoping control up or down as
desired. To lengthen or shorten the steering
column, pull the control toward you or push
the control away from you as desired.
WARNING!
• Do not adjust the steering wheel while driving. The tilt/telescoping adjustment must belocked while driving. Adjusting the steering wheel while driving or driving without the
tilt/telescoping adjustment locked could cause the driver to lose control of the vehicle.
Failure to follow this warning may result in you and others being severely injured or killed.
• Moving the steering column while the vehicle is moving is dangerous. Without a stable steering column, you could lose control of the vehicle and have a collision. Adjust the
column only while the vehicle is stopped.
GETTING STARTED
20
Page 23 of 92
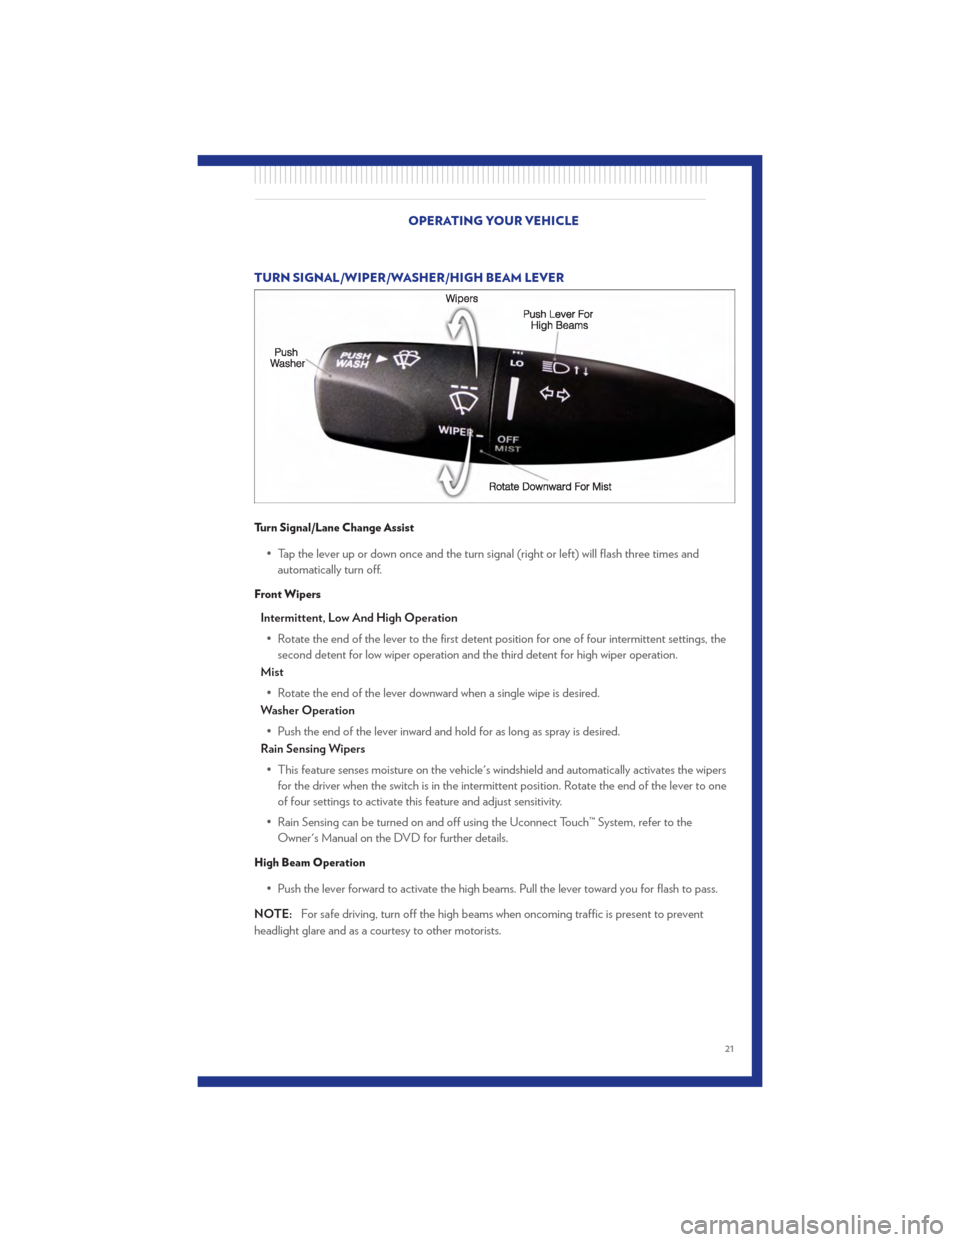
TURN SIGNAL/WIPER/WASHER/HIGH BEAM LEVER
Turn Signal/Lane Change Assist
• Tap the lever up or down once and the turn signal (right or left) will flash three times andautomatically turn off.
Front Wipers
Intermittent, Low And High Operation
• Rotate the end of the lever to the first detent position for one of four intermittent settings, the second detent for low wiper operation and the third detent for high wiper operation.
Mist
• Rotate the end of the lever downward when a single wipe is desired.
Washer Operation
• Push the end of the lever inward and hold for as long as spray is desired.
Rain Sensing Wipers
• This feature senses moisture on the vehicle's windshield and automatically activates the wipers for the driver when the switch is in the intermittent position. Rotate the end of the lever to one
of four settings to activate this feature and adjust sensitivity.
• Rain Sensing can be turned on and off using the Uconnect Touch™ System, refer to the Owner's Manual on the DVD for further details.
High Beam Operation
• Push the lever forward to activate the high beams. Pull the lever toward you for flash to pass.
NOTE: For safe driving, turn off the high beams when oncoming traffic is present to prevent
headlight glare and as a courtesy to other motorists.
OPERATING YOUR VEHICLE
21
Page 27 of 92
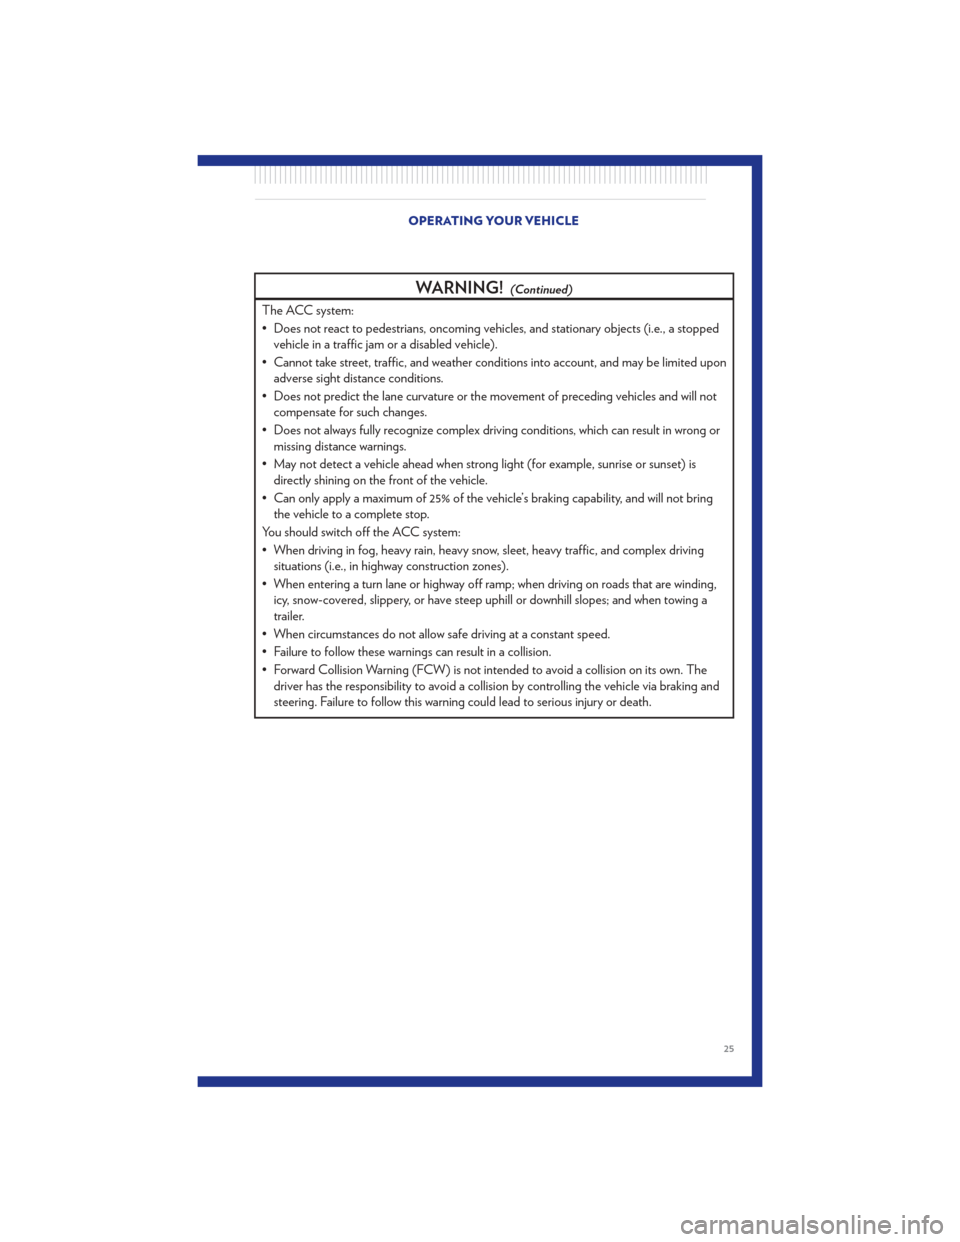
WARNING!(Continued)
The ACC system:
• Does not react to pedestrians, oncoming vehicles, and stationary objects (i.e., a stoppedvehicle in a traffic jam or a disabled vehicle).
• Cannot take street, traffic, and weather conditions into account, and may be limited upon adverse sight distance conditions.
• Does not predict the lane curvature or the movement of preceding vehicles and will not compensate for such changes.
• Does not always fully recognize complex driving conditions, which can result in wrong or missing distance warnings.
• May not detect a vehicle ahead when strong light (for example, sunrise or sunset) is directly shining on the front of the vehicle.
• Can only apply a maximum of 25% of the vehicle’s braking capability, and will not bring the vehicle to a complete stop.
You should switch off the ACC system:
• When driving in fog, heavy rain, heavy snow, sleet, heavy traffic, and complex driving situations (i.e., in highway construction zones).
• When entering a turn lane or highway off ramp; when driving on roads that are winding, icy, snow-covered, slippery, or have steep uphill or downhill slopes; and when towing a
trailer.
• When circumstances do not allow safe driving at a constant speed.
• Failure to follow these warnings can result in a collision.
• Forward Collision Warning (FCW) is not intended to avoid a collision on its own. The driver has the responsibility to avoid a collision by controlling the vehicle via braking and
steering. Failure to follow this warning could lead to serious injury or death.
OPERATING YOUR VEHICLE
25
Page 48 of 92
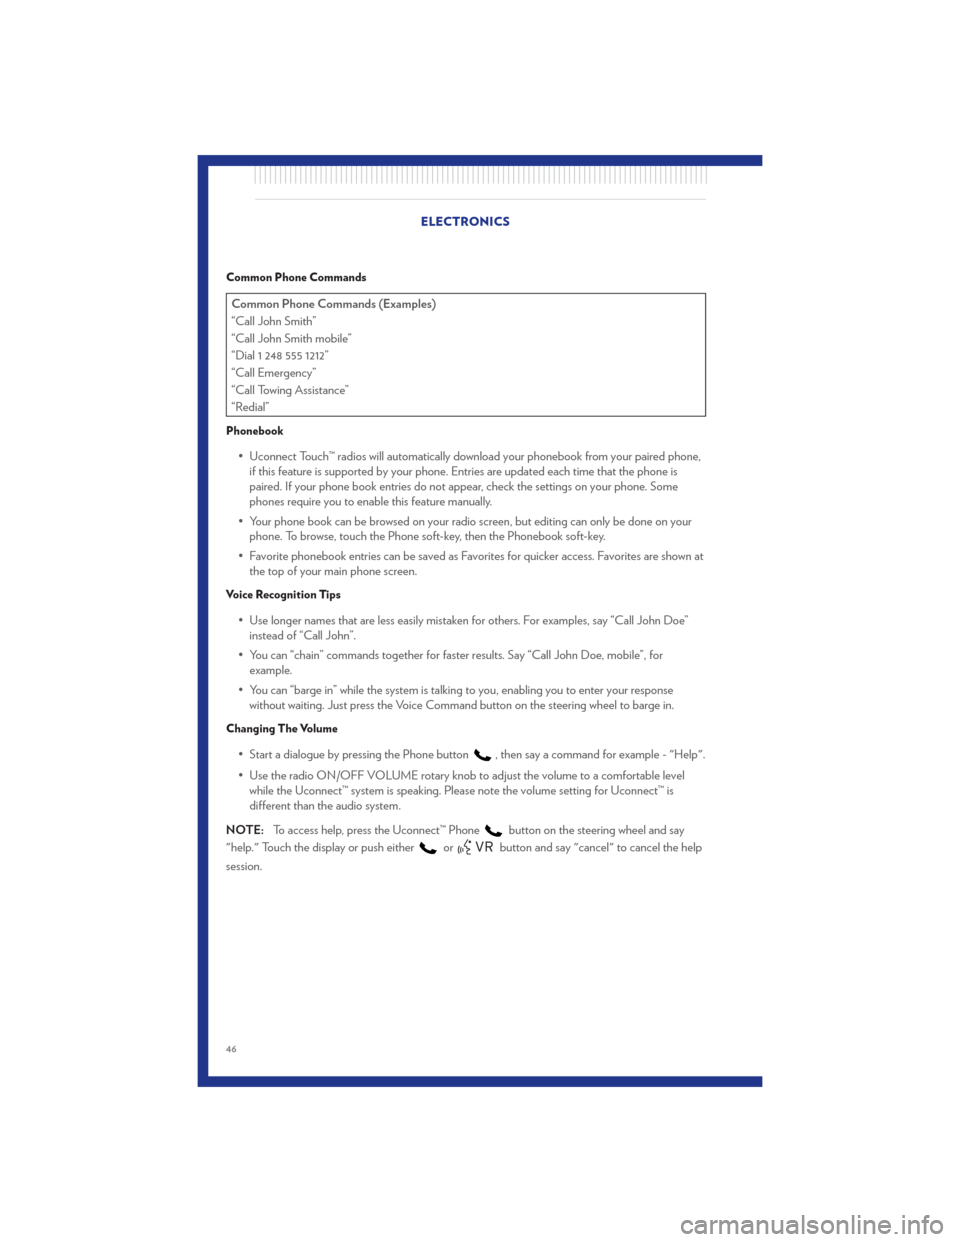
Common Phone Commands
Common Phone Commands (Examples)
“Call John Smith”
“Call John Smith mobile”
“Dial 1 248 555 1212”
“Call Emergency”
“Call Towing Assistance”
“Redial”
Phonebook
• Uconnect Touch™ radios will automatically download your phonebook from your paired phone,if this feature is supported by your phone. Entries are updated each time that the phone is
paired. If your phone book entries do not appear, check the settings on your phone. Some
phones require you to enable this feature manually.
• Your phone book can be browsed on your radio screen, but editing can only be done on your phone. To browse, touch the Phone soft-key, then the Phonebook soft-key.
• Favorite phonebook entries can be saved as Favorites for quicker access. Favorites are shown at the top of your main phone screen.
Voice Recognition Tips
• Use longer names that are less easily mistaken for others. For examples, say “Call John Doe”instead of “Call John”.
• You can “chain” commands together for faster results. Say “Call John Doe, mobile”, for example.
• You can “barge in” while the system is talking to you, enabling you to enter your response without waiting. Just press the Voice Command button on the steering wheel to barge in.
Changing The Volume
• Start a dialogue by pressing the Phone button, then say a command for example - "Help".
• Use the radio ON/OFF VOLUME rotary knob to adjust the volume to a comfortable level while the Uconnect™ system is speaking. Please note the volume setting for Uconnect™ is
different than the audio system.
NOTE: To access help, press the Uconnect™ Phone
button on the steering wheel and say
"help." Touch the display or push either
orbutton and say "cancel" to cancel the help
session. ELECTRONICS
46
Page 55 of 92
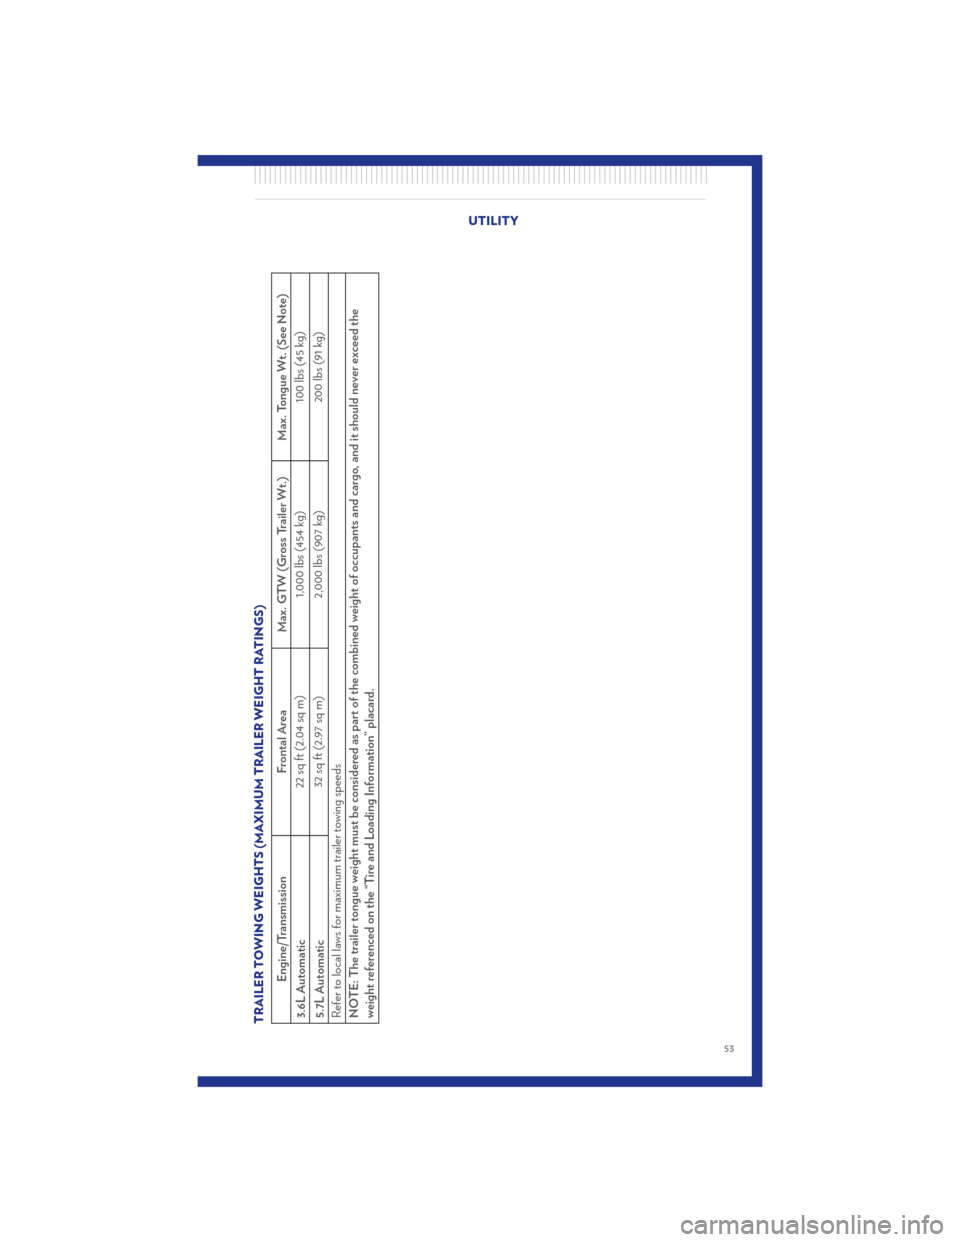
TRAILER TOWING WEIGHTS (MAXIMUM TRAILER WEIGHT RATINGS)
Engine/TransmissionFrontal AreaMax. GTW (Gross Trailer Wt.) Max. Tongue Wt. (See Note)
3.6L Automatic 22 sq ft (2.04 sq m)
1,000 lbs (454 kg) 100 lbs (45 kg)
5.7L Automatic 32 sq ft (2.97 sq m)
2,000 lbs (907 kg) 200 lbs (91 kg)
Refer to local laws for maximum trailer towing speeds
NOTE: The trailer tongue weight must be considered as part of the combined weight of occupants and cargo, and it should never exceed the
weight referenced on the “Tire and Loading Information” placard.
UTILITY
53
Page 56 of 92
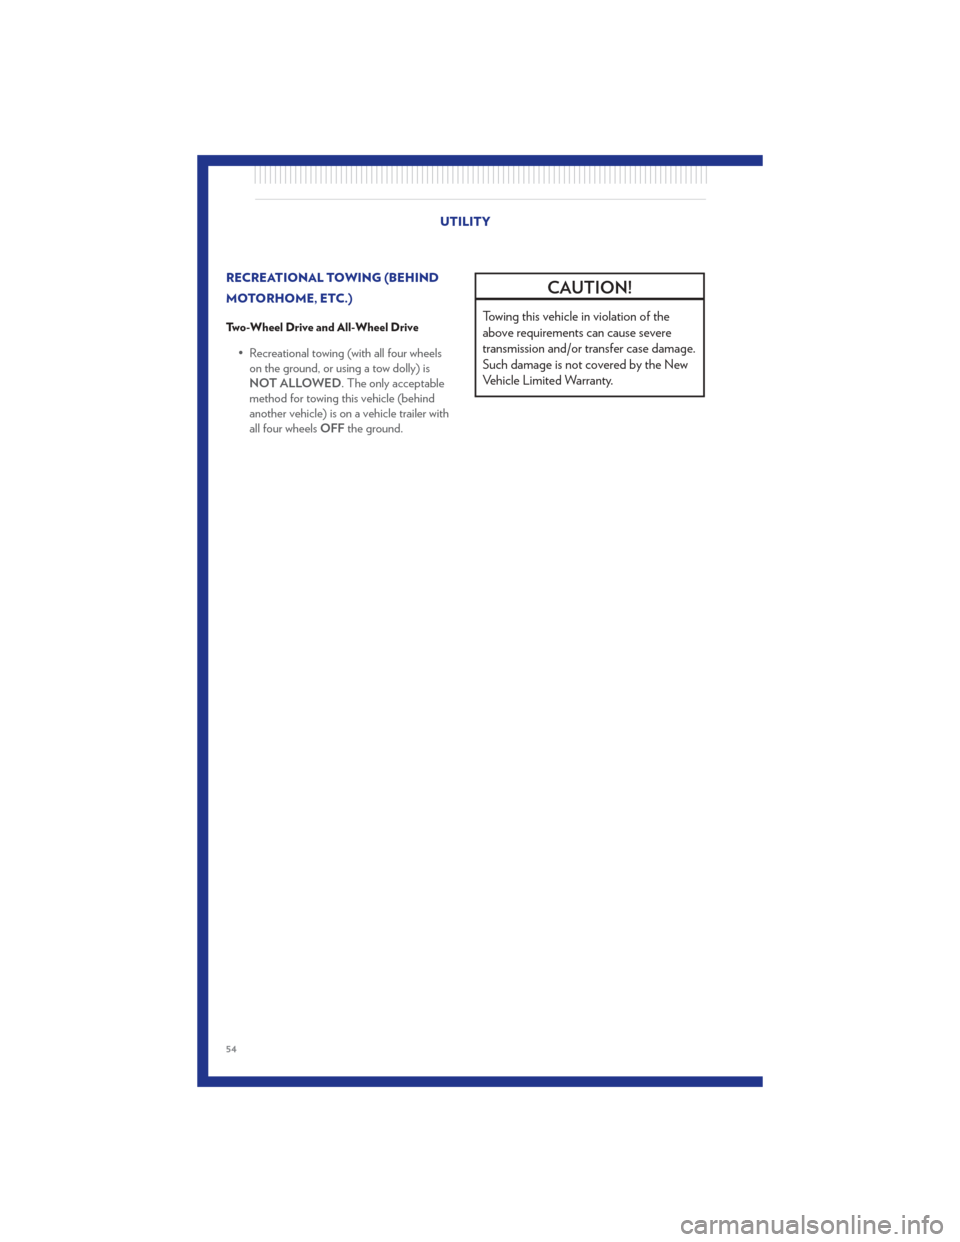
RECREATIONAL TOWING (BEHIND
MOTORHOME, ETC.)
Two-Wheel Drive and All-Wheel Drive
• Recreational towing (with all four wheelson the ground, or using a tow dolly) is
NOT ALLOWED. The only acceptable
method for towing this vehicle (behind
another vehicle) is on a vehicle trailer with
all four wheels OFFthe ground.
CAUTION!
Towing this vehicle in violation of the
above requirements can cause severe
transmission and/or transfer case damage.
Such damage is not covered by the New
Vehicle Limited Warranty.
UTILITY
54
Page 57 of 92
24-HOUR TOWING ASSISTANCE• Dial toll-free 1-800-521-2779 or 1-800-363-4869 for Canadian residents.
• Provide your name, vehicle identification number and license plate number.
• Provide your location, including telephone number, from which you are calling.
• Briefly describe the nature of the problem and answer a few simple questions.
• You will be given the name of the service provider and an estimated time of arrival. If you feelyou are in an “unsafe situation”, please let us know. With your consent, we will contact local
police or safety authorities.
INSTRUMENT CLUSTER WARNING LIGHTS
- Electronic Stability Control (ESC) Activation/Malfunction Indicator Light
• The “ESC Activation/Malfunction Indicator Light” in the instrument cluster will come on when the ignition switch is turned to the ON/RUN position. It should go out with the engine running.
If the “ESC Activation/Malfunction Indicator Light” comes on continuously with the engine
running, a malfunction has been detected in the ESC system.
• If this light remains on after several ignition cycles, and the vehicle has been driven several miles (kilometers) at speeds greater than 30 mph (48 km/h), we recommend you drive to the nearest
service center and have the vehicle serviced immediately.
- Tire Pressure Monitoring System (TPMS) Light
• Each tire, including the spare (if provided), should be checked monthly, when cold and inflatedto the inflation pressure recommended by the vehicle manufacturer on the vehicle placard or
tire inflation pressure label. (If your vehicle has tires of a different size than the size indicated on
the vehicle placard or tire inflation pressure label, you should determine the proper tire inflation
pressure for those tires.)
• As an added safety feature, your vehicle has been equipped with a Tire Pressure Monitoring System (TPMS) that illuminates a low tire pressure telltale when one or more of your tires is
significantly under-inflated. Accordingly, when the low tire pressure telltale illuminates, you
should stop and check your tires as soon as possible, and inflate them to the proper pressure.
Driving on a significantly under-inflated tire causes the tire to overheat and can lead to tire
failure. Under-inflation also reduces fuel efficiency and tire tread life, and may affect the
vehicle’s handling and stopping ability.
• IF THE LIGHT STARTS FLASHING INDICATING A LOW TIRE PRESSURE, ADJUST
THE AIR PRESSURE IN THE LOW TIRE TO THE AIR PRESSURE SHOWN ON THE
VEHICLE PLACARD OR TIRE INFLATION PRESSURE LABEL LOCATED ON THE
DRIVER'S DOOR. NOTE: AFTER INFLATION, THE VEHICLE MAY NEED TO BE
DRIVEN FOR 20 MINUTES BEFORE THE FLASHING LIGHT WILL TURN OFF.
• Please note that the TPMS is not a substitute for proper tire maintenance, and it is the driver’s responsibility to maintain correct tire pressure, even if under-inflation has not reached the level
to trigger illumination of the TPMS low tire pressure telltale. WHAT TO DO IN EMERGENCIES
55
Page 59 of 92

WARNING!
Driving a vehicle with the red brake light on is dangerous. Part of the brake system may
have failed. It will take longer to stop the vehicle. You could have a collision. Have the
vehicle checked immediately.
- Malfunction Indicator Light (MIL)
• Certain conditions, such as a poor fuel quality, etc., may illuminate the MIL after engine start.The vehicle should be serviced if the light stays on through several typical driving cycles. In
most situations, the vehicle will drive normally and not require towing.
• If the MIL flashes when the engine is running, serious conditions may exist that could lead to immediate loss of power or severe catalytic converter damage. We recommend you do not
operate the vehicle. Have the vehicle serviced immediately.
- Electronic Stability Control (ESC) OFF Indicator Light
• This light indicates the Electronic Stability Control (ESC) is off.
- Charging System Light
• This light shows the status of the electrical charging system. If the charging system lightremains on, it means that the vehicle is experiencing a problem with the charging system.
• We recommend you do not continue driving if the charging system light is on. Have the vehicle serviced immediately.
- Oil Pressure Warning Light
• This light indicates low engine oil pressure. If the light turns on while driving, stop the vehicleand shut off the engine as soon as possible. A chime will sound for four minutes when this light
turns on.
• We recommend you do not operate the vehicle or engine damage will occur. Have the vehicle serviced immediately.
- Anti-Lock Brake (ABS) Light
• This light monitors the Anti-Lock Brake System (ABS).
• If the light is not on during starting, stays on, or turns on while driving, we recommend you driveto the nearest service center and have the vehicle serviced immediately. WHAT TO DO IN EMERGENCIES
57