change time CHRYSLER 300 2014 2.G User Guide
[x] Cancel search | Manufacturer: CHRYSLER, Model Year: 2014, Model line: 300, Model: CHRYSLER 300 2014 2.GPages: 132, PDF Size: 3.65 MB
Page 4 of 132
WELCOME FROM CHRYSLER GROUP LLC
Congratulations on selecting your new Chrysler Group LLC vehicle. Be assured that it represents
precision workmanship, distinctive styling, and high quality - all essentials that are traditional to
our vehicles.
Your new Chrysler Group LLC vehicle has characteristics to enhance the driver's control under
some driving conditions. These are to assist the driver and are never a substitute for attentive
driving. They can never take the driver's place. Always drive carefully.
Your new vehicle has many features for the comfort and convenience of you and your passengers.
Some of these should not be used when driving because they take your eyes from the road or
your attention from driving. Never text while driving or take your eyes more than momentarily off
the road.
This guide illustrates and describes the operation of features and equipment that are either
standard or optional on this vehicle. This guide may also include a description of features
and equipment that are no longer available or were not ordered on this vehicle. Please disregard
any features and equipment described in this guide that are not available on this vehicle.
Chrysler Group LLC reserves the right to make changes in design and specifications and/or
make additions to or improvements to its products without imposing any obligation upon itself to
install them on products previously manufactured.
This User Guide has been prepared to help you quickly become acquainted with the important
features of your vehicle. It contains most things you will need to operate and maintain the vehicle,
including emergency information.
The DVD includes a computer application containing detailed owner's information which can be
viewed on a personal computer or MAC computer. The multimedia DVD also includes videos
which can be played on any standard DVD player (including the Uconnect® Touchscreen
Radios). Additional DVD operational information is located on the back of the DVD sleeve.
For complete owner information, refer to your Owner's Manual on the DVD in the owner’s
kit provided at the time of new vehicle purchase.For your convenience, the information
contained on the DVD may also be printed and saved for future reference.
Chrysler Group LLC is committed to protecting our environment and natural resources. By con-
verting from paper to electronic delivery for the majority of the user information for your vehicle,
together we greatly reduce the demand for tree-based products and lessen the stress on our
environment.
INTRODUCTION/WELCOME
2
Page 10 of 132
KEY FOB
Locking And Unlocking The Doors
• Push and release the LOCK button on theRKE transmitter to lock all doors. The turn
signal lights will flash and the horn will chirp
to acknowledge the signal.
•
Push and release the UNLOCK button on the
RKE transmitter once to unlock the driver's
door or twice within five seconds to unlock
all doors. The turn signal lights will flash to
acknowledge the unlock signal. The illumi-
nated entry system will also turn on.
1st Push Of Key Fob Unlocks
This feature lets you program the system to
unlock either the driver's door or all doors on
the first push of the UNLOCK button on the
RKE transmitter. To change the current setting,
refer to your Owner's Manual on the DVD for
further information.
Opening The Trunk
• Press the Trunk Release button on the trans- mitter two times within five seconds to open the trunk.
Panic Alarm
• Press the PANIC button once to turn the panic alarm on.
• Wait approximately three seconds and press the button a second time to turn the panicalarm off.
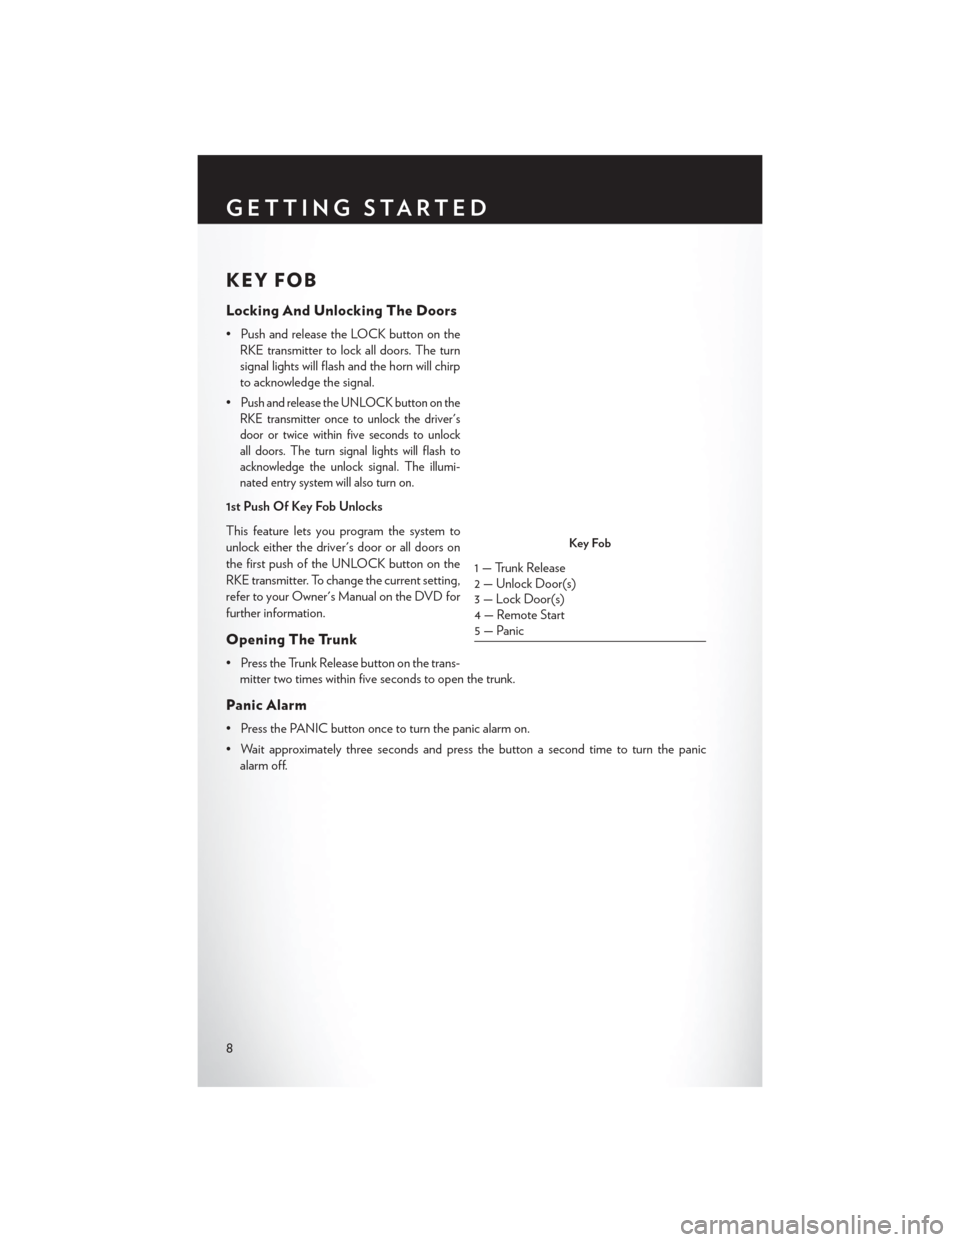
Key Fob
1 — Trunk Release
2 — Unlock Door(s)
3 — Lock Door(s)
4 — Remote Start
5 — Panic
GETTING STARTED
8
Page 28 of 132
TURN SIGNAL/WIPER/WASHER/HIGH BEAM
LEVER
Turn Signal/Lane Change Assist
• Tap the lever up or down once and the turn signal (right or left) will flash three times andautomatically turn off.
Front Wipers
Intermittent, Low And High Operation
• Rotate the end of the lever to the first detent position for one of four intermittent settings, thesecond detent for low wiper operation and the third detent for high wiper operation.
Mist
• Rotate the end of the lever downward when a single wipe is desired.
NOTE:
The mist feature does not activate the washer pump; therefore, no washer fluid will be sprayed on
the windshield. The wash function must be activated in order to spray the windshield with washer
fluid.
Washer Operation
• Push the end of the lever inward and hold for as long as spray is desired.
Rain Sensing Wipers
• This feature senses moisture on the vehicle's windshield and automatically activates the wipers for the driver when the switch is in the intermittent position. Rotate the end of the lever to one
of four settings to activate this feature and adjust sensitivity.
• Rain Sensing can be turned on and off using the Uconnect® System, refer to the Owner's Manual on the DVD for further details.
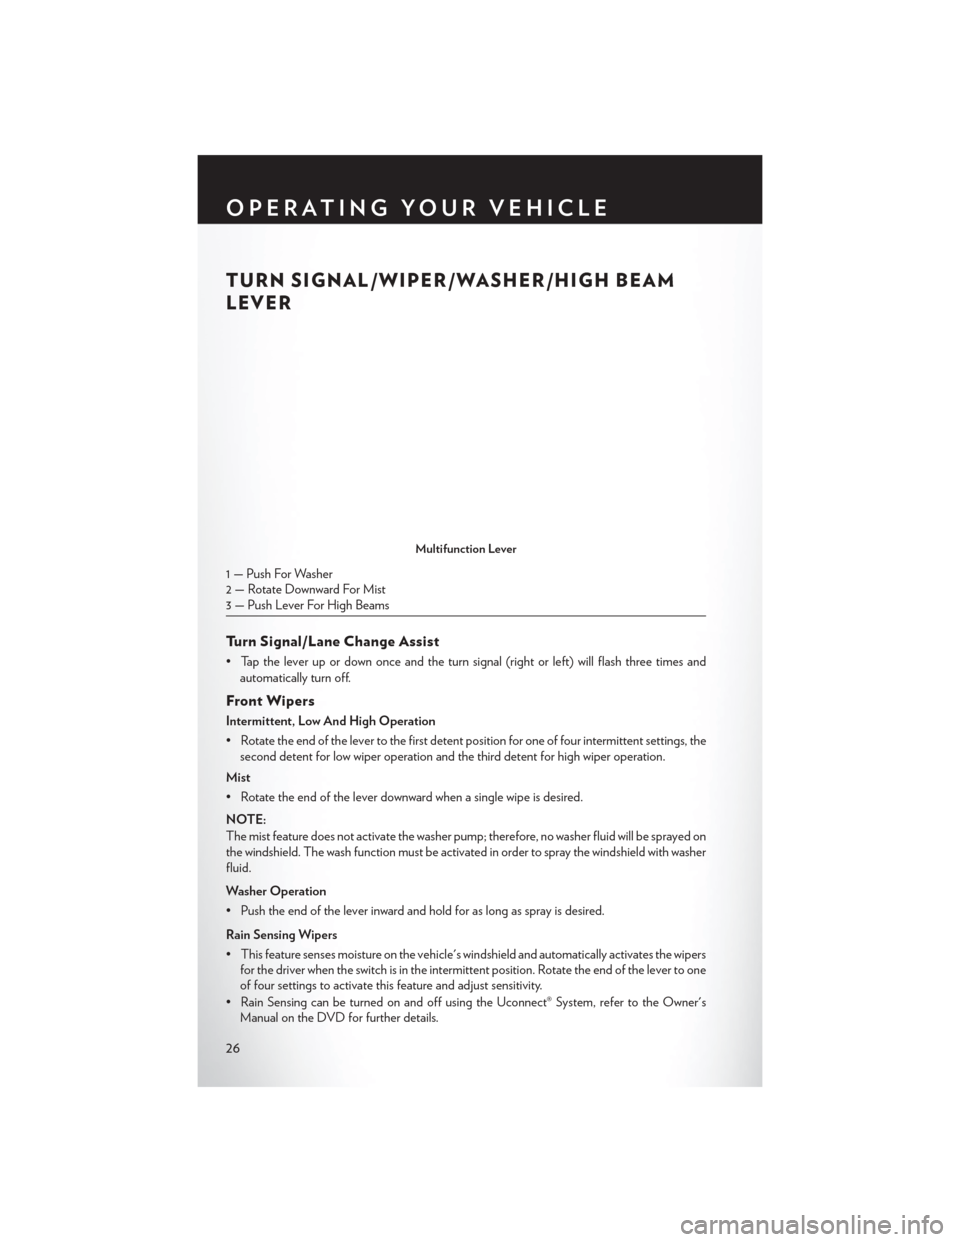
Multifunction Lever
1 — Push For Washer
2 — Rotate Downward For Mist
3 — Push Lever For High Beams
OPERATING YOUR VEHICLE
26
Page 32 of 132
Distance Setting (ACC Only)
The specified following distance for ACC can be set by varying the distance setting between
3 (long), 2 (medium), and 1 (short). Using this distance setting and the vehicle speed, ACC
calculates and sets the distance to the vehicle ahead. This distance setting displays in the
Electronic Vehicle Information Center (EVIC).
• To set or change the distance setting, press the Distance button and release. Each time thebutton is pressed, the distance setting adjusts between long (3), medium (2), and short (1).
The distance setting will default to the last set mode the next time the vehicle is restarted and
the ACC system is turned on.
Mode (ACC Only)
If desired, the Adaptive Cruise Control mode can be turned off and the system can be operated
as a standard (fixed speed) Cruise Control. When in the standard (fixed speed) Cruise Control
mode the distance setting feature will be disabled and the system will maintain the speed you set.
• To change modes, press the MODE button when the system is in either the OFF, READY, orSET position. “Cruise Ready” will be displayed if the system was in ACC READY or ACC SET
position. “Cruise Off ” will be displayed if the system was in the ACC OFF position. To switch
back to Adaptive Cruise Control mode, press the MODE button a second time.
Refer to your Owner's Manual on the DVD for further information.
Forward Collision Warning
The Forward Collision Warning (FCW) system provides the driver with audible and visual
warnings (within the EVIC) when it detects a potential frontal collision. The warnings are
intended to provide the driver with enough time to react and avoid the potential collision.
Changing FCW Status
The FCW feature has three settings and can be changed within the Uconnect® System:
•Far
• Near
•Off
NOTE:
The FCW settings can only be changed when the vehicle is in PARK.
Far
The default status of FCW is the “Far” setting.
The far setting provides warnings for potential collisions more distant in front of the vehicle,
allowing the driver to have the most reaction time to avoid a collision.
This setting is designed to provide early warnings per NHTSA (National Highway Traffic Safety
Administration) recommendations.
More cautious drivers that do not mind frequent warnings may prefer this setting.
NOTE:
This setting gives you the most reaction time.
Near
Changing the FCW status to the “Near” setting, allows the system to warn you of a potential
frontal collision when you are much closer.
OPERATING YOUR VEHICLE
30
Page 33 of 132
This setting provides less reaction time than the “Far” setting, which allows for a more dynamic
driving experience.
More dynamic or aggressive drivers that want to avoid frequent warnings may prefer this setting.
Off
Changing the FCW status to “Off ” prevents the system from warning you of a potential frontal
collision.
NOTE:
• If FCW is set to “Off ”, “FCW OFF” will be displayed in the EVIC.
• Refer to the Owner's Manual on the DVD for further details.
WARNING!
•Leaving the Electronic or Adaptive Speed Control system on when not in use is dangerous.
You could accidentally set the system or cause it to go faster than you want. You could lose
control and have a collision. Always leave the Electronic or Adaptive Speed Control system
off when you are not using it.
•Electronic Speed Control can be dangerous where the system cannot maintain a constant
speed. Your vehicle could go too fast for the conditions, and you could lose control. A collision
could be the result. Do not use Electronic Speed Control in heavy traffic or on roads that are
winding, icy, snow-covered or slippery.
•Adaptive Cruise Control (ACC) is a convenience system. It is not a substitute for active driving
involvement. Pay attention to road, traffic, and weather conditions, vehicle speed, distance to
the vehicle ahead, and brake operation to ensure safe operation of the vehicle under all road
conditions. Your attention is always required while driving to maintain safe control of your
vehicle. Failure to follow these warnings can result in a collision or serious personal injury.
The ACC system:
• Does not react to pedestrians, oncoming vehicles, and stationary objects (i.e., a stoppedvehicle in a traffic jam or a disabled vehicle).
• Cannot take street, traffic, and weather conditions into account, and may be limited upon adverse sight distance conditions.
• Does not predict the lane curvature or the movement of preceding vehicles and will not compensate for such changes.
• Does not always fully recognize complex driving conditions, which can result in wrong or missing distance warnings.
• Can only apply a maximum of 25% of the vehicle’s braking capability, and may not bring
the vehicle to a complete stop.
You should switch off the ACC system:
• When driving in fog, heavy rain, heavy snow, sleet, heavy traffic, and complex driving situations (i.e., in highway construction zones).
• When entering a turn lane or highway off ramp; when driving on roads that are winding, icy, snow-covered, slippery, or have steep uphill or downhill slopes; and when towing a trailer.
• When circumstances do not allow safe driving at a constant speed.
• Failure to follow these warnings can result in a collision.
•
Forward Collision Warning (FCW) is not intended to avoid a collision on its own. The driver
has the responsibility to avoid a collision by controlling the vehicle via braking and steering.
Failure to follow this warning could lead to serious injury or death.
OPERATING YOUR VEHICLE
31
Page 56 of 132
•The iPod® battery charges when plugged into the USB port (if supported by the specific device).
• To route the USB/iPod® cable out of the center console, use the access cut out in the front ofthe console.
NOTE:
When connecting your iPod® device for the first time, the system may take several minutes to
read your music, depending on the number of files. For example, the system will take approxi-
mately five minutes for every 1000 songs loaded on the device. Also during the reading process,
the Shuffle and Browse functions will be disabled. This process is needed to ensure the full use of
your iPod® features and only happens the first time it is connected. After the first time, the
reading process of your iPod® will take considerably less time unless changes are made or new
songs are added to the playlist.
• The USB port supports certain Mini, Classic, Nano, Touch, and iPhone® devices. The USB port also supports playing music from compatible external USB Mass Storage Class memory
devices. Some iPod® software versions may not fully support the USB port features. Please visit
Apple’s website for iPod® software updates.
3. SD Card
• Play songs stored on an SD card inserted into the SD card slot.
• Song playback can be controlled using the radio or Steering Wheel Audio Controls to play, skip to the next or previous track, browse, and list the contents.
4. Bluetooth® Streaming Audio
• If equipped with Uconnect® Voice Command, your Bluetooth-equipped iPod® devices, cell phones or other media players, may also be able to stream music to your vehicle's sound
system. Your connected device must be Bluetooth-compatible, and paired with your
Uconnect® system (see Uconnect® Phone for pairing instructions). You can access the music
from your connected Bluetooth® device by touching the Source soft-key while in Player mode.
Uconnect® PHONE (Bluetooth® HANDS FREE
CALLING)
• If the Uconnect® Phone Buttonexists on your steering wheel, then you have the
Uconnect® Phone features.
• The Uconnect® Phone is a voice-activated, hands-free, in-vehicle communications system with Voice Command Capability (see Voice Command section).
• The Uconnect® Phone allows you to dial a phone number with your mobile phone using simple voice commands or using screen soft-keys.
• Refer to the Understand The Features Of Your Vehicle section of your vehicle's Owner's Manual on the DVD for further details.
NOTE:
The Uconnect® Phone requires a mobile phone equipped with the Bluetooth® Hands-Free
Profile, Version 1.0 or higher. For Uconnect® customer support, call 1–877–855–8400 or
visit www.UconnectPhone.com. Canadian Residents: call 1–800–465–2001 (English) or
1–800–387–9983 (French).
ELECTRONICS
54
Page 65 of 132
Before You Begin Programming HomeLink®
Ensure that your vehicle is parked outside of the garage before you begin programming.
For efficient programming and accurate transmission of the radio-frequency signal, it is recom-
mended that a new battery be placed in the hand-held transmitter of the device that is being
programmed to the HomeLink® system.
Erase all channels before you begin programming. To erase the channels, place the ignition switch
into the ON/RUN position, then press and hold the two outside HomeLink® buttons (I and III) for
up to 20 seconds or until the red indicator flashes.
NOTE:
Erasing all channels should only be performed when programming HomeLink® for the first time.
Do not erase channels when programming additional buttons.
If you have any problems, or require assistance, please call toll-free 1-800-355-3515 or, on the
Internet at www.HomeLink.com for information or assistance.
Programming A Rolling Code
NOTE:
For programming Garage Door Openers that were manufactured after 1995. These Garage
Door Openers can be identified by the “LEARN” or “TRAIN” button located where the hanging
antenna is attached to the Garage Door Opener. It is NOT the button that is normally used to
open and close the door. The name and color of the button may vary by manufacturer.
1. Place the ignition switch into the ON/RUN position.
2. Place the hand-held transmitter 1 to 3 in (3 to 8 cm) away from the HomeLink® button you wishto program while keeping the HomeLink® indicator light in view.
3. Simultaneously press and hold both the HomeLink® button you want to program and the hand-held transmitter button.
4.
Continue to hold both buttons and observe the indicator light. The HomeLink® indicator will
flash slowly and then rapidly after HomeLink® has received the frequency signal from the
hand-held transmitter. Release both buttons after the indicator light changes from slow to rapid.
5. At the garage door opener motor (in the garage), locate the “LEARN” or “TRAINING” button. This can usually be found where the hanging antenna wire is attached to the garage
door opener motor. Firmly press and release the “LEARN” or “TRAINING” button.
NOTE:
You have 30 seconds in which to initiate the next step after the LEARN button has been pressed.
6.
Return to the vehicle and press the programmed HomeLink® button twice (holding the button for
two seconds each time). If the device is plugged in and activates, programming is complete.
NOTE:
If the device does not activate, press the button a third time (for two seconds) to complete the
training.
7. To program the remaining two HomeLink® buttons, repeat each step for each remaining button. DO NOT erase the channels.
ELECTRONICS
63
Page 66 of 132
Programming A Non-Rolling Code
NOTE:
For programming Garage Door Openers manufactured before 1995.
1. Turn the ignition switch to the ON/RUN position.
2. Place the hand-held transmitter 1 to 3 inches (3 to 8 cm) away from the HomeLink® button youwish to program while keeping the HomeLink® indicator light in view.
3. Simultaneously press and hold both the HomeLink® button you want to program and the hand-held transmitter button.
4. Continue to hold both buttons and observe the indicator light. The HomeLink® indicator will flash slowly and then rapidly after HomeLink® has received the frequency signal from the
hand-held transmitter. Release both buttons after the indicator light changes from slow to
rapid.
5. Press and hold the programmed HomeLink® button and observe the indicator light. If the indicator light stays on constantly, programming is complete and the garage door (or device)
should activate when the HomeLink® button is pressed.
6. To program the two remaining HomeLink® buttons, repeat each step for each remaining button. DO NOT erase the channels.
Using HomeLink®
• To operate, press and release the programmed HomeLink® button. Activation will now occurfor the programmed device (e.g., garage door opener, gate operator, security system, entry
door lock, home/office lighting, etc.,). The hand-held transmitter of the device may also be
used at any time.
WARNING!
• Your motorized door or gate will open and close while you are programming the universal
transceiver. Do not program the transceiver if people or pets are in the path of the door or
gate.
• Do not run your vehicle in a closed garage or confined area while programming the
transceiver. Exhaust gas from your vehicle contains Carbon Monoxide (CO) which is
odorless and colorless. Carbon Monoxide is poisonous when inhaled and can cause you
and others to be severely injured or killed.
ELECTRONICS
64
Page 71 of 132
• This mode will provide aggressive shifting and is intended for spirited driving.
• The system will return to SPORT mode when the ignition switch is cycled from RUN to OFF,and back to RUN again, if this mode is selected.
SRT PERFORMANCE FEATURES
• The EVIC can be used to view or changethe following SRT Performance Features.
Push the UP
or DOWN button
until SRT Performance displays in the EVIC,
then push the RIGHT
button. Follow
the prompts to view and set your desired
settings. Push the BACKbutton to scroll
back to a previous menu or sub menu.
SRT Performance Sub Menu Items
• 0-60 mph (0-100 km/h) • Instantaneous G-Force
• Braking Distance • Peak G-Force
• 1/8 Mile • Digital Speedometer
• 1/4 Mile
0-60 mph (0-100 km/h)
• When selected, this screen displays the time it takes for the vehicle to go from 0 to 60 mph (0 to 100 km/h) within 10 seconds.
Braking Distance
• When selected, this screen displays the vehicle's braking distance and the speed at which the brake pedal was depressed.
1/8 Mile, 1/4 Mile
• When selected, this screen displays the time it takes the vehicle to travel 1/8 mile (1/4 mile) within 30 seconds and the vehicle's speed when it reaches 1/8 mile (1/4 mile).
Instantaneous G-Force
• When selected, this screen displays the current G-Force (lateral and longitudinal) along with a friction circle that displays the directions of the forces.
Peak G-Force
• When selected, this screen displays all four G-Force values (two lateral and two longitudinal).
SRT
69
Page 77 of 132
If a problem is detected, the light will come on while the engine is running. Cycle the ignition
when the vehicle has completely stopped and the shift lever is placed in the PARK position; the
light should turn off.
If the light remains lit with the engine running, your vehicle will usually be drivable; however, see
an authorized dealer immediately. If the light is flashing when the engine is running, immediate
service is required and you may experience reduced performance, an elevated/rough idle or
engine stall and your vehicle may require towing.
- Air Bag Warning Light
• If the light is not on during starting, stays on, or turns on while driving, have the vehicle servicedby an authorized dealer immediately.
SERVICE AWD SYSTEM Message
• If the SERVICE AWD SYSTEM warning message appears after engine start up, or duringdriving, it means the AWD system is not functioning properly. We recommend you do not
operate the vehicle. Have the vehicle serviced immediately.
– Sport Shifting
• This light will illuminate when SPORT MODEis selected. This mode provides performance
based transmission shifting depending on the driver requested throttle position.
– Sport Suspension Indicator
• The light will illuminate when SPORTorTrack MODE is selected. This mode provides
performance based tuning with improved handling through an electronic controlled damping
system.
Oil Change Indicator
Message
• If an “oil change” message (shown as Oil Change Due) appears and a single chime sounds, it is time for your next required oil change.
Resetting The Light After Servicing
Vehicles Equipped With Keyless Enter-N-Go™
• Without pressing the brake pedal, push the ENGINE START/STOP button and cycle the ignition to the ON/RUN position (Do not start the engine.)
• Fully depress the accelerator pedal, slowly, three times within 10 seconds.
• Without pressing the brake pedal, push the ENGINE START/STOP button once to return the ignition to the OFF/LOCK position.
Vehicles Not Equipped With Keyless Enter-N-Go™
• Turn the ignition switch to the ON/RUN position (Do not start the engine.)
• Fully depress the accelerator pedal, slowly, three times within 10 seconds.
• Turn the ignition switch to the OFF/LOCK position.
WHAT TO DO IN EMERGENCIES
75