lock CHRYSLER 300 2015 2.G Owner's Manual
[x] Cancel search | Manufacturer: CHRYSLER, Model Year: 2015, Model line: 300, Model: CHRYSLER 300 2015 2.GPages: 180, PDF Size: 30.54 MB
Page 20 of 180

WARNING!
• Side Air Bags need room to inflate. Do not lean against the door or window. Sit upright inthe center of the seat.
•BeingtooclosetotheSideAirBagsduringdeploymentcouldcauseyoutobeseverelyinjured or killed.
•RelyingontheSideAirBagsalonecouldleadtomoresevereinjuriesinacollision.TheSide Air Bags work with your seat belt to restrain you properly. In some collisions, Side AirBags won’t deploy at all. Always wear your seat belt even though you have Side Air Bags.
•ThisvehicleisequippedwithleftandrightSupplementalSideAirBagInflatableCurtains(SABICs). Do not stack luggage or other cargo up high enough to block the deploymentof the SABICs. The trim covering above the side windows where the SABIC and itsdeployment path are located should remain free from any obstructions.
•ThisvehicleisequippedwithSABICs.InorderfortheSABICstoworkasintended,donotinstall any accessory items in your vehicle which could alter the roof. Do not add anaftermarket sunroof to your vehicle. Do not add roof racks that require permanentattachments (bolts or screws) for installation on the vehicle roof. Do not drill into the roofof the vehicle for any reason.
•DonotuseaccessoryseatcoversorplaceobjectsbetweenyouandtheSideAirBags;theperformance could be adversely affected and/or objects could be pushed into you,causing serious injury.
CHILD RESTRAINTS
Children 12 years or younger should ride properly buckled up in a rear seat, if available. According
to crash statistics, children are safer when properly restrained in the rear seats rather than in the
front.
Every state in the United States and all Canadian provinces require that small children ride in
proper restraint systems. This is the law, and you can be prosecuted for ignoring it.
NOTE:
• For additional information, refer to www.seatcheck.org or call 1–866–SEATCHECK
(1–866–732–8243).
• Canadian residents, should refer to Transport Canada’s website for additional information:
http://www.tc.gc.ca/eng/roadsafety/safedrivers-childsafety-index-53.htm
LATCH — Lower Anchors For CHildren
•YourvehicleisequippedwiththechildrestraintanchoragesystemcalledLATCH,which
stands for Lower Anchors and Tethers for CHildren.
•Allrearseatingpositionshaveloweranchorsandtoptetheranchors.
LATCH System Weight Limit
Yo u m a y u s e t h e L A T C H a n c h o r a g e s y s t e m u n t i l t h e c o m b i n e d w e i g h t o f t h e c h i l d a n d t h e c h i l d
restraint is 65 lbs (29.5 kg). Use the seat belt and tether anchor instead of the LATCH system
once the combined weight is more than 65 lbs (29.5 kg).
GETTING STARTED
18
Page 21 of 180

Locating LATCH Anchorages
The lower anchorages are round bars that
are found at the rear of the seat cushion where
it meets the seatback, below the anchorage
symbols on the seatback. They are just visible
when you lean into the rear seat to install the
child restraint. You will easily feel them if you
run your finger along the gap between the
seatback and seat cushion.
Locating Tether Anchorages
•In addition, there are tether strap anchorages behind each rear seating position located
in the panel between the rear seatback and the rear window. These tether strap anchorages are
under a plastic cover with the tether anchorage symbol on it.
Center Seat LATCH
If a child restraint installed in the center position
blocks the seat belt webbing or buckle for the
outboard position, do not use that outboard
position. If a child seat in the center position
blocks the outboard LATCH anchors or seat
belt, do not install a child seat in that outboard
position.
LATCH Anchorage Locations
Tether Anchorage Location
GETTING STARTED
19
Page 22 of 180

Installing The Child Restraint Using The LATCH Lower Anchors
NOTE:
Never “share” a LATCH anchorage with two or more child restraints.
1. Loosen the adjusters on the lower straps and on the tether strap of the child seat so that youcan more easily attach the hooks or connectors to the vehicle anchorages.
2. Attach the lower hooks or connectors of the child restraint to the lower anchorages in theselected seating position.
3. If the child restraint has a tether strap, connect it to the top tether anchorage. See below fordirections to attach a tether anchor.
4. Tighten all of the straps as you push the child restraint rearward and downward into the seat.
Remove slack in the straps according to the child restraint manufacturer’s instructions.
5. Test that the child restraint is installed tightly by pulling back and forth on the child seat at thebelt path. It should not move more than 1 inch (25.4 mm) in any direction.
Installing The Child Restraint Using The Vehicle Seat Belts
The seat belts in the passenger seating positions are equipped with a Switchable AutomaticLocking Retractor (ALR) that is designed to keep the lap portion of the seat belt tight around thechild restraint. Any seat belt system will loosen with time, so check the belt occasionally, and pullit tight if necessary.
Te t h e r A n c h o r a g e W e i g h t L i m i t
Always use the tether anchor when using the seat belt to install a forward facing child restraint, up
to the recommended weight limit of the child restraint.
To I n s t a l l A C h i l d S e a t U s i n g A n A L R :
1. Pull enough of the seat belt webbing from the retractor to pass it through the belt path of thechild restraint. Do not twist the belt webbing in the belt path.
2. Slide the latch plate into the buckle until you hear a “click.”
3. Pull on the webbing to make the lap portion tight against the child seat.
4. To lock the seat belt, pull down on the shoulder part of the belt until you have pulled all the seatbelt webbing out of the retractor. Then, allow the webbing to retract back into the retractor. Asthe webbing retracts, you will hear a clicking sound. This means the seat belt is now in theAutomatic Locking mode.
5. Try to pull the webbing out of the retractor. If it is locked, you should not be able to pull out anywebbing. If the retractor is not locked, repeat the last step.
6. Finally, pull up on any extra webbing to tighten the lap portion around the child restraint whileyou push the child restraint rearward and downward into the vehicle seat.
7. If the child restraint has a top tether strap and the seating position has a top tether anchorage,connect the tether strap to the anchorage and tighten the tether strap. See below fordirections to attach a tether anchor.
8. Test that the child restraint is installed tightly by pulling back and forth on the child seat at the
belt path. It should not move more than 1 inch (25.4 mm) in any direction.
GETTING STARTED
20
Page 27 of 180
Memory Seat
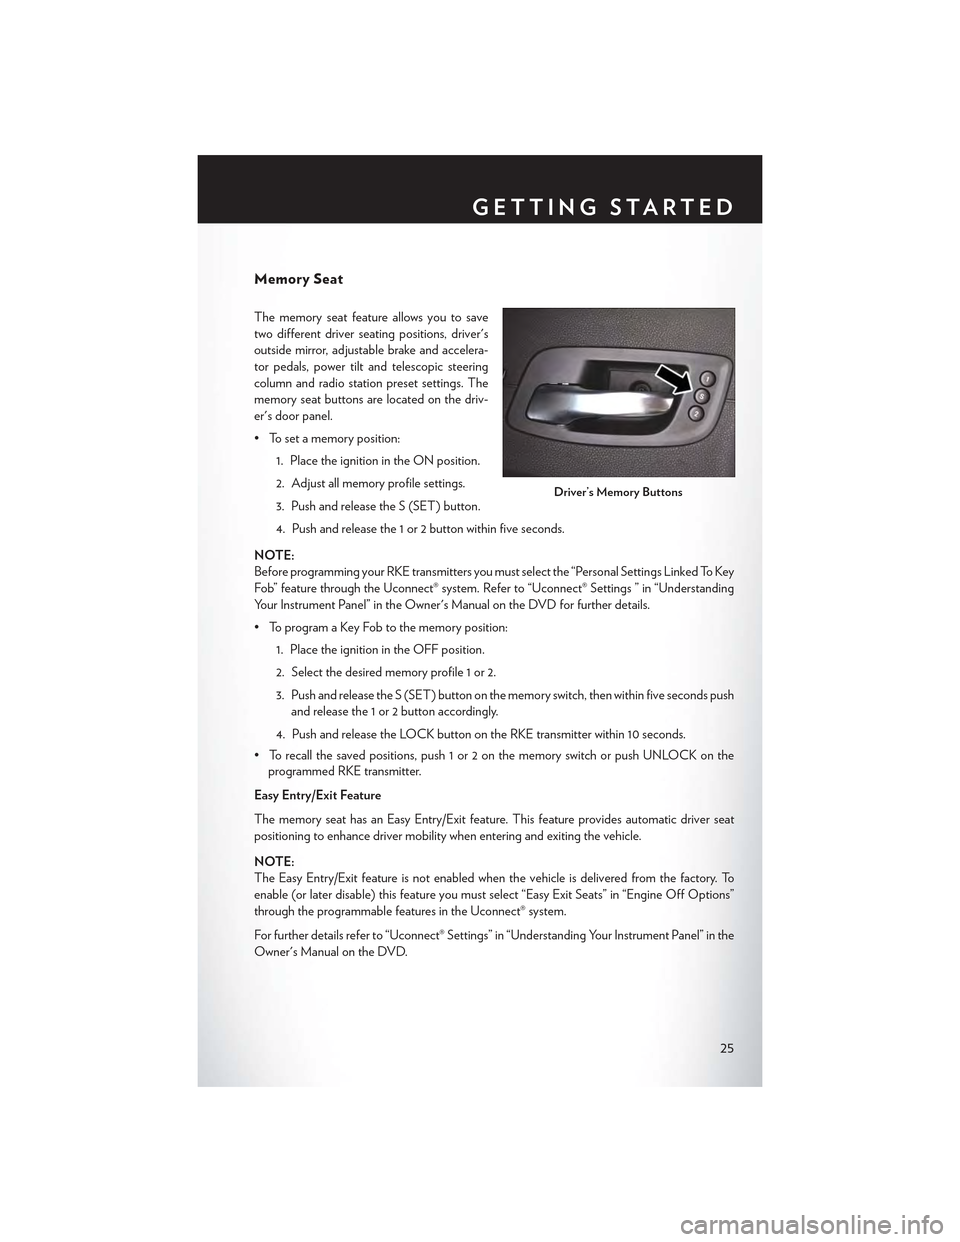
The memory seat feature allows you to save
two different driver seating positions, driver's
outside mirror, adjustable brake and accelera-
tor pedals, power tilt and telescopic steering
column and radio station preset settings. The
memory seat buttons are located on the driv-
er's door panel.
• To set a memory position:
1. Place the ignition in the ON position.
2. Adjust all memory profile settings.
3. Push and release the S (SET) button.
4. Push and release the 1 or 2 button within five seconds.
NOTE:
Before programming your RKE transmitters you must select the “Personal Settings Linked To Key
Fob” feature through the Uconnect® system. Refer to “Uconnect® Settings ” in “Understanding
Yo u r I n s t r u m e n t P a n e l ” i n t h e O w n e r ' s M a n u a l o n t h e D V D f o r f u r t h e r d e t a i l s .
• To program a Key Fob to the memory position:
1. Place the ignition in the OFF position.
2. Select the desired memory profile 1 or 2.
3. Push and release the S (SET) button on the memory switch, then within five seconds push
and release the 1 or 2 button accordingly.
4. Push and release the LOCK button on the RKE transmitter within 10 seconds.
•Torecallthesavedpositions,push1or2onthememoryswitchorpushUNLOCKonthe
programmed RKE transmitter.
Easy Entry/Exit Feature
The memory seat has an Easy Entry/Exit feature. This feature provides automatic driver seat
positioning to enhance driver mobility when entering and exiting the vehicle.
NOTE:
The Easy Entry/Exit feature is not enabled when the vehicle is delivered from the factory. To
enable (or later disable) this feature you must select “Easy Exit Seats” in “Engine Off Options”
through the programmable features in the Uconnect® system.
For further details refer to “Uconnect® Settings” in “Understanding Your Instrument Panel” in the
Owner's Manual on the DVD.
Driver’s Memory Buttons
GETTING STARTED
25
Page 29 of 180

REAR SEAT
Folding Rear Seatback
•Pullontheloops,locatedneartheoutertopoftheseatbacks,tofolddowneitherorboth
seatbacks. These loops can be tucked away when not in use.
•Whentheseatbackisraisedtotheupright
position, make sure it is latched by strongly
pulling on the top of the seatback above the
seat loop.
WARNING!
•Be certain that the seatback is securely locked into position. If the seatback is not securely locked
into position, the seat will not provide the proper stability for child seats and/or passengers. An
improperly latched seat could cause you and others to severely injured or killed.
•Thecargoareaintherearofthevehicle(withtherearseatbacksinthelocked-upor
folded-down position) should not be used as a play area by children when the vehicle is in
motion. They could be severely injured or killed in a collision. Children should be seated
and using the proper restraint system.
HEATED SEATS
Front Heated Seats
The front heated seats control buttons are located within the climate or controls screen of the
touchscreen.
• Press the heated seat buttononce to turn the HI setting On.
• Press the heated seat buttona second time to turn the LO setting On.
• Press the heated seat buttona third time to turn the heating elements Off.
If the HI-level setting is selected, the system will automatically switch to LO-level after approximately
60 minutes. The LO-level setting will turn Off automatically after approximately 45 minutes.
NOTE:
On models that are equipped with remote start, this feature can be programmed to come on
during a remote start through the Uconnect® system. Refer to “Uconnect® Settings” in “Under-
standing Your Instrument Panel” in the Owner's Manual on the DVD.
Rear Seat Loop
GETTING STARTED
27
Page 32 of 180
TILT/TELESCOPING STEERING COLUMN
Manual Tilt/Telescoping Steering Column
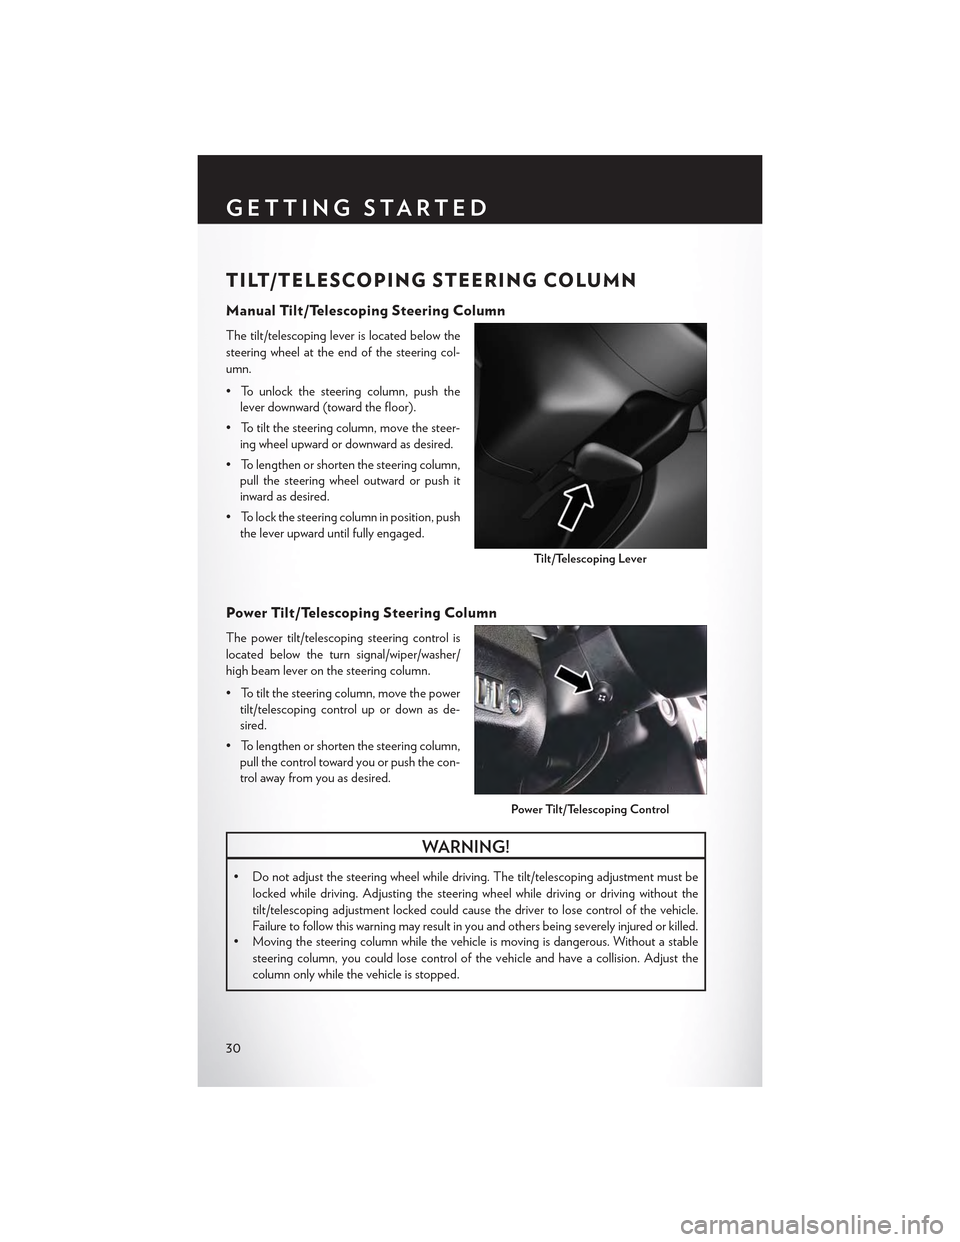
The tilt/telescoping lever is located below the
steering wheel at the end of the steering col-
umn.
• To unlock the steering column, push the
lever downward (toward the floor).
•Totiltthesteeringcolumn,movethesteer-
ing wheel upward or downward as desired.
• To lengthen or shorten the steering column,
pull the steering wheel outward or push it
inward as desired.
• To lock the steering column in position, push
the lever upward until fully engaged.
Power Tilt/Telescoping Steering Column
The power tilt/telescoping steering control is
located below the turn signal/wiper/washer/
high beam lever on the steering column.
•Totiltthesteeringcolumn,movethepower
tilt/telescoping control up or down as de-
sired.
• To lengthen or shorten the steering column,
pull the control toward you or push the con-
trol away from you as desired.
WARNING!
• Do not adjust the steering wheel while driving. The tilt/telescoping adjustment must be
locked while driving. Adjusting the steering wheel while driving or driving without the
tilt/telescoping adjustment locked could cause the driver to lose control of the vehicle.
Failure to follow this warning may result in you and others being severely injured or killed.•Movingthesteeringcolumnwhilethevehicleismovingisdangerous.Withoutastable
steering column, you could lose control of the vehicle and have a collision. Adjust the
column only while the vehicle is stopped.
Ti l t / Te l e s c o p i n g Le v e r
Power Tilt/Telescoping Control
GETTING STARTED
30
Page 53 of 180

Pinch Protection Feature
This feature will detect an obstruction in the opening of the sunroof during Express Close
operation. If an obstruction in the path of the sunroof is detected, the sunroof will automatically
retract. Remove the obstruction if this occurs. Next, push the switch forward and release to
Express Close.
NOTE:
If three consecutive sunroof close attempts result in P inch Protect reversals, the fourth close
attempt will be a Manual Close movement with Pinch Protect disabled.
WARNING!
•Donotletchildrenplaywiththesunroof.Neverleavechildrenunattendedinavehicle,or
with access to an unlocked vehicle. Do not leave the Key Fob in or near the vehicle, and do
not leave the ignition of a vehicle equipped with Keyless Enter-N-Go™ in the ACC or
ON/RUN mode. Occupants, particularly unattended children, can become entrapped by
the power sunroof while operating the power sunroof switch. Such entrapment may result
in serious injury or death.
• In a collision, there is a greater risk of being thrown from a vehicle with an open sunroof.
Yo u c o u l d a l s o b e s e v e r e l y i n j u r e d o r k i l l e d . A l w a y s f a s t e n y o u r s e a t b e l t p r o p e r l y a n d m a k e
sure all passengers are properly secured.
•Donotallowsmallchildrentooperatethesunroof.Neverallowyourfingers,otherbody
parts, or any object to project through the sunroof opening. Injury may result.
WIND BUFFETING
Wind buffeting can be described as a helicopter-type percussion sound. If buffeting occurs with
the rear windows open, adjust the front and rear windows together.
If buffeting occurs with the sunroof open, adjust the sunroof opening, or adjust any window. This
will minimize buffeting.
OPERATING YOUR VEHICLE
51
Page 57 of 180
Uconnect® ACCESS
Uconnect® Access — If Equipped (Available On Uconnect® 8.4A/8.4AN
—U.S.ResidentsOnly)
WARNING!
ALWAYS drive safely with your hands on the steering wheel. You have full responsibility and
assume all risks related to the use of the Uconnect® features and applications in this vehicle.
Only use Uconnect® when it is safe to do so. Failure to do so may result in an accident involving
serious injury or death.
Uconnect® Access enhances your ownership and driving experience by connecting your vehicle
with a built-in cellular connection. With Uconnect® Access, you can:
• Place a call to a local 9-1-1 Operator for emergency assistance.
•Remotelylock/unlockyourdoorsandstartyourvehiclefromvirtuallyanywhere,usingthe
Uconnect® Access App from your smartphone. You can also do so by logging into Mopar
Owner Connect, or by calling Uconnect® Care. (Vehicle must be within the United States and
have network coverage).
•TurnyourvehicleintoaWiFiHotspotandconnectyourdevicestotheinternet.
•Receivetextoremailnotificationsifyourvehicle'stheftalarmgoesoff.
•Receivestolenvehicleassistance,usingGPStechnologytohelpauthoritieslocateyour
vehicle if it is stolen.
•Listentoyourtextmessagesorsendfree-formtextmessageswithyourvoicewhilekeeping
your hands on the wheel, using the Voice Texting feature. Requires a cell phone that supports
Bluetooth Message Access Profile (MAP).
•Searchforplacestoeat,shop,relaxandplaywithYelp®,usingyourvoiceoron-screenmenu.
Then navigate to them (navigation standard on Uconnect® 8.4AN, optional on Uconnect®
8.4A).
•GetoperatorassistanceusingtheASSISTbuttononyourinteriorrearviewmirror.
Before you drive, familiarize yourself with the easy-to-use Uconnect® Access.
1. The ASSIST and 9-1-1 buttons are located on your rearview mirror. The ASSIST button is used
for contacting Roadside Assistance, Vehicle Care and Uconnect® Care. The 9-1-1 button
connects you to emergency services.
NOTE:
Ve h i c l e s s o l d i n C a n a d a a n d M e x i c o D O N O T h a v e 9 - 1 - 1 C a l l s y s t e m c a p a b i l i t i e s . 9 - 1 - 1 o r
other emergency line operators in Canada and Mexico may not answer or respond to 9-1-1
system calls.
2. The Uconnect® “Apps” button on the menu bar at the bottom right corner of the radio
touchscreen. This is where you can begin your registration process, manage your Apps and
purchase WiFi on demand.
ELECTRONICS
55
Page 59 of 180
NOTE:
For security reasons, this link is valid for 72 hours from the time you’ve submitted your email
address into the radio touchscreen. If the link has expired, simply re-enter your email address into
the Uconnect® Registration App on the radio touchscreen to receive another link. The secured
registration link will take you through the Uconnect® Access registration process step by step.
7. To unlock the full potential of Uconnect® Access in your vehicle, you will need to create or
validate an existing Mopar Owner Connect account previously (Owner Center). Uconnect®
along with Mopar Owner Connect have joined forces to create one destination to manage all
of your vehicle needs, from managing your Uconnect® Access account, to tracking service
history and finding recommended accessories for your vehicle. If you already have a Mopar
Owner Connect account, log in to the website with your existing username/email and
password. For assistance with this web based registration process, call Uconnect® Care at
1-855-792-4241 .
8. Once you are logged in to your Mopar Owner Connect account, you will create a personal
Uconnect® Security PIN. The Uconnect® Security PIN will be required to authenticate you
when accessing your account via Uconnect® Care or performing any remote services such as
Remote Door Lock/Unlock, Remote Horn & Lights or Starting and Stopping the engine.
9. If your vehicle qualifies for a trial package it will be presented. Simply agree to the Uconnect®
Terms of Service (checkbox) and then select the “Start Service” button.
At this point your vehicle is registered with Uconnect® Access. Continue to set up Via Mobile.
Apps will be downloaded the next time you start your vehicle. If the Apps have not appeared after
24 hours, please contact Uconnect® Care.
Download The Uconnect® Access App
The Uconnect® Access smartphone app allows you to remotely lock or unlock your doors, start
your engine (if equipped) and activate your horn and lights from virtually anywhere. The
smartphone app also features Via Mobile (if equipped) which uses your smartphone’s data plan
to access your personal Pandora®, iHeartRadio, Slacker Radio and Aha™ by HARMAN accounts
and control them using your vehicle touchscreen.
The Uconnect® Access app is only compatible with select iPhone® and Android smartphones.
Visit UconnectPhone.com or call 1-877-855-8400 to confirm that your smartphone is compatible
with Uconnect®. Once you’ve confirmed your smartphone is compatible, Android and iPhone®
users should visit their respective app store and search for “Uconnect Access” to download the
app.
Set Up Your Via Mobile Profile — If Equipped
Setting up your Via Mobile profile means entering your login information for each App so that
they can work in your vehicle. Complete your Via Mobile Profile online during registration of your
Uconnect® Access system. Access this pageby logging into your Mopar Owner Connect
account (moparownerconnect.com), going to Edit Profile, then Via Mobile Profile.
If you already have an account with these Apps, scroll down and press the “Link” button to enter
your information. If you do not have an account, you can create a new one.
ELECTRONICS
57
Page 65 of 180
4.Yelp®—Customershavetheabilitytosearchfornearbydestinationsorapointofinterest
(POI) either by category or custom search by using keywords (for example, “Italian restau-
rant”). Searching can be done by either voice or by using the touchscreen keypad. Using the
touchscreen, launch Yelp® by selecting the “Apps” icon, press the “All Apps” tab, and then
press “Yelp.” Using voice recognition, push the Voice Command (VR) button on the steering
wheel and say “Launch Yelp®.”
5.Security Alarm Notification—TheSecurityAlarmNotificationfeaturenotifiesyouviaemail
or text (SMS) message when the vehicle’s factory-installed security alarm system has been
set-off. There are a number of reasons why your alarm may have been triggered, one of which
could be that your vehicle was stolen. If so, please see the details of the Stolen Vehicle
Assistance service below. When you register, Security Alarm Notification is automatically set
to send you an email at the mail address you provide should the alarm go off. You may also opt
to have a text message sent to your mobile device.
6.Stolen Vehicle Assistance—Ifyourvehicleisstolen,contactlocallawenforcementimme-
diately to file a stolen vehicle report. Once this report has been filed, Uconnect® care can help
locate your vehicle. The Uconnect® Care agent will ask for the stolen vehicle report number
issued by local law enforcement. Then, using GPS technology and the built-in wireless
connection within your vehicle, the Uconnect® Care agent will be able to locate the stolen
vehicle and work with law enforcement to help recover it. (Vehicle must be within the United
States, have network coverage and must be registered with Uconnect® Access with an active
subscription that includes the applicable feature).
7.WiFi Hotspot—WiFiHotspotison-demandWiFi3Gconnectivitythat'sbuilt-inandready
to go whenever you are. Once your vehicle is registered for Uconnect® Access, you can
purchase a Wifi Hotspot subscription at the Uconnect® Store. After you've made your
purchase, turn on your signal and connect your passengers devices. It's never been easier to
bring your home or office with you.
NOTE:
Yo u r v e h i c l e m u s t h a v e a w o r k i n g e l e c t r i c a l s y s t e m f o r a n y o f t h e i n v e h i c l e U c o n n e c t ® f e a t u r e s t o
operate.
Uconnect® Access Remote Features
If you own a compatible iPhone® or Android® powered device, the Uconnect® Access App allows
you to remotely lock or unlock your doors, start your engine or activate your horn and lights from
virtually anywhere (Vehicle must be within the United States and have network coverage). You
can download the App from Mopar Owner Connect or from the App Store (iPhone) or Google
Play store. Visit UconnectPhone.com to determine if your device is compatible. For Uconnect®
Phone customer support and to determine if your device is compatible.
U.S. residents - visit UconnectPhone.com or call 1-877-855-8400
ELECTRONICS
63