ignition CHRYSLER 300 2015 2.G Owner's Manual
[x] Cancel search | Manufacturer: CHRYSLER, Model Year: 2015, Model line: 300, Model: CHRYSLER 300 2015 2.GPages: 180, PDF Size: 30.54 MB
Page 136 of 180

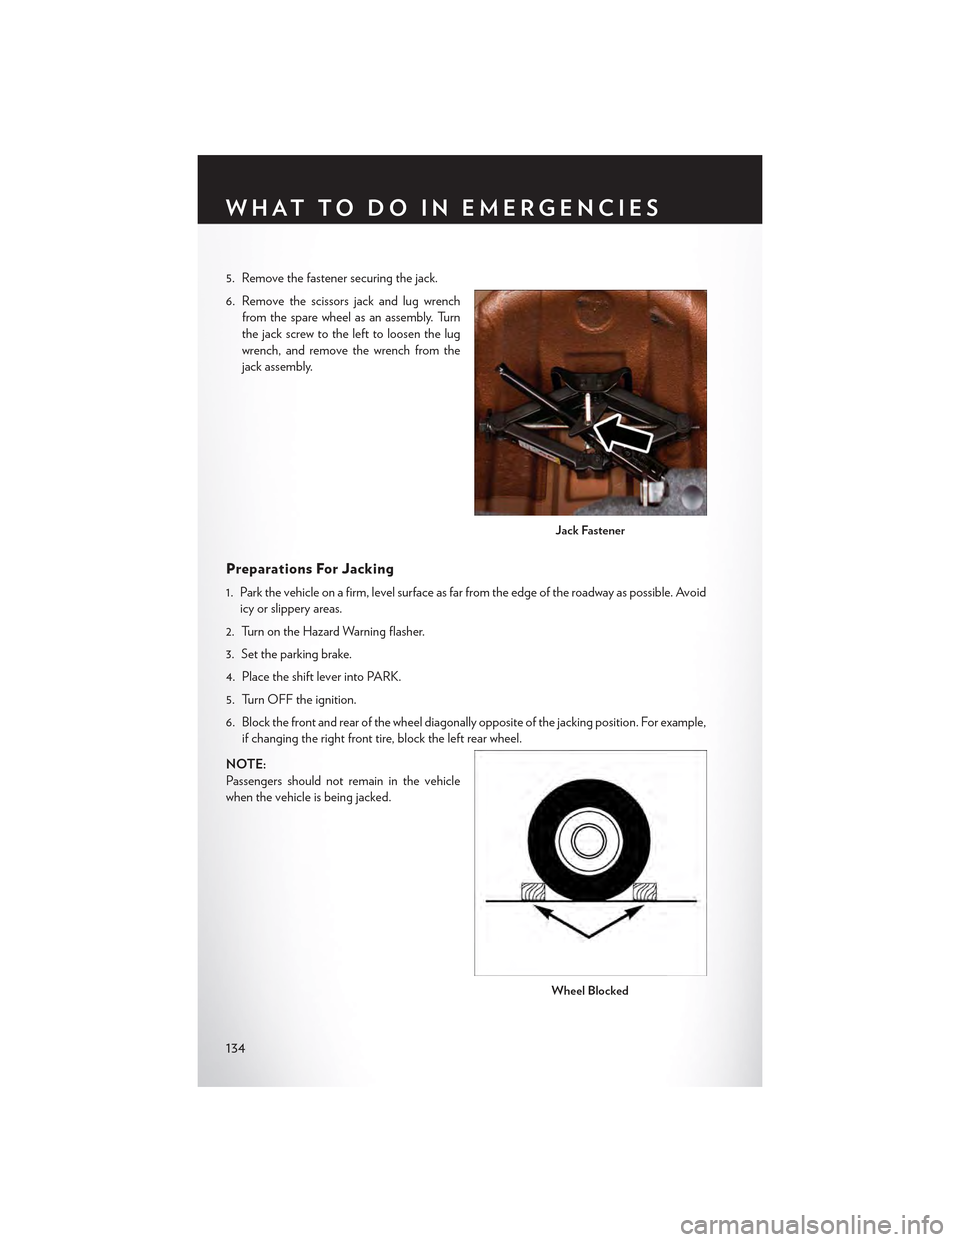
5. Remove the fastener securing the jack.
6. Remove the scissors jack and lug wrench
from the spare wheel as an assembly. Turn
the jack screw to the left to loosen the lug
wrench, and remove the wrench from the
jack assembly.
Preparations For Jacking
1. Park the vehicle on a firm, level surface as far from the edge of the roadway as possible. Avoid
icy or slippery areas.
2. Turn on the Hazard Warning flasher.
3. Set the parking brake.
4. Place the shift lever into PARK.
5. Turn OFF the ignition.
6. Block the front and rear of the wheel diagonally opposite of the jacking position. For example,
if changing the right front tire, block the left rear wheel.
NOTE:
Passengers should not remain in the vehicle
when the vehicle is being jacked.
Jack Fastener
Wheel Blocked
WHAT TO DO IN EMERGENCIES
134
Page 141 of 180

BATTERY LOCATION
The battery is stored under an access cover in the trunk. Remote battery posts are located on the
right side of the engine compartment for jump-starting.
JUMP-STARTING
If your vehicle has a discharged battery it can be jump-started using a set of jumper cables and a
battery in another vehicle or by using a portable battery booster pack.
Jump-starting can be dangerous if done improperly so please follow the procedures in this
section carefully.
NOTE:
When using a portable battery booster pack
follow the manufacturer’s operating instruc-
tions and precautions.
Preparations For Jump-Start
The battery is stored under an access cover in
the trunk. Remote battery posts are located on
the right side of the engine compartment for
jump-starting.
NOTE:
The remote battery posts are viewed by stand-
ing on the right side of the vehicle looking over
the fender.
•Settheparkingbrake,shifttheautomatic
transmission into PARK and turn the ignition
to OFF.
• Turn off the heater, radio, and all unnecessary
electrical accessories.
•Ifusinganothervehicletojump-startthebattery,parkthevehiclewithinthejumpercables
reach, set the parking brake and make sure the ignition is OFF.
Remote Battery Posts
1—PositiveBatteryPost2—NegativeBatteryPost
WHAT TO DO IN EMERGENCIES
139
Page 143 of 180

WARNING!
•Whentemperaturesarebelowthefreezingpoint,electrolyteinadischargedbatterymay
freeze. Do not attempt jump-starting because the battery could rupture or explode and
cause personal injury. Battery temperature must be brought above freezing point before
attempting a jump-start.
•Takecaretoavoidtheradiatorcoolingfanwheneverthehoodisraised.Itcanstartanytime
the ignition switch is on. You can be injured by moving fan blades.
•Removeanymetaljewelry,suchaswatchbandsorbracelets,thatmightmakean
inadvertent electrical contact. You could be severely injured.
•Batteriescontainsulfuricacidthatcanburnyourskinoreyesandgeneratehydrogengas
which is flammable and explosive. Keep open flames or sparks away from the battery.
•Donotallowvehiclestotoucheachotherasthiscouldestablishagroundconnectionand
personal injury could result.
• Failure to follow this procedure could result in personal injury or property damage due to
battery explosion.
•Donotconnectthecabletothenegativepost(-)of the discharged battery. The resulting
electrical spark could cause the battery to explode and could result in personal injury.
MANUAL PARK RELEASE
WARNING!
Always secure your vehicle by fully applying the parking brake, before activating the Manual
Park Release. Activating the Manual Park Release will allow your vehicle to roll away if it is not
secured by the parking brake or by proper connection to a tow vehicle. Activating the Manual
Park Release on an unsecured vehicle could lead to serious injury or death for those in or
around the vehicle.
In order to push or tow the vehicle in cases where the transmission will not shift out of PARK (such
as a dead battery), a Manual Park Release is available.
Follow these steps to use the Manual Park Release:
1. Firmly apply the parking brake.
2. Remove the console storage bin to access the Manual Park Release lever.
3. Using a small screwdriver or similar tool, fish the tether strap up through the opening in the
console base.
4. Insert the screwdriver into the slot in the center of the lever, and disengage the lever locking
tab by pushing it to the right.
5. While holding the locking tab in the disengaged position, pull the tether strap to rotate the
lever up and rearward, until it locks in place in the vertical position. The vehicle is now out of
PA R K a n d c a n b e t o w e d . Re l e a s e t h e p a r k i n g b ra ke o n l y w h e n t h e v e h i c l e i s s e c u re l y
connected to a tow vehicle.
WHAT TO DO IN EMERGENCIES
141
Page 144 of 180

To R e s e t T h e M a n u a l P a r k R e l e a s e :
1. Push the latch (at the base of the lever, on the rear side) rearward (away from the lever) to
unlatch the lever.
2. Rotate the Manual Park Release lever forward and down, to its original position, until the
locking tab snaps into place to secure the lever.
3. Pull up gently on the tether strap to confirm that the lever is locked in its stowed position.
4. Tuck the tether strap into the base of the console. Reinstall the console storage bin.
TOWING A DISABLED VEHICLE
This section describes procedures for towing a disabled vehicle using a commercial towing
service.
Towing ConditionWheels OFF TheGroundRWD MODELS AWD MODELS
Flat TowNONE
If transmission is op-erable:• Transmission inNEUTRAL• 30 mph (48 km/h)maxspeed• 30 miles (48 km)maxdistance
NOT ALLOWED
Wheel Lift or DollyTo w
Front
NOT RECOM-MENDED (but, ifused, same limita-tions as above)
NOT ALLOWED
RearNOT RECOM-MENDED
NOT RECOM-MENDED, but, if used:• Ignition in ON/RUN position• Transmission
inNEUTRAL
(NOT in Park)
FlatbedALLBEST METHOD BEST METHOD
Refer to your Owner’s Manual on the DVD for further information.
WHAT TO DO IN EMERGENCIES
142
Page 159 of 180

FUSES
Front Power Distribution Center (Fuses)
The Front Power Distribution Center is located in the engine compartment. This module
contains fuses and relays.
CAUTION!
•Wheninstallingthepowerdistributioncentercover,itisimportanttoensurethecoveris
properly positioned and fully latched. Failure to do so may allow water to get into the
power distribution center and possibly result in an electrical system failure.
• When replacing a blown fuse, it is important to use only a fuse having the correct
amperage rating. The use of a fuse with a rating other than indicated may result in a
dangerous electrical system overload. If a properly rated fuse continues to blow, it
indicates a problem in the circuit that must be corrected.
Cavity Cartridge Fuse Mini-FuseDescription
1––Fuse – Spare
2 40 Amp Green–Radiator Fan #1 – If Equipped
3 50 Amp Red–Power Steering #1 / Radiator Fan(6.2L Supercharged) – If Equipped
4 30 Amp Pink–Starter
5 40 Amp Green–Electronic Stability Control
6 30 Amp Pink–Electronic Stability Control
7––Fuse – Spare
8 20 Amp Blue–Police Ignition Run / ACC # 2
9–20 Amp Yellow All-Wheel Drive Module – If Equipped
10–10 Amp Red Security – If Equipped / Under hoodLamp – Police
11–20 Amp YellowHorns
12–10 Amp RedAir Conditioning Clutch
13––Fuse – Spare
14––Fuse – Spare
15–20 Amp YellowLeft HID – If Equipped
16–20 Amp Yellow Right HID – If Equipped
18 50 Amp Red–Radiator Fan #2 – If Equipped
19 50 Amp Red–Power Steering #2 / Radiator Fan(6.2L Supercharged)
20 30 Amp Pink–Wiper Motor
21 30 Amp Pink– Headlamp Washers – If Equipped / Po-lice Feed
MAINTAINING YOUR VEHICLE
157
Page 162 of 180

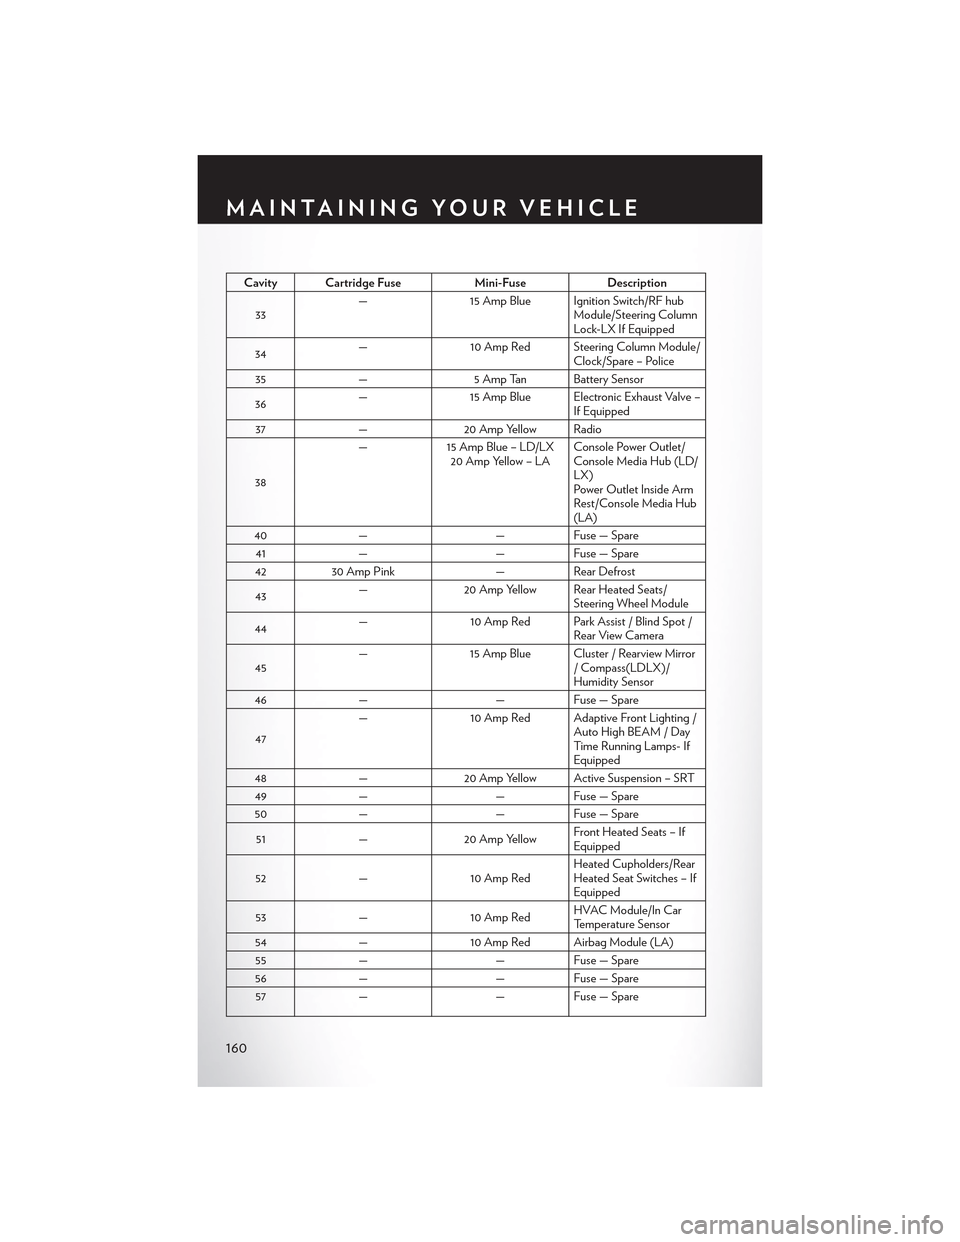
Cavity Cartridge FuseMini-FuseDescription
33—15 Amp Blue Ignition Switch/RF hubModule/Steering ColumnLock-LX If Equipped
34—10 Amp Red Steering Column Module/Clock/Spare – Police
35—5 Amp Tan Battery Sensor
36—15 Amp Blue Electronic Exhaust Valve –If Equipped
37—20 Amp Yellow Radio
38
—15 Amp Blue – LD/LX20 Amp Yellow – LAConsole Power Outlet/Console Media Hub (LD/LX)Power Outlet Inside ArmRest/Console Media Hub(LA)
40——Fuse — Spare
41——Fuse — Spare
4230 Amp Pink—Rear Defrost
43—20 Amp Yellow Rear Heated Seats/Steering Wheel Module
44—10 Amp Red Park Assist / Blind Spot /Rear View Camera
45—15 Amp Blue Cluster / Rearview Mirror/Compass(LDLX)/Humidity Sensor
46——Fuse — Spare
47
—10 Amp Red Adaptive Front Lighting /Auto High BEAM / DayTi m e R u n n i n g L a m p s- IfEquipped
48—20 Amp Yellow Active Suspension – SRT
49——Fuse — Spare
50——Fuse — Spare
51—20 Amp YellowFront Heated Seats – IfEquipped
52—10 Amp RedHeated Cupholders/RearHeated Seat Switches – IfEquipped
53—10 Amp RedHVAC Module/In CarTemperature Sensor
54—10 Amp Red Airbag Module (LA)
55——Fuse — Spare
56——Fuse — Spare
57——Fuse — Spare
MAINTAINING YOUR VEHICLE
160