change time CHRYSLER 300 2015 2.G User Guide
[x] Cancel search | Manufacturer: CHRYSLER, Model Year: 2015, Model line: 300, Model: CHRYSLER 300 2015 2.GPages: 180, PDF Size: 30.54 MB
Page 4 of 180
WELCOME FROM FCA US LLC
Congratulations on selecting your new FCA US LLC (“FCA US”) vehicle. Be assured that it
represents precision workmanship, distinctive styling, and high quality - all essentials that are
traditional to our vehicles.
Yo u r n e w F C A U S v e h i c l e h a s c h a r a c t e r i s t i c s t o e n h a n c e t h e d r i v e r ' s c o n t r o l u n d e r s o m e d r i v i n g
conditions. These are to assist the driver and are never a substitute for attentive driving. They can
never take the driver's place. Always drive carefully.
Yo u r n e w v e h i c l e h a s m a n y f e a t u r e s f o r t h e c o m f o r t a n d c o n v e n i e n c e o f y o u a n d y o u r p a s s e n g e r s .
Some of these should not be used when driving because they take your eyes from the road or
your attention from driving. Never text while driving or take your eyes more than momentarily off
the road.
This guide illustrates and describes the operation of features and equipment that are either
standard or optional on this vehicle. This guide may also include a description of features and
equipment that are no longer available or were not ordered on this vehicle. Please disregard any
features and equipment described in this guide that are not available on this vehicle. FCA US
reserves the right to make changes in design and specifications and/or make additions to or
improvements to its products without imposing any obligation upon itself to install them on
products previously manufactured.
This User Guide has been prepared to help you quickly become acquainted with the important
features of your vehicle. It contains most things you will need to operate and maintain the vehicle,
including emergency information.
The DVD includes a computer application containing detailed Owner's information which can
be viewed on a personal computer or MAC computer. The multimedia DVD also includes videos
which can be played on any standard DVD player (including the Uconnect Touchscreen Radios
if equipped with DVD player capabilities). Additional DVD operational information is located on
the back of the DVD sleeve.
For complete owner information, refer to your Owner's Manual on the DVD in the owner’s
kit provided at the time of new vehicle purchase.For your convenience, the information
contained on the DVD may also be printed and saved for future reference.
FCA US is committed to protecting our environment and natural resources. By converting from
paper to electronic delivery for the majority of the user information for your vehicle, together we
greatly reduce the demand for tree-based products and lessen the stress on our environment.
INTRODUCTION/WELCOME
2
Page 41 of 180
Distance Setting (ACC Only)
The specified following distance for ACC can be set by varying the distance setting between four
bars (longest), three bars (long), two bars (medium) and one bar (short). Using this distance
setting and the vehicle speed, ACC calculates and sets the distance to the vehicle ahead. This
distance setting displays in the DID.
• To increase the distance setting, push the Distance Setting—Increase button and release. Each
time the button is pushed, the distance setting increases by one bar (longer).
• To decrease the distance setting, push the Distance Setting—Decrease button and release.
Each time the button is pushed, the distance setting decreases by one bar (shorter).
Changing Modes (ACC Only)
If desired, the Adaptive Cruise Control mode can be turned off and the system can be operated
as a normal (Fixed Speed) Speed Control mode. When in the normal (Fixed Speed) Speed
Control mode the distance setting feature will be disabled and the system will maintain the speed
you set.
• To change between the different cruise control modes, push the ADAPTIVE CRUISE
CONTROL (ACC ) ON/OFF button which turns the ACC and the normal (Fixed Speed)
Speed Control OFF.
•Pushingthenormal(FixedSpeed)SPEEDCONTROLON/OFFbuttonwillresultinturning
ON (changing to) the normal (Fixed Speed) Speed Control mode.
Refer to your Owner's Manual on the DVD for further information.
OPERATING YOUR VEHICLE
39
Page 42 of 180
WARNING!
Adaptive Cruise Control (ACC) is a convenience system. It is not a substitute for activedriving involvement. It is always the driver’s responsibility to be attentive of road, traffic, andweather conditions, vehicle speed, distance to the vehicle ahead; and, most importantly, brakeoperation to ensure safe operation of the vehicle under all road conditions. Your completeattention is always required while driving to maintain safe control of your vehicle. Failure tofollow these warnings can result in a collision and death or serious personal injury.The ACC system:•Doesnotreacttopedestrians,oncomingvehicles,andstationaryobjects(e.g.,astopped
vehicle in a traffic jam or a disabled vehicle).
• Cannot take street, traffic, and weather conditions into account, and may be limited upon
adverse sight distance conditions.
•Doesnotalwaysfullyrecognizecomplexdrivingconditions,whichcanresultinwrongor
missing distance warnings.
•Willbringthevehicletoacompletestopwhilefollowingatargetvehicleandholdthevehicle for 2 seconds in the stop position. If the target vehicle does not start moving withintwo seconds the ACC system will display a message that the system will release the brakesand that the brakes must be applied manually. An audible chime will sound when thebrakes are released.
Yo u s h o u l d s w i t c h o f f t h e A C C s y s t e m :
• When driving in fog, heavy rain, heavy snow, sleet, heavy traffic, and complex driving
situations (i.e., in highway construction zones).
• When entering a turn lane or highway off ramp; when driving on roads that are winding, icy,
snow-covered, slippery, or have steep uphill or downhill slopes.
• When towing a trailer up or down steep slopes.
• When circumstances do not allow safe driving at a constant speed.
The Cruise Control system has two control modes:
•AdaptiveCruiseControlmodeformaintaininganappropriatedistancebetweenvehicles.• Normal (fixed speed) electronic speed control mode for cruising at a constant presetspeed. For additional information, refer to “Normal (Fixed Speed) Cruise Control Mode”in this section.
Normal (fixed speed) electronic speed control will not react to preceding vehicles. Always be
aware of the mode selected.
You can change the mode by using the Cruise Control buttons. The two control modes
function differently. Always confirm which mode is selected.
FORWARD COLLISION WARNING (FCW)
The Forward Collision Warning (FCW) system provides the driver with audible warnings and
visual warnings within the Driver Information Display (DID), to warn the driver when it detects a
potential frontal collision. The warnings are intended to provide the driver with enough time to
react, avoid or mitigate the potential collision.
NOTE:
FCW monitors the information from the forward looking sensors as well as the Electronic Brake
Controller (EBC ), to calculate the probability of a forward collision. When the system determines
that a forward collision is probable, the driver will be provided with audible and visual warnings.
OPERATING YOUR VEHICLE
40
Page 43 of 180
Turning FCW ON Or OFF
The forward collision button is located on the switch panel below the Uconnect® display.
•ToturntheFCWsystemOFF,pushtheforwardcollisionbuttononce(LEDturnson).
•ToturntheFCWsystembackON,pushtheforwardcollisionbuttonagain(LEDturnsoff).
NOTE:
The default status of FCW is “On”, this allows the system to warn you of a possible collision
with the vehicle in front of you.
Changing the FCW status to “Off ” prevents the system from warning you of a possible collision
with the vehicle in front of you. If FCW is set to “Off ”, “FCW OFF” will be displayed in the Driver
Information Display (DID).
Changing FCW Status
The FCW feature has two settings and can be changed within the Uconnect® System Screen:
•Far
• Near
Far
The default status of FCW is the “Far” setting.
The far setting provides warnings for potential collisions more distant in front of the vehicle,
allowing the driver to have the most reaction time to avoid a collision.
More cautious drivers that do not mind frequent warnings may prefer this setting.
NOTE:
This setting gives you the most reaction time.
Near
Changing the FCW status to the “Near” setting, allows the system to warn you of a potential
frontal collision when you are much closer.
This setting provides less reaction time than the “Far” setting, which allows for a more dynamic
driving experience.
More dynamic or aggressive drivers that want to avoid frequent warnings may prefer this setting.
Refer to the Owner's Manual on the DVD for further details.
WARNING!
Forward Collision Warning (FCW ) is not intended to avoid a collision on its own, nor can
FCW detect every type of potential collision. The driver has the responsibility to avoid a
collision by controlling the vehicle via braking and steering. Failure to follow this warning could
lead to serious injury or death.
OPERATING YOUR VEHICLE
41
Page 78 of 180
Replay
Lets you replay up to 44 minutes of the content of the current SiriusXM channel.
ReplayOptionOption Description
Play/Pause Press to Pause content playback. Press Pause/Play again to resume playback.
Rewind/RW Rewinds the channel content in steps of five seconds. Press and hold to rewindcontinuously, then release to begin playing content at that point.
FastForward/FWForwards the content, and works similarly to Rewind/RW. However, FastForward/FW can only be used when content has been previously rewound.
Replay Time Displays the amount of time in the upper center of the screen by which your contentlags the Live channel.
Live Resumes playback of Live content at any time while replaying rewound content.
SiriusXM services require subscriptions, sold separately after the 12-month trial included with the
new vehicle purchase.If you decide to continue your service at the end of your trial subscrip-
tion, the plan you choose will automatically renew and bill at then-current rates until you call
SiriusXM at 1-866-635-2349 for U.S. residents and 1-888-539-7474 for Canadian residents
to cancel. See SiriusXM Customer Agreement for complete terms at www.siriusxm.com for
U.S. residents and www.siriusxm.ca for Canadian residents.All fees and programming subject
to change. Our satellite service is available only to those at least 18 and older in the 48 contiguous
USA and D.C. Our Sirius satellite service is also available in PR (with coverage limitations). Our
Internet radio service is available throughout our satellite service area and in AK and HI. © 2015
Sirius XM Radio Inc. Sirius, XM and all related marks and logos are trademarks of Sirius XM
Radio Inc.
MEDIA HUB — PLAYING iPod®/USB/MP3 DEVICES
There are many ways to play music from iPod®/MP3 players or USB devices through your
vehicle's sound system. Press your “Media” button on the touchscreen to begin.
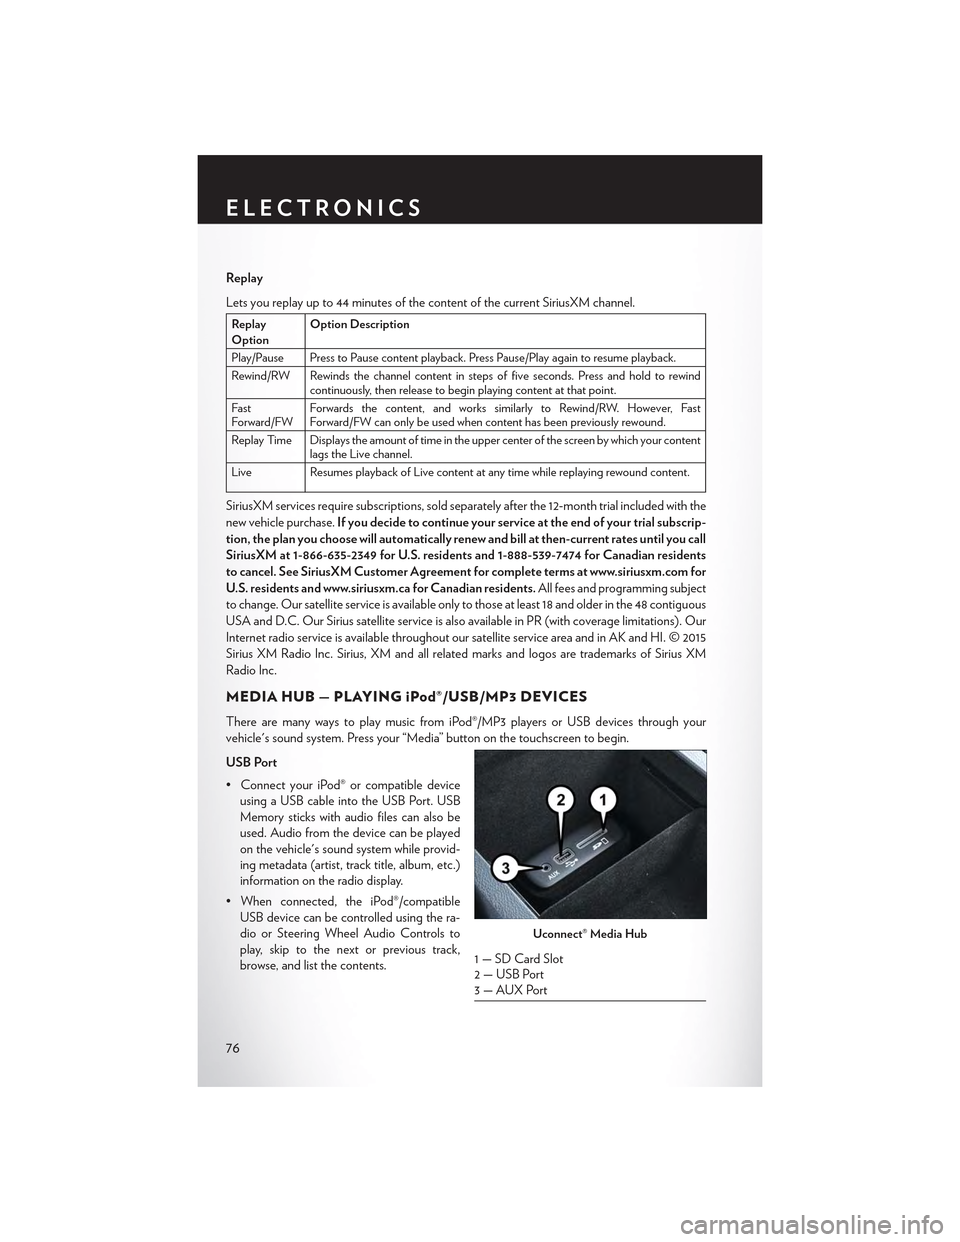
USB Port
•ConnectyouriPod®orcompatibledevice
using a USB cable into the USB Port. USB
Memory sticks with audio files can also be
used. Audio from the device can be played
on the vehicle's sound system while provid-
ing metadata (artist, track title, album, etc.)
information on the radio display.
•Whenconnected,theiPod®/compatible
USB device can be controlled using the ra-
dio or Steering Wheel Audio Controls to
play, skip to the next or previous track,
browse, and list the contents.
Uconnect® Media Hub
1 — SD Card Slot2 — USB Port3—AUXPort
ELECTRONICS
76
Page 79 of 180
•TheiPod®batterychargeswhenpluggedintotheUSBport(ifsupportedbythespecific
device).
• To route the USB/iPod® cable out of the center console, use the access cut out.
NOTE:
•WhenconnectingyouriPod®deviceforthefirsttime,thesystemmaytakeseveralminutesto
read your music, depending on the number of files. For example, the system will take
approximately five minutes for every 1,000 songs loaded on the device. Also during the
reading process, the Shuffle and Browse functions will be disabled. This process is needed to
ensure the full use of your iPod® features and only happens the first time it is connected. After
the first time, the reading process of your iPod® will take considerably less time unless changes
are made or new songs are added to the playlist.
• The USB port supports certain Mini, Classic, Nano, Touch, and iPhone® devices. The USB
port also supports playing music from compatible external USB Mass Storage Class memory
devices. Some iPod® software versions may not fully support the USB port features. Please visit
Apple’s website for iPod® software updates.
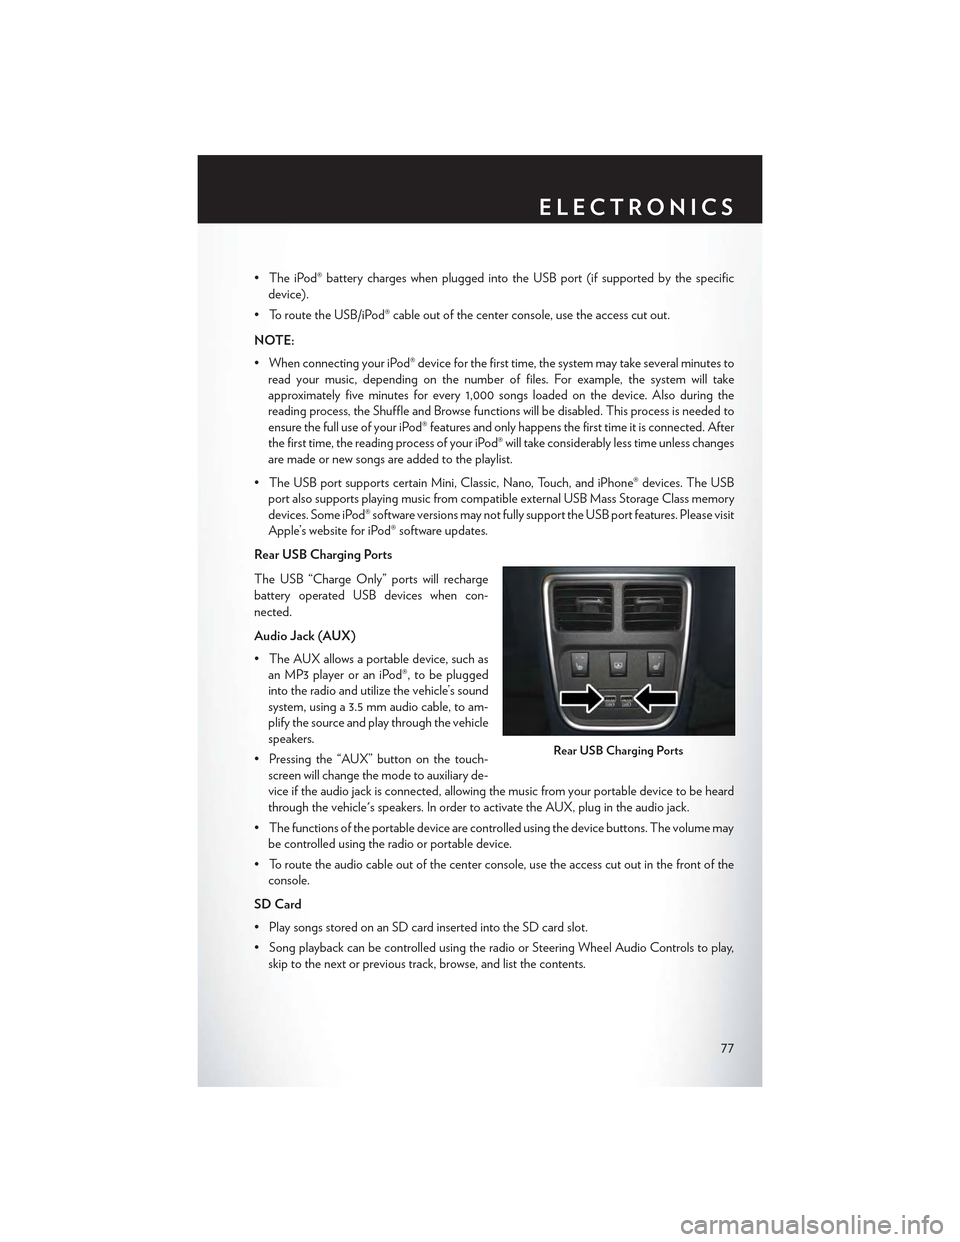
Rear USB Charging Ports
The USB “Charge Only” ports will recharge
battery operated USB devices when con-
nected.
Audio Jack (AUX)
• The AUX allows a portable device, such as
an MP3 player or an iPod®, to be plugged
into the radio and utilize the vehicle’s sound
system, using a 3.5 mm audio cable, to am-
plify the source and play through the vehicle
speakers.
• Pressing the “AUX” button on the touch-
screen will change the mode to auxiliary de-
vice if the audio jack is connected, allowing the music from your portable device to be heard
through the vehicle's speakers. In order to activate the AUX, plug in the audio jack.
•Thefunctionsoftheportabledevicearecontrolledusingthedevicebuttons.Thevolumemay
be controlled using the radio or portable device.
• To route the audio cable out of the center console, use the access cut out in the front of the
console.
SD Card
• Play songs stored on an SD card inserted into the SD card slot.
•SongplaybackcanbecontrolledusingtheradioorSteeringWheelAudioControlstoplay,
skip to the next or previous track, browse, and list the contents.
Rear USB Charging Ports
ELECTRONICS
77
Page 102 of 180
Replay
Lets you replay up to 44 minutes of the content of the current SiriusXM channel.
ReplayOptionOption Description
Play/Pause Press to Pause content playback. Press Pause/Play again to resume playback.
Rewind/RW Rewinds the channel content in steps of five seconds. Press and hold to rewindcontinuously, then release to begin playing content at that point.
FastForward/FWForwards the content, and works similarly to Rewind/RW. However, FastForward/FW can only be used when content has been previously rewound.
Replay Time Displays the amount of time in the upper center of the screen by which your contentlags the Live channel.
Live Resumes playback of Live content at any time while replaying rewound content.
SiriusXM services require subscriptions, sold separately after the 12-month trial included with the
new vehicle purchase.If you decide to continue your service at the end of your trial subscrip-
tion, the plan you choose will automatically renew and bill at then-current rates until you call
SiriusXM at 1-866-635-2349 for U.S. residents and 1-888-539-7474 for Canadian residents
to cancel. See SiriusXM Customer Agreement for complete terms at www.siriusxm.com for
U.S. residents and www.siriusxm.ca for Canadian residents.All fees and programming subject
to change. Our satellite service is available only to those at least 18 and older in the 48 contiguous
USA and D.C. Our Sirius satellite service is also available in PR (with coverage limitations). Our
Internet radio service is available throughout our satellite service area and in AK and HI. © 2015
Sirius XM Radio Inc. Sirius, XM and all related marks and logos are trademarks of Sirius XM
Radio Inc.
MEDIA HUB — PLAYING iPod®/USB/MP3 DEVICES
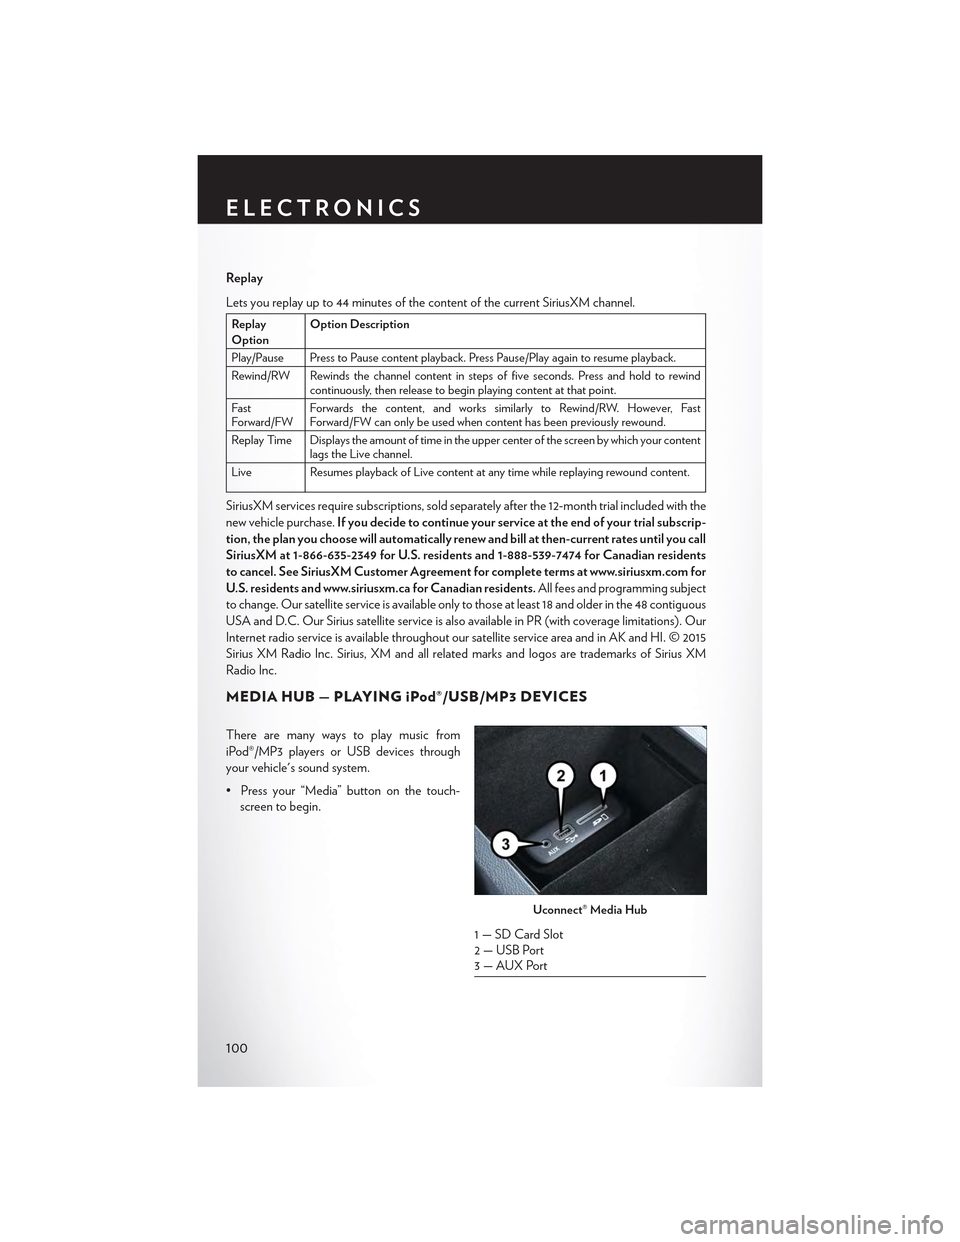
There are many ways to play music from
iPod®/MP3 players or USB devices through
your vehicle's sound system.
•Pressyour“Media”buttononthetouch-
screen to begin.
Uconnect® Media Hub
1 — SD Card Slot2 — USB Port3—AUXPort
ELECTRONICS
100
Page 103 of 180
USB Port
Connect your iPod® or compatible device using a USB cable into the USB Port. USB Memory
sticks with audio files can also be used. Audio from the device can be played on the vehicle's
sound system while providing metadata (artist, track title, album, etc.) information on the radio
display.
When connected, the iPod®/compatible USB device can be controlled using the radio or
Steering Wheel Audio Controls to play, skip to the next or previous track, browse, and list the
contents.
The iPod® battery charges when plugged into the USB port (if supported by the specific device).
To route the USB/iPod® cable out of the center console, use the access cut out.
NOTE:
•WhenconnectingyouriPod®deviceforthefirsttime,thesystemmaytakeseveralminutesto
read your music, depending on the number of files. For example, the system will take
approximately five minutes for every 1000 songs loaded on the device. Also during the
reading process, the Shuffle and Browse functions will be disabled. This process is needed to
ensure the full use of your iPod® features and only happens the first time it is connected. After
the first time, the reading process of your iPod® will take considerably less time unless changes
are made or new songs are added to the playlist.
• The USB port supports certain Mini, Classic, Nano, Touch, and iPhone® devices. The USB
port also supports playing music from compatible external USB Mass Storage Class memory
devices. Some iPod® software versions may not fully support the USB port features. Please visit
Apple’s website for iPod® software updates.
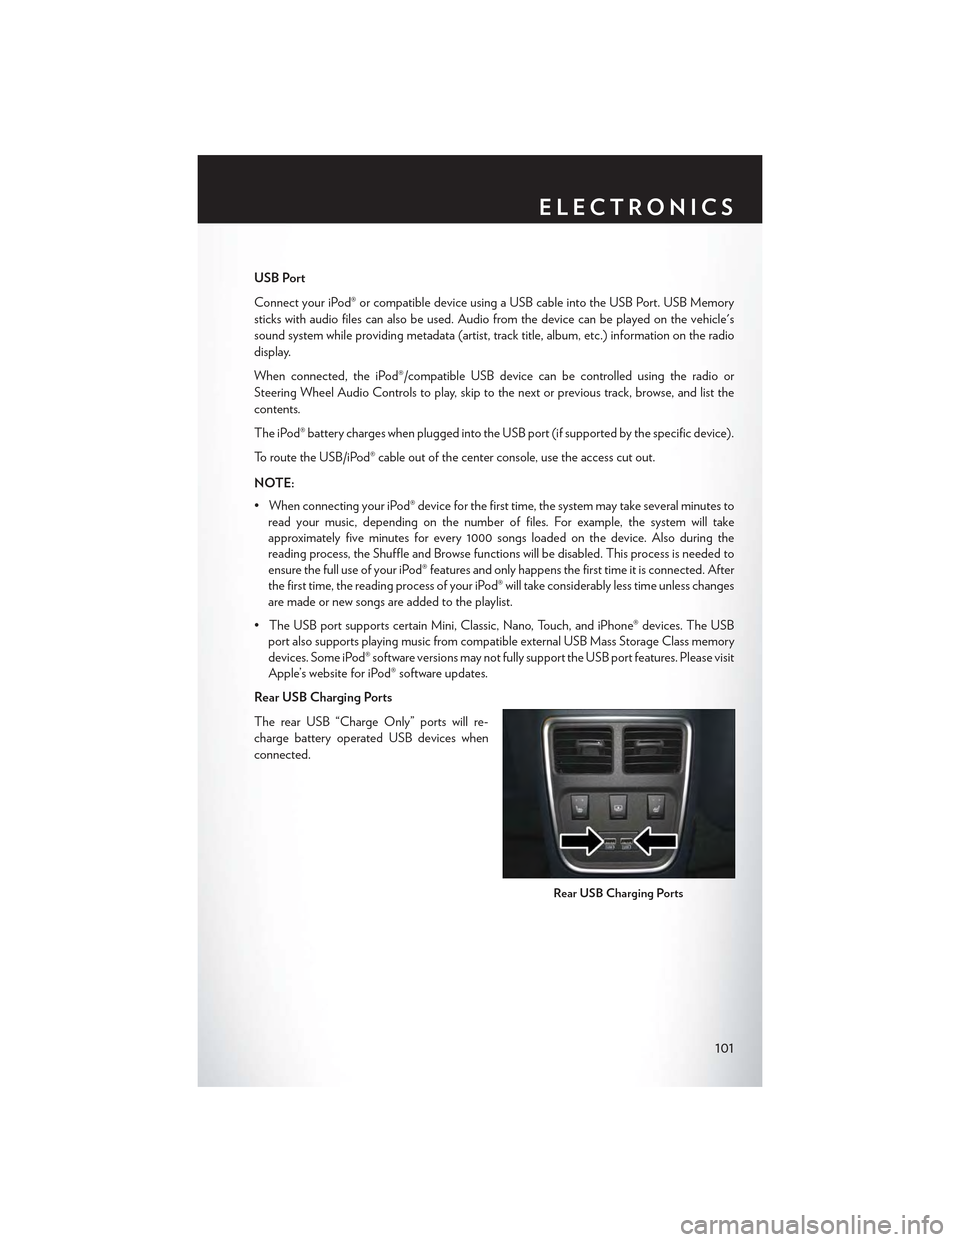
Rear USB Charging Ports
The rear USB “Charge Only” ports will re-
charge battery operated USB devices when
connected.
Rear USB Charging Ports
ELECTRONICS
101
Page 124 of 180
4. Continue to hold both buttons and observe the indicator light. The HomeLink® indicator will
flash slowly and then rapidly after HomeLink® has received the frequency signal from the
hand-held transmitter. Release both buttons after the indicator light changes from slow to
rapid.
5. At the garage door opener motor (in the garage), locate the “LEARN” or “TRAINING”
button. This can usually be found where the hanging antenna wire is attached to the garage
door opener motor. Firmly push and release the “LEARN” or “TRAINING” button.
NOTE:
Yo u h a v e 3 0 s e c o n d s i n w h i c h t o i n i t i a t e t h e n e x t s t e p a f t e r t h e L E A R N b u t t o n h a s b e e n p u s h e d .
6. Return to the vehicle and push the programmed HomeLink® button twice (holding the button
for two seconds each time). If the device is plugged in and activates, programming is
complete.
NOTE:
If the device does not activate, push the button a third time (for two seconds) to complete the
training.
7. To program the remaining two HomeLink® buttons, repeat each step for each remaining
button. DO NOT erase the channels.
Programming A Non-Rolling Code
NOTE:
For programming Garage Door Openers manufactured before 1995.
1. Turn the ignition switch to the ON/RUN position.
2. Place the hand-held transmitter 1 to 3 inches (3 to 8 cm) away from the HomeLink® button you
wish to program while keeping the HomeLink® indicator light in view.
3. Push and hold the HomeLink® button you want to program while you push and hold the
hand-held transmitter button.
4. Continue to hold both buttons and observe the indicator light. The HomeLink® indicator will
flash slowly and then rapidly after HomeLink® has received the frequency signal from the
hand-held transmitter. Release both buttons after the indicator light changes from slow to
rapid.
5. Push and hold the programmed HomeLink® button and observe the indicator light. If the
indicator light stays on constantly, programming is complete and the garage door (or device)
should activate when the HomeLink® button is pushed.
6. To program the two remaining HomeLink® buttons, repeat each step for each remaining
button. DO NOT erase the channels.
Using HomeLink®
To o p e r a t e , p u s h a n d r e l e a s e t h e p r o g r a m m e d H o m e L i n k ® b u t t o n . A c t i v a t i o n w i l l n o w o c c u r f o r
the programmed device (e.g., garage door opener, gate operator, security system, entry door
lock, home/office lighting, etc.). The hand-held transmitter of the device may also be used at any
time.
ELECTRONICS
122
Page 133 of 180
–ElectronicStabilityControl(ESC)OFFIndicatorLight
This light indicates the Electronic Stability Control (ESC) is off.
–DoorAjarIndicator
This indicator will illuminate when a door(s) is left ajar and not fully closed.
–SportShifting
This light will illuminate whenSPORT MODEis selected. Sport Mode will provide improved
throttle response and modified shifting for an enhanced driving experience as well as the greatest
amount of steering feel. (SPORT MODEwill enable AWD (if equipped) in the AWD Sport
mode providing an enhanced AWD driving performance).
Oil Change Due
Yo u r v e h i c l e i s e q u i p p e d w i t h a n e n g i n e o i l c h a n g e i n d i c a t o r s y s t e m . T h e “ O i l C h a n g e D u e ”
message will display for 5 seconds along with a single chime to indicate the next scheduled oil
change interval. The engine oil change indicator system is duty cycle based, which means the
engine oil change interval may fluctuate dependent upon your personal driving style.
Resetting The Light After Servicing
Vehicles Equipped With Keyless Enter-N-Go
1. Without pushing the brake pedal, push the ENGINE START/STOP button and cycle the
ignition to the ON/RUN position (do not start the engine).
2. Fully depress the accelerator pedal, slowly, three times within 10 seconds.
3. Without pushing the brake pedal, push the ENGINE START/STOP button once to return the
ignition to the OFF/LOCK position.
Vehicles Not Equipped With Keyless Enter-N-Go
1. Turn the ignition switch to the ON/RUN position (do not start the engine).
2. Fully depress the accelerator pedal, slowly, three times within 10 seconds.
3. Turn the ignition switch to the OFF/LOCK position.
NOTE:
If the indicator message illuminates when you start the vehicle, the oil change indicator system did
not reset. If necessary, repeat this procedure.
NOTE:
Resetting the oil life can also be done within the "Oil Life" menu under “Vehicle Info.”
WHAT TO DO IN EMERGENCIES
131