change wheel CHRYSLER 300 2015 2.G User Guide
[x] Cancel search | Manufacturer: CHRYSLER, Model Year: 2015, Model line: 300, Model: CHRYSLER 300 2015 2.GPages: 180, PDF Size: 30.54 MB
Page 78 of 180
Replay
Lets you replay up to 44 minutes of the content of the current SiriusXM channel.
ReplayOptionOption Description
Play/Pause Press to Pause content playback. Press Pause/Play again to resume playback.
Rewind/RW Rewinds the channel content in steps of five seconds. Press and hold to rewindcontinuously, then release to begin playing content at that point.
FastForward/FWForwards the content, and works similarly to Rewind/RW. However, FastForward/FW can only be used when content has been previously rewound.
Replay Time Displays the amount of time in the upper center of the screen by which your contentlags the Live channel.
Live Resumes playback of Live content at any time while replaying rewound content.
SiriusXM services require subscriptions, sold separately after the 12-month trial included with the
new vehicle purchase.If you decide to continue your service at the end of your trial subscrip-
tion, the plan you choose will automatically renew and bill at then-current rates until you call
SiriusXM at 1-866-635-2349 for U.S. residents and 1-888-539-7474 for Canadian residents
to cancel. See SiriusXM Customer Agreement for complete terms at www.siriusxm.com for
U.S. residents and www.siriusxm.ca for Canadian residents.All fees and programming subject
to change. Our satellite service is available only to those at least 18 and older in the 48 contiguous
USA and D.C. Our Sirius satellite service is also available in PR (with coverage limitations). Our
Internet radio service is available throughout our satellite service area and in AK and HI. © 2015
Sirius XM Radio Inc. Sirius, XM and all related marks and logos are trademarks of Sirius XM
Radio Inc.
MEDIA HUB — PLAYING iPod®/USB/MP3 DEVICES
There are many ways to play music from iPod®/MP3 players or USB devices through your
vehicle's sound system. Press your “Media” button on the touchscreen to begin.
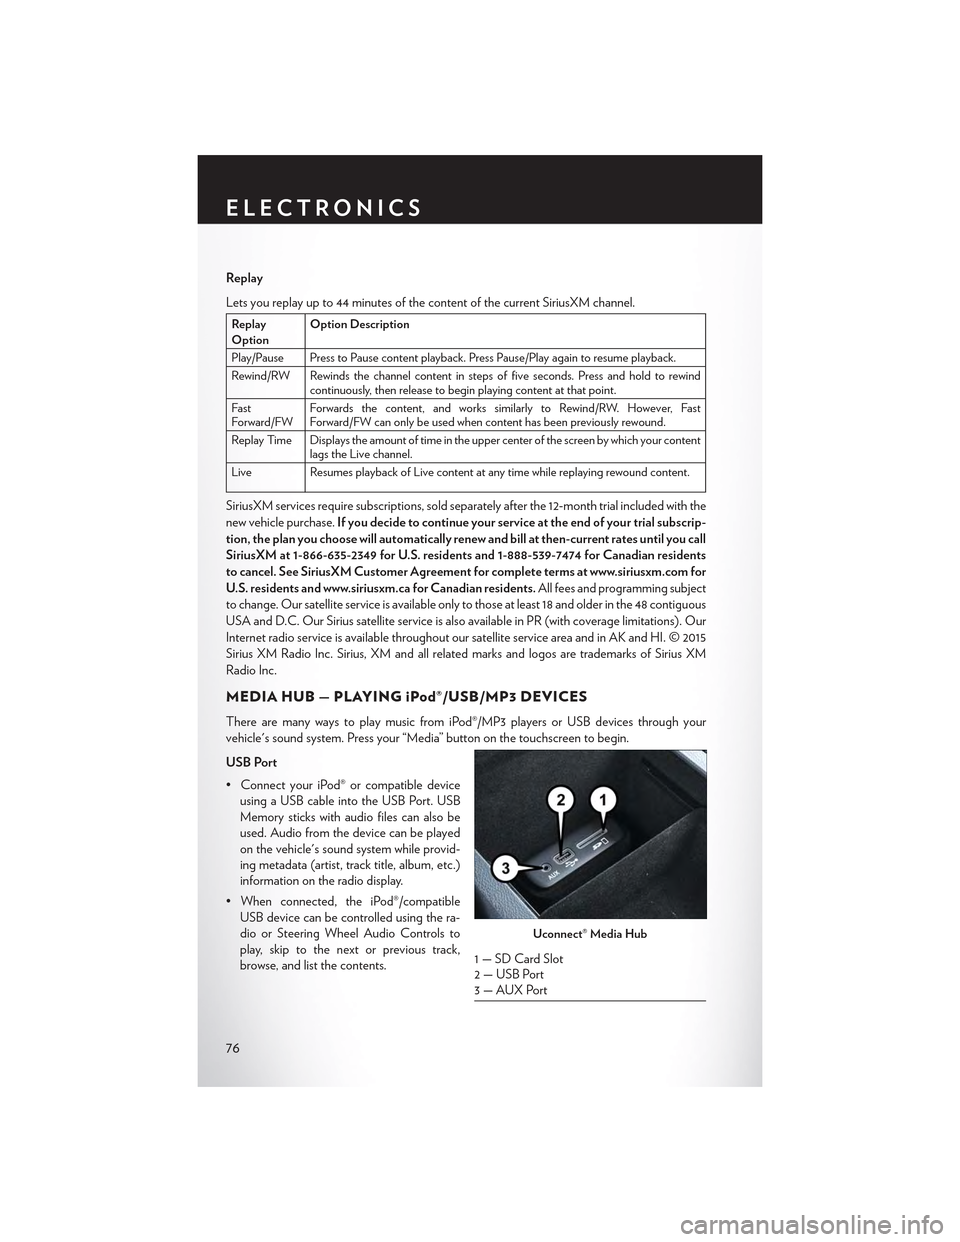
USB Port
•ConnectyouriPod®orcompatibledevice
using a USB cable into the USB Port. USB
Memory sticks with audio files can also be
used. Audio from the device can be played
on the vehicle's sound system while provid-
ing metadata (artist, track title, album, etc.)
information on the radio display.
•Whenconnected,theiPod®/compatible
USB device can be controlled using the ra-
dio or Steering Wheel Audio Controls to
play, skip to the next or previous track,
browse, and list the contents.
Uconnect® Media Hub
1 — SD Card Slot2 — USB Port3—AUXPort
ELECTRONICS
76
Page 79 of 180
•TheiPod®batterychargeswhenpluggedintotheUSBport(ifsupportedbythespecific
device).
• To route the USB/iPod® cable out of the center console, use the access cut out.
NOTE:
•WhenconnectingyouriPod®deviceforthefirsttime,thesystemmaytakeseveralminutesto
read your music, depending on the number of files. For example, the system will take
approximately five minutes for every 1,000 songs loaded on the device. Also during the
reading process, the Shuffle and Browse functions will be disabled. This process is needed to
ensure the full use of your iPod® features and only happens the first time it is connected. After
the first time, the reading process of your iPod® will take considerably less time unless changes
are made or new songs are added to the playlist.
• The USB port supports certain Mini, Classic, Nano, Touch, and iPhone® devices. The USB
port also supports playing music from compatible external USB Mass Storage Class memory
devices. Some iPod® software versions may not fully support the USB port features. Please visit
Apple’s website for iPod® software updates.
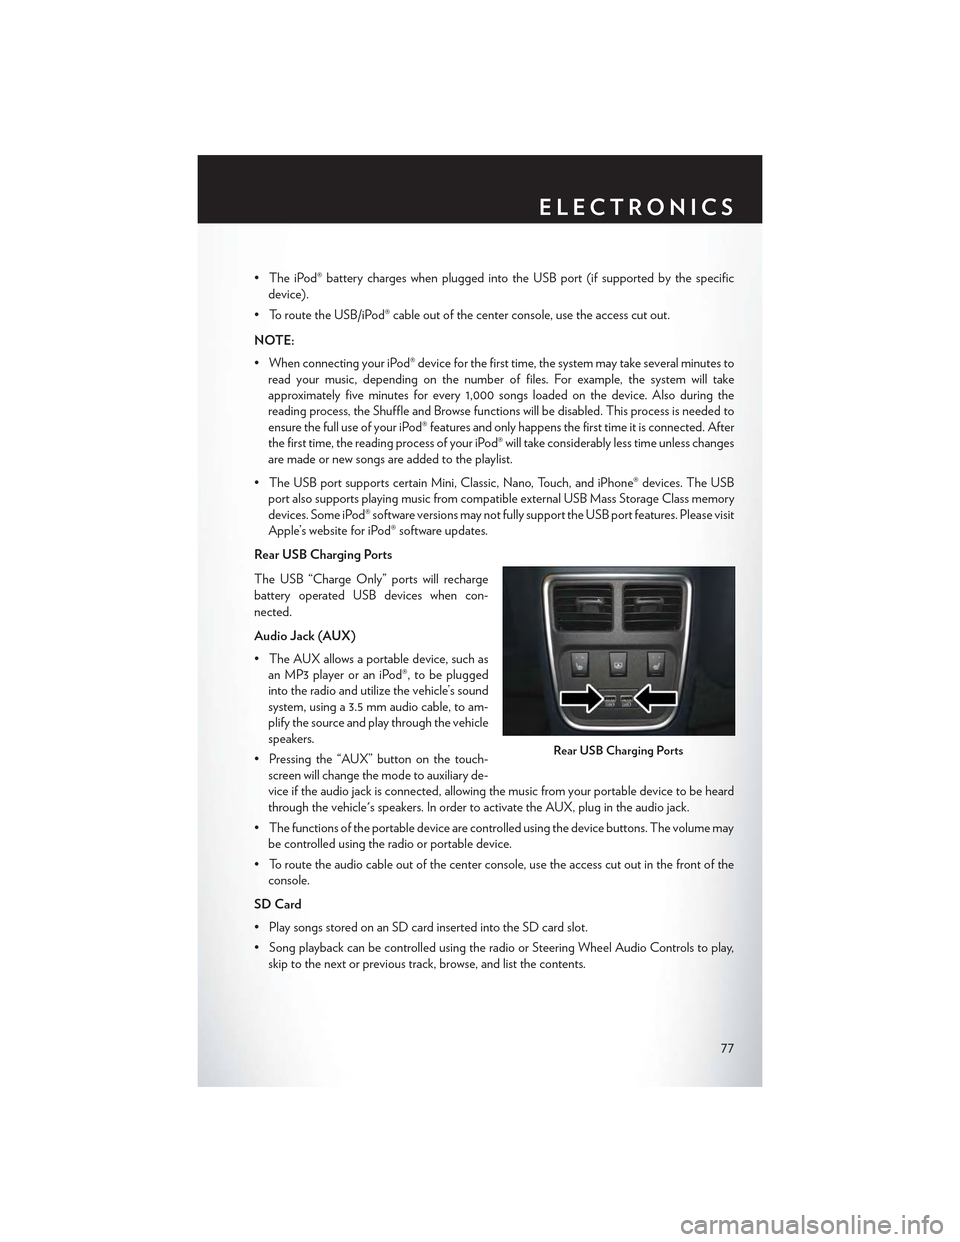
Rear USB Charging Ports
The USB “Charge Only” ports will recharge
battery operated USB devices when con-
nected.
Audio Jack (AUX)
• The AUX allows a portable device, such as
an MP3 player or an iPod®, to be plugged
into the radio and utilize the vehicle’s sound
system, using a 3.5 mm audio cable, to am-
plify the source and play through the vehicle
speakers.
• Pressing the “AUX” button on the touch-
screen will change the mode to auxiliary de-
vice if the audio jack is connected, allowing the music from your portable device to be heard
through the vehicle's speakers. In order to activate the AUX, plug in the audio jack.
•Thefunctionsoftheportabledevicearecontrolledusingthedevicebuttons.Thevolumemay
be controlled using the radio or portable device.
• To route the audio cable out of the center console, use the access cut out in the front of the
console.
SD Card
• Play songs stored on an SD card inserted into the SD card slot.
•SongplaybackcanbecontrolledusingtheradioorSteeringWheelAudioControlstoplay,
skip to the next or previous track, browse, and list the contents.
Rear USB Charging Ports
ELECTRONICS
77
Page 103 of 180
USB Port
Connect your iPod® or compatible device using a USB cable into the USB Port. USB Memory
sticks with audio files can also be used. Audio from the device can be played on the vehicle's
sound system while providing metadata (artist, track title, album, etc.) information on the radio
display.
When connected, the iPod®/compatible USB device can be controlled using the radio or
Steering Wheel Audio Controls to play, skip to the next or previous track, browse, and list the
contents.
The iPod® battery charges when plugged into the USB port (if supported by the specific device).
To route the USB/iPod® cable out of the center console, use the access cut out.
NOTE:
•WhenconnectingyouriPod®deviceforthefirsttime,thesystemmaytakeseveralminutesto
read your music, depending on the number of files. For example, the system will take
approximately five minutes for every 1000 songs loaded on the device. Also during the
reading process, the Shuffle and Browse functions will be disabled. This process is needed to
ensure the full use of your iPod® features and only happens the first time it is connected. After
the first time, the reading process of your iPod® will take considerably less time unless changes
are made or new songs are added to the playlist.
• The USB port supports certain Mini, Classic, Nano, Touch, and iPhone® devices. The USB
port also supports playing music from compatible external USB Mass Storage Class memory
devices. Some iPod® software versions may not fully support the USB port features. Please visit
Apple’s website for iPod® software updates.
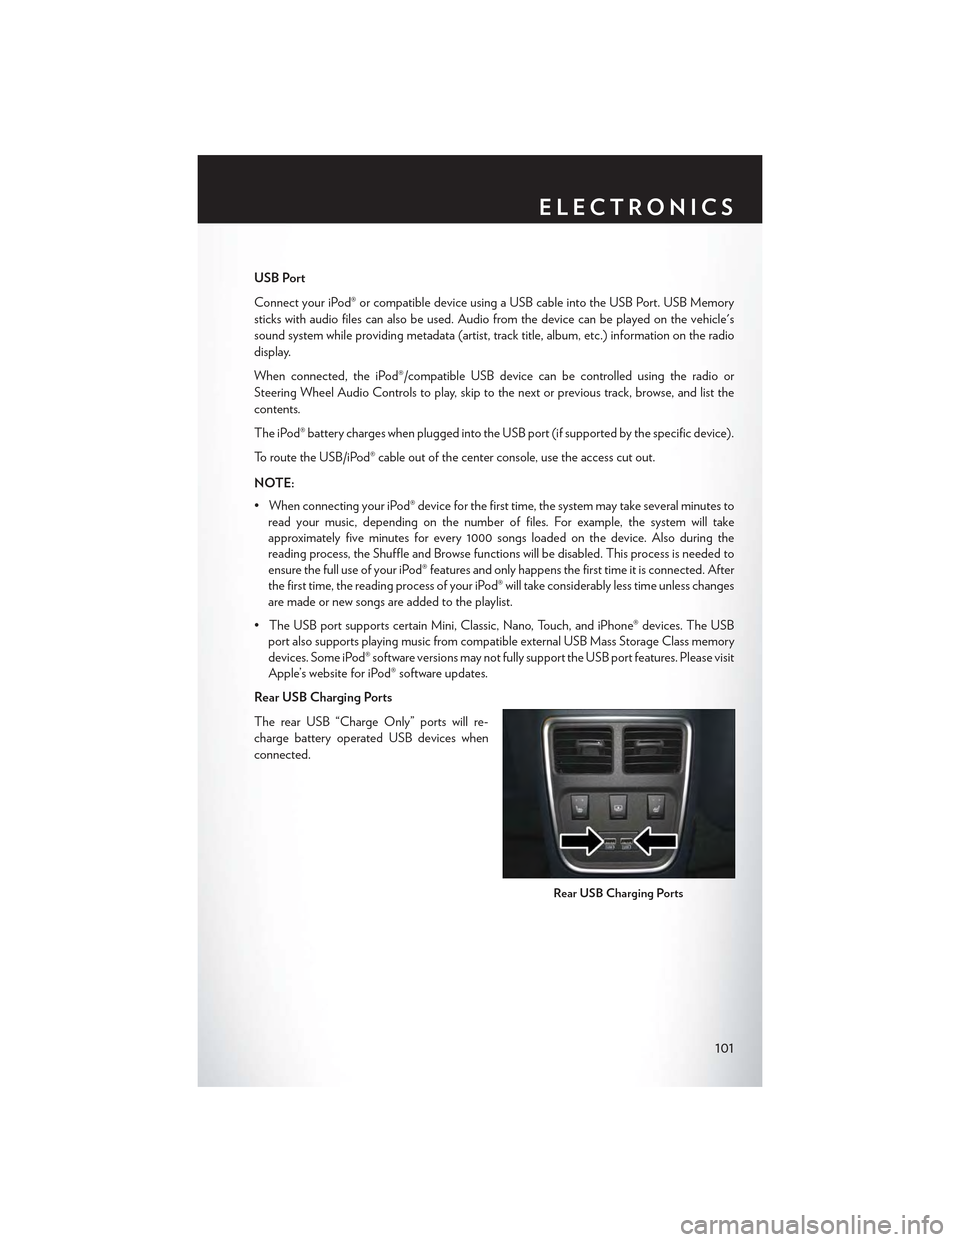
Rear USB Charging Ports
The rear USB “Charge Only” ports will re-
charge battery operated USB devices when
connected.
Rear USB Charging Ports
ELECTRONICS
101
Page 104 of 180
Audio Jack (AUX)
The AUX allows a portable device, such as an MP3 player or an iPod®, to be plugged into the radio
and utilize the vehicle’s sound system, using a 3.5 mm stereo audio cable, to amplify the source and
play through the vehicle speakers.
• Pressing the “AUX” button on the touchscreen will change the mode to auxiliary device if the
audio jack is connected, allowing the music from your portable device to be heard through the
vehicle's speakers. In order to activate the AUX, plug in the audio jack.
•Thefunctionsoftheportabledevicearecontrolledusingthedevicebuttons.Thevolumemay
be controlled using the radio or portable device.
• To route the audio cable out of the center console, use the access cut out in the front of the
console.
SD Card
• Play songs stored on an SD card inserted into the SD card slot.
•SongplaybackcanbecontrolledusingtheradioorSteeringWheelAudioControlstoplay,
skip to the next or previous track, browse, and list the contents.
Bluetooth® Streaming Audio
If using a Bluetooth® - equipped device, you may also be able to stream music to your vehicle's
sound system. Your connected device must be Bluetooth-compatible, and paired with your
system (see Uconnect® Phone for pairing instructions).
•YoucanaccessthemusicfromyourconnectedBluetooth®devicebypressingthe
“Bluetooth®”button on the touchscreen while in Media mode.
Uconnect® 8.4A& 8.4AN
Media Hub (USB,AUX Ports)Media Hub (SD,USB, AUX Ports)Remote USB Port(Fully Functional)
Remote USBPorts (Charging Only)
-S-S
S = Standard Equipment
O = Optional Equipment
ELECTRONICS
102
Page 120 of 180
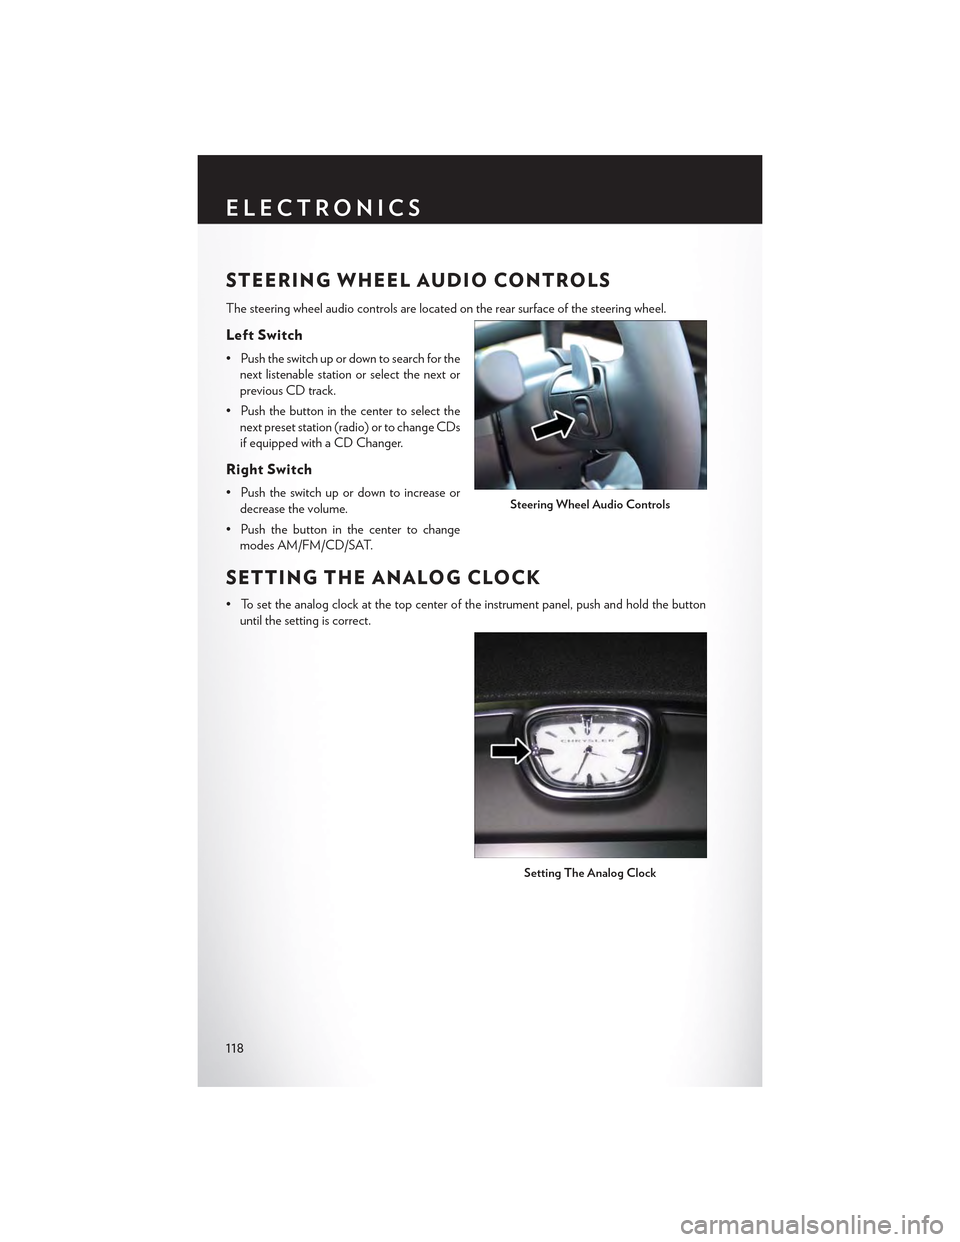
STEERING WHEEL AUDIO CONTROLS
The steering wheel audio controls are located on the rear surface of the steering wheel.
Left Switch
• Push the switch up or down to search for the
next listenable station or select the next or
previous CD track.
• Push the button in the center to select the
next preset station (radio) or to change CDs
if equipped with a CD Changer.
Right Switch
• Push the switch up or down to increase or
decrease the volume.
• Push the button in the center to change
modes AM/FM/CD/SAT.
SETTING THE ANALOG CLOCK
•Tosettheanalogclockatthetopcenteroftheinstrumentpanel,pushandholdthebutton
until the setting is correct.
Steering Wheel Audio Controls
Setting The Analog Clock
ELECTRONICS
118
Page 129 of 180
NOTE:
AFTER INFLATION, THE VEHICLE MAY NEED TO BE DRIVEN FOR 20 MINUTES
BEFORE THE FLASHING LIGHT WILL TURN OFF.
Please note that the TPMS is not a substitute for proper tire maintenance, and it is the driver’s
responsibility to maintain correct tire pressure, even if under-inflation has not reached the level to
trigger illumination of the TPMS low tire pressure telltale.
Yo u r v e h i c l e h a s a l s o b e e n e q u i p p e d w i t h a T P M S m a l f u n c t i o n i n d i c a t o r t o i n d i c a t e w h e n t h e
system is not operating properly. The TPMS malfunction indicator is combined with the low tire
pressure telltale.
When the system detects a malfunction, the telltale will flash for approximately one minute and
then remain continuously illuminated. This sequence will continue upon subsequent vehicle
start-ups as long as the malfunction exists. When the malfunction indicator is illuminated, the
system may not be able to detect or signal low tire pressure as intended. TPMS malfunctions may
occur for a variety of reasons, including the installation of replacement or alternate tires or wheels
on the vehicle that prevent the TPMS from functioning properly. Always check the TPMS
malfunction telltale after replacing one or more tires or wheels on your vehicle to ensure that the
replacement or alternate tires and wheels allow the TPMS to continue to function properly.
NOTE:
Tire pressures change by approximately 1 psi (7 kPa) per 12° F (7° C) of air temperature change.
Keep this in mind when checking tire pressure inside a garage, especially in the Winter. Example:
If garage temperature is 68°F (20°C), and the outside temperature is 32°F (0°C), then the cold
tire inflation pressure should be increased by 3 psi (21 kPa), which equals 1 psi (7 kPa) for every
12°F (7°C) for this outside temperature condition.
CAUTION!
The TPMS has been optimized for the original equipment tires and wheels. TPMS pressures
and warning have been established for the tire size equipped on your vehicle. Undesirable
system operation or sensor damage may result when using replacement equipment that is not
of the same size, type, and/or style. Aftermarket wheels can cause sensor damage. Do not use
tire sealant from a can, or balance beads if your vehicle is equipped with a TPMS, as damage
to the sensors may result.
–EngineTemperatureWarningLight
This light warns of an overheated engine condition.
If the light turns on or flashes continuously while driving, safely pull over and stop the vehicle. If
the A/C system is on, turn it off. Also, shift the transmission into NEUTRAL and idle the vehicle.
If the temperature reading does not return to normal, turn the engine off immediately.
We r e c o m m e n d t h a t y o u d o n o t o p e r a t e t h e v e h i c l e o r e n g i n e d a m a g e w i l l o c c u r. H a v e t h e
vehicle serviced immediately.
WHAT TO DO IN EMERGENCIES
127
Page 140 of 180

CAUTION!
Do not attempt to raise the vehicle by jacking on locations other than those indicated in the
Jacking Instructions for this vehicle.
WARNING!
•Donotattempttochangeatireonthesideofthevehicleclosetomovingtraffic.Pullfar
enough off the road to avoid the danger of being hit when operating the jack or changing
the wheel.
•Beingunderajacked-upvehicleisdangerous.Thevehiclecouldslipoffthejackandfallon
you. You could be crushed. Never put any part of your body under a vehicle that is on a
jack.
•Neverstartorruntheenginewhilethevehicleisonajack.Ifyouneedtogetunderaraised
vehicle, take it to a service center where it can be raised on a lift.
• The jack is designed to be used as a tool for changing tires only. The jack should not be
used to lift the vehicle for service purposes. The vehicle should be jacked on a firm level
surface only. Avoid ice or slippery areas.
•Aloosetireorjackthrownforwardinacollisionorhardstopcouldendangertheoccupants
of the vehicle. Always stow the jack parts and the spare tire in the places provided.
•Carefullyfollowthesetirechangingwarningstohelppreventpersonalinjuryordamageto
your vehicle:
•Alwaysparkonafirm,levelsurfaceasfarfromtheedgeoftheroadwayaspossiblebefore
raising the vehicle.
• Turn on the Hazard Warning flasher.
• Block the wheel diagonally opposite the wheel to be raised.
•SettheparkingbrakefirmlyandsetanautomatictransmissioninPARK;amanual
transmission in REVERSE.
•Donotletanyonesitinthevehiclewhenitisonajack.
•Donotgetunderthevehiclewhenitisonajack.
•Onlyusethejackinthepositionsindicatedandforliftingthisvehicleduringatirechange.
•Ifworkingonorneararoadway,beextremelycarefulofmotortraffic.
•Raisingthevehiclehigherthannecessarycanmakethevehiclelessstable.Itcouldslipoff
the jack and hurt someone near it. Raise the vehicle only enough to remove the tire.
•Toavoidtheriskofforcingthevehicleoffthejack,donotfullytightenthewheelnutsuntil
the vehicle has been lowered. Failure to follow this warning may result in personal injury.
•Aloosetireorjackthrownforwardinacollisionorhardstopcouldendangertheoccupants
of the vehicle. Always stow the jack parts and the spare tire in the places provided.
•Thelimited-usesparetiresareforemergencyuseonly.Installationofthislimited-usespare
tire affects vehicle handling. With this tire, do not drive more than 60 mph (100 km/h).
Keep inflated to the cold tire inflation pressure listed on either your tire placard or
limited-use spare tire and wheel assembly. Replace (or repair) the original tire at the first
opportunity and reinstall it on your vehicle. Failure to do so could result in loss of vehicle
control.
WHAT TO DO IN EMERGENCIES
138
Page 157 of 180
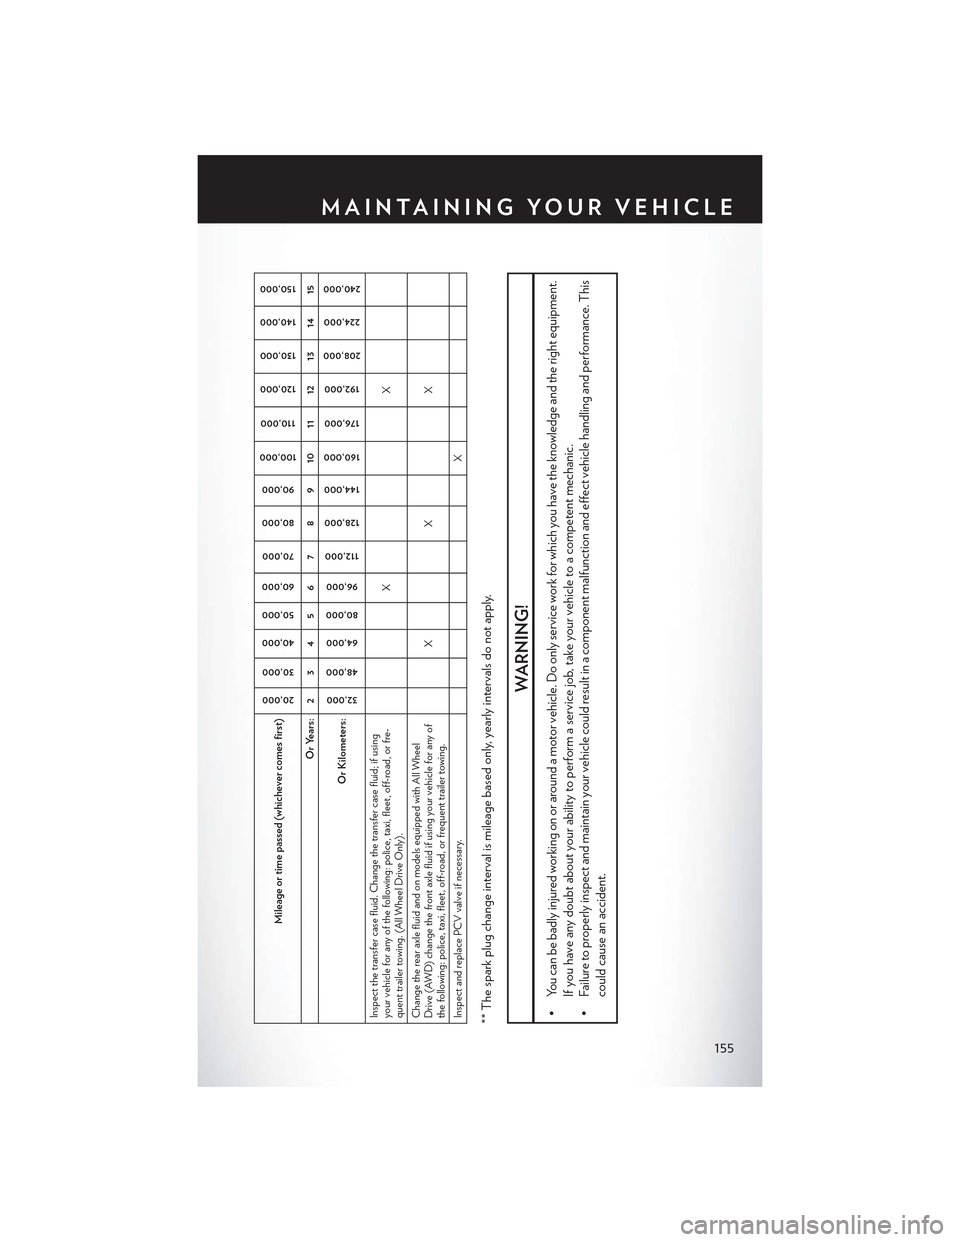
Mileage or time passed (whichever comes first)
20,000
30,000
40,000
50,000
60,000
70,000
80,000
90,000
100,000
110,000
120,000
130,000
140,000
150,000
Or Years: 2 3 4 5 6 7 8 9 10 11 12 13 14 15
Or Kilometers:
32,000
48,000
64,000
80,000
96,000
112,000
128,000
144,000
160,000
176,000
192,000
208,000
224,000
240,000
Inspect the transfer case fluid. Change the transfer case fluid; if usingyour vehicle for any of the following: police, taxi, fleet, off-road, or fre-quent trailer towing. (All Wheel Drive Only).
XX
Change the rear axle fluid and on models equipped with All WheelDrive (AWD) change the front axle fluid if using your vehicle for any ofthe following: police, taxi, fleet, off-road, or frequent trailer towing.
XX X
Inspect and replace PCV valve if necessary.
X
** The spark plug change interval is mileage based only, yearly intervals do not apply.
WARNING!
•Youcanbebadlyinjuredworkingonoraroundamotorvehicle.Doonlyserviceworkforwhichyouhavetheknowledgeandtherightequipment.
If you have any doubt about your ability to perform a service job, take your vehicle to a competent mechanic.
•Failuretoproperlyinspectandmaintainyourvehiclecouldresultinacomponentmalfunctionandeffectvehiclehandlingandperformance.This
could cause an accident.
MAINTAINING YOUR VEHICLE
155
Page 173 of 180
Access
Uconnect...............55
Access, Uconnect.............55
Adaptive Cruise Control (ACC) (Cruise
Control)................37
Adding Engine Coolant (Antifreeze) . . .152
Adding Washer Fluid...........152
Adjustable Pedals.............29Air BagAdvanced Front Air Bag........15Advance Front Air Bag.........15Air Bags . . . . . . . . . . . . . . . .15Air Bag Warning Light.........15Driver Knee Air Bag . . . . . . . . . .17Front Air Bag . . . . . . . . . . . . .15Passenger Knee Air Bag........17Rollover . . . . . . . . . . . . . . . .15Side Impacts..............15Air Bag Light . . . . . . . . . . . . . ..129Air Bag, Side . . . . . . . . . . . . . . . .15Air Cleaner, Engine (Engine Air CleanerFilter).................152Air Conditioner Maintenance.......152Air Conditioning............46, 47Air Conditioning Refrigerant.......152Air Conditioning System.........152AlarmVehicle Security Alarm.........14Alarm (Security Alarm)........14, 130Antifreeze (Engine Coolant).....150, 152Disposal................152Anti-Lock Warning Light.........129APPUconnect Access............57Appearance Care.............152Arming System (Security Alarm)......14Assistance Towing.............126Automatic Headlights...........33Automatic High Beams..........34Automatic Oil Change Indicator.....131Automatic Temperature Control (ATC) . .46Automatic Transmission..........43Adding Fluid.............151Fluid Type..............151Axle Fluid.................151Axle Lubrication..............151
Back-Up Camera . . . . . . . . . . . . .42
Battery..................152
Blind Spot Monitoring...........48
Body Mechanism Lubrication.......152
Brake Fluid................151
Brakes. . . . . . . . . . . . . . . . . ..152
BrakeSystem...............152
Fluid Check..............151
Master Cylinder...........152Warning Light............128Break-In Recommendations, New Vehicle. .31Bulb Replacement............166Bulbs, Light................166
Calibration, Compass...........119Capacities, Fluid.............150Caps, FillerOil (Engine).............152Car Washes................152Changing A Flat Tire...........132Charging System Light..........129Child Restraint...............18Child RestraintsCar Seat................18Child Restraints............18Child Tether Anchorage Locations . . .21Lower Anchors And Tethers ForChildren................18CleaningWheels................152Windshield Wiper Blades.......152Climate Control..............46Clock . . . . . . . . . . . . . . . . . ..118Cluster Warning/Indicator LightsAnti-Lock Brake (ABS) Light.....129Brake Warning Light..........128Charging System Light........129Electronic Throttle Control (ETC) Indica-tor Light...............129Engine Temperature Warning Light . .127Front Fog Light Indicator.......130High Beam Indicator.........130Oil Pressure Warning Light......129Ti re Pre s s u re M o n i t o r i n g S y s t e m ( T P M S )Light.................126Turn Signal Indicator.........130Vehicle Security Light.........130Clutch . . . . . . . . . . . . . . . . ..152Clutch Fluid................152
INDEX
171
Page 176 of 180
Overheating, Engine...........132
Paddle Shifters...............44
Paddle Shift Mode.............44
Paint Care................152
Panic Alarm.................9
Pedals, Adjustable.............29
Phone, Hands-Free (Uconnect)......109
Phone (Uconnect)............109Placard, Tire And Loading Information . .161PowerDistribution Center (Fuses)......158Glass Sunroof.............49Outlet (Auxiliary Electrical Outlet) . .123Seats.................24Tilt/Telescoping Steering Column . . .30Preparation For Jacking..........134Programmable Electronic Features . . . .120Purchase AppsUconnect Access............58
RadioPresets...............73, 97Rain Sensitive Wiper System........32Rear Camera. . . . . . . . . . . . . . . .42Rear Cross Path . . . . . . . . . . . . . .48Rear Heated Seats.............28Rear ParkSense System..........42Rear Seat, Folding.............27Recreational Towing............125Refrigerant................152Remote ControlTrunk Release..............9Remote Keyless Entry (RKE)Lock The Doors . . . . . . . . . . . . .8Unlock The Doors............8Remote StartingEnter Remote Start Mode.......10Exit Remote Start Mode........10How To Use Remote Start.......10Key Fob . . . . . . . . . . . . . . . .10Remote Starting System........10Remote Starting System..........10Replacement Bulbs............166Reporting Safety Defects.........168Resetting Oil Change Indicator......131Restraint, Head..............22
Schedule, Maintenance..........152
Seat Belt
Child Restraints............18
Seat Belt Maintenance..........152
Seat Belts.................14
Adjustable Shoulder Belt........14
Pretensioners.............14
Seat Belt Warning...........15
Seats....................24Adjustment..............26Head Restraints............22Heated................27Lumbar Support............24Power . . . . . . . . . . . . . . . . .24Security Alarm..............130Security Alarm.............14Selection Of Coolant (Antifreeze) . . . .150Setting The Clock.............118Set Up Your Via Mobile ProfileUconnect...............57ShiftingAutomatic Transmission........43Signals, Turn..............32, 130Sirius Satellite Radio..........74, 98SIRIUS Travel Link............108Spare Tire . . . . . . . . . . ..132, 162, 163Spark Plugs................150SpecificationsFuel (Gasoline)............150Oil . . . . . . . . . . . . . . . . ..150Speed ControlAccel/Decel..............35Distance Setting (ACC Only).....36Mode Setting (ACC Only)......39Speed Control (Cruise Control)......35Sport Mode . . . . . . . . . . . . . . ..131StartingRemote . . . . . . . . . . . . . . . .10SteeringTilt Column..............30Steering Wheel Audio Controls......118Sun Roof . . . . . . . . . . . . . . . . .49Supplemental Restraint System - Air Bag . .15
Temperature Control, Automatic (ATC) . .46Tether Anchor, Child Restraint.......20Text Messaging..............116Tilt Steering Column............30
INDEX
174