weight CHRYSLER 300 2015 2.G User Guide
[x] Cancel search | Manufacturer: CHRYSLER, Model Year: 2015, Model line: 300, Model: CHRYSLER 300 2015 2.GPages: 180, PDF Size: 30.54 MB
Page 3 of 180

INTRODUCTION/WELCOME
WELCOME FROM FCA US LLC . . . . . . . 2
CONTROLS AT A GLANCE
DRIVER COCKPIT...............4INSTRUMENT CLUSTER...........6
GETTING STARTED
KEY FOB . . . . . . . . . . . . . . . . . . . . 8REMOTE START...............10KEYLESS ENTER-N-GO™..........10VEHICLE SECURITY ALARM . .......14SEAT BELT SYSTEMS.............14SUPPLEMENTAL RESTRAINT SYSTEM (SRS)—AIRBAGS . . . . . . . . . . . . . . . . . . 15CHILD RESTRAINTS.............18HEAD RESTRAINTS..............22FRONT SEATS . . . . . . . . . . . . . . . . 24REAR SEAT...................27HEATED SEATS . . . . . . . . . . . . . . . . 27HEATED AND COOLED CUPHOLDERS...28ADJUSTABLE PEDALS............29TILT/TELESCOPING STEERINGCOLUMN . . . . . . . . . . . . . . . . . . . 30
OPERATING YOUR VEHICLE
ENGINE BREAK-INRECOMMENDATIONS............31TURN SIGNAL/WIPER/WASHER/HIGH BEAMLEVER.....................32HEADLIGHT SWITCH............33ELECTRONIC SPEED CONTROL.....35ADAPTIVE CRUISE CONTROL (ACC) . . . 37LANESENSE..................42PA R K V I E W ® R E A R B AC K- U P C A M E R A . . 4 2EIGHT-SPEED AUTOMATICTRANSMISSION................43AUTOSTICK . . . . . . . . . . . . . . . . . . 44AUTOMATIC TEMPERATURE CONTROLS(ATC) . . . . . . . . . . . . . . . . . . . . . 46BLIND SPOT MONITORING........48POWER SUNROOF..............49WIND BUFFETING..............51
ELECTRONICS
YO U R V E H I C L E ' S S O U N D SYS T E M....52IDENTIFYING YOUR RADIO........54Uconnect® ACCESS..............55Uconnect® 8.4A.................71Uconnect® 8.4AN...............94Uconnect® PHONE ..............109STEERING WHEEL AUDIO CONTROLS...118SETTING THE ANALOG CLOCK.....118DRIVER INFORMATION DISPLAY (DID). . 119PROGRAMMABLE FEATURES.......120UNIVERSAL GARAGE DOOR OPENER(HomeLink®)..................121
POWER OUTLETS.............123
UTILITY
TRAILER TOWING WEIGHTS (MAXIMUMTRAILER WEIGHT RATINGS).......124RECREATIONAL TOWING (BEHINDMOTORHOME, ETC.)...........125
WHAT TO DO IN EMERGENCIES
ROADSIDE ASSISTANCE..........126INSTRUMENT CLUSTER WARNINGLIGHTS . . . . . . . . . . . . . . . . . . . . 126INSTRUMENT CLUSTER INDICATORLIGHTS . . . . . . . . . . . . . . . . . . . . 130IF YOUR ENGINE OVERHEATS......132JACKING AND TIRE CHANGING.....132BATTERY LOCATION............139JUMP-STARTING..............139MANUAL PARK RELEASE..........141TOWING A DISABLED VEHICLE.....142FREEING A STUCK VEHICLE.......143EVENT DATA RECORDER (EDR).....144
MAINTAINING YOUR VEHICLE
OPENING THE HOOD . . .........145ENGINE COMPARTMENT — 3.6L.....146ENGINE COMPARTMENT — 5.7L.....148FLUID CAPACITIES . . . . . . . . . . . . . 150FLUIDS, LUBRICANTS, AND GENUINEPA RTS . . . . . . . . . . . . . . . . . . . . . 1 5 0MAINTENANCE PROCEDURES . . . . . . 152MAINTENANCE SCHEDULE . . .....152FUSES.....................157TIRE PRESSURES...............161SPARE TIRES — IF EQUIPPED . . . . . . . 162FUEL DOOR RELEASE ...........164WHEEL AND WHEEL TRIM CARE.....165REPLACEMENT BULBS...........166
CONSUMER ASSISTANCE
FCA US LLC CUSTOMER CENTER . . . . 167FCA CANADA INC. CUSTOMERCENTER...................167PUBLICATIONS ORDERING........167ASSISTANCE FOR THE HEARINGIMPAIRED . . . . . . . . . . . . . . . . . . 167REPORTING SAFETY DEFECTS IN THEUNITED STATES . . . . . . . . . . . . . . . 168
MOPAR® ACCESSORIES
AUTHENTIC ACCESSORIES BYMOPAR® . . . . . . . . . . . . . . . . . . . 169
FREQUENTLY ASKED QUESTIONSFREQUENTLY ASKED QUESTIONS....170
INDEX................... 171
TA B L E O F CO N T E N TS
Page 20 of 180

WARNING!
• Side Air Bags need room to inflate. Do not lean against the door or window. Sit upright inthe center of the seat.
•BeingtooclosetotheSideAirBagsduringdeploymentcouldcauseyoutobeseverelyinjured or killed.
•RelyingontheSideAirBagsalonecouldleadtomoresevereinjuriesinacollision.TheSide Air Bags work with your seat belt to restrain you properly. In some collisions, Side AirBags won’t deploy at all. Always wear your seat belt even though you have Side Air Bags.
•ThisvehicleisequippedwithleftandrightSupplementalSideAirBagInflatableCurtains(SABICs). Do not stack luggage or other cargo up high enough to block the deploymentof the SABICs. The trim covering above the side windows where the SABIC and itsdeployment path are located should remain free from any obstructions.
•ThisvehicleisequippedwithSABICs.InorderfortheSABICstoworkasintended,donotinstall any accessory items in your vehicle which could alter the roof. Do not add anaftermarket sunroof to your vehicle. Do not add roof racks that require permanentattachments (bolts or screws) for installation on the vehicle roof. Do not drill into the roofof the vehicle for any reason.
•DonotuseaccessoryseatcoversorplaceobjectsbetweenyouandtheSideAirBags;theperformance could be adversely affected and/or objects could be pushed into you,causing serious injury.
CHILD RESTRAINTS
Children 12 years or younger should ride properly buckled up in a rear seat, if available. According
to crash statistics, children are safer when properly restrained in the rear seats rather than in the
front.
Every state in the United States and all Canadian provinces require that small children ride in
proper restraint systems. This is the law, and you can be prosecuted for ignoring it.
NOTE:
• For additional information, refer to www.seatcheck.org or call 1–866–SEATCHECK
(1–866–732–8243).
• Canadian residents, should refer to Transport Canada’s website for additional information:
http://www.tc.gc.ca/eng/roadsafety/safedrivers-childsafety-index-53.htm
LATCH — Lower Anchors For CHildren
•YourvehicleisequippedwiththechildrestraintanchoragesystemcalledLATCH,which
stands for Lower Anchors and Tethers for CHildren.
•Allrearseatingpositionshaveloweranchorsandtoptetheranchors.
LATCH System Weight Limit
Yo u m a y u s e t h e L A T C H a n c h o r a g e s y s t e m u n t i l t h e c o m b i n e d w e i g h t o f t h e c h i l d a n d t h e c h i l d
restraint is 65 lbs (29.5 kg). Use the seat belt and tether anchor instead of the LATCH system
once the combined weight is more than 65 lbs (29.5 kg).
GETTING STARTED
18
Page 22 of 180

Installing The Child Restraint Using The LATCH Lower Anchors
NOTE:
Never “share” a LATCH anchorage with two or more child restraints.
1. Loosen the adjusters on the lower straps and on the tether strap of the child seat so that youcan more easily attach the hooks or connectors to the vehicle anchorages.
2. Attach the lower hooks or connectors of the child restraint to the lower anchorages in theselected seating position.
3. If the child restraint has a tether strap, connect it to the top tether anchorage. See below fordirections to attach a tether anchor.
4. Tighten all of the straps as you push the child restraint rearward and downward into the seat.
Remove slack in the straps according to the child restraint manufacturer’s instructions.
5. Test that the child restraint is installed tightly by pulling back and forth on the child seat at thebelt path. It should not move more than 1 inch (25.4 mm) in any direction.
Installing The Child Restraint Using The Vehicle Seat Belts
The seat belts in the passenger seating positions are equipped with a Switchable AutomaticLocking Retractor (ALR) that is designed to keep the lap portion of the seat belt tight around thechild restraint. Any seat belt system will loosen with time, so check the belt occasionally, and pullit tight if necessary.
Te t h e r A n c h o r a g e W e i g h t L i m i t
Always use the tether anchor when using the seat belt to install a forward facing child restraint, up
to the recommended weight limit of the child restraint.
To I n s t a l l A C h i l d S e a t U s i n g A n A L R :
1. Pull enough of the seat belt webbing from the retractor to pass it through the belt path of thechild restraint. Do not twist the belt webbing in the belt path.
2. Slide the latch plate into the buckle until you hear a “click.”
3. Pull on the webbing to make the lap portion tight against the child seat.
4. To lock the seat belt, pull down on the shoulder part of the belt until you have pulled all the seatbelt webbing out of the retractor. Then, allow the webbing to retract back into the retractor. Asthe webbing retracts, you will hear a clicking sound. This means the seat belt is now in theAutomatic Locking mode.
5. Try to pull the webbing out of the retractor. If it is locked, you should not be able to pull out anywebbing. If the retractor is not locked, repeat the last step.
6. Finally, pull up on any extra webbing to tighten the lap portion around the child restraint whileyou push the child restraint rearward and downward into the vehicle seat.
7. If the child restraint has a top tether strap and the seating position has a top tether anchorage,connect the tether strap to the anchorage and tighten the tether strap. See below fordirections to attach a tether anchor.
8. Test that the child restraint is installed tightly by pulling back and forth on the child seat at the
belt path. It should not move more than 1 inch (25.4 mm) in any direction.
GETTING STARTED
20
Page 23 of 180

Installing The Top Tether Strap (With Either Lower Anchors Or Vehicle
Seat Belt):
When installing a forward-facing child restraint, always secure the top tether strap, up to the
tether anchor weight limit, whether the child restraint is installed with the lower anchors or the
vehicle seat belt.
Te t h e r S t r a p I n s t a l l a t i o n
1. Rotate or lift the cover to access the anchor directly behind the seat where you are placing the
child restraint.
2. Route the tether strap to provide the most direct path for the strap between the anchor and
the child seat.
3. If your vehicle is equipped with adjustable rear head restraints, raise the head restraint, and
where possible, route the tether strap under the head restraint and between the two posts. If
not possible, lower the head restraint and pass the tether strap around the outboard side of the
head restraint.
4. Attach the tether strap hook of the child restraint to the top tether anchorage and remove
slack in the tether strap according to the child restraint manufacturer’s instructions.
Tether Strap Mounting
1—Cover3 — Attaching StrapA — Tether Strap HookB — Tether Anchor
GETTING STARTED
21
Page 126 of 180

TRAILER TOWING WEIGHTS (MAXIMUM
TRAILER WEIGHT RATINGS)
Engine/Transmission Frontal AreaMax. GTW (GrossTrailer Weight)Max. Tongue Weight(See Note)
3.6L Automatic22 sq ft (2.04 sq m) 1,000 lbs (454 kg) 100 lbs (45 kg)
5.7L Automatic32 sq ft (2.97 sq m) 1,000 lbs (454 kg) 100 lbs (45 kg)
Refer to local laws for maximum trailer towing speeds.
NOTE:
The trailer tongue weight must be considered as part of the combined weight of occupants and
cargo, and it should never exceed the weight referenced on the “Tire and Loading Information”
placard. Refer to “Tire Safety Information” in “Starting And Operating” on the DVD for further
information.
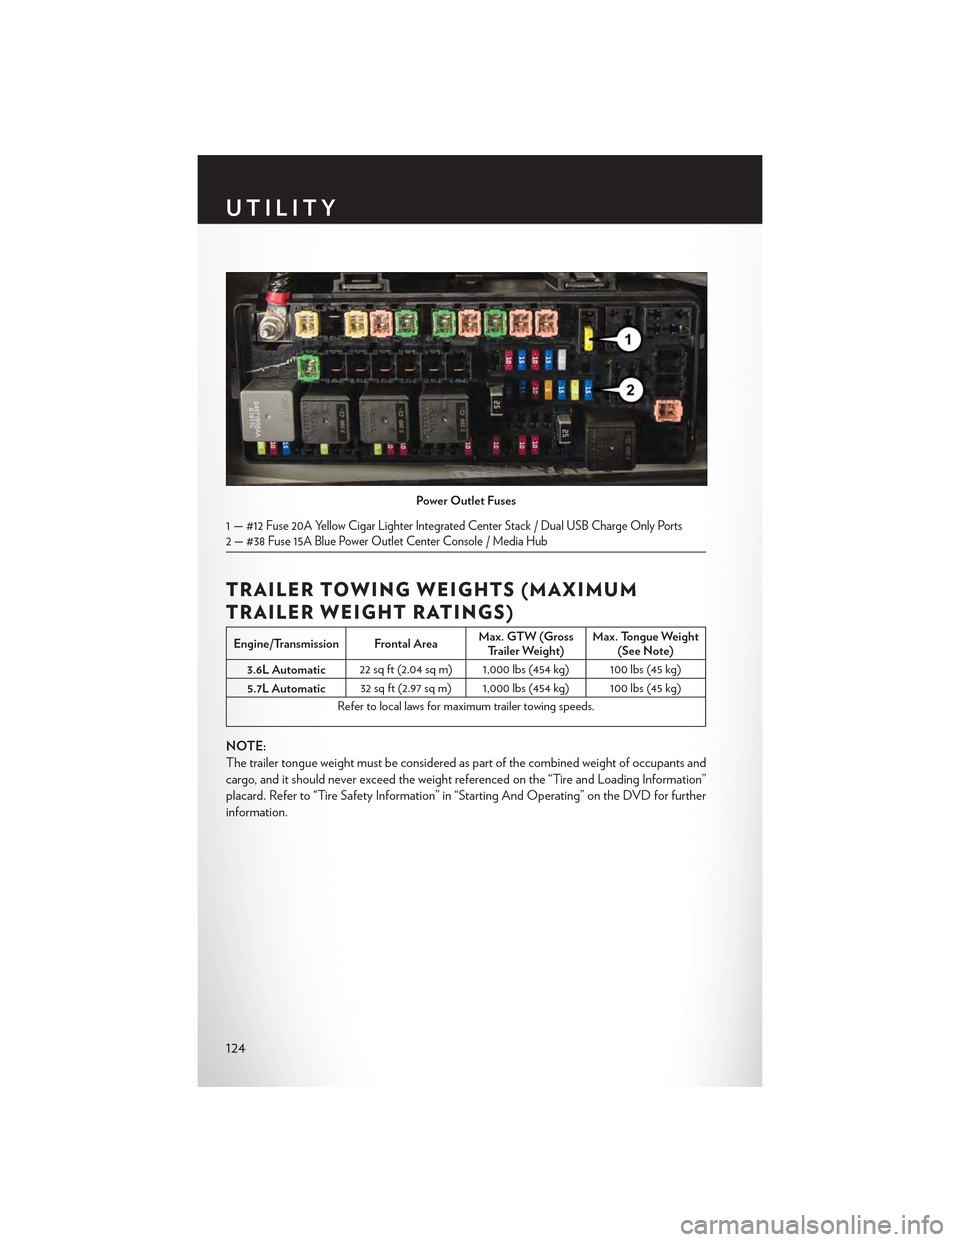
Power Outlet Fuses
1—#12 Fuse 20A Yellow Cigar Lighter Integrated Center Stack / Dual USB Charge Only Ports2 — #38 Fuse 15A Blue Power Outlet Center Console / Media Hub
UTILITY
124
Page 177 of 180

Tilt/Telescoping Steering ColumnManual................30Ti re sAir Pressure..............161Changing............132, 135Compact Spare . . . . . . . . . . ..162Flat Changing............132Jacking..............134, 135Spare Tire . . . . . . . . . . . . . ..132TowingDisabled Vehicle...........142Guide................124Recreational.............125Weight................124Towing Vehicle Behind A Motorhome . . .125Trailer Towing Guide...........124Trailer Weight...............124Transfer CaseFluid.................151Transmission................43Automatic...............43Fluid...............151, 152Maintenance.............152Turn Signals..............32, 130
UconnectAccess.................55Set Up Your Via Mobile Profile.....57Using Access..............59Via Mobile Apps............70Uconnect 8.4A...............71Changing The Volume........114Helpful Tips For Bluetooth.......117
Mute . . . . . . . . . . . . . . . ..113Phonebook..............113Transfer Ongoing Call Between HandsetAnd Vehicle..............113Voice Recognition Tips........114Uconnect 8.4AN.............94At A Glance..............94Radio.................97Uconnect Access.............55APP . . . . . . . . . . . . . . . . . .57In Vehicle Features...........61Purchase Apps.............58Uconnect Voice Command........82Using AccessUconnect...............59
Via Mobile AppsUconnect...............70Vo i c e C o m m a n d . . . . . . . . . . . . . . 8 2Vo i c e R e c o g n i t i o n S y s t e m ( V R )......82
Warnings And Cautions..........18WasherAdding Fluid.............152Washers, Windshield............32Washing Vehicle.............152Wheel And Wheel Trim..........152Wheel And Wheel Trim Care.....152, 165Wind Buffeting...............51Windshield Washers............32Windshield Wiper Blades.........152Windshield Wipers.............32Wiper Blade Replacement........152
INDEX
175