CHRYSLER 300 2017 2.G Owners Manual
Manufacturer: CHRYSLER, Model Year: 2017, Model line: 300, Model: CHRYSLER 300 2017 2.GPages: 488, PDF Size: 4.3 MB
Page 431 of 488
stiff brush. They can damage the wheel’s protective coating
that helps keep them from corroding and tarnishing.
NOTE:Many aftermarket wheel cleaners contain strong
acids or strong alkaline additives that can harm the wheel
surface.
CAUTION!
Avoid products or automatic car washes that use acidic
solutions or strong alkaline additives or harsh brushes.
These products and automatic car washes may damage
the wheel’s protective finish. Such damage is not
covered by the New Vehicle Limited Warranty. Only
car wash soap, Mopar Wheel Cleaner or equivalent is
recommended.
When cleaning extremely dirty wheels including excessive
brake dust, care must be taken in the selection of tire and
wheel cleaning chemicals and equipment to prevent dam-
age to the wheels. Mopar Wheel Treatment or Mopar
Chrome Cleaner or their equivalent is recommended or
select a non-abrasive, non-acidic cleaner for aluminum or
chrome wheels. Do not use any products on Dark Vapor or Black Satin Chrome Wheels. They will permanently dam-
age this finish and such damage is not covered by the New
Vehicle Limited Warranty.
CAUTION!
Do not use scouring pads, steel wool, a bristle brush,
metal polishes or oven cleaner. These products may
damage the wheel’s protective finish. Such damage is
not covered by the New Vehicle Limited Warranty.
Only car wash soap, Mopar Wheel Cleaner or equiva-
lent is recommended.
NOTE: If you intend parking or storing your vehicle for an
extended period after cleaning the wheels with wheel
cleaner, drive your vehicle for a few minutes before doing
so. Driving the vehicle and applying the brakes when
stopping will reduce the risk of brake rotor corrosion.
Dark Vapor Or Black Satin Chrome Wheels
CAUTION!
If your vehicle is equipped with Dark Vapor or Black
Satin Chrome wheels DO NOT USE wheel cleaners,
(Continued)
7
MAINTAINING YOUR VEHICLE 429
Page 432 of 488
CAUTION!(Continued)
abrasives or polishing compounds. They will perma-
nently damage this finish and such damage is not
covered by the New Vehicle Limited Warranty. USE
ONLY MILD SOAP AND WATER WITH A SOFT
CLOTH. Used on a regular basis; this is all that is
required to maintain this finish.
Stain Repel Fabric Cleaning Procedure — If
Equipped
Stain Repel seats may be cleaned in the following manner:
•Remove as much of the stain as possible by blotting with
a clean, dry towel.
• Blot any remaining stain with a clean, damp towel.
• For tough stains, apply Mopar Total Clean, or a mild
soap solution to a clean, damp cloth and remove stain.
Use a fresh, damp towel to remove soap residue.
• For grease stains, apply Mopar Multi-Purpose Cleaner
to a clean, damp cloth and remove stain. Use a fresh,
damp towel to remove soap residue.
• Do not use any harsh solvents or any other form of
protectants on Stain Repel products.
Interior Care
Use Mopar Total Clean to clean fabric upholstery and
carpeting.
Use Mopar Total Clean to clean vinyl upholstery.
Mopar Total Clean is specifically recommended for leather
upholstery.
Your leather upholstery can be best preserved by regular
cleaning with a damp soft cloth. Small particles of dirt can
act as an abrasive and damage the leather upholstery and
should be removed promptly with a damp cloth. Stubborn
soils can be removed easily with a soft cloth and Mopar
Total Clean. Care should be taken to avoid soaking your
leather upholstery with any liquid. Please do not use
polishes, oils, cleaning fluids, solvents, detergents, or
ammonia-based cleaners to clean your leather upholstery.
Application of a leather conditioner is not required to
maintain the original condition.
WARNING!
Do not use volatile solvents for cleaning purposes.
Many are potentially flammable, and if used in closed
areas they may cause respiratory harm.
430 MAINTAINING YOUR VEHICLE
Page 433 of 488
CAUTION!
•Direct contact of air fresheners, insect repellents,
suntan lotions, or hand sanitizers to the plastic,
painted, or decorated surfaces of the interior may
cause permanent damage. Wipe away immediately.
• Damage caused by these type of products may not be
covered by your New Vehicle Limited Warranty.
• Do not use Alcohol and Alcohol-based and/or Keton
based cleaning products to clean leather seats, as
damage to the seat may result.
Cleaning Headlights
Your vehicle is equipped with plastic headlights and fog
lights that are lighter and less susceptible to stone breakage
than glass headlights.
Plastic is not as scratch resistant as glass and therefore
different lens cleaning procedures must be followed.
To minimize the possibility of scratching the lenses and
reducing light output, avoid wiping with a dry cloth. To
remove road dirt, wash with a mild soap solution followed
by rinsing.
Do not use abrasive cleaning components, solvents, steel
wool or other aggressive material to clean the lenses.
Glass Surfaces
All glass surfaces should be cleaned on a regular basis with
Mopar Glass Cleaner, or any commercial household-type
glass cleaner. Never use an abrasive type cleaner. Use
caution when cleaning the inside rear window equipped
with electric defrosters or windows equipped with radio
antennas. Do not use scrapers or other sharp instrument
that may scratch the elements.
When cleaning the rear view mirror, spray cleaner on the
towel or cloth that you are using. Do not spray cleaner
directly on the mirror.
Cleaning Plastic Instrument Cluster Lenses
The lenses in front of the instruments in this vehicle are
molded in clear plastic. When cleaning the lenses, care
must be taken to avoid scratching the plastic.
1. Clean with a wet soft cloth. A mild soap solution may be
used, but do not use high alcohol content or abrasive
cleaners. If soap is used, wipe clean with a clean damp
cloth.
2. Dry with a soft cloth.
7
MAINTAINING YOUR VEHICLE 431
Page 434 of 488
Seat Belt Maintenance
Do not bleach, dye, or clean the belts with chemical
solvents or abrasive cleaners. This will weaken the fabric.
Sun damage can also weaken the fabric.
If the belts need cleaning, use Mopar Total Clean, a mild
soap solution, or lukewarm water. Do not remove the belts
from the vehicle to wash them. Dry with a soft cloth.
Replace the belts if they appear frayed or worn or if the
buckles do not work properly.
WARNING!
A frayed or torn belt could rip apart in a collision and
leave you with no protection. Inspect the belt system
periodically, checking for cuts, frays, or loose parts.
Damaged parts must be replaced immediately. Do not
disassemble or modify the system. Seat belt assemblies
must be replaced after a collision if they have been
damaged (i.e., bent retractor, torn webbing, etc.).
Cleaning The Center Console Cupholders
Clean with a damp cloth or towel using a mild detergent
with the cupholder in the center console.
NOTE:The cupholder cannot be removed.
FUSES
WARNING!
•When replacing a blown fuse, always use an appro-
priate replacement fuse with the same amp rating as
the original fuse. Never replace a fuse with another
fuse of higher amp rating. Never replace a blown
fuse with metal wires or any other material. Failure
to use proper fuses may result in serious personal
injury, fire and/or property damage.
• Before replacing a fuse, make sure that the ignition is
off and that all the other services are switched off
and/or disengaged.
• If the replaced fuse blows again, contact an autho-
rized dealer.
• If a general protection fuse for safety systems (air
bag system, braking system), power unit systems
(engine system, gearbox system) or steering system
blows, contact an authorized dealer.
432 MAINTAINING YOUR VEHICLE
Page 435 of 488
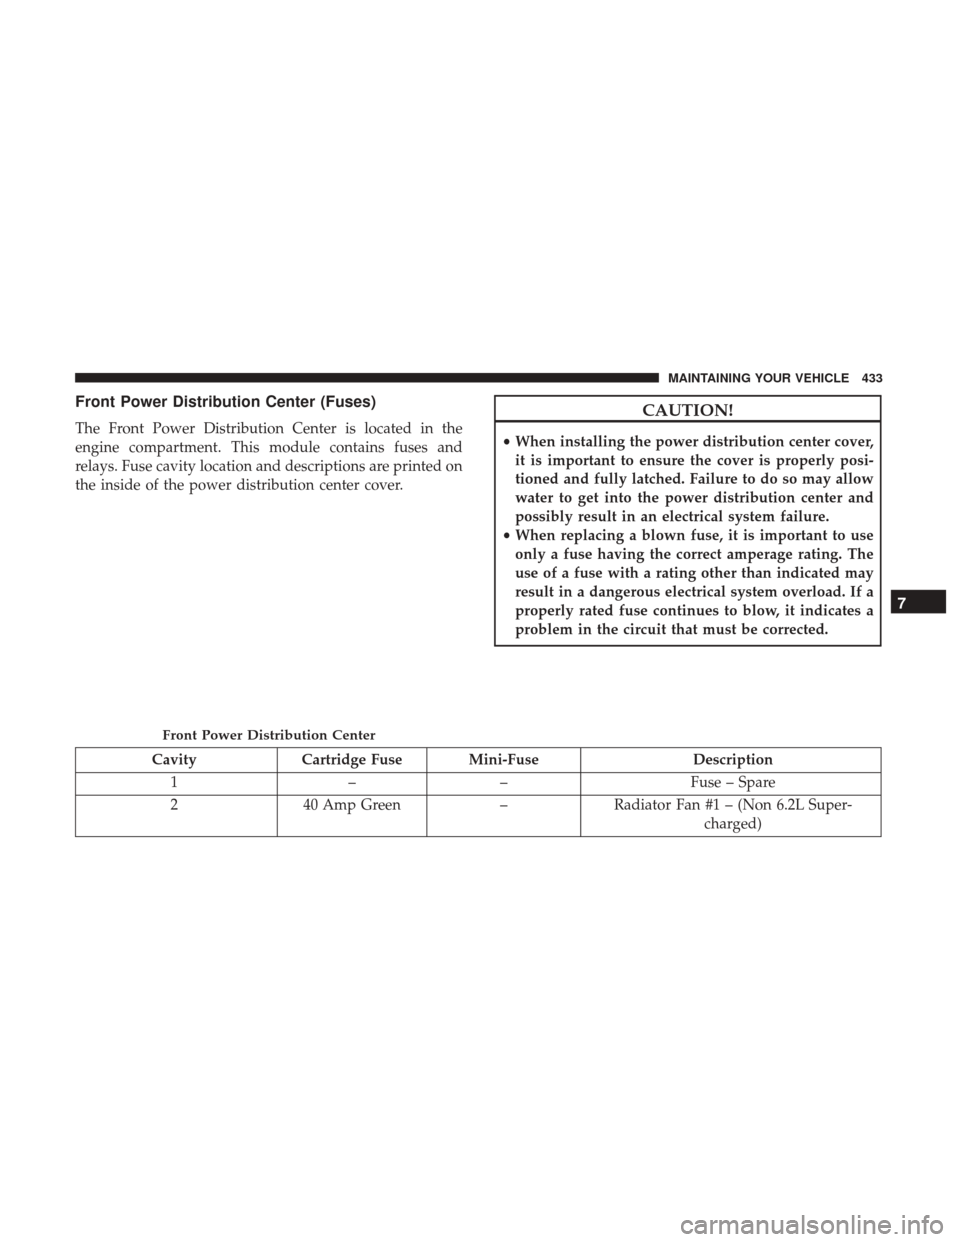
Front Power Distribution Center (Fuses)
The Front Power Distribution Center is located in the
engine compartment. This module contains fuses and
relays. Fuse cavity location and descriptions are printed on
the inside of the power distribution center cover.
CAUTION!
•When installing the power distribution center cover,
it is important to ensure the cover is properly posi-
tioned and fully latched. Failure to do so may allow
water to get into the power distribution center and
possibly result in an electrical system failure.
• When replacing a blown fuse, it is important to use
only a fuse having the correct amperage rating. The
use of a fuse with a rating other than indicated may
result in a dangerous electrical system overload. If a
properly rated fuse continues to blow, it indicates a
problem in the circuit that must be corrected.
Cavity Cartridge Fuse Mini-Fuse Description
1 –– Fuse – Spare
2 40 Amp Green –Radiator Fan #1 – (Non 6.2L Super-
charged)
Front Power Distribution Center
7
MAINTAINING YOUR VEHICLE 433
Page 436 of 488
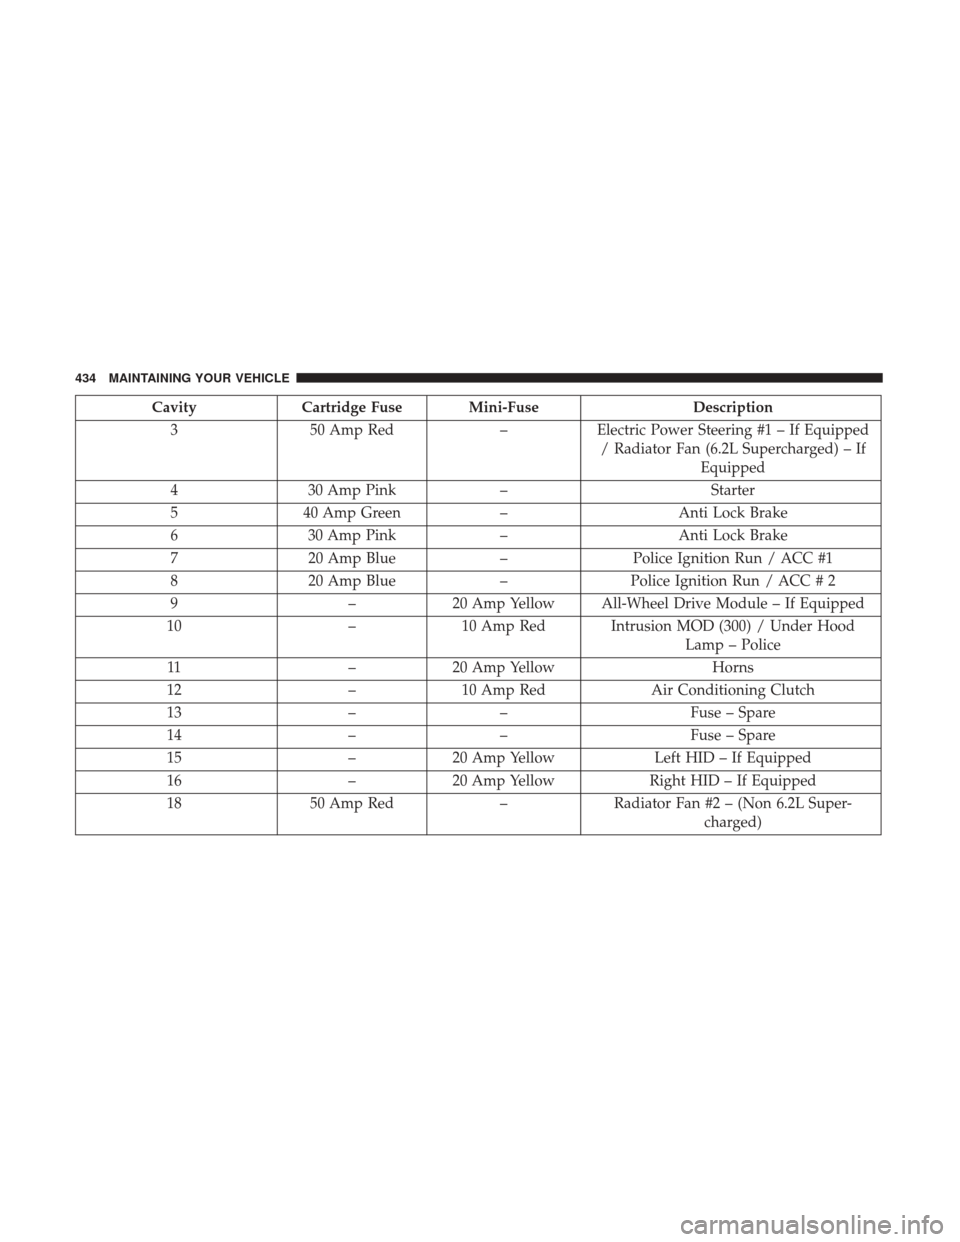
CavityCartridge Fuse Mini-Fuse Description
3 50 Amp Red –Electric Power Steering #1 – If Equipped
/ Radiator Fan (6.2L Supercharged) – If Equipped
4 30 Amp Pink – Starter
5 40 Amp Green –Anti Lock Brake
6 30 Amp Pink –Anti Lock Brake
7 20 Amp Blue –Police Ignition Run / ACC #1
8 20 Amp Blue –Police Ignition Run / ACC # 2
9 –20 Amp Yellow All-Wheel Drive Module – If Equipped
10 –10 Amp Red Intrusion MOD (300) / Under Hood
Lamp – Police
11 –20 Amp Yellow Horns
12 –10 Amp Red Air Conditioning Clutch
13 –– Fuse – Spare
14 –– Fuse – Spare
15 –20 Amp Yellow Left HID – If Equipped
16 –20 Amp Yellow Right HID – If Equipped
18 50 Amp Red –Radiator Fan #2 – (Non 6.2L Super-
charged)
434 MAINTAINING YOUR VEHICLE
Page 437 of 488
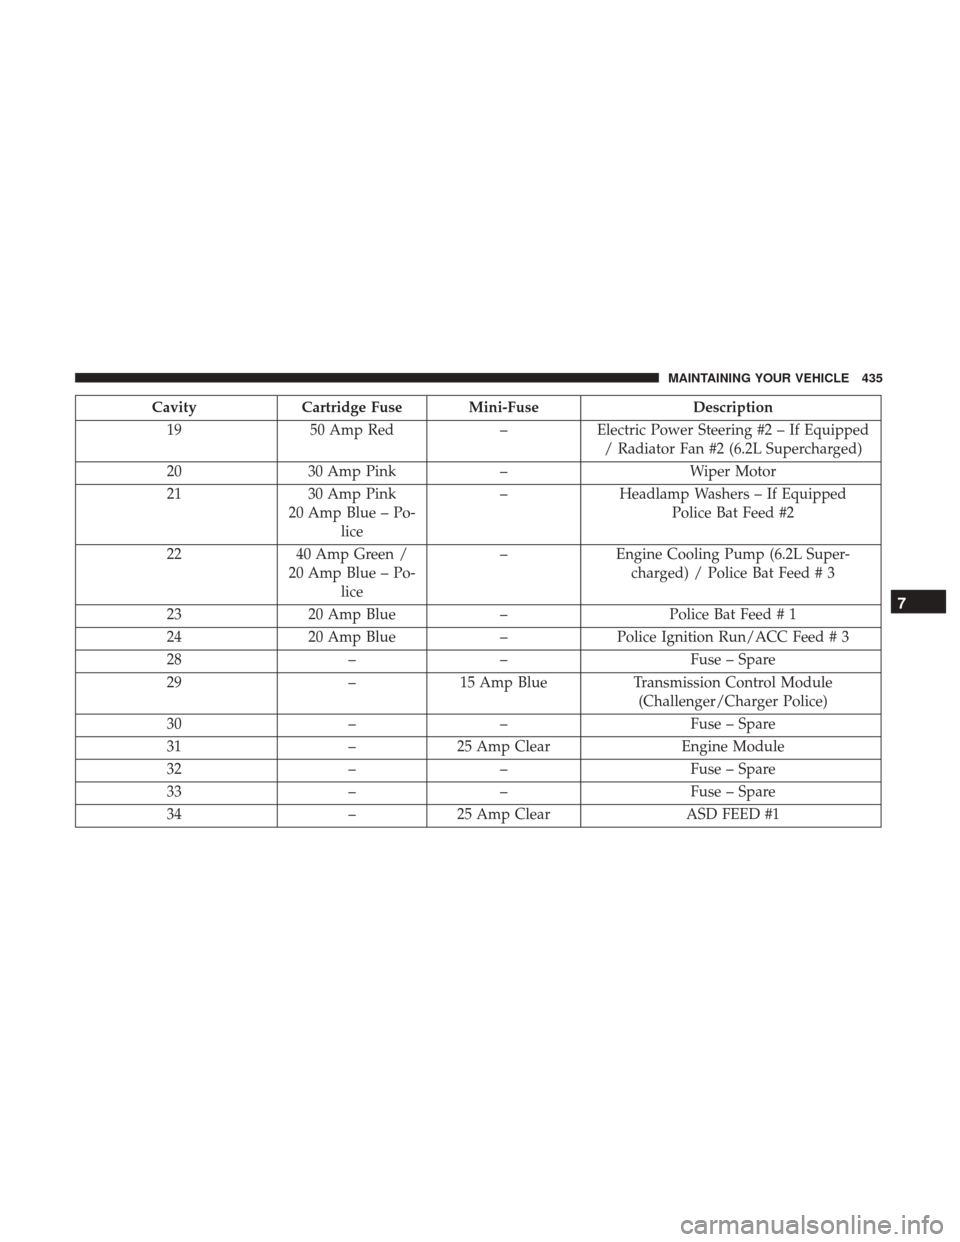
CavityCartridge Fuse Mini-Fuse Description
19 50 Amp Red –Electric Power Steering #2 – If Equipped
/ Radiator Fan #2 (6.2L Supercharged)
20 30 Amp Pink –Wiper Motor
21 30 Amp Pink
20 Amp Blue – Po- lice –
Headlamp Washers – If Equipped
Police Bat Feed #2
22 40 Amp Green /
20 Amp Blue – Po- lice –
Engine Cooling Pump (6.2L Super-
charged) / Police Bat Feed # 3
23 20 Amp Blue –Police Bat Feed # 1
24 20 Amp Blue –Police Ignition Run/ACC Feed # 3
28 –– Fuse – Spare
29 –15 Amp Blue Transmission Control Module
(Challenger/Charger Police)
30 –– Fuse – Spare
31 –25 Amp Clear Engine Module
32 –– Fuse – Spare
33 –– Fuse – Spare
34 –25 Amp Clear ASD FEED #1
7
MAINTAINING YOUR VEHICLE 435
Page 438 of 488
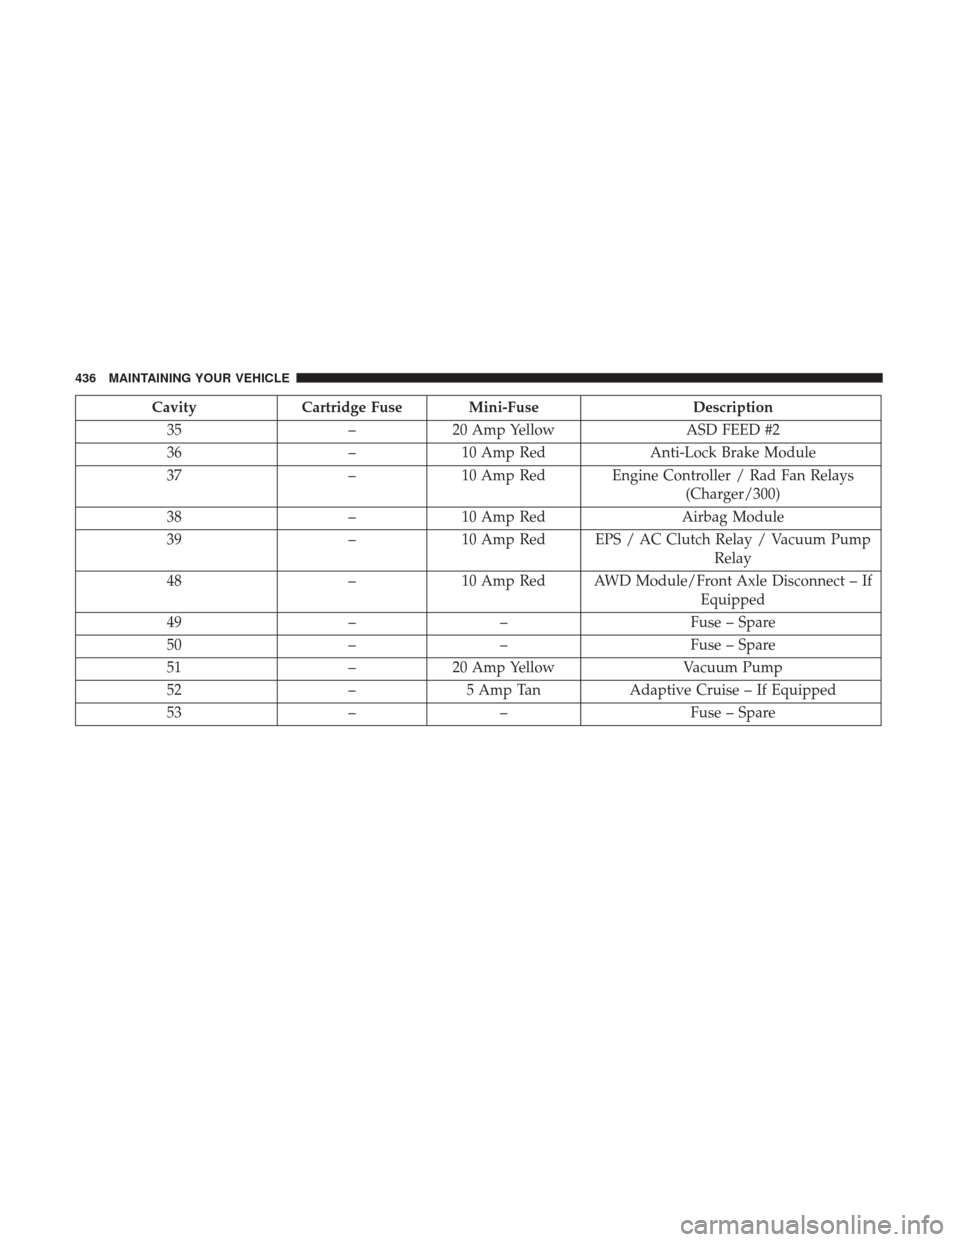
CavityCartridge Fuse Mini-Fuse Description
35 –20 Amp Yellow ASD FEED #2
36 –10 Amp Red Anti-Lock Brake Module
37 –10 Amp Red Engine Controller / Rad Fan Relays
(Charger/300)
38 –10 Amp Red Airbag Module
39 –10 Amp Red EPS / AC Clutch Relay / Vacuum Pump
Relay
48 –10 Amp Red AWD Module/Front Axle Disconnect – If
Equipped
49 –– Fuse – Spare
50 –– Fuse – Spare
51 –20 Amp Yellow Vacuum Pump
52 –5 Amp Tan Adaptive Cruise – If Equipped
53 –– Fuse – Spare
436 MAINTAINING YOUR VEHICLE
Page 439 of 488
Rear Power Distribution Center (Fuses)
There is also a power distribution center located in the
trunk under the spare tire access panel. This center con-
tains fuses and relays. Fuse cavity location and descrip-
tions are printed on the inside of the power distribution
center cover.
CAUTION!
•When installing the power distribution center cover,
it is important to ensure the cover is properly posi-
tioned and fully latched. Failure to do so may allow
water to get into the power distribution center and
possibly result in an electrical system failure.
• When replacing a blown fuse, it is important to use
only a fuse having the correct amperage rating. The
use of a fuse with a rating other than indicated may
result in a dangerous electrical system overload. If a
(Continued)
Opening The Access Cover
Rear Power Distribution Center
7
MAINTAINING YOUR VEHICLE 437
Page 440 of 488
CAUTION!(Continued)
properly rated fuse continues to blow, it indicates a
problem in the circuit that must be corrected.
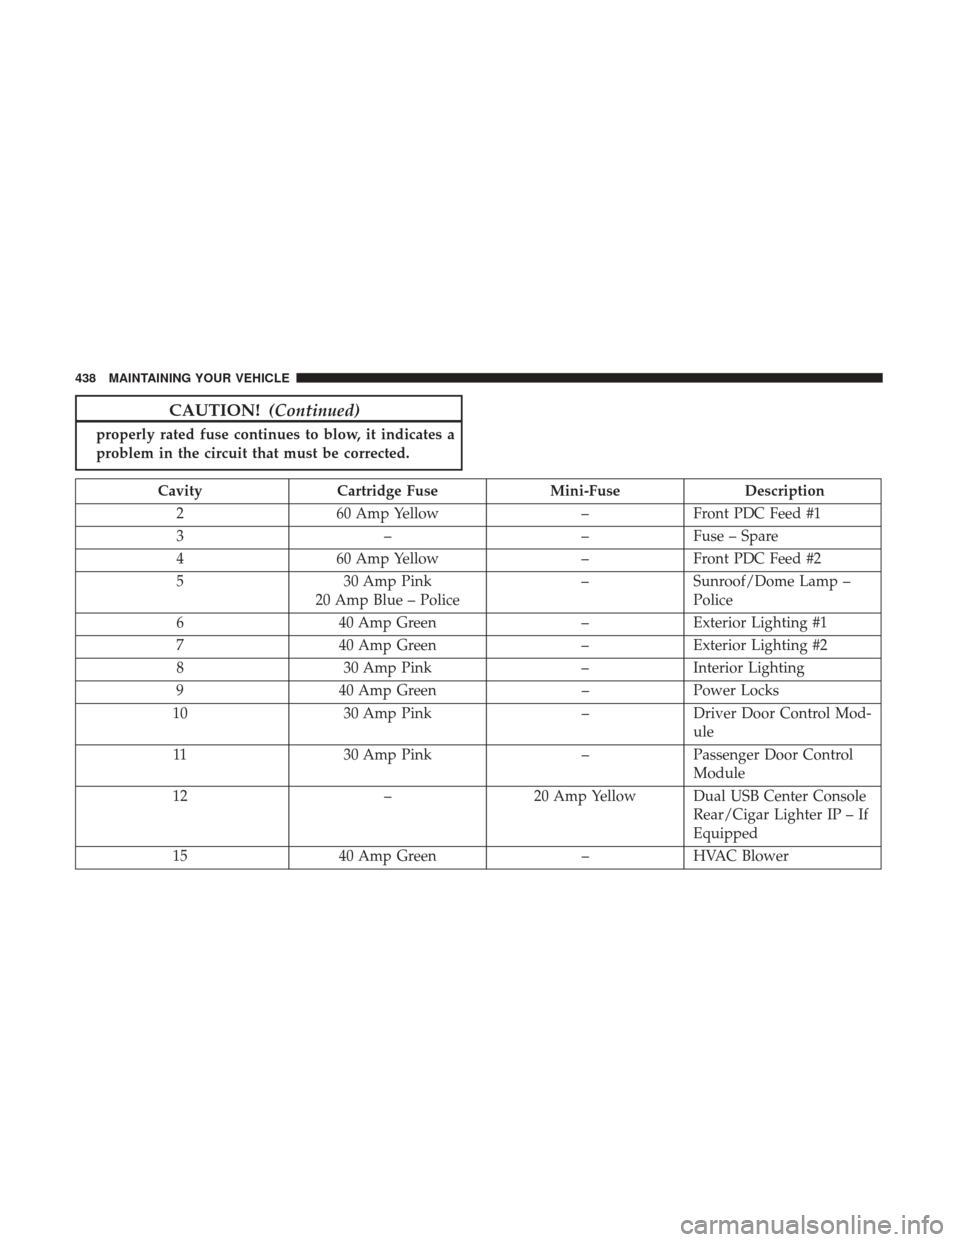
Cavity Cartridge Fuse Mini-FuseDescription
2 60 Amp Yellow –Front PDC Feed #1
3 ––Fuse – Spare
4 60 Amp Yellow –Front PDC Feed #2
5 30 Amp Pink
20 Amp Blue – Police –
Sunroof/Dome Lamp –
Police
6 40 Amp Green –Exterior Lighting #1
7 40 Amp Green –Exterior Lighting #2
8 30 Amp Pink –Interior Lighting
9 40 Amp Green –Power Locks
10 30 Amp Pink –Driver Door Control Mod-
ule
11 30 Amp Pink –Passenger Door Control
Module
12 –20 Amp Yellow Dual USB Center Console
Rear/Cigar Lighter IP – If
Equipped
15 40 Amp Green –HVAC Blower
438 MAINTAINING YOUR VEHICLE