oil change CHRYSLER 300 2020 Owners Manual
[x] Cancel search | Manufacturer: CHRYSLER, Model Year: 2020, Model line: 300, Model: CHRYSLER 300 2020Pages: 328, PDF Size: 14.28 MB
Page 5 of 328
3
EXTERIOR LIGHTS ................................................42 Multifunction Lever ...................................... 42
Headlight Switch .......................................... 42
Daytime Running Lights (DRLs) .................. 43
High/Low Beam Switch ............................... 43
Automatic High Beam — If Equipped ......... 43
Flash-To-Pass ............................................... 44
Automatic Headlights ................................. 44
Parking Lights ............................................. 44
Headlights On With Wipers ......................... 44
Adaptive Bi-Xenon High Intensity
Discharge Headlights — If Equipped........... 44 Headlight Time Delay .................................. 45
Lights-On Reminder .................................... 45
Fog Lights — If Equipped ............................. 45
Turn Signals ................................................ 46
Lane Change Assist — If Equipped ............. 46
INTERIOR LIGHTS ................................................46
Courtesy Lights ............................................ 46
WINDSHIELD WIPERS AND WASHERS .............48
Wiper Operation ........................................... 48
Rain Sensing Wipers — If Equipped ........... 49
CLIMATE CONTROLS ...........................................50
Automatic Climate Control Overview .......... 50
Climate Control Functions ........................... 55
Automatic Temperature Control (ATC) ....... 55
Operating Tips ............................................. 56 WINDOWS ............................................................ 57
Power Window Controls .............................. 57
Wind Buffeting ............................................ 59
PANORAMIC SUNROOF — IF EQUIPPED ........... 59
Opening Sunroof .......................................... 59
Closing Sunroof............................................ 60
Wind Buffeting ............................................ 60
Opening Power Shade ................................. 60
Closing Power Shade................................... 61
Pinch Protect Feature.................................. 61
Sunroof Maintenance.................................. 61
Ignition Off Operation .................................. 61
HOOD ..................................................................... 61
To Open The Hood ...................................... 61
To Close The Hood ....................................... 62
TRUNK.................................................................... 62
Opening ........................................................ 62
Closing .......................................................... 63
Trunk Safety ................................................. 63
Cargo Area Features ................................... 64
LOAD LEVELING SYSTEM — IF EQUIPPED ....... 65
GARAGE DOOR OPENER — IF EQUIPPED ........ 66 Before You Begin Programming
HomeLink® .................................................. 66 Canadian/Gate Operator Programming ..... 68
Using HomeLink®........................................ 69
Security......................................................... 69
Troubleshooting Tips ................................... 69
General Information .................................... 70 INTERNAL EQUIPMENT ........................................70
Storage ......................................................... 70
Cupholders .................................................. 72
Power Sunshade — If Equipped .................. 73
Electrical Power Outlets .............................. 74
Sunglasses Bin Door .................................. 75
GETTING TO KNOW YOUR
INSTRUMENT PANEL
INSTRUMENT CLUSTER .......................................76
Instrument Cluster Descriptions ................ 77
INSTRUMENT CLUSTER DISPLAY .......................78
Location And Controls ................................. 78
Engine Oil Life Reset .................................. 79
Instrument Cluster Display Selectable
Menu Items .................................................. 80 Battery Saver On/Battery Saver Mode
Message — Electrical Load Reduction
Actions — If Equipped ................................. 83
WARNING LIGHTS AND MESSAGES ..................84
Red Warning Lights ..................................... 85
Yellow Warning Lights ................................. 88
Yellow Indicator Lights ................................ 91
Green Indicator Lights ................................. 91
White Indicator Lights ................................. 92
Blue Indicator Lights ................................... 92
ONBOARD DIAGNOSTIC SYSTEM — OBD II ......93
Onboard Diagnostic System (OBD II)
Cybersecurity ............................................... 93
20_LX_OM_EN_USC_t.book Page 3
Page 81 of 328
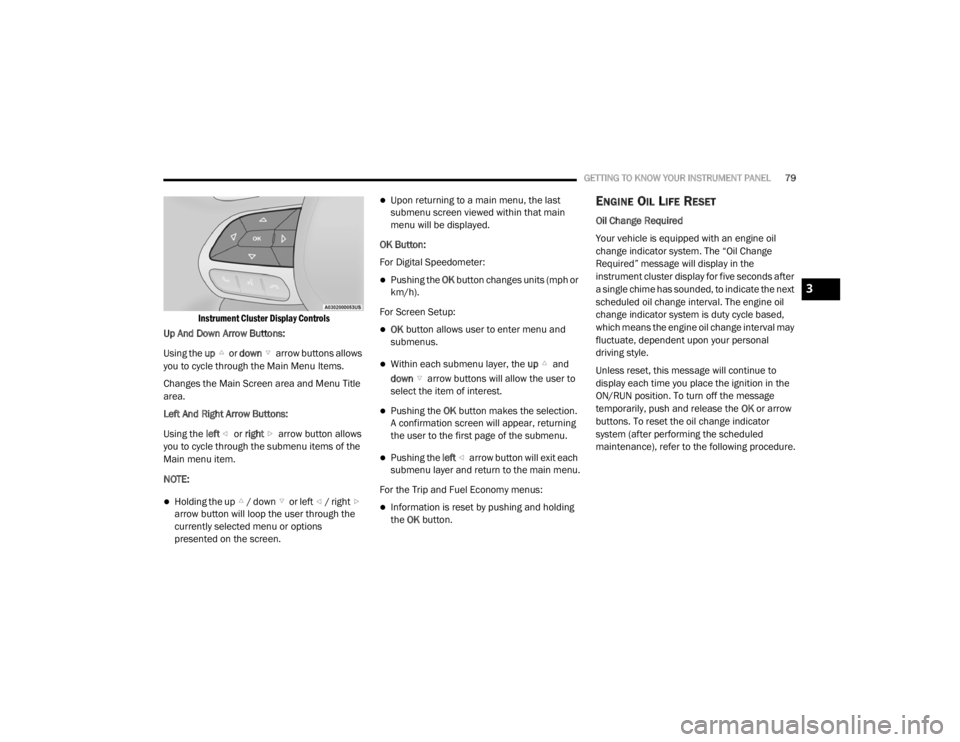
GETTING TO KNOW YOUR INSTRUMENT PANEL79
Instrument Cluster Display Controls
Up And Down Arrow Buttons:
Using the up or down arrow buttons allows
you to cycle through the Main Menu Items.
Changes the Main Screen area and Menu Title
area.
Left And Right Arrow Buttons:
Using the left or right arrow button allows
you to cycle through the submenu items of the
Main menu item.
NOTE:
Holding the up / down or left / right arrow button will loop the user through the
currently selected menu or options
presented on the screen.
Upon returning to a main menu, the last
submenu screen viewed within that main
menu will be displayed.
OK Button:
For Digital Speedometer:
Pushing the OK button changes units (mph or
km/h).
For Screen Setup:
OK button allows user to enter menu and
submenus.
Within each submenu layer, the up and
down arrow buttons will allow the user to
select the item of interest.
Pushing the OK button makes the selection.
A confirmation screen will appear, returning
the user to the first page of the submenu.
Pushing the left arrow button will exit each
submenu layer and return to the main menu.
For the Trip and Fuel Economy menus:
Information is reset by pushing and holding
the OK button.
ENGINE OIL LIFE RESET
Oil Change Required
Your vehicle is equipped with an engine oil
change indicator system. The “Oil Change
Required” message will display in the
instrument cluster display for five seconds after
a single chime has sounded, to indicate the next
scheduled oil change interval. The engine oil
change indicator system is duty cycle based,
which means the engine oil change interval may
fluctuate, dependent upon your personal
driving style.
Unless reset, this message will continue to
display each time you place the ignition in the
ON/RUN position. To turn off the message
temporarily, push and release the OK or arrow
buttons. To reset the oil change indicator
system (after performing the scheduled
maintenance), refer to the following procedure.
3
20_LX_OM_EN_USC_t.book Page 79
Page 82 of 328
80GETTING TO KNOW YOUR INSTRUMENT PANEL
Vehicles Equipped With Keyless Enter-N-Go —
Ignition
Use the steering wheel instrument cluster
display controls for the following procedure(s):
1. Without pressing the brake pedal, push the
ENGINE START/STOP button and place the
ignition in the ON/RUN position (do not
start the engine).
2. Push and release the down arrow button
to scroll downward through the main menu
to “Vehicle Info.”
3. Push and release the right arrow button
to access the ”Oil Life” screen.
4. Push and hold the OK button to reset oil life.
If conditions are met, the gauge and
numeric display will update to show 100%.
If conditions are not met a pop-up message
of "To reset oil life engine must be off with
ignition in run" will be displayed (for five
seconds), and the user will remain at the Oil
Life screen. 5. Push and release the
up or down
arrow button to exit the submenu screen.
NOTE:
If the indicator message illuminates when you
start the vehicle, the oil change indicator
system did not reset. If necessary, repeat this
procedure.
Secondary Method Of Resetting Engine Oil Life
1. Without pressing the brake pedal, push the ENGINE START/STOP button and place the
ignition to the ON/RUN position (do not
start the engine).
2. Fully press the accelerator pedal, slowly, three times within ten seconds.
3. Without pushing the brake pedal, push the ENGINE START/STOP button once to return
the ignition to the OFF/LOCK position.
NOTE:
If the indicator message illuminates when you
start the vehicle, the oil change indicator
system did not reset. If necessary, repeat this
procedure.INSTRUMENT CLUSTER DISPLAY
S
ELECTABLE MENU ITEMS
Push and release the up or down arrow
button until the desired Selectable Menu item is
displayed in the instrument cluster display.
Follow the Menu or submenu prompts as
desired.
Speedometer
Push and release the OK button to toggle
between mph and km/h.
Vehicle Info
The Vehicle Info consists of the following
submenu (pushing the left or right arrow
button will allow you to scroll through the
submenu):
Tire Pressure Monitor
Coolant Temperature
Transmission Temperature
Oil Temperature
Oil Pressure
Oil Life
20_LX_OM_EN_USC_t.book Page 80
Page 145 of 328
SAFETY143
(Continued)
EXHAUST GAS The best protection against carbon monoxide
entry into the vehicle body is a properly
maintained engine exhaust system.
Whenever a change is noticed in the sound of
the exhaust system, when exhaust fumes can
be detected inside the vehicle, or when the
underside or rear of the vehicle is damaged,
have a competent mechanic inspect the
complete exhaust system and adjacent body
areas for broken, damaged, deteriorated, or
mispositioned parts. Open seams or loose
connections could permit exhaust fumes to
seep into the passenger compartment. In
addition, inspect the exhaust system each time
the vehicle is raised for lubrication or oil
change. Replace as required.
SAFETY CHECKS YOU SHOULD MAKE
I
NSIDE THE VEHICLE
Seat Belts
Inspect the seat belt system periodically,
checking for cuts, frays, and loose parts.
Damaged parts must be replaced immediately.
Do not disassemble or modify the system.
Front seat belt assemblies must be replaced
after a collision. Rear seat belt assemblies must
be replaced after a collision if they have been
damaged (i.e., bent retractor, torn webbing,
etc.). If there is any question regarding seat belt
or retractor condition, replace the seat belt.
Air Bag Warning Light
The Air Bag warning light will turn on for four
to eight seconds as a bulb check when the
ignition switch is first turned to ON/RUN. If the
light is either not on during starting, stays on, or
turns on while driving, have the system
inspected at an authorized dealer as soon as
possible. After the bulb check, this light will
Do not allow people to ride in any area of
your vehicle that is not equipped with seats
and seat belts.
Be sure everyone in your vehicle is in a seat
and using a seat belt properly.
WARNING!
Exhaust gases can injure or kill. They contain
carbon monoxide (CO), which is colorless and
odorless. Breathing it can make you
unconscious and can eventually poison you.
To avoid breathing (CO), follow these safety
tips:
Do not run the engine in a closed garage or
in confined areas any longer than needed
to move your vehicle in or out of the area.
If you are required to drive with the trunk/
liftgate/rear doors open, make sure that all
windows are closed and the climate control
BLOWER switch is set at high speed. DO
NOT use the recirculation mode.
WARNING! (Continued)
If it is necessary to sit in a parked vehicle
with the engine running, adjust your
heating or cooling controls to force outside
air into the vehicle. Set the blower at high
speed.
WARNING! (Continued)
4
20_LX_OM_EN_USC_t.book Page 143
Page 147 of 328
SAFETY145
(Continued)
PERIODIC SAFETY CHECKS YOU SHOULD
M
AKE OUTSIDE THE VEHICLE
Tires
Examine tires for excessive tread wear and
uneven wear patterns. Check for stones, nails,
glass, or other objects lodged in the tread or
sidewall. Inspect the tread for cuts and cracks.
Inspect sidewalls for cuts, cracks, and bulges.
Check the wheel nuts for tightness. Check the
tires (including spare) for proper cold inflation
pressure.
Lights
Have someone observe the operation of brake
lights and exterior lights while you work the
controls. Check turn signal and high beam
indicator lights on the instrument panel.
Door Latches
Check for proper closing, latching, and locking.
Fluid Leaks
Check area under the vehicle after overnight
parking for fuel, coolant, oil, or other fluid leaks.
Also, if gasoline fumes are detected or if fuel, or
brake fluid leaks are suspected, the cause
should be located and corrected immediately.
ONLY use the passenger’s side floor mat on
the passenger’s side floor area.
ALWAYS make sure objects cannot fall or
slide into the driver’s side floor area when
the vehicle is moving. Objects can become
trapped under accelerator, brake, or clutch
pedals and could cause a loss of vehicle
control.
NEVER place any objects under the floor
mat (e.g., towels, keys, etc.). These objects
could change the position of the floor mat
and may cause interference with the accel -
erator, brake, or clutch pedals.
If the vehicle carpet has been removed and
re-installed, always properly attach carpet
to the floor and check the floor mat
fasteners are secure to the vehicle carpet.
Fully depress each pedal to check for inter -
ference with the accelerator, brake, or
clutch pedals then re-install the floor mats.
WARNING! (Continued)
It is recommended to only use mild soap
and water to clean your floor mats. After
cleaning, always check your floor mat has
been properly installed and is secured to
your vehicle using the floor mat fasteners
by lightly pulling mat.
WARNING! (Continued)
4
20_LX_OM_EN_USC_t.book Page 145
Page 152 of 328
150STARTING AND OPERATING
ENGINE BREAK-IN RECOMMENDATIONS
A long break-in period is not required for the
drivetrain (engine, transmission, clutch, and
rear axle) in your new vehicle.
Drive moderately during the first 300 miles
(500 km). After the initial 60 miles (100 km),
speeds up to 50 or 55 mph (80 or 90 km/h) are
desirable.
While cruising, brief full-throttle acceleration
within the limits of local traffic laws contributes
to a good break-in. However, wide-open throttle
acceleration in low gear can be detrimental and
should be avoided.
The engine oil, transmission fluid, and axle
lubricant installed at the factory are high-quality
and energy-conserving. Oil, fluid, and lubricant
changes should be consistent with anticipated
climate and conditions under which vehicle
operations will occur. For the recommended
viscosity and quality grades, refer to “Fluids And
Lubricants” in “Technical Specifications”. NOTE:
A new engine may consume some oil during its
first few thousand miles (kilometers) of opera
-
tion. This should be considered a normal part of
the break-in and not interpreted as an indica -
tion of difficulty. Please check your oil level with
the engine oil indicator often during the break in
period. Add oil as required.
PARKING BRAKE
Before leaving the vehicle, make sure that the
parking brake is fully applied and place the gear
selector in the PARK position.
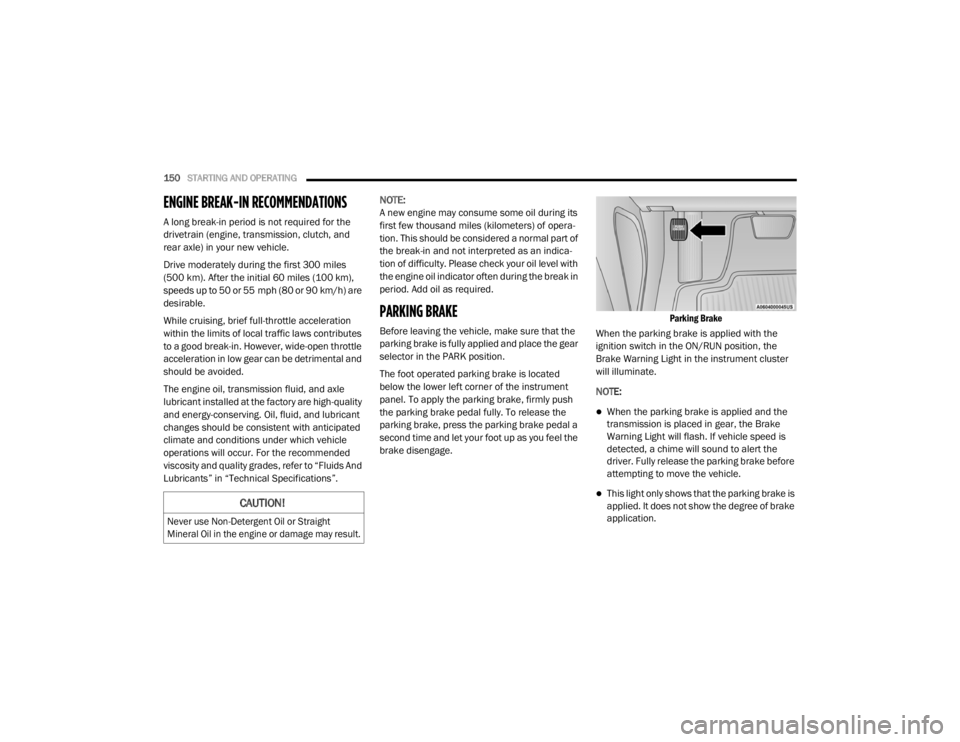
The foot operated parking brake is located
below the lower left corner of the instrument
panel. To apply the parking brake, firmly push
the parking brake pedal fully. To release the
parking brake, press the parking brake pedal a
second time and let your foot up as you feel the
brake disengage.
Parking Brake
When the parking brake is applied with the
ignition switch in the ON/RUN position, the
Brake Warning Light in the instrument cluster
will illuminate.
NOTE:
When the parking brake is applied and the
transmission is placed in gear, the Brake
Warning Light will flash. If vehicle speed is
detected, a chime will sound to alert the
driver. Fully release the parking brake before
attempting to move the vehicle.
This light only shows that the parking brake is
applied. It does not show the degree of brake
application.CAUTION!
Never use Non-Detergent Oil or Straight
Mineral Oil in the engine or damage may result.
20_LX_OM_EN_USC_t.book Page 150
Page 233 of 328
231
SERVICING AND MAINTENANCE
SCHEDULED SERVICING
This vehicle is equipped with an automatic oil
change indicator system. The oil change
indicator system will remind you that it is time to
take your vehicle in for scheduled maintenance.
Based on engine operation conditions, the oil
change indicator message will illuminate. This
means that service is required for the vehicle.
Operating conditions such as frequent
short-trips, trailer tow, and extremely hot or cold
ambient temperatures will influence when the
“Change Oil” or “Oil Change Required” message
is displayed. Severe Operating Conditions can
cause the change oil message to illuminate as
early as 3,500 miles (5,600 km) since last
reset. Have your vehicle serviced as soon as
possible, within the next 500 miles (805 km).
The “Oil Change Required” message will be
displayed in the instrument cluster and a single
chime will sound, indicating that an oil change
is necessary.An authorized dealer will reset the oil change
indicator message after completing the
scheduled oil change. If a scheduled oil change
is performed by someone other than an
authorized dealer, the message can be reset by
referring to “Instrument Cluster Display” in
“Getting To Know Your Instrument Panel” for
further information.
NOTE:
Under no circumstances should oil change
intervals exceed 10,000 miles (16,000 km),
12 months or 350 hours of engine run time,
whichever comes first. The 350 hours of engine
run or idle time is generally only a concern for
fleet customers.
Severe Duty All Models
Change Engine Oil at 4,000 miles (6,500 km) or
350 hours of engine run time if the vehicle is
operated in a dusty and off-road environment,
or is operated predominantly at idle or only very
low engine RPM. This type of vehicle use is
considered Severe Duty.Once A Month Or Before A Long Trip:Check engine oil level.
Check windshield washer fluid level.
Check tire pressure and look for unusual
wear or damage. Rotate tires at the first sign
of irregular wear, even if it occurs before your
next scheduled service.
Check the fluid levels of the coolant reservoir,
brake master cylinder, and power steering (if
equipped) and fill as needed.
Check function of all interior and exterior
lights.
7
20_LX_OM_EN_USC_t.book Page 231
Page 234 of 328
232SERVICING AND MAINTENANCE
MAINTENANCE PLAN
Required Maintenance Intervals:
Refer to the maintenance schedules on the following page for the required maintenance intervals.
At Every Oil Change Interval As Indicated By Oil Change Indicator System:
Change oil and filter
Rotate the tires
Rotate at the first sign of irregular wear, even if it occurs before your next scheduled service
Inspect battery and clean and tighten terminals as required
Inspect the CV/Universal joints
Inspect brake pads, shoes, rotors, drums, hoses and parking brake
Inspect engine cooling system protection and hoses
Inspect exhaust system
Inspect engine air cleaner if using in dusty or off-road conditions, replace engine air cleaner filter if necessary.
20_LX_OM_EN_USC_t.book Page 232
Page 237 of 328
SERVICING AND MAINTENANCE235
(Continued)
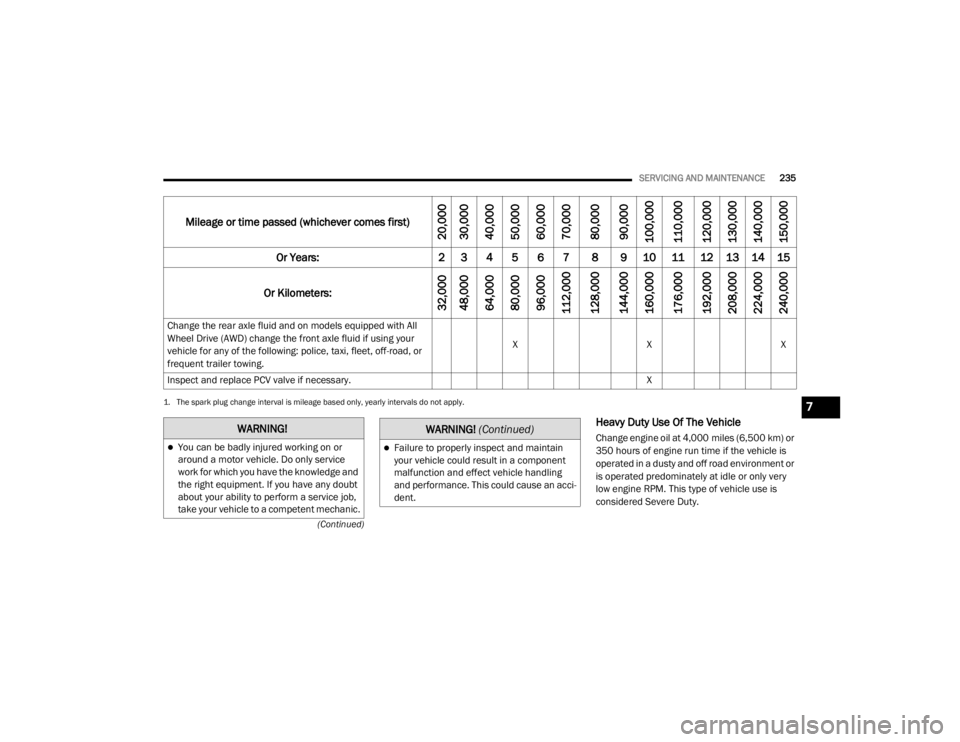
Heavy Duty Use Of The Vehicle
Change engine oil at 4,000 miles (6,500 km) or
350 hours of engine run time if the vehicle is
operated in a dusty and off road environment or
is operated predominately at idle or only very
low engine RPM. This type of vehicle use is
considered Severe Duty.
Change the rear axle fluid and on models equipped with All
Wheel Drive (AWD) change the front axle fluid if using your
vehicle for any of the following: police, taxi, fleet, off-road, or
frequent trailer towing.
X
XX
Inspect and replace PCV valve if necessary. X
1. The spark plug change interval is mileage based only, yearly intervals do not apply.
Mileage or time passed (whichever comes first)
20,000
30,000
40,000
50,000
60,000
70,000
80,000
90,000
100,000
110,000
120,000
130,000
140,000
150,000
Or Years: 2 3 4 5 6 7 8 9 10 11 12 13 14 15
Or Kilometers:
32,000
48,000
64,000
80,000
96,000
112,000
128,000
144,000
160,000
176,000
192,000
208,000
224,000
240,000
WARNING!
You can be badly injured working on or
around a motor vehicle. Do only service
work for which you have the knowledge and
the right equipment. If you have any doubt
about your ability to perform a service job,
take your vehicle to a competent mechanic.Failure to properly inspect and maintain
your vehicle could result in a component
malfunction and effect vehicle handling
and performance. This could cause an acci -
dent.
WARNING! (Continued)
7
20_LX_OM_EN_USC_t.book Page 235
Page 242 of 328
240SERVICING AND MAINTENANCE
ENGINE OIL
Change Engine Oil
The oil change indicator system will remind you
that it is time to take your vehicle in for scheduled
maintenance. Refer to “Scheduled Servicing” in
this section for the proper maintenance intervals.
NOTE:
Under no circumstances should oil change
intervals exceed 10,000 miles (16,000 km),
12 months or 350 hours of engine run time,
whichever comes first. The 350 hours of engine
run or idle time is generally only a concern for
fleet customers.
Engine Oil Selection — 3.6L And 5.7L
Engine
For best performance and maximum protection
under all types of operating conditions, the
manufacturer only recommends engine oils
that are API Certified and meet the
requirements of FCA Material Standard
MS-6395.
NOTE:
Hemi engines (5.7L) at times can tick right after
startup and then quiet down after approxi -
mately 30 seconds. This is normal and will not harm the engine. This characteristic can be
caused by short drive cycles. For example, if the
vehicle is started then shut off after driving a
short distance. Upon restarting, you may experi
-
ence a ticking sound. Other causes could be if
the vehicle is unused for an extended period of
time, incorrect oil, extended oil changes or
extended idling. If the engine continues to tick
or if the Malfunction Indicator Light (MIL) comes
on, see the nearest authorized dealer
American Petroleum Institute (API) Engine
Oil Identification Symbol
This symbol means that the oil has
been certified by the American
Petroleum Institute (API). The
manufacturer only recommends
API Certified engine oils.
This symbol certifies 0W-20, 5W-20, 0W-30,
5W-30 and 10W-30 engine oils.
Engine Oil Viscosity (SAE Grade) — 3.6L
Engine
Mopar SAE 5W-20 engine oil approved to FCA
Material Standard MS-6395 such as Pennzoil,
Shell Helix Ultra or equivalent is recommended
for all operating temperatures. This engine oil
improves low temperature starting and vehicle
fuel economy.
The engine oil filler cap also shows the
recommended engine oil viscosity for your
engine. For information on engine oil filler cap
location, refer to the “Engine Compartment”
illustration in this section.
NOTE:
Mopar SAE 5W-30 engine oil approved to FCA
Material Standard MS-6395 such as Pennzoil,
Shell Helix Ultra or equivalent may be used
when SAE 5W-20 engine oil meeting MS-6395
is not available.
Lubricants which do not have both the engine
oil certification mark and the correct SAE
viscosity grade number should not be used.
CAUTION!
Do not use chemical flushes in your engine oil
as the chemicals can damage your engine.
Such damage is not covered by the New
Vehicle Limited Warranty.
20_LX_OM_EN_USC_t.book Page 240