start stop button CHRYSLER 300 2020 Owners Manual
[x] Cancel search | Manufacturer: CHRYSLER, Model Year: 2020, Model line: 300, Model: CHRYSLER 300 2020Pages: 328, PDF Size: 14.28 MB
Page 13 of 328

GETTING TO KNOW YOUR VEHICLE11
TIP:
When viewing a topic, tap the star icon to add it
to your Favorites, for easy access in the future.
KEYS
KEY FOB
Your vehicle uses a keyless ignition system. The
ignition system consists of a key fob with
Remote Keyless Entry (RKE) and a START/STOP
push button ignition system. The Remote
Keyless Entry system consists of a key fob and
Keyless Enter-N-Go feature (if equipped).
NOTE:
The key fob may not be found by the RKE
system if it is located next to a mobile phone,
laptop or other electronic device; these devices
may block the key fob’s wireless signal.
The key fob allows you to lock or unlock the doors
and trunk from distances up to approximately
66 feet (20 m). The key fob does not need to be
pointed at the vehicle to activate the system.
NOTE:
In the ON/RUN position, key fob commands are
disabled if the vehicle is at or above 2 mph
(4 km/h).
Key Fob
The key fob also contains an emergency key,
which is stored in the rear of the key fob.
Emergency Key
The emergency key allows for entry into the
vehicle should the battery in the vehicle or the
key fob become depleted. The emergency key is
also for locking/unlocking the glove
compartment. You can keep the emergency key
with you when valet parking.
1 — Unlock
2 — Trunk Open
3 — Lock
4 — Remote Start
5 — Panic Button
6 — Emergency Key
2
20_LX_OM_EN_USC_t.book Page 11
Page 14 of 328
12GETTING TO KNOW YOUR VEHICLE
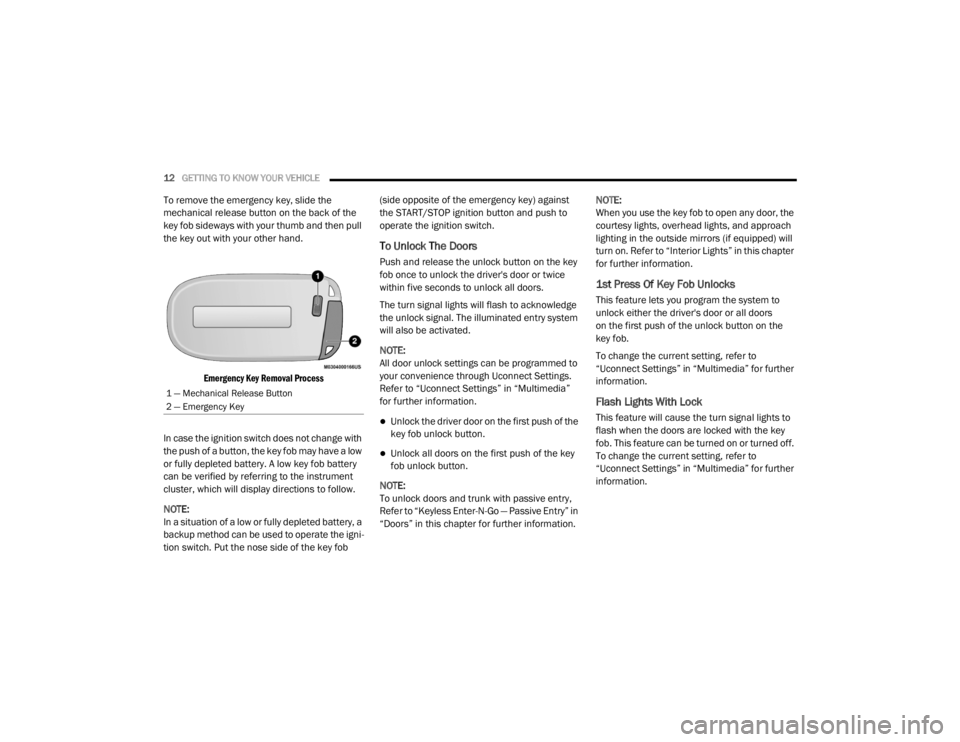
To remove the emergency key, slide the
mechanical release button on the back of the
key fob sideways with your thumb and then pull
the key out with your other hand.
Emergency Key Removal Process
In case the ignition switch does not change with
the push of a button, the key fob may have a low
or fully depleted battery. A low key fob battery
can be verified by referring to the instrument
cluster, which will display directions to follow.
NOTE:
In a situation of a low or fully depleted battery, a
backup method can be used to operate the igni -
tion switch. Put the nose side of the key fob (side opposite of the emergency key) against
the START/STOP ignition button and push to
operate the ignition switch.
To Unlock The Doors
Push and release the unlock button on the key
fob once to unlock the driver's door or twice
within five seconds to unlock all doors.
The turn signal lights will flash to acknowledge
the unlock signal. The illuminated entry system
will also be activated.
NOTE:
All door unlock settings can be programmed to
your convenience through Uconnect Settings.
Refer to “Uconnect Settings” in “Multimedia”
for further information.
Unlock the driver door on the first push of the
key fob unlock button.
Unlock all doors on the first push of the key
fob unlock button.
NOTE:
To unlock doors and trunk with passive entry,
Refer to “Keyless Enter-N-Go — Passive Entry” in
“Doors” in this chapter for further information. NOTE:
When you use the key fob to open any door, the
courtesy lights, overhead lights, and approach
lighting in the outside mirrors (if equipped) will
turn on. Refer to “Interior Lights” in this chapter
for further information.
1st Press Of Key Fob Unlocks
This feature lets you program the system to
unlock either the driver's door or all doors
on the first push of the unlock button on the
key fob.
To change the current setting, refer to
“Uconnect Settings” in “Multimedia” for further
information.
Flash Lights With Lock
This feature will cause the turn signal lights to
flash when the doors are locked with the key
fob. This feature can be turned on or turned off.
To change the current setting, refer to
“Uconnect Settings” in “Multimedia” for further
information.
1 — Mechanical Release Button
2 — Emergency Key
20_LX_OM_EN_USC_t.book Page 12
Page 18 of 328
16GETTING TO KNOW YOUR VEHICLE
Le présent appareil est conforme aux CNR
d`Innovation, Science and Economic
Development applicables aux appareils radio
exempts de licence. L'exploitation est autorisée
aux deux conditions suivantes:
1. l'appareil ne doit pas produire de
brouillage, et
2. l'utilisateur de l'appareil doit accepter tout brouillage radioélectrique subi, même si le
brouillage est susceptible d'en compro -
mettre le fonctionnement.
La operación de este equipo está sujeta a las
siguientes dos condiciones:
1. es posible que este equipo o dispositivo no cause interferencia perjudicial y
2. este equipo o dispositivo debe aceptar cualquier interferencia, incluyendo la que
pueda causar su operación no deseada.
NOTE:
Changes or modifications not expressly
approved by the party responsible for compli -
ance could void the user’s authority to operate
the equipment.IGNITION SWITCH
KEYLESS PUSH BUTTON IGNITION
This feature allows the driver to operate the
ignition with the push of a button as long as the
key fob is in the passenger compartment.
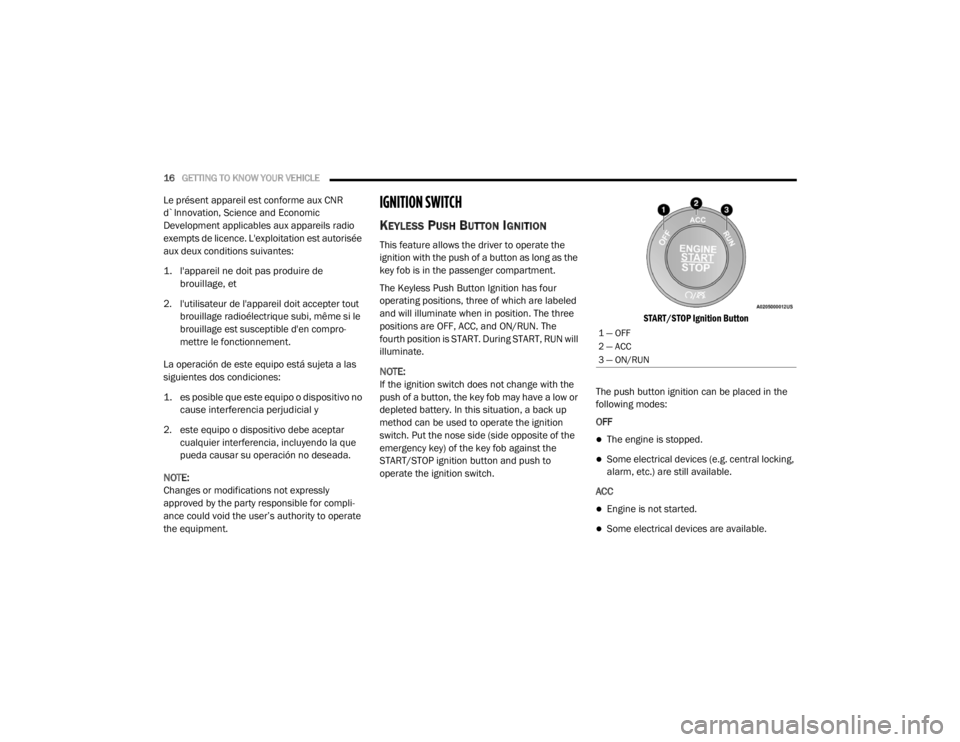
The Keyless Push Button Ignition has four
operating positions, three of which are labeled
and will illuminate when in position. The three
positions are OFF, ACC, and ON/RUN. The
fourth position is START. During START, RUN will
illuminate.
NOTE:
If the ignition switch does not change with the
push of a button, the key fob may have a low or
depleted battery. In this situation, a back up
method can be used to operate the ignition
switch. Put the nose side (side opposite of the
emergency key) of the key fob against the
START/STOP ignition button and push to
operate the ignition switch.
START/STOP Ignition Button
The push button ignition can be placed in the
following modes:
OFF
The engine is stopped.
Some electrical devices (e.g. central locking,
alarm, etc.) are still available.
ACC
Engine is not started.
Some electrical devices are available.
1 — OFF
2 — ACC
3 — ON/RUN
20_LX_OM_EN_USC_t.book Page 16
Page 20 of 328
18GETTING TO KNOW YOUR VEHICLE
(Continued)
REMOTE START — IF EQUIPPED
HOW TO USE REMOTE START — IF
E
QUIPPED
Push remote start button on the key
fob twice within five seconds. Pushing
the remote start button a third time
shuts the engine off.
To drive the vehicle, push the unlock button,
and push the ignition to the ON/RUN position.
NOTE:
With remote start, the engine will only run for
15 minutes (timeout) unless the ignition is
placed in the ON/RUN position.
The vehicle must be started using the START/
STOP ignition button after two consecutive
timeouts.
All of the following conditions must be met
before the engine will remote start:
Gear selector in PARK
Doors closed
Hood closed
Trunk closed
Hazard switch off
Brake switch inactive (brake pedal not
pushed)
Battery at an acceptable charge level
PANIC button not pushed
System not disabled from previous remote
start event
Vehicle alarm system indicator flashing
Ignition in STOP/OFF position
Fuel level meets minimum requirement
Vehicle security alarm is not signaling an
intrusion
Malfunction indicator is not illuminated
Do not leave the key fob in or near the
vehicle, or in a location accessible to chil-
dren, and do not leave the ignition of a
vehicle equipped with Keyless Enter-N-Go
in the ON/RUN mode. A child could operate
power windows, other controls, or move the
vehicle.
Do not leave children or animals inside
parked vehicles in hot weather. Interior
heat build-up may cause serious injury or
death.
CAUTION!
An unlocked vehicle is an invitation for
thieves. Always remove key fob from the
vehicle and lock all doors when leaving the
vehicle unattended.
WARNING! (Continued)
WARNING!
Do not start or run an engine in a closed
garage or confined area. Exhaust gas
contains Carbon Monoxide (CO) which is
odorless and colorless. Carbon Monoxide is
poisonous and can cause serious injury or
death when inhaled.
20_LX_OM_EN_USC_t.book Page 18
Page 21 of 328

GETTING TO KNOW YOUR VEHICLE19
REMOTE START ABORT MESSAGE ON
T
HE INSTRUMENT CLUSTER DISPLAY —
I
F EQUIPPED
The following messages will display in the
instrument cluster display if the vehicle fails to
remote start or exits remote start prematurely:
Remote Start Aborted — Door Open
Remote Start Aborted — Hood Open
Remote Start Aborted — Fuel Low
Remote Start Aborted — Trunk Open
Remote Start Disabled — Start Vehicle To
Reset
Remote Start Aborted — Too Cold
Remote Start Aborted — Time Expired
The message will stay active until the ignition is
placed in the ON/RUN position.
TO ENTER REMOTE START MODE
Push and release the remote start button on the
key fob twice within five seconds. The vehicle
doors will lock, the parking lights will flash, and
the horn will chirp twice (if programmed). Then,
the engine will start, and the vehicle will remain
in the Remote Start mode for a 15 minute cycle.
NOTE:
If an engine fault is present or fuel level is
low, the vehicle will start and then shut down
in 10 seconds.
The park lamps will turn on and remain on
during Remote Start mode.
For security, power window and power
sunroof operation (if equipped) are disabled
when the vehicle is in the Remote Start
mode.
The engine can be started two consecutive
times with the key fob. However, the ignition
must be cycled by pushing the START/STOP
ignition button twice (or the ignition switch
must be placed in the ON/RUN position)
before you can repeat the start sequence for
a third cycle.
TO EXIT REMOTE START MODE
W
ITHOUT DRIVING THE VEHICLE
Push and release the remote start button one
time or allow the engine to run for the entire
15 minute cycle.
NOTE:
To avoid unintentional shutdowns, the system
will disable for two seconds after receiving a
valid remote start request.
TO EXIT REMOTE START MODE AND
D
RIVE THE VEHICLE
Before the end of 15 minute cycle, push and
release the unlock button on the key fob to
unlock the doors and disarm the vehicle
security alarm (if equipped). Then, prior to the
end of the 15 minute cycle, push and release
the START/STOP ignition button.
NOTE:
For vehicles not equipped with the Keyless
Enter-N-Go — Passive Entry feature, the igni -
tion switch must be in the ON/RUN position
in order to drive the vehicle.
Keep key fobs away from children. Opera -
tion of the Remote Start System, windows,
door locks or other controls could cause
serious injury or death.
WARNING! (Continued)
2
20_LX_OM_EN_USC_t.book Page 19
Page 22 of 328

20GETTING TO KNOW YOUR VEHICLE
For vehicles not equipped with the Keyless
Enter-N-Go — Passive Entry feature, the
message “Remote Start Active — Insert Key
and Turn To Run” will show in the instrument
cluster display until you insert the key.
For vehicles equipped with the Keyless
Enter-N-Go — Passive Entry feature, the
message “Remote Start Active — Push Start
Button” will show in the instrument cluster
display until you push the START/STOP igni -
tion button.
To Cancel Remote Start
Remote Starting will also cancel if any of the
following occur:
The engine stalls or engine speed exceeds
2500 RPM.
Any engine warning lights come on.
Low Fuel Light turns on.
The hood is opened.
The hazard switch is pushed.
The gear selector is moved out of PARK.
The brake pedal is pushed.
REMOTE START COMFORT SYSTEMS —
I
F EQUIPPED
When remote start is activated, the heated
steering wheel and driver heated seat features
will automatically turn on in cold weather. In
warm weather, the driver vented seat feature
will automatically turn on when the remote start
is activated. These features will stay on through
the duration of remote start or until the ignition
switch is placed in the ON/RUN position.
GENERAL INFORMATION
The following regulatory statement applies to all
Radio Frequency (RF) devices equipped in this
vehicle:
This device complies with Part 15 of the FCC
Rules and with Innovation, Science and
Economic Development Canada license-exempt
RSS standard(s). Operation is subject to the
following two conditions:
1. This device may not cause harmful
interference, and
2. This device must accept any interference received, including interference that may
cause undesired operation. Le présent appareil est conforme aux CNR
d`Innovation, Science and Economic
Development applicables aux appareils radio
exempts de licence. L'exploitation est autorisée
aux deux conditions suivantes:
1. l'appareil ne doit pas produire de
brouillage, et
2. l'utilisateur de l'appareil doit accepter tout brouillage radioélectrique subi, même si le
brouillage est susceptible d'en compro -
mettre le fonctionnement.
La operación de este equipo está sujeta a las
siguientes dos condiciones:
1. es posible que este equipo o dispositivo no cause interferencia perjudicial y
2. este equipo o dispositivo debe aceptar cualquier interferencia, incluyendo la que
pueda causar su operación no deseada.
NOTE:
Changes or modifications not expressly
approved by the party responsible for compli -
ance could void the user’s authority to operate
the equipment.
20_LX_OM_EN_USC_t.book Page 20
Page 80 of 328
78GETTING TO KNOW YOUR INSTRUMENT PANEL
engine cooling system is operating satis-
factorily.
The gauge pointer will likely indicate a
higher temperature when driving in hot
weather, up mountain grades, or when
towing a trailer. It should not be allowed
to exceed the upper limits of the normal
operating range. 5. Fuel Gauge
The pointer shows the level of fuel in the
fuel tank when the Keyless Push Button
Ignition is in the ON/RUN position.
The fuel pump symbol points
to the side of the vehicle where
the fuel door is located.
For further information refer to “Refueling
The Vehicle” in “Starting And Operating.”
NOTE:
The warning / indicator Lights will briefly illumi -
nate for a bulb check when the ignition is first
cycled.
INSTRUMENT CLUSTER DISPLAY
Your vehicle is equipped with an instrument
cluster display, which offers useful information
to the driver. With the ignition in the OFF mode,
opening/closing of a door will activate the
display for viewing, and display the total miles,
or kilometers, in the odometer. Your instrument
cluster display is designed to display important
information about your vehicle’s systems and
features. Using a driver interactive display
located on the instrument panel, your
instrument cluster display can show you how systems are working and give you warnings
when they are not. The steering wheel mounted
controls allow you to scroll through the main
menus and submenus. You can access the
specific information you want and make
selections and adjustments.
LOCATION AND CONTROLS
The instrument cluster display features an
interactive display which is located in the
instrument cluster.
This system conveniently allows the driver to
select a variety of useful information by pushing
the arrow buttons located on the left side of the
steering wheel. The instrument cluster display
menu items consist of the following:
Speedometer
Vehicle Info
Driver Assist — If Equipped
Fuel Economy
Trip
Audio
Messages
Screen Setup
WARNING!
A hot engine cooling system is dangerous.
You or others could be badly burned by steam
or boiling coolant. You may want to call an
authorized dealer for service if your vehicle
overheats.
CAUTION!
Driving with a hot engine cooling system
could damage your vehicle. If the
temperature gauge reads “H,” pull over and
stop the vehicle. Idle the vehicle with the air
conditioner turned off until the pointer drops
back into the normal range. If the pointer
remains on the “H,” turn the engine off
immediately and call an authorized dealer for
service.
20_LX_OM_EN_USC_t.book Page 78
Page 82 of 328
80GETTING TO KNOW YOUR INSTRUMENT PANEL
Vehicles Equipped With Keyless Enter-N-Go —
Ignition
Use the steering wheel instrument cluster
display controls for the following procedure(s):
1. Without pressing the brake pedal, push the
ENGINE START/STOP button and place the
ignition in the ON/RUN position (do not
start the engine).
2. Push and release the down arrow button
to scroll downward through the main menu
to “Vehicle Info.”
3. Push and release the right arrow button
to access the ”Oil Life” screen.
4. Push and hold the OK button to reset oil life.
If conditions are met, the gauge and
numeric display will update to show 100%.
If conditions are not met a pop-up message
of "To reset oil life engine must be off with
ignition in run" will be displayed (for five
seconds), and the user will remain at the Oil
Life screen. 5. Push and release the
up or down
arrow button to exit the submenu screen.
NOTE:
If the indicator message illuminates when you
start the vehicle, the oil change indicator
system did not reset. If necessary, repeat this
procedure.
Secondary Method Of Resetting Engine Oil Life
1. Without pressing the brake pedal, push the ENGINE START/STOP button and place the
ignition to the ON/RUN position (do not
start the engine).
2. Fully press the accelerator pedal, slowly, three times within ten seconds.
3. Without pushing the brake pedal, push the ENGINE START/STOP button once to return
the ignition to the OFF/LOCK position.
NOTE:
If the indicator message illuminates when you
start the vehicle, the oil change indicator
system did not reset. If necessary, repeat this
procedure.INSTRUMENT CLUSTER DISPLAY
S
ELECTABLE MENU ITEMS
Push and release the up or down arrow
button until the desired Selectable Menu item is
displayed in the instrument cluster display.
Follow the Menu or submenu prompts as
desired.
Speedometer
Push and release the OK button to toggle
between mph and km/h.
Vehicle Info
The Vehicle Info consists of the following
submenu (pushing the left or right arrow
button will allow you to scroll through the
submenu):
Tire Pressure Monitor
Coolant Temperature
Transmission Temperature
Oil Temperature
Oil Pressure
Oil Life
20_LX_OM_EN_USC_t.book Page 80
Page 101 of 328
SAFETY99
NOTE:
For vehicles with multiple partial ESC modes
a momentary button push will toggle the ESC
mode. Multiple momentary button pushes
may be required to return to “"ESC On"”.
Trailer Sway Control (TSC) is disabled when
the ESC system is in the “Partial Off” mode.
If Equipped — "ESC Sport" and "ESC Track"
are ESC “Partial Off” mode(s).
Full Off – If Equipped
This mode is intended for off-highway or
off-road use only and should not be used on any
public roadways. In this mode, TCS and ESC
features are turned off. To enter the “Full Off”
mode, push and hold the “ESC OFF” switch for
five seconds while the vehicle is stopped with
the engine running. After five seconds, a chime
will sound, the “ESC OFF Indicator Light” will
illuminate, and the “ESC OFF” message will
display in the instrument cluster. To turn ESC on
again, momentarily push the “ESC OFF” switch.
ESC Activation/Malfunction Indicator Light
And ESC OFF Indicator Light
The “ESC Activation/Malfunction
Indicator Light” in the instrument
cluster will come on when the ignition
is placed in the ON position. It should
go out with the engine running. If the “ESC
Activation/Malfunction Indicator Light” comes
on continuously with the engine running, a
malfunction has been detected in the ESC
system. If this light remains on after several
ignition cycles, and the vehicle has been driven
several miles (kilometers) at speeds greater
than 30 mph (48 km/h), see an authorized
dealer as soon as possible to have the problem
diagnosed and corrected.
The “ESC Activation/Malfunction Indicator
Light” (located in the instrument cluster) starts
to flash as soon as the tires lose traction and
the ESC system becomes active. The “ESC
Activation/Malfunction Indicator Light” also
flashes when TCS is active. If the “ESC
Activation/Malfunction Indicator Light” begins
to flash during acceleration, ease up on the
accelerator and apply as little throttle as
possible. Be sure to adapt your speed and
driving to the prevailing road conditions.
WARNING!
In the ESC “Full Off” mode, the engine
torque reduction and stability features are
disabled. Therefore, enhanced vehicle
stability offered by the ESC system is
unavailable. In an emergency evasive
maneuver, the ESC system will not engage
to assist in maintaining stability. ESC “Full
Off” mode is intended for off-highway or
off-road use only.
With the ESC switched off, the enhanced
vehicle stability offered by ESC is unavail -
able. In an emergency evasive maneuver,
the ESC system will not engage to assist in
maintaining stability. ESC “Full Off” mode is
only intended for off-highway or off-road
use.
The Electronic Stability Control (ESC)
cannot prevent the natural laws of physics
from acting on the vehicle, nor can it
increase the traction afforded by prevailing
road conditions. ESC cannot prevent all
accidents, including those resulting from
excessive speed in turns, driving on very
slippery surfaces, or hydroplaning. ESC also
cannot prevent collisions.
4
20_LX_OM_EN_USC_t.book Page 99
Page 103 of 328

SAFETY101
Disabling And Enabling HSA
This feature can be turned on or turned off. To
change the current setting, proceed as follows:
If disabling HSA using your instrument cluster
display, refer to “Instrument Cluster Display”
in “Getting To Know Your Instrument Panel”
for further information.
If disabling HSA using Uconnect Settings,
refer to “Uconnect Settings” in “Multimedia”
for further information.
For vehicles not equipped with an instrument
cluster display, perform the following steps:
1. Center the steering wheel (front wheels pointing straight forward).
2. Shift the transmission into PARK.
3. Apply the parking brake.
4. Start the engine.
5. Rotate the steering wheel slightly more than one-half turn to the left.
6. Push the “ESC OFF” button located in the lower switch bank below the climate control
four times within 20 seconds. The “ESC OFF
Indicator Light” should turn on and turn off
two times.
7. Rotate the steering wheel back to center and then an additional slightly more than
one-half turn to the right. 8. Turn the ignition to the OFF mode and then
back to ON. If the sequence was completed
properly, the “ESC OFF Indicator Light” will
blink several times to confirm HSA is
disabled.
9. Repeat these steps if you want to return this feature to its previous setting.
Rain Brake Support (RBS)
Rain Brake Support (RBS) may improve braking
performance in wet conditions. It will
periodically apply a small amount of brake
pressure to remove any water buildup on the
front brake rotors. It functions when the
windshield wipers are in LO or HI speed. When
RBS is active, there is no notification to the
driver and no driver interaction is required.
Ready Alert Braking (RAB)
Ready Alert Braking (RAB) may reduce the time
required to reach full braking during emergency
braking situations. It anticipates when an
emergency braking situation may occur by
monitoring how fast the throttle is released by
the driver. The Electronic Brake Controller (EBC)
will prepare the brake system for a panic stop.
WARNING!
If you use a trailer brake controller with your
trailer, the trailer brakes may be activated
and deactivated with the brake switch. If
so, there may not be enough brake pres -
sure to hold both the vehicle and the trailer
on a hill when the brake pedal is released.
In order to avoid rolling down an incline
while resuming acceleration, manually acti -
vate the trailer brake or apply more vehicle
brake pressure prior to releasing the brake
pedal.
HSA is not a parking brake. Always apply
the parking brake fully when exiting your
vehicle. Also, be certain to place the trans -
mission in PARK.
Failure to follow these warnings can result
in a collision or serious personal injury.
4
20_LX_OM_EN_USC_t.book Page 101