lock CHRYSLER 300 2021 Manual PDF
[x] Cancel search | Manufacturer: CHRYSLER, Model Year: 2021, Model line: 300, Model: CHRYSLER 300 2021Pages: 268, PDF Size: 15.24 MB
Page 209 of 268
SERVICING AND MAINTENANCE 207
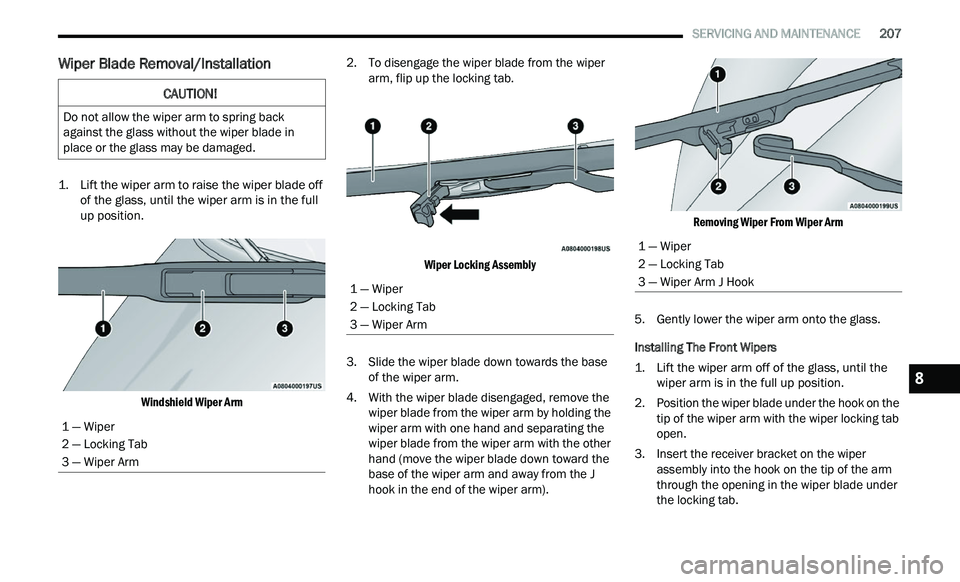
Wiper Blade Removal/Installation
1. Lift the wiper arm to raise the wiper blade off
of the glass, until the wiper arm is in the full
up position.
Windshield Wiper Arm
2. T
o disengage the wiper blade from the wiper
a
rm, flip up the locking tab.
Wiper Locking Assembly
3. S lide the wiper blade down towards the base
of
the wiper arm.
4. With the wiper blade disengaged, remove the w
iper blade from the wiper arm by holding the
wiper arm with one hand and separating the
wiper blade from the wiper arm with the other
hand (move the wiper blade down toward the
base of the wiper arm and away from the J
hook in the end of the wiper arm).
Removing Wiper From Wiper Arm
5. G ently lower the wiper arm onto the glass.
I
nstalling The Front Wipers
1. Lift the wiper arm off of the glass, until the w
iper arm is in the full up position.
2. Position the wiper blade under the hook on the t
ip of the wiper arm with the wiper locking tab
open.
3. I nsert the receiver bracket on the wiper
a
ssembly into the hook on the tip of the arm
through the opening in the wiper blade under
the locking tab.
CAUTION!
Do not allow the wiper arm to spring back
against the glass without the wiper blade in
place or the glass may be damaged.
1 — Wiper
2 — Locking Tab
3 — Wiper Arm
1 — Wiper
2 — Locking Tab
3 — Wiper Arm
1 — Wiper
2 — Locking Tab
3 — Wiper Arm J Hook
8
Page 210 of 268
208 SERVICING AND MAINTENANCE
(Continued)
4. Slide the wiper blade onto the arm until motion stops, then fold down the locking tab to
secure.
NOTE:
The locking tab will not snap into place until the
b l
ade is properly positioned on the wiper arm hook.
5. Gently lower the wiper blade onto the glass.
EXHAUST SYSTEM
The best protection against carbon monoxide entry
into the vehicle body is a properly maintained
engine exhaust system.
If you notice a change in the sound of the exhaust
s y
stem; or if the exhaust fumes can be detected
inside the vehicle; or when the underside or rear of
the vehicle is damaged; have an authorized
technician inspect the complete exhaust system
and adjacent body areas for broken, damaged,
deteriorated, or mispositioned parts. Open seams
or loose connections could permit exhaust fumes
to seep into the passenger compartment. In
addition, have the exhaust system inspected each
time the vehicle is raised for lubrication or oil
change. Replace as required. Under normal operating conditions, the catalytic
c
on
verter will not require maintenance. However, it
is important to keep the engine properly tuned to
ensure proper catalyst operation and prevent
possible catalyst damage.
NOTE:
Intentional tampering with emissions control
s y
stems can result in civil penalties being
assessed against you.
WARNING!
Exhaust gases can injure or kill. They contain
carbon monoxide (CO), which is colorless and
odorless. Breathing it can make you uncon -
scious and can eventually poison you. To
a v
oid breathing CO Ú page 178.
A hot exhaust system can start a fire if you
park over materials that can burn. Such mate -
rials might be grass or leaves coming into
c on
tact with your exhaust system. Do not park
or operate your vehicle in areas where your
exhaust system can contact anything that can
burn.
CAUTION!
The catalytic converter requires the use of
unleaded fuel only. Leaded gasoline will
destroy the effectiveness of the catalyst as an
emissions control device and may seriously
reduce engine performance and cause
serious damage to the engine.
Damage to the catalytic converter can result if
your vehicle is not kept in proper operating
condition. In the event of engine malfunction,
particularly involving engine misfire or other
apparent loss of performance, have your
vehicle serviced promptly. Continued opera -
tion of your vehicle with a severe malfunction
c ou
ld cause the converter to overheat,
resulting in possible damage to the converter
and vehicle.
CAUTION!
Page 217 of 268
SERVICING AND MAINTENANCE 215
CAUTION!
When installing the power distribution center cover, it is important to ensure the cover is properly positioned and fully latched. Failure to do so may allow
water to get into the power distribution center and possibly result in an electrical system failure.
When replacing a blown fuse, it is important to use only a fuse having the correct amperage rating. The use of a fuse with a rating other than indicated may
result in a dangerous electrical system overload. If a properly rated fuse continues to blow, it indicates a problem in the circuit that must be corrected.
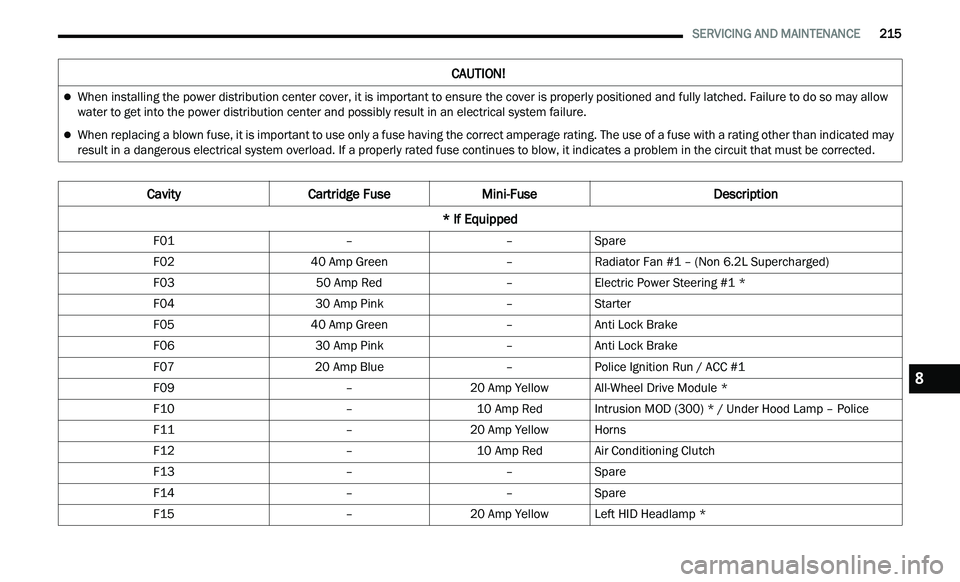
Cavity Cartridge Fuse Mini-Fuse Description
* If Equipped
F01 ––Spare
F02 40 Amp Green –Radiator Fan #1 – (Non 6.2L Supercharged)
F03 50 Amp Red –Electric Power Steering #1 *
F04 30 Amp Pink –Starter
F05 40 Amp Green –Anti Lock Brake
F06 30 Amp Pink –Anti Lock Brake
F07 20 Amp Blue –Police Ignition Run / ACC #1
F09 –20 Amp YellowAll-Wheel Drive Module *
F10 –10 Amp RedIntrusion MOD (300) * / Under Hood Lamp – Police
F11 –20 Amp YellowHorns
F12 –10 Amp RedAir Conditioning Clutch
F13 ––Spare
F14 ––Spare
F15 –20 Amp YellowLeft HID Headlamp *
8
Page 218 of 268
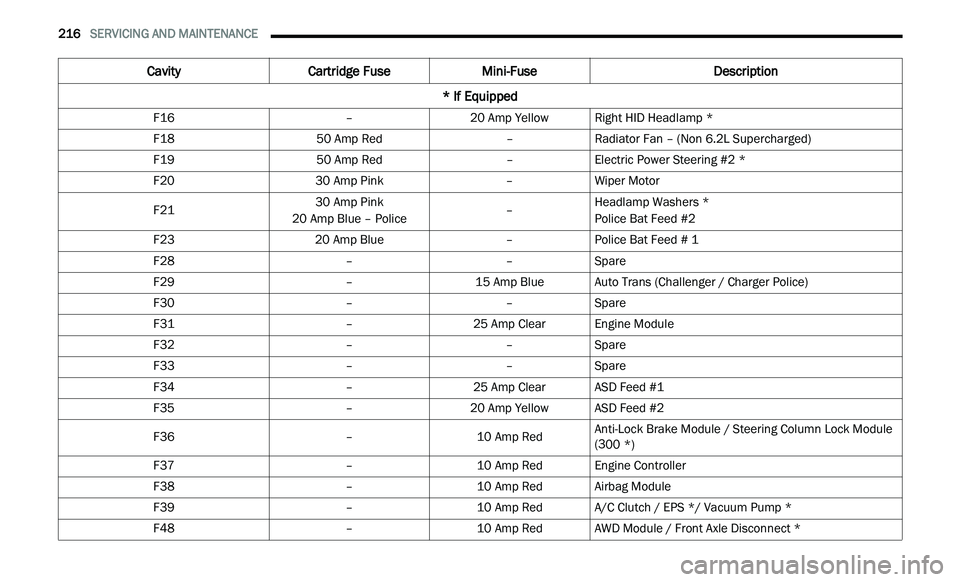
216 SERVICING AND MAINTENANCE
F16 –20 Amp YellowRight HID Headlamp *
F18 50 Amp Red –Radiator Fan – (Non 6.2L Supercharged)
F19 50 Amp Red –Electric Power Steering #2 *
F20 30 Amp Pink –Wiper Motor
F21 30 Amp Pink
20 Amp Blue – Police –Headlamp Washers *
Police Bat Feed #2
F23 20 Amp Blue –Police Bat Feed # 1
F28 ––Spare
F29 –15 Amp BlueAuto Trans (Challenger / Charger Police)
F30 ––Spare
F31 –25 Amp ClearEngine Module
F32 ––Spare
F33 ––Spare
F34 –25 Amp ClearASD Feed #1
F35 –20 Amp YellowASD Feed #2
F36 –10 Amp RedAnti-Lock Brake Module / Steering Column Lock Module
(
3
00 *)
F37 –10 Amp RedEngine Controller
F38 –10 Amp RedAirbag Module
F39 –10 Amp RedA/C Clutch / EPS */ Vacuum Pump *
F48 –10 Amp RedAWD Module / Front Axle Disconnect *
Cavity Cartridge Fuse Mini-Fuse Description
* If Equipped
Page 220 of 268
218 SERVICING AND MAINTENANCE
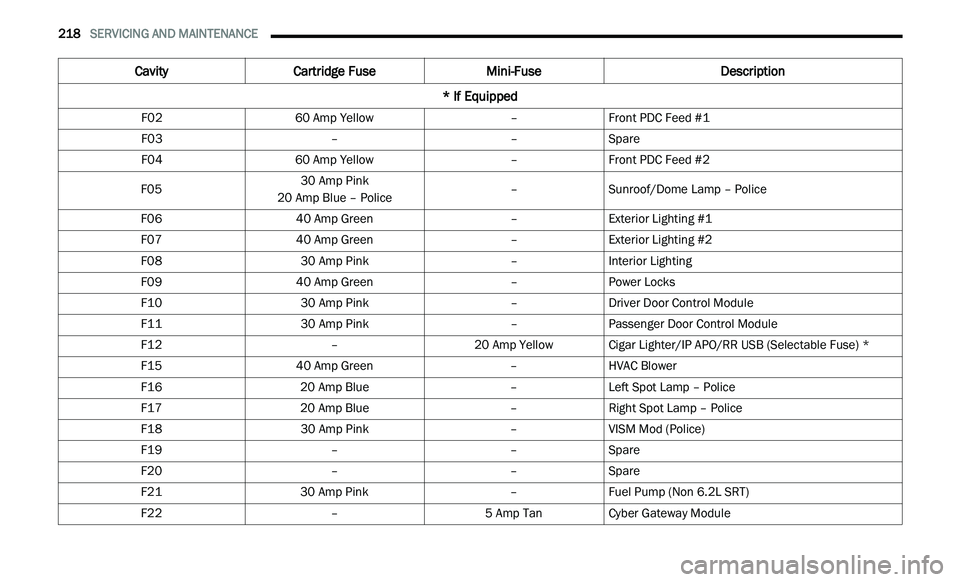
Cavity Cartridge Fuse Mini-Fuse Description
* If Equipped
F02 60 Amp Yellow –Front PDC Feed #1
F03 ––Spare
F04 60 Amp Yellow –Front PDC Feed #2
F05 30 Amp Pink
20 Amp Blue – Police –
Sunroof/Dome Lamp – Police
F06 40 Amp Green –Exterior Lighting #1
F07 40 Amp Green –Exterior Lighting #2
F08 30 Amp Pink –Interior Lighting
F09 40 Amp Green –Power Locks
F10 30 Amp Pink –Driver Door Control Module
F11 30 Amp Pink –Passenger Door Control Module
F12 –20 Amp YellowCigar Lighter/IP APO/RR USB (Selectable Fuse) *
F15 40 Amp Green –HVAC Blower
F16 20 Amp Blue –Left Spot Lamp – Police
F17 20 Amp Blue –Right Spot Lamp – Police
F18 30 Amp Pink –VISM Mod (Police)
F19 ––Spare
F20 ––Spare
F21 30 Amp Pink –Fuel Pump (Non 6.2L SRT)
F22 –5 Amp TanCyber Gateway Module
Page 221 of 268
SERVICING AND MAINTENANCE 219
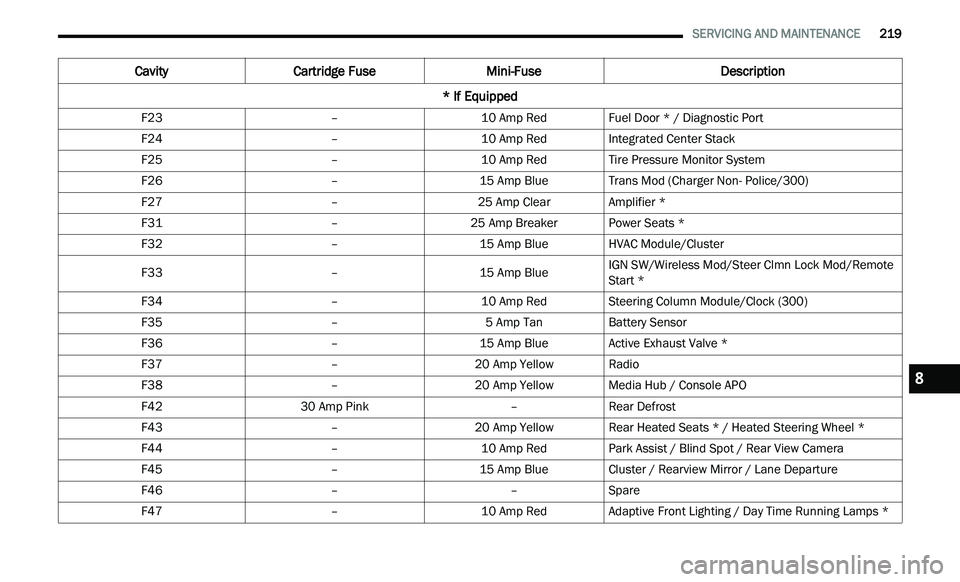
F23 –10 Amp RedFuel Door * / Diagnostic Port
F24 –10 Amp RedIntegrated Center Stack
F25 –10 Amp RedTire Pressure Monitor System
F26 –15 Amp BlueTrans Mod (Charger Non- Police/300)
F27 –25 Amp ClearAmplifier *
F31 –25 Amp BreakerPower Seats *
F32 –15 Amp BlueHVAC Module/Cluster
F33 –15 Amp BlueIGN SW/Wireless Mod/Steer Clmn Lock Mod/Remote
S
t
art *
F34 –10 Amp RedSteering Column Module/Clock (300)
F35 –5 Amp TanBattery Sensor
F36 –15 Amp BlueActive Exhaust Valve *
F37 –20 Amp YellowRadio
F38 –20 Amp YellowMedia Hub / Console APO
F42 30 Amp Pink –Rear Defrost
F43 –20 Amp YellowRear Heated Seats * / Heated Steering Wheel *
F44 –10 Amp RedPark Assist / Blind Spot / Rear View Camera
F45 –15 Amp BlueCluster / Rearview Mirror / Lane Departure
F46 ––Spare
F47 –10 Amp RedAdaptive Front Lighting / Day Time Running Lamps *
Cavity Cartridge Fuse Mini-Fuse Description
* If Equipped
8
Page 225 of 268
SERVICING AND MAINTENANCE 223
BI-HALOGEN LOW BEAM AND HIGH BEAM
HEADLAMP — IF EQUIPPED
See steps below to replace:
1. O pen the hood.
NOTE:
Removal of the air cleaner filter housing may be
n e
cessary prior to replacing bulbs in the headlamp
assembly on the driver side of the vehicle.
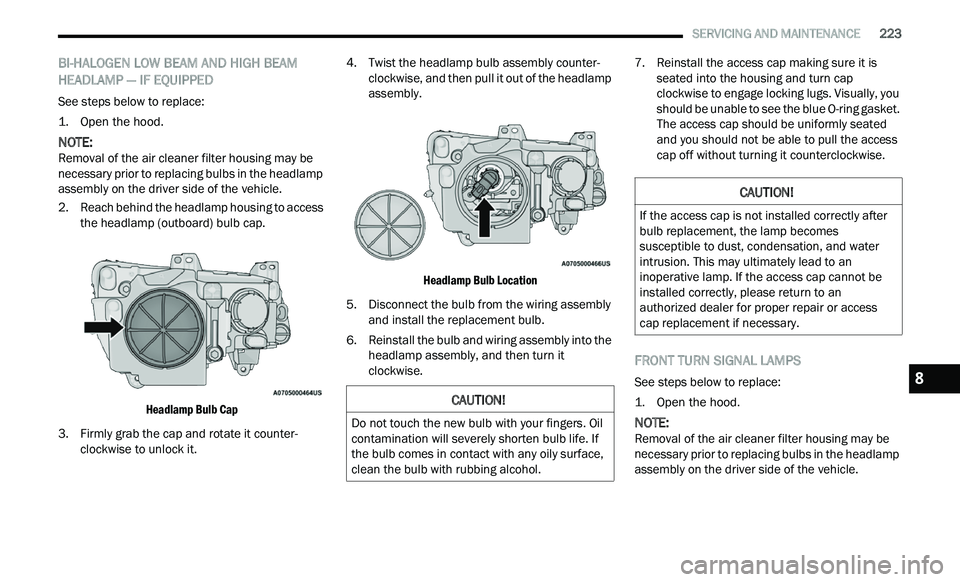
2. R each behind the headlamp housing to access
t
he headlamp (outboard) bulb cap.
Headlamp Bulb Cap
3. F irmly grab the cap and rotate it counter -
c
lockwise to unlock it. 4. Twist the headlamp bulb assembly counter
-
c
lockwise, and then pull it out of the headlamp
a s
sembly.
Headlamp Bulb Location
5. D isconnect the bulb from the wiring assembly
a
nd install the replacement bulb.
6. Reinstall the bulb and wiring assembly into the h
eadlamp assembly, and then turn it
clockwise. 7. Reinstall the access cap making sure it is
s
eated into the housing and turn cap
clockwise to engage locking lugs. Visually, you
should be unable to see the blue O-ring gasket.
The access cap should be uniformly seated
and you should not be able to pull the access
cap off without turning it counterclockwise.
FRONT TURN SIGNAL LAMPS
See steps below to replace:
1. O pen the hood.
NOTE:
Removal of the air cleaner filter housing may be
n e
cessary prior to replacing bulbs in the headlamp
assembly on the driver side of the vehicle.
CAUTION!
Do not touch the new bulb with your fingers. Oil
contamination will severely shorten bulb life. If
the bulb comes in contact with any oily surface,
clean the bulb with rubbing alcohol.
CAUTION!
If the access cap is not installed correctly after
bulb replacement, the lamp becomes
susceptible to dust, condensation, and water
intrusion. This may ultimately lead to an
inoperative lamp. If the access cap cannot be
installed correctly, please return to an
authorized dealer for proper repair or access
cap replacement if necessary.
8
Page 226 of 268
224 SERVICING AND MAINTENANCE
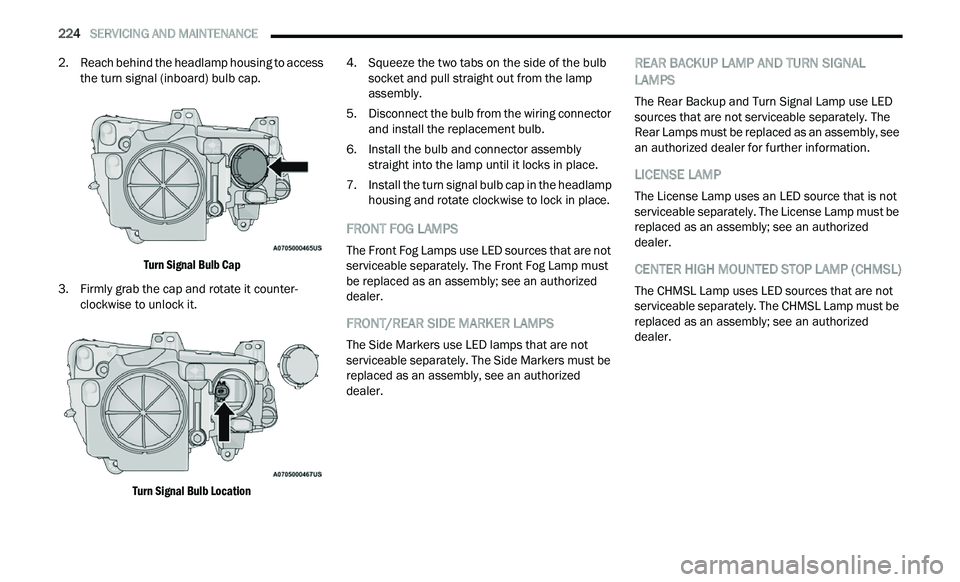
2. Reach behind the headlamp housing to access
the turn signal (inboard) bulb cap.
Turn Signal Bulb Cap
3. F irmly grab the cap and rotate it counter -
c
lockwise to unlock it.
Turn Signal Bulb Location
4. S
queeze the two tabs on the side of the bulb
s
ocket and pull straight out from the lamp
assembly.
5. D isconnect the bulb from the wiring connector
a
nd install the replacement bulb.
6. Install the bulb and connector assembly s
traight into the lamp until it locks in place.
7. Install the turn signal bulb cap in the headlamp h
ousing and rotate clockwise to lock in place.
FRONT FOG LAMPS
The Front Fog Lamps use LED sources that are not
serviceable separately. The Front Fog Lamp must
be replaced as an assembly; see an authorized
dealer.
FRONT/REAR SIDE MARKER LAMPS
The Side Markers use LED lamps that are not
serviceable separately. The Side Markers must be
replaced as an assembly, see an authorized
dealer.
REAR BACKUP LAMP AND TURN SIGNAL
LAMPS
The Rear Backup and Turn Signal Lamp use LED
sources that are not serviceable separately. The
Rear Lamps must be replaced as an assembly, see
an authorized dealer for further information.
LICENSE LAMP
The License Lamp uses an LED source that is not
serviceable separately. The License Lamp must be
replaced as an assembly; see an authorized
dealer.
CENTER HIGH MOUNTED STOP LAMP (CHMSL)
The CHMSL Lamp uses LED sources that are not
serviceable separately. The CHMSL Lamp must be
replaced as an assembly; see an authorized
dealer.
Page 257 of 268
255
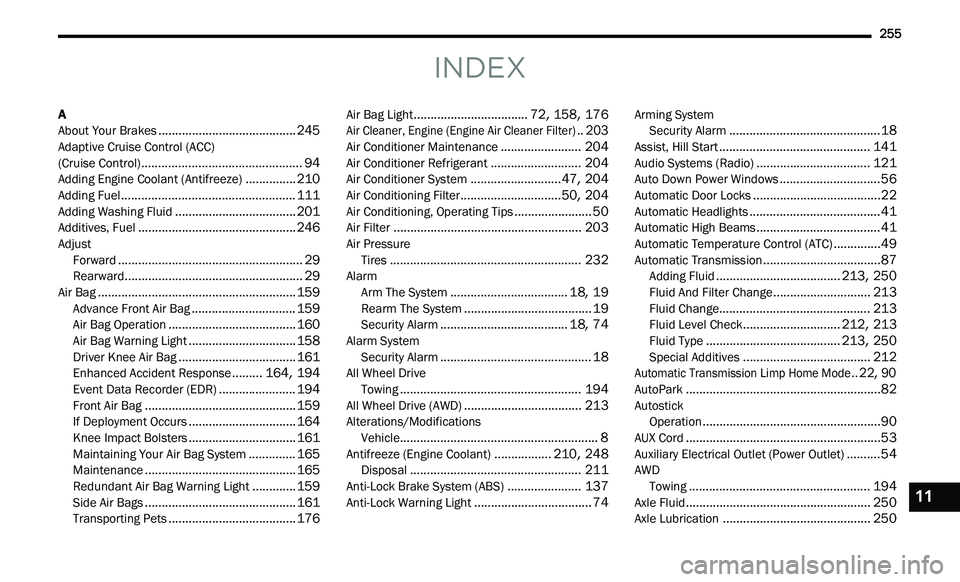
INDEX
A
About Your Brakes.........................................245Adaptive Cruise Control (ACC)
(Cruise Control)................................................94Adding Engine Coolant (Antifreeze)...............210Adding Fuel....................................................111Adding Washing Fluid....................................201Additives, Fuel...............................................246Adjust Forward.......................................................29Rearward.....................................................29Air Bag...........................................................159Advance Front Air Bag...............................159Air Bag Operation......................................160Air Bag Warning Light................................158Driver Knee Air Bag...................................161Enhanced Accident Response.........164, 194Event Data Recorder (EDR).......................194Front Air Bag.............................................159If Deployment Occurs................................164Knee Impact Bolsters................................161Maintaining Your Air Bag System..............165Maintenance.............................................165Redundant Air Bag Warning Light.............159Side Air Bags.............................................161Transporting Pets......................................176
Air Bag Light..................................72, 158, 176
Air Cleaner, Engine (Engine Air Cleaner Filter)..203
Air Conditioner Maintenance........................204Air Conditioner Refrigerant...........................204Air Conditioner System...........................47, 204Air Conditioning Filter..............................50, 204Air Conditioning, Operating Tips.......................50Air Filter........................................................203Air PressureTires.........................................................232AlarmArm The System...................................18, 19Rearm The System......................................19Security Alarm......................................18, 74Alarm SystemSecurity Alarm.............................................18All Wheel DriveTowing......................................................194All Wheel Drive (AWD)...................................213Alterations/ModificationsVehicle...........................................................8Antifreeze (Engine Coolant).................210, 248Disposal...................................................211Anti-Lock Brake System (ABS)......................137Anti-Lock Warning Light...................................74
Arming SystemSecurity Alarm.............................................18Assist, Hill Start.............................................141Audio Systems (Radio)..................................121Auto Down Power Windows..............................56Automatic Door Locks......................................22Automatic Headlights.......................................41Automatic High Beams.....................................41Automatic Temperature Control (ATC)..............49Automatic Transmission...................................87Adding Fluid.....................................213, 250Fluid And Filter Change.............................213Fluid Change.............................................213Fluid Level Check.............................212, 213Fluid Type........................................213, 250Special Additives......................................212
Automatic Transmission Limp Home Mode..22, 90
AutoPark..........................................................82AutostickOperation.....................................................90AUX Cord..........................................................53Auxiliary Electrical Outlet (Power Outlet)..........54AWDTowing......................................................194Axle Fluid.......................................................250Axle Lubrication............................................250
11
Page 258 of 268
256
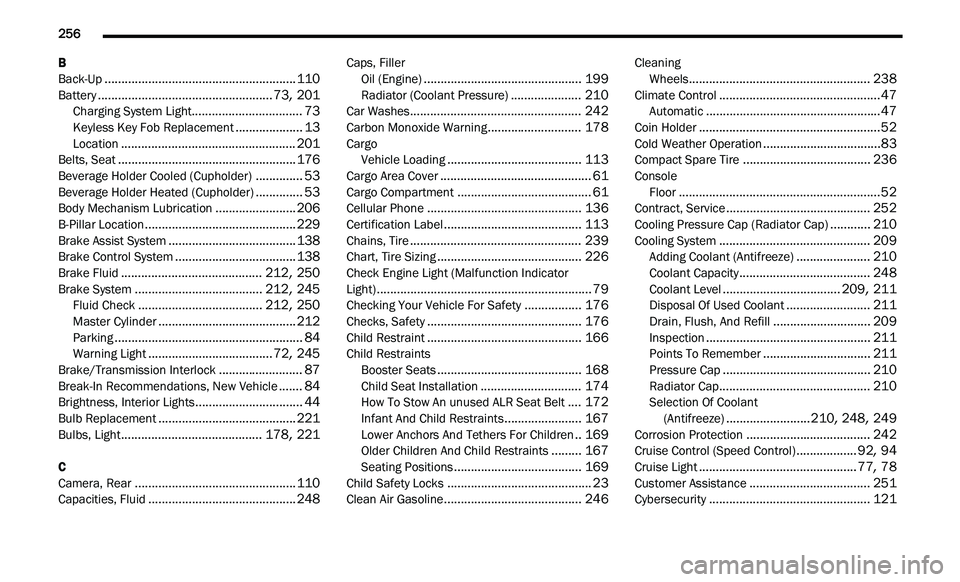
B
Back-Up.........................................................110Battery....................................................73, 201Charging System Light.................................73Keyless Key Fob Replacement....................13Location....................................................201Belts, Seat.....................................................176Beverage Holder Cooled (Cupholder)..............53Beverage Holder Heated (Cupholder)..............53Body Mechanism Lubrication........................206B-Pillar Location.............................................229Brake Assist System......................................138Brake Control System....................................138Brake Fluid..........................................212, 250Brake System......................................212, 245Fluid Check.....................................212, 250Master Cylinder.........................................212Parking........................................................84Warning Light.....................................72, 245Brake/Transmission Interlock.........................87Break-In Recommendations, New Vehicle.......84Brightness, Interior Lights................................44Bulb Replacement.........................................221Bulbs, Light..........................................178, 221
C
Camera, Rear................................................110Capacities, Fluid............................................248
Caps, Filler
Oil (Engine)...............................................199Radiator (Coolant Pressure).....................210Car Washes...................................................242Carbon Monoxide Warning............................178CargoVehicle Loading........................................113Cargo Area Cover.............................................61Cargo Compartment........................................61Cellular Phone..............................................136Certification Label.........................................113Chains, Tire...................................................239Chart, Tire Sizing...........................................226Check Engine Light (Malfunction Indicator
Light)................................................................79Checking Your Vehicle For Safety.................176Checks, Safety..............................................176Child Restraint..............................................166Child Restraints Booster Seats...........................................168Child Seat Installation..............................174How To Stow An unused ALR Seat Belt....172Infant And Child Restraints.......................167Lower Anchors And Tethers For Children..169Older Children And Child Restraints.........167Seating Positions......................................169Child Safety Locks...........................................23Clean Air Gasoline.........................................246
CleaningWheels......................................................238Climate Control................................................47Automatic....................................................47Coin Holder......................................................52Cold Weather Operation...................................83Compact Spare Tire......................................236ConsoleFloor............................................................52Contract, Service...........................................252Cooling Pressure Cap (Radiator Cap)............210Cooling System.............................................209Adding Coolant (Antifreeze)......................210Coolant Capacity.......................................248Coolant Level...................................209, 211Disposal Of Used Coolant.........................211Drain, Flush, And Refill.............................209Inspection.................................................211Points To Remember................................211Pressure Cap............................................210Radiator Cap.............................................210Selection Of Coolant
(Antifreeze).........................210, 248, 249Corrosion Protection.....................................242Cruise Control (Speed Control)..................92, 94Cruise Light...............................................77, 78Customer Assistance....................................251Cybersecurity................................................121