turn signal CHRYSLER 300 C 2008 1.G User Guide
[x] Cancel search | Manufacturer: CHRYSLER, Model Year: 2008, Model line: 300 C, Model: CHRYSLER 300 C 2008 1.GPages: 520, PDF Size: 5.43 MB
Page 135 of 520

The Headlight delay time is programmable on vehicles
equipped with the Electronic Vehicle Information Center
(EVIC). For details, refer to “Delay Turning Headlights
Off,” under “Personal Settings (Customer Programmable
Features),” under “Electronic Vehicle Information Center
(EVIC)” in Section 4 of this manual.
Daytime Running Lights — If Equipped
The high beam headlights will come on as Daytime
Running Lights, whenever the ignition switch is on, the
headlights are off, and the parking brake is off. The
headlight switch must be used for normal nighttime
driving.
Lights-on Reminder
If the headlights or parking lights are on after the ignition
is turned OFF, a chime will sound to alert the driver
when the driver’s door is opened.
Fog Lights — If Equipped
The front fog light switch is on the headlight
switch below the dimmer control. To activate the
front fog lights, turn on the parking lights or the
low beam headlights and press the fog light switch.
An indicator light in the instrument cluster illuminates
when the fog lights are turned on.
NOTE:The fog lights will operate with the low beam
headlights or parking lights on. However, selecting the
high beam headlights will turn off the fog lights.
Multi-Function Lever
The multi-function lever controls the operation of the
turn signals, headlight beam selection, and passing
lights. The lever is located on the left side of the steering
column.
134 UNDERSTANDING THE FEATURES OF YOUR VEHICLE
Page 136 of 520
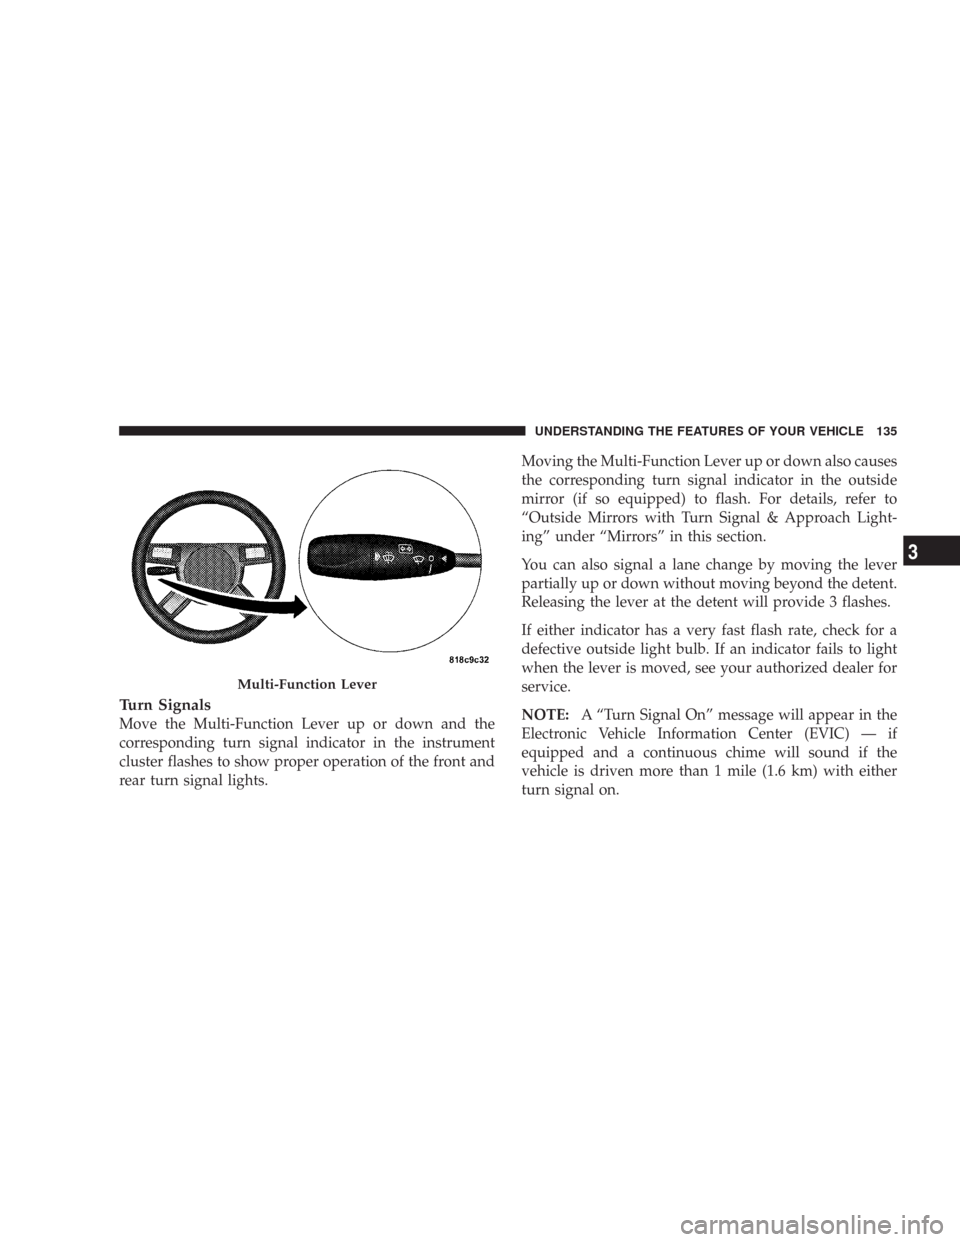
Turn Signals
Move the Multi-Function Lever up or down and the
corresponding turn signal indicator in the instrument
cluster flashes to show proper operation of the front and
rear turn signal lights.Moving the Multi-Function Lever up or down also causes
the corresponding turn signal indicator in the outside
mirror (if so equipped) to flash. For details, refer to
“Outside Mirrors with Turn Signal & Approach Light-
ing” under “Mirrors” in this section.
You can also signal a lane change by moving the lever
partially up or down without moving beyond the detent.
Releasing the lever at the detent will provide 3 flashes.
If either indicator has a very fast flash rate, check for a
defective outside light bulb. If an indicator fails to light
when the lever is moved, see your authorized dealer for
service.
NOTE:A “Turn Signal On” message will appear in the
Electronic Vehicle Information Center (EVIC) — if
equipped and a continuous chime will sound if the
vehicle is driven more than 1 mile (1.6 km) with either
turn signal on.
Multi-Function Lever
UNDERSTANDING THE FEATURES OF YOUR VEHICLE 135
3
Page 137 of 520

Highbeam/Lowbeam Select Switch
Push the Multi-Function Lever away from you to switch
the headlights to HIGH beam. Pull the Lever towards
you to switch the headlights back to LOW beam.
Flash to Pass
You can signal another vehicle with your headlights by
lightly pulling the Multi-Function Lever toward you.
This will cause the headlights to turn on at high beam
and remain on until the lever is released.
Overhead Console Map/Reading Lights
These lights are mounted between the sun visors on the
overhead console. Each light is turned ON by pressing
the lens. Press the lens a second time to turn OFF the
light. These lights also turn on when a door is opened, or
when the unlock button on the remote keyless entry
transmitter is pressed, or when the dimmer control is
turned fully upward, past the second detent.
Interior Lights
The interior lights come on when a door is opened.
To protect the battery, the interior lights will turn off
automatically 10 minutes after the ignition switch is
moved to the LOCK position. This will occur if the
interior lights were switched on manually or are on
Overhead Console
136 UNDERSTANDING THE FEATURES OF YOUR VEHICLE
Page 179 of 520

WARNING!
Vehicle exhaust contains carbon monoxide, a danger-
ous gas. Do not run your vehicle in the garage while
training the transceiver. Exhaust gas can cause seri-
ous injury or death.
Programming HomeLink\5
Before You Begin
If you have not trained any of the HomeLink\2buttons,
erase all channels before you begin training.
To do this, press and hold the two outside buttons for 20
seconds. The EVIC will display “CLEARING CHAN-
NELS.” Release the buttons when the EVIC message
states “CHANNELS CLEARED.”It is recommended that a new battery be placed in the
hand-held transmitter of the device being programmed
to HomeLink\2for more efficient training and accurate
transmission of the radio-frequency signal.
Your vehicle should be parked outside of the garage
while training.
1. Turn the ignition switch to the ON/RUN position.
2. Place the hand-held transmitter 1–3 inches (3–8 cm)
from the HomeLink\2buttons while keeping the EVIC
display in view.
For optimal training, point the battery end of the hand-
held transmitter away from the HomeLink\2.
3. Simultaneously press and hold both the chosen
HomeLink\2button and the hand-held transmitter button
until the EVIC display changes from “CHANNEL #
TRAINING” to “CHANNEL # TRAINED.”
178 UNDERSTANDING THE FEATURES OF YOUR VEHICLE
Page 182 of 520
7. Return to the vehicle and press the programmed
HomeLink\2button twice (holding the button for 2 sec-
onds each time). If the device is plugged in and activates,
programming is complete.
If the device does not activate, press the button a third
time (for 2 seconds) to complete the training.
If you are have any problems, or require assistance,
please call toll-free 1–800–355–3515 or, on the Internet at
www.HomeLink.com for information or assistance.
To program the remaining two HomeLink\2buttons,
repeat each step for each remaining button. DO NOT
erase the channels.
Gate Operator/Canadian Programming
Canadian radio-frequency laws require transmitter sig-
nals to “time-out” (or quit) after several seconds of
transmission – which may not be long enough for
HomeLink\2to pick up the signal during programming.Similar to this Canadian law, some U.S. gate operators are
designed to “time-out” in the same manner.
It may be helpful to unplug the device during the cycling
process to prevent possible overheating of the garage
door or gate motor.
If you are having difficulties programming a garage door
opener or a gate operator, replace “Programming
HomeLink” Step 3 with the following:
3. Continue to press and hold the HomeLink\2button
while you press and release - every two seconds
(“cycle”) your hand-held transmitter until HomeLink\2
has successfully accepted the frequency signal. The
EVIC display will change from “CHANNEL # TRAIN-
ING” to “CHANNEL # TRAINED.”
If you unplugged the device for training, plug it back in
at this time.
UNDERSTANDING THE FEATURES OF YOUR VEHICLE 181
3
Page 203 of 520
INSTRUMENT CLUSTER DESCRIPTIONS
1. Electronic Speed Control/Adaptive Cruise Control
(ACC) Indicator Light — If Equipped
This light will turn on when the electronic
speed control or ACC is ON. (See page 148 for
more information.) (See page 152 for more
information.)
2. Low Fuel Indicator Light
This light will turn on and a single chime will
sound when the fuel level drops to 1/8 tank. (See
page 369 for more information.)
3. Front Fog Light Indicator — If Equipped
This light will turn on when the front fog lights are
ON. (See page 134 for more information.)
4. Turn Signal Indicators
The arrow will flash with the exterior turn signal
when the turn signal lever is operated.NOTE:A continuous chime will sound if the vehicle is
driven more than 1 mile (1.6 km) with either turn signal
on.
NOTE:Check for a defective outside light bulb if either
indicator flashes at a rapid rate.(See page 135 for more
information.)
5. Speedometer
Indicates vehicle speed.
6. Odometer/Trip Odometer
The odometer shows the total distance the vehicle has
been driven. The trip odometer shows individual trip
mileage. Refer to “Trip Odometer Button” for additional
information.
NOTE:U.S. federal regulations require upon transfer of
vehicle ownership, the seller certify the mileage the
vehicle has been driven. Therefore, if the odometer
reading is changed because of repair or replacement, be
202 UNDERSTANDING YOUR INSTRUMENT PANEL
Page 212 of 520
When the malfunction indicator is illuminated, the sys-
tem may not be able to detect or signal low tire pressure
as intended. TPMS malfunctions may occur for a variety
of reasons, including the installation of replacement or
alternate tires or wheels on the vehicle that prevent the
TPMS from functioning properly. Always check the
TPMS malfunction telltale after replacing one or more
tires or wheels on your vehicle to ensure that the replace-
ment or alternate tires and wheels allow the TPMS to
continue to function properly. (See page 355 for more
information.)CAUTION!
The TPMS has been optimized for the original
equipment tires and wheels. TPMS pressures and
warning have been established for the tire size
equipped on your vehicle. Undesirable system opera-
tion or sensor damage may result when using re-
placement equipment that is not of the same size,
type, and/or style. Aftermarket wheels can cause
sensor damage. Do not use aftermarket tire sealants
or balance beads if your vehicle is equipped with a
TPMS, as damage to the sensors may result.
23. Charging System Light
This light shows the status of the electrical charg-
ing system. The light should turn on when the
ignition switch is first turned ON and remain on briefly
as a bulb check. If the light stays on or turns on while
UNDERSTANDING YOUR INSTRUMENT PANEL 211
4
Page 216 of 520

Electronic Vehicle Information Center (EVIC)
Displays
When the appropriate conditions exist, the Electronic
Vehicle Information Center (EVIC) displays the following
messages:
•Turn Signal On (with a continuous warning chime if
the vehicle is driven more than 1 mile [1.6 km] with
either turn signal on)
•Left Front Turn Signal Light Out (with a single chime)
•Left Rear Turn Signal Light Out (with a single chime)
•Right Front Turn Signal Light Out (with a single
chime)
•Right Rear Turn Signal Light Out (with a single chime)
•RKE Battery Low (with a single chime)
•Memory #1/#2 Profile Set
•Memory #1/#2 Profile Recall
•Memory System Disabled – Vehicle Not In Park (with
a single chime)
•Memory System Disabled – Seat Belt Buckled (with a
single chime)
•Personal Settings Not Available – Vehicle Not in Park
•Left/Right Front Door Ajar (one or more, with a single
chime if speed is above 1 mph [1.6 km/h])
•Left/Right Rear Door Ajar (one or more, with a single
chime if speed is above 1 mph [1.6 km/h])
•Door(s) Ajar (with a single chime if vehicle is in
motion)
•Trunk Ajar (with a single chime)
•Low Washer Fluid (with a single chime)
UNDERSTANDING YOUR INSTRUMENT PANEL 215
4
Page 225 of 520

1. Turn the ignition switch ON.
2. Press and hold the compass button for approximately
2 seconds.
3. Press the SCROLL button until “Compass Variance”
message and the last variance zone number displays in
the EVIC.
4. Press and release FUNCTION SELECT button until
the proper variance zone is selected according to the
map.
5. Press and release the compass button to exit.
Telephone — If Equipped
Press and release the MENU button until “Telephone”
displays in the EVIC.
When the appropriate conditions exist, the EVIC pro-
vides the following telephone information:
•Phone status: idle, voice mail, roaming, battery
strength, and signal strength in increments of 20
percent.
•Call status: Incoming call, connecting, connected, air
time in minutes and seconds, call ended, call failed,
roaming, and no phone connection.
•UConnect Active.
•Caller ID phone number display.
When the appropriate conditions exist, and if supported
by the cell phone, the EVIC will display the following
telephone symbols:
The EVIC displays this symbol to indicate the
signal strength of the UConnect™ phone. The
number of horizontal bars increases as the
strength of the UConnect™ phone signal in-
creases.
Signal
Strength
224 UNDERSTANDING YOUR INSTRUMENT PANEL
Page 230 of 520
the FUNCTION SELECT button until “ON” or “OFF”
appears. When OFF is selected, the system reverts to the
standard intermittent wiper operation.
“Automatically Move Seat Back on Exit” — If
Equipped
This feature provides automatic driver seat positioning to
enhance driver mobility when entering and exiting the
vehicle. To make your selection, press and release the
FUNCTION SELECT button until “ON” or “OFF” ap-
pears.
NOTE:The seat will return to the memorized seat
location (if Recall Memory with Remote Key Unlock is set
to ON) when the remote keyless entry transmitter is used
to unlock the door. Refer to “Easy Entry/Exit Seat” under
“Driver Memory Seat” in Section 3 of this manual for
more information.
“Flash Lights with Remote Key Lock”
When ON is selected, the front and rear turn signals will
flash when the doors are locked or unlocked with the
remote keyless entry transmitter. This feature may be
selected with or without the sound horn on lock feature
selected. To make your selection, press and release the
FUNCTION SELECT button until “ON” or “OFF” ap-
pears.
“Headlights On with Wipers” (Available with Auto
Headlights Only)
When ON is selected, and the headlight switch is in the
AUTO position, the headlights will turn on approxi-
mately 10 seconds after the wipers are turned on. The
headlights will also turn off when the wipers are turned
off if they were turned on by this feature. To make your
selection, press and release the FUNCTION SELECT
button until “ON” or “OFF” appears.
UNDERSTANDING YOUR INSTRUMENT PANEL 229
4