spare tire CHRYSLER 300 LX 2005 Owners Manual
[x] Cancel search | Manufacturer: CHRYSLER, Model Year: 2005, Model line: 300 LX, Model: CHRYSLER 300 LX 2005Pages: 374, PDF Size: 7.09 MB
Page 59 of 374

turned ON. If the LED is not lit during starting, have it
checked. If the light stays on or comes on while driving,
have the system checked by an authorized dealer.
Defroster
Check operation by selecting the defrost mode and place
the blower control on high speed. You should be able to
feel the air directed against the windshield.
Periodic Safety Checks You Should Make Outside
The Vehicle
Tires
Examine tires for excessive tread wear or uneven wear
patterns. Check for stones, nails, glass, or other objects
lodged in the tread. Inspect tread and sidewall for cuts or
cracks. Check wheel nuts for tightness, and tires (includ-
ing spare) for proper pressure.
Lights
Have someone observe the operation of exterior lights
while you work the controls. Check turn signal and high
beam indicator lights on the instrument panel.
Fluid Leaks
Check area under vehicle after overnight parking for fuel,
engine coolant, oil or other fluid leaks. Also, if gasoline
fumes are detected or fuel, power steering fluid or brake
fluid leaks are suspected, the cause should be located and
corrected immediately.
THINGS TO KNOW BEFORE STARTING YOUR VEHICLE 59
2
ProCarManuals.com
Page 116 of 374

To Activate:
Push and release the speed control lever (ªON/OFFº)
once and an LED on the lever will illuminate indicating
that the electronic speed control is ON. To turn the
system OFF, Push and release the lever (ªON/OFFº)
again and the system and indicator will turn off.
WARNING!
Leaving the Electronic Speed Control system on
when not in use is dangerous. You could accidently
set the system or cause it to go faster than you want.
You could lose control and have an accident. Always
leave the system OFF when you aren't using it.
To Set At A Desired Speed:
When the vehicle has reached the desired speed, pull the
lever toward you and release. Release the accelerator and
the vehicle will operate at the selected speed.
NOTE:Speed control will only function in third, fourth,
or fifth gear when in the Autostick Mode Ð if equipped.
NOTE:The speed control may not engage if a different
size tire is installed on one wheel, such as the compact
spare tire.
To Deactivate:
A soft tap on the brake pedal, pushing the lever away
from you (ªCANCELº) or normal braking while slowing
the vehicle will deactivate the speed control without
erasing the memory. Pushing and releasing the lever
(ªON/OFFº) or turning off the ignition erases the speed
memory.
To Resume Speed:
To resume a previously set speed, push the lever up and
release (ªACC/RESº). Resume can be used at any speed
above 20 mph (32 km/h).
To Vary the Speed Setting:
When the speed control is set, speed can be increased by
pushing the lever up and holding (ªACC/RESº). When
the lever is released, a new set speed will be established.
Pushing the lever up and releasing (ªACC/RESº) once
will result in a 1 mph (1.6 km/h) speed increase. Each
time the lever is pushed up and released, speed increases
116 UNDERSTANDING THE FEATURES OF YOUR VEHICLE
ProCarManuals.com
Page 146 of 374

reset. The light will remain on or flashing until the tire
pressure is properly set or the problem with the sensor
is corrected.
This light will turn on momentarily as a bulb check when
the engine is started.
When the tire pressure monitoring system warning light
is lit, one or more of your tires is significantly underin-
flated. You should stop and check your tires as soon as
possible, and inflate them to the proper pressure as
indicated on the tire and loading information placard.
Driving on a significantly underinflated tire causes the
tire to overheat and can lead to tire failure. Underinfla-
tion also reduces fuel efficiency and tire tread life, and
may affect the vehicle's handling and stopping ability.
Each tire, including the spare, should be checked
monthly when cold and set to the recommended inflation
pressure as specified in the tire and loading information
placard.
22. Voltage Light
This light monitors the electrical system volt-
age. The light should turn on momentarily as
the engine is started. If the light stays on or turns onwhile driving, it indicates a problem with the charging
system. Immediate service should be obtained.
23. Malfunction Indicator Light
This light is part of an onboard diagnostic
system called OBD that monitors engine and
automatic transmission control systems. The
light will illuminate when the key is in the ON
position before engine start. If the bulb does not come
on when turning the key from OFF to ON, have the
condition checked promptly.
Certain conditions such as a loose or missing gas cap,
poor fuel quality, etc. may illuminate the light after
engine start. The vehicle should be serviced if the light
stays on through several of your typical driving cycles. In
most situations the vehicle will drive normally and will
not require towing.
The Malfunction Indicator Light flashes to alert you to
serious conditions that could lead to immediate loss of
power or severe catalytic converter damage. The vehicle
should be serviced as soon as possible if this occurs.
146 UNDERSTANDING YOUR INSTRUMENT PANEL
ProCarManuals.com
Page 205 of 374

STARTING AND OPERATING
CONTENTS
mStarting Procedures....................207
NNormal Starting......................207
mEngine Block Heater Ð If Equipped........209
mTransmission Shifting...................209
N4 Speed Automatic Transmission..........209
N5 Speed Automatic Transmission..........214
NAutomatic Transmission Ð General
Information.........................219
mAutoStick Ð If Equipped................222
NAutoStick Operation...................222
mParking Brake.........................222
mBrake System.........................224NAnti-Lock Brake System................225
mPower Steering........................227
mTire Safety Information..................228
NTire Markings........................228
NTire Identification Number (TIN)..........231
NTire Loading And Tire Pressure...........232
mTiresÐGeneral Information...............236
NTire Pressure.........................236
NTire Inflation Pressures.................237
NRadial-Ply Tires......................239
NCompact Spare Tire Ð If Equipped.........239
NTire Spinning........................240
5
ProCarManuals.com
Page 228 of 374

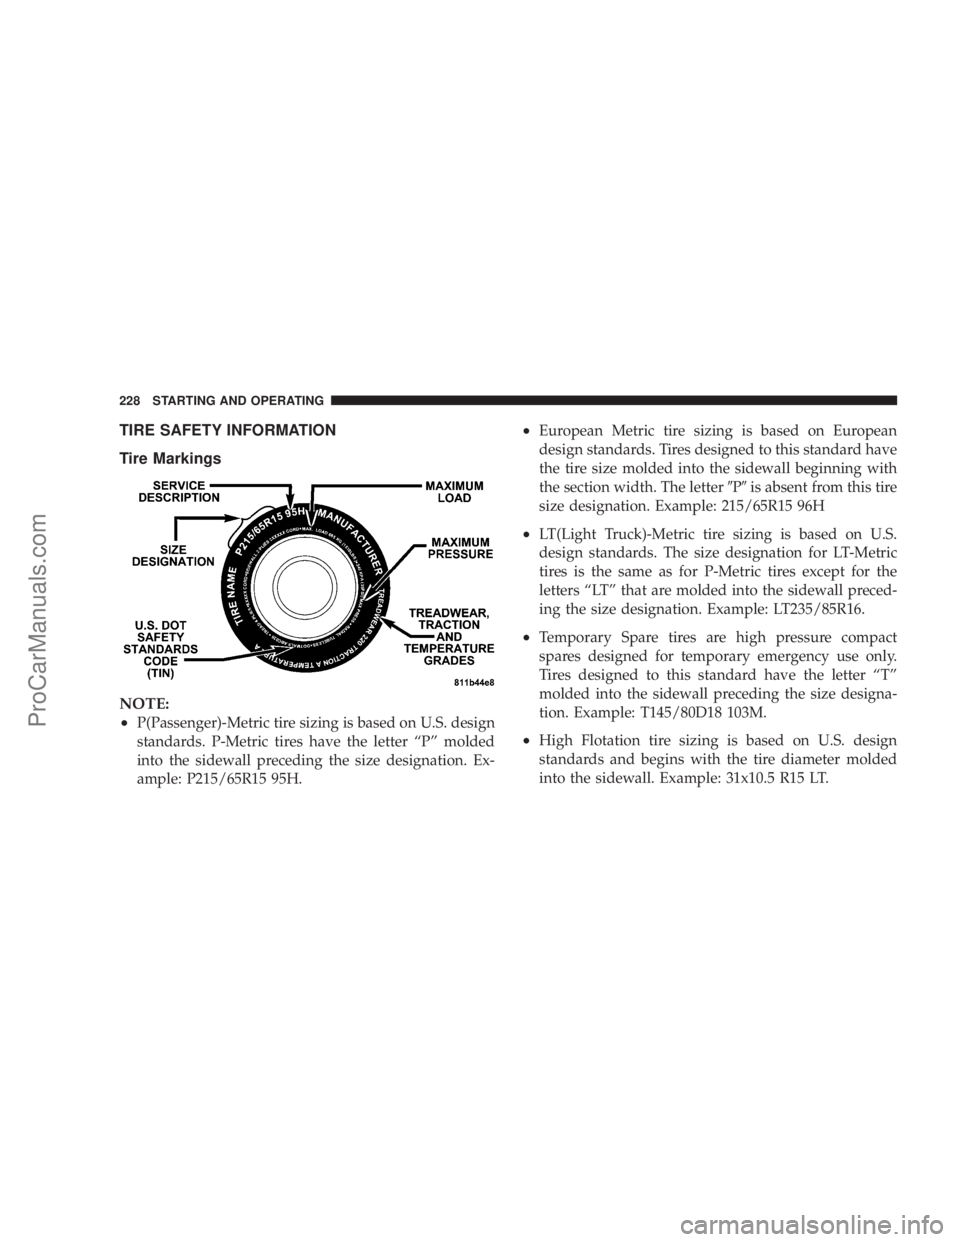
TIRE SAFETY INFORMATION
Tire Markings
NOTE:
²
P(Passenger)-Metric tire sizing is based on U.S. design
standards. P-Metric tires have the letter ªPº molded
into the sidewall preceding the size designation. Ex-
ample: P215/65R15 95H.
²European Metric tire sizing is based on European
design standards. Tires designed to this standard have
the tire size molded into the sidewall beginning with
the section width. The letter9P9is absent from this tire
size designation. Example: 215/65R15 96H
²LT(Light Truck)-Metric tire sizing is based on U.S.
design standards. The size designation for LT-Metric
tires is the same as for P-Metric tires except for the
letters ªLTº that are molded into the sidewall preced-
ing the size designation. Example: LT235/85R16.
²Temporary Spare tires are high pressure compact
spares designed for temporary emergency use only.
Tires designed to this standard have the letter ªTº
molded into the sidewall preceding the size designa-
tion. Example: T145/80D18 103M.
²High Flotation tire sizing is based on U.S. design
standards and begins with the tire diameter molded
into the sidewall. Example: 31x10.5 R15 LT.
228 STARTING AND OPERATING
ProCarManuals.com
Page 229 of 374

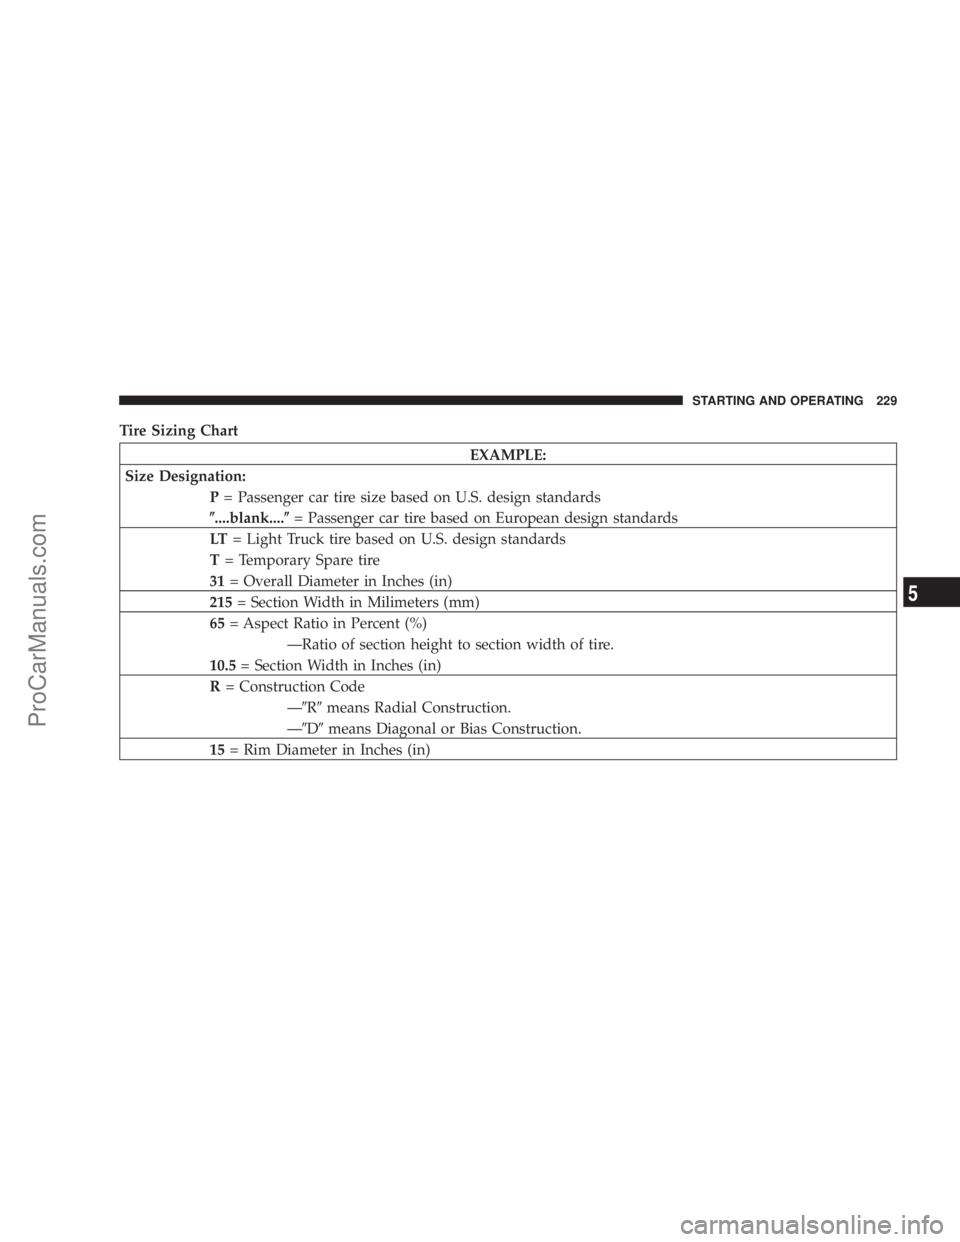
Tire Sizing Chart
EXAMPLE:
Size Designation:
P= Passenger car tire size based on U.S. design standards
(....blank....(= Passenger car tire based on European design standards
LT= Light Truck tire based on U.S. design standards
T= Temporary Spare tire
31= Overall Diameter in Inches (in)
215= Section Width in Milimeters (mm)
65= Aspect Ratio in Percent (%)
ÐRatio of section height to section width of tire.
10.5= Section Width in Inches (in)
R= Construction Code
Ð9R9means Radial Construction.
Ð9D9means Diagonal or Bias Construction.
15= Rim Diameter in Inches (in)
STARTING AND OPERATING 229
5
ProCarManuals.com
Page 232 of 374

Tire Loading and Tire Pressure
Tire Placard Location
NOTE:
Some vehicles have a ªTire and Loading Infor-
mationº placard located on the driver's side ªBº pillar.
Tire and Loading Information Placard
This placard tells you important information about
the,
1) number of people that can be carried in the vehicle
2) the total weight your vehicle can carry
3) the tire size designed for your vehicle
4) the cold tire inflation pressures for the front, rear
and spare tires.
232 STARTING AND OPERATING
ProCarManuals.com
Page 239 of 374

WARNING!
High speed driving with your vehicle under maxi-
mum load is dangerous. The added strain on your
tires could cause them to fail. You could have a
serious accident. Don't drive a vehicle loaded to the
maximum capacity at continuous speeds above 75
mph (120 km/h).
Radial-Ply Tires
WARNING!
Combining radial ply tires with other types of tires
on your vehicle will cause your vehicle to handle
poorly. The instability could cause an accident. Al-
ways use radial ply tires in sets of four (or 6, in case
of trucks with dual rear wheels). Never combine
them with other types of tires.
Cuts and punctures in radial tires are repairable only in
the tread area because of sidewall flexing. Consult your
authorized tire dealer for radial tire repairs.
Compact Spare Tire Ð If Equipped
The compact spare is for temporary emergency use with
radial tires. It is engineered to be used on your style
vehicle only. Since this tire has limited tread life, the
original tire should be repaired (or replaced) and rein-
stalled at the first opportunity.
WARNING!
Temporary use spare tires are for emergency use
only. With these tires, do not drive more than 50 mph
(80 km/h). Temporary-use spare tires have limited
tread life. When two or more tread wear indicators
appear in adjacent grooves, the temporary use spare
tire needs to be replaced. Be sure to follow the
warnings which apply to your spare. Failure to do so
could result in spare tire failure and loss of vehicle
control.
STARTING AND OPERATING 239
5
ProCarManuals.com
Page 240 of 374

Do not install a wheel cover or attempt to mount a
conventional tire on the compact spare wheel, since the
wheel is designed specifically for the compact spare.
Do not install more than one compact spare tire/wheel
on the vehicle at any given time.
CAUTION!
Because of the reduced ground clearance, do not take
your vehicle through an automatic car wash with the
compact spare installed. Damage to the vehicle may
result.
Tire Spinning
When stuck in mud, sand, snow, or ice conditions, do not
spin your vehicle's wheels above 35 mph (55 km/h).
See the paragraph on Freeing A Stuck Vehicle in Section
6 of this manual.
WARNING!
Fast spinning tires can be dangerous. Forces gener-
ated by excessive wheel speeds may cause tire dam-
age or failure. A tire could explode and injure
someone. Do not spin your vehicle's wheels faster
than 35 mph (55 km/h) when you are stuck. And
don't let anyone near a spinning wheel, no matter
what the speed.
240 STARTING AND OPERATING
ProCarManuals.com
Page 243 of 374

SELF±SEALING TIRESÐIF EQUIPPED
A non-hardening viscous sealant applied to the inner
liner of each tire fills punctures up to 0.19 in. (5 mm) to
minimize the loss of air pressure. This contributes to the
safety of the vehicle by significantly reducing the prob-
ability of a roadside stop due to a flat tire.
TIRE PRESSURE MONITOR SYSTEM Ð IF
EQUIPPED
TIRE PRESSURE MONITORING Ð BASE SYSTEM
The Tire Pressure Monitor System (TPM) system uses
wireless technology with wheel rim mounted electronic
sensors to monitor tire pressure levels (EXCLUDING
THE SPARE TIRE). Sensors, mounted to each wheel as
part of the valve stem, transmit tire pressure readings to
the Receiver Module.
NOTE:It is particularly important, for you to check the
tire pressure in all of your tires regularly and to maintain
the proper pressure.The Tire Pressure Monitoring Indicator Lamp will
illuminate in the instrument cluster, and an au-
dible chime will be activated when one or more
tire pressures is low. The Tire Pressure Monitoring Indi-
cator Lamp will flash on and off for ten seconds when a
system fault is detected. The flash cycle will repeat every
ten minutes or until the fault condition is removed and
reset.
The Tire Pressure Monitoring System consists of the
following components:
²Receiver Module
²4/5 Wheel Sensors
²Amber Colored Tire Pressure Monitoring Indicator
Lamp
The system will consist of tire pressure monitoring
sensors attached to each wheel through the valve stem
mounting hole, a central receiver module and an amber
colored Indicator Lamp. A sensor is located in the spare
wheel if the vehicle is equipped with a matching full size
spare wheel and tire assembly.
STARTING AND OPERATING 243
5
ProCarManuals.com