airbag CHRYSLER 300 M 2004 1.G User Guide
[x] Cancel search | Manufacturer: CHRYSLER, Model Year: 2004, Model line: 300 M, Model: CHRYSLER 300 M 2004 1.GPages: 277, PDF Size: 5.69 MB
Page 41 of 277
Infants and Child Restraints
•
Safety experts recommend that children ride
rearward-facing in the vehicle until they are at least
one year old and weigh at least 20 lbs (9 kg). Two types
of child restraints can be used rearward-facing: infant
carriers and “convertible” child seats.
•The infant carrier is only used rearward-facing in the
vehicle. It is recommended for children who weigh up
to about 20 lbs (9 kg). “Convertible” child seats can be
used either rearward-facing or forward-facing in the
vehicle. Convertible child seats often have a higher
weight limit in the rearward-facing direction than in-
fant carriers do, so they can be used rearward-facing by
children who weigh more than 20 lbs (9 kg) but are less
than one year old. Both types of child restraints are held
in the vehicle by the lap/shoulder belt or the LATCH
anchorage system. (See the LATCH — Child Seat An-
chorage System section for greater explanation.)
•Rearward-facing child seats mustNEVERbe used in
the front seat of a vehicle with a front passenger
airbag. An airbag deployment could cause severe
injury or death to infants in this position.
WARNING!
•A rearward facing infant restraint should only be
used in a rear seat. A rearward facing infant
restraint in the front seat may be struck by a
deploying passenger airbag which may cause se-
vere or fatal injury to the infant.
•Improper installation can lead to failure of an
infant or child restraint. It could come loose in a
collision. The child could be badly injured or
killed. Follow the manufacturer’s directions ex-
actly when installing an infant or child restraint.
Here are some tips on getting the most out of your child
restraint:
•Before buying any restraint system, make sure that it
has a label certifying that it meets all applicable Safety
Standards. We also recommend that you try a child
restraint in the vehicle seats where you will use it
before you buy it.
THINGS TO KNOW BEFORE STARTING YOUR VEHICLE 41
2
Page 46 of 277
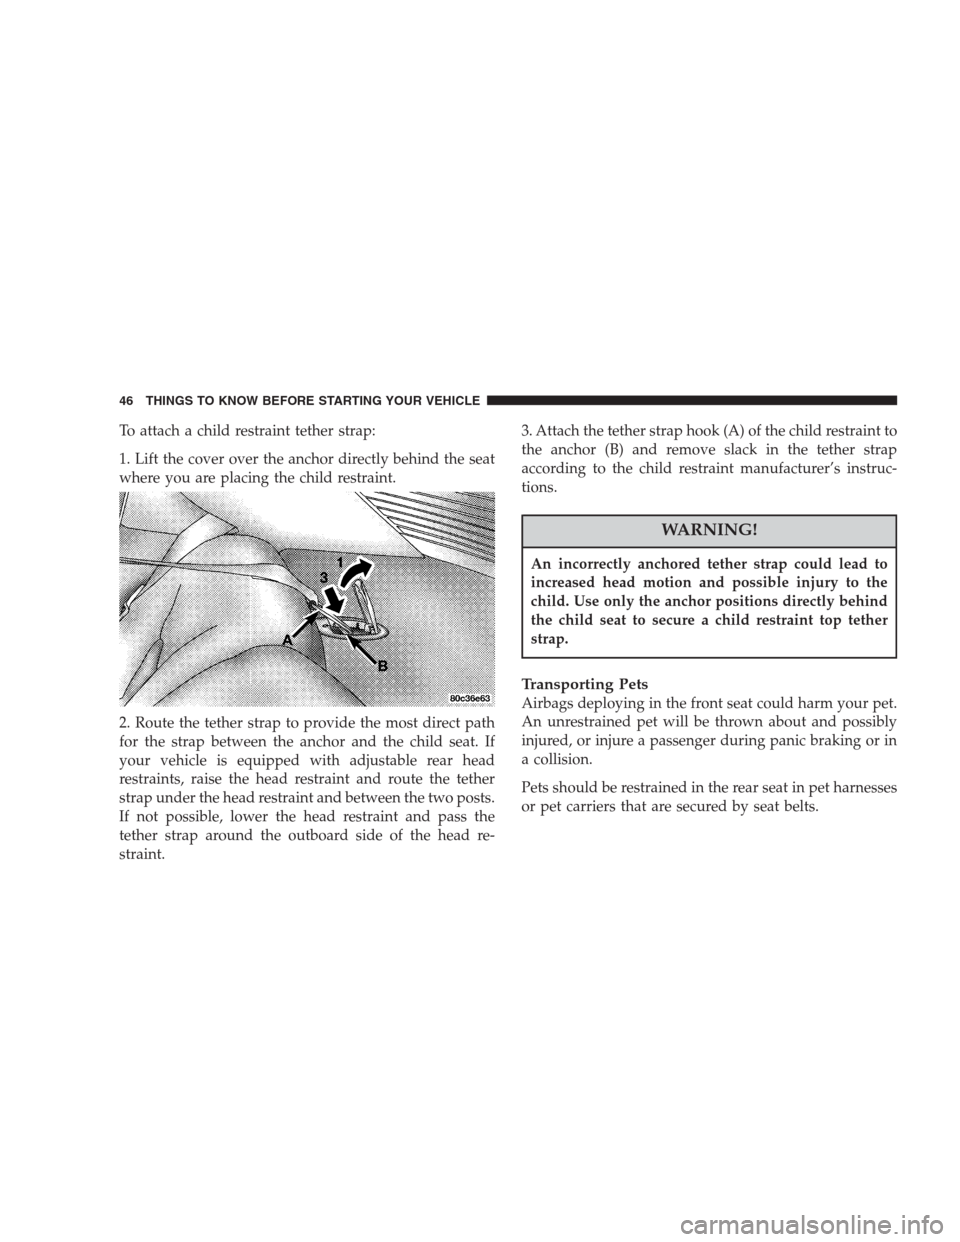
To attach a child restraint tether strap:
1. Lift the cover over the anchor directly behind the seat
where you are placing the child restraint.
2. Route the tether strap to provide the most direct path
for the strap between the anchor and the child seat. If
your vehicle is equipped with adjustable rear head
restraints, raise the head restraint and route the tether
strap under the head restraint and between the two posts.
If not possible, lower the head restraint and pass the
tether strap around the outboard side of the head re-
straint.3. Attach the tether strap hook (A) of the child restraint to
the anchor (B) and remove slack in the tether strap
according to the child restraint manufacturer’s instruc-
tions.
WARNING!
An incorrectly anchored tether strap could lead to
increased head motion and possible injury to the
child. Use only the anchor positions directly behind
the child seat to secure a child restraint top tether
strap.
Transporting Pets
Airbags deploying in the front seat could harm your pet.
An unrestrained pet will be thrown about and possibly
injured, or injure a passenger during panic braking or in
a collision.
Pets should be restrained in the rear seat in pet harnesses
or pet carriers that are secured by seat belts.
46 THINGS TO KNOW BEFORE STARTING YOUR VEHICLE
Page 48 of 277
must remain open, close all windows. Adjust the
heating or cooling system to force outside air into the
vehicle. Set the blower at high speed.
Safety Checks You Should Make Inside the
Vehicle
Seat Belts
Inspect the belt system periodically, checking for cuts,
frays and loose parts. Damaged parts must be replaced
immediately. Do not disassemble or modify the system.
Safety belt assemblies must be replaced after an accident
if they have been damaged (bent retractor, torn webbing,
etc.). If there is any question regarding belt or retractor
condition, replace the belt.
Airbag Light
The light should come on and remain on for 6 to
8 seconds as a bulb check when the ignition
switch is first turned ON. If the bulb is not lit
during starting, have it replaced. If the light stays on or
comes on while driving, have the system checked by an
authorized dealer.
Defrosters
Check operation by selecting the defrost mode and place
the blower control on high speed. You should be able to
feel the air directed against the windshield.
Periodic Safety Checks You Should Make Outside
the Vehicle
Tires
Examine tires for excessive tread wear or uneven wear
patterns. Check for stones, nails, glass, or other objects
lodged in the tread. Inspect for tread cuts or sidewall
cracks. Check wheel nuts for tightness and tires (includ-
ing spare) for proper pressure.
Lights
Have someone observe the operation of exterior lights
while you work the controls. Check turn signal and high
beam indicator lights on the instrument panel.
Fluid Leaks
Check area under vehicle after overnight parking for
brake fluid, fuel, water, oil, or other fluid leaks. Also, if
gasoline fumes are present, the cause should be corrected
immediately.
48 THINGS TO KNOW BEFORE STARTING YOUR VEHICLE
Page 115 of 277
If the pointer rises to the “H” mark, stop the vehicle and
turn off the engine until the problem is corrected.
CAUTION!
Continuing to drive with an overheated engine cool-
ing system can cause damage to the engine or other
components.
There are steps that you can take to slow down an
impending overheat condition. If your air conditioning is
on, turn it off. The air conditioning system adds heat to
the engine cooling system and turning off the A/C
removes this heat. You can also turn the Temperature
control to maximum heat, the Mode control to Floor and
the Fan control to High. This allows the heater core to act
as a supplement to the radiator and aids in removing heat
from the engine cooling system.
16. Malfunction Indicator Light
This light is part of an onboard diagnostic
system called OBD that monitors engine and
automatic transmission control systems. Thelight will illuminate when the key is in the ON
position before engine start. If the bulb does not come
on when turning the key from OFF to ON, have the
condition checked promptly.
Certain conditions such as a loose or missing gas cap or
poor fuel quality may illuminate the light after engine
start. The vehicle should be serviced if the light stays on
through several of your typical driving cycles. In most
situations the vehicle will drive normally and will not
require towing.
The Malfunction Indicator Light flashes to alert to serious
conditions that could lead to immediate loss of power or
severe catalytic converter damage. The vehicle should be
serviced as soon as possible if this occurs.
17. Trip Odometer Reset Knob
To reset the trip odometer, push the reset knob for about
two seconds.
18. Airbag Light
The light will come on and remain on for 6 to 8
seconds as a bulb check when the ignition switch
is first turned ON. If the bulb is not lit during starting,
UNDERSTANDING YOUR INSTRUMENT PANEL 115
4
Page 229 of 277
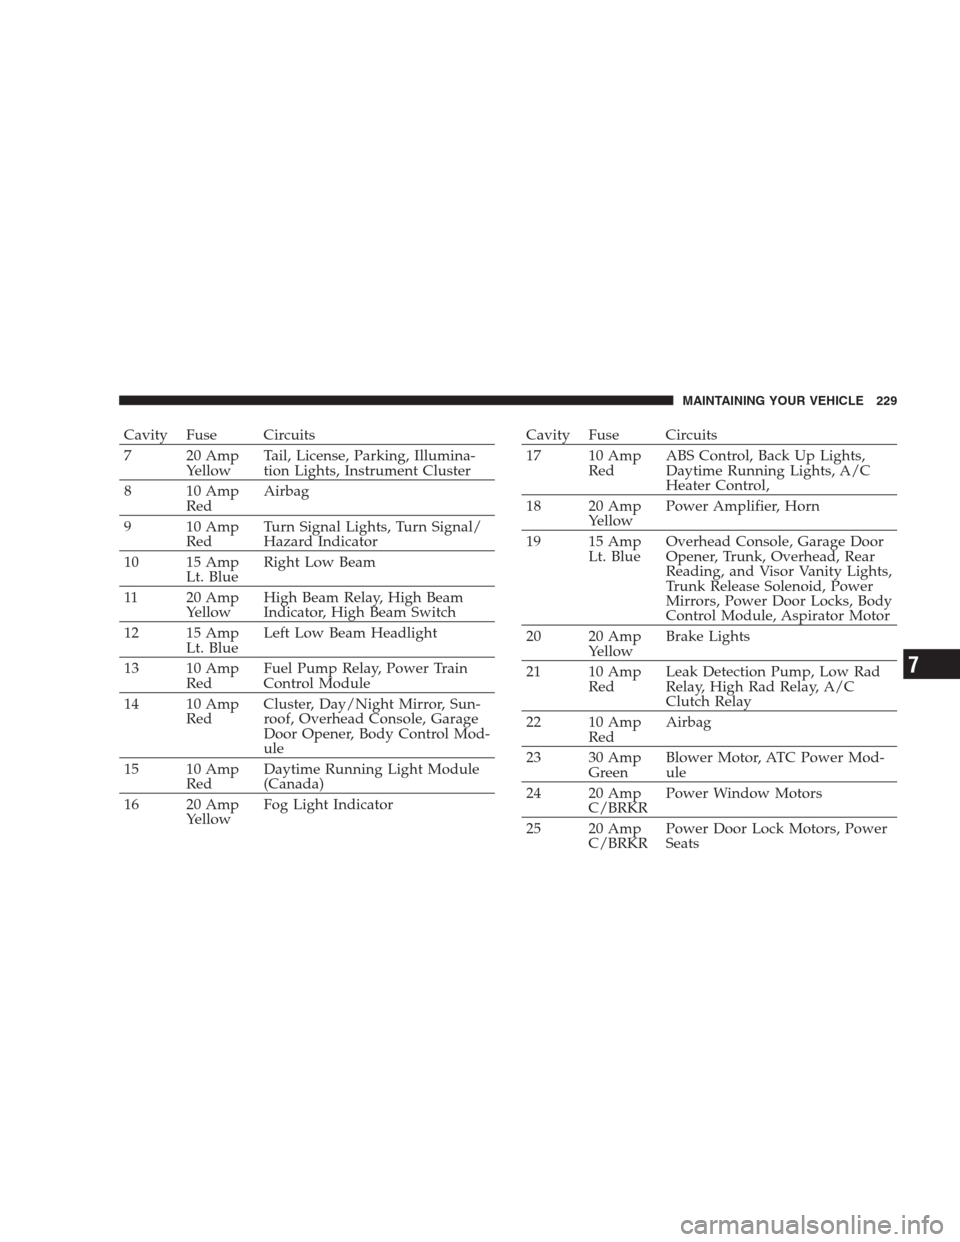
Cavity Fuse Circuits
7 20 Amp
YellowTail, License, Parking, Illumina-
tion Lights, Instrument Cluster
8 10 Amp
RedAirbag
9 10 Amp
RedTurn Signal Lights, Turn Signal/
Hazard Indicator
10 15 Amp
Lt. BlueRight Low Beam
11 20 Amp
YellowHigh Beam Relay, High Beam
Indicator, High Beam Switch
12 15 Amp
Lt. BlueLeft Low Beam Headlight
13 10 Amp
RedFuel Pump Relay, Power Train
Control Module
14 10 Amp
RedCluster, Day/Night Mirror, Sun-
roof, Overhead Console, Garage
Door Opener, Body Control Mod-
ule
15 10 Amp
RedDaytime Running Light Module
(Canada)
16 20 Amp
YellowFog Light IndicatorCavity Fuse Circuits
17 10 Amp
RedABS Control, Back Up Lights,
Daytime Running Lights, A/C
Heater Control,
18 20 Amp
YellowPower Amplifier, Horn
19 15 Amp
Lt. BlueOverhead Console, Garage Door
Opener, Trunk, Overhead, Rear
Reading, and Visor Vanity Lights,
Trunk Release Solenoid, Power
Mirrors, Power Door Locks, Body
Control Module, Aspirator Motor
20 20 Amp
YellowBrake Lights
21 10 Amp
RedLeak Detection Pump, Low Rad
Relay, High Rad Relay, A/C
Clutch Relay
22 10 Amp
RedAirbag
23 30 Amp
GreenBlower Motor, ATC Power Mod-
ule
24 20 Amp
C/BRKRPower Window Motors
25 20 Amp
C/BRKRPower Door Lock Motors, Power
Seats
MAINTAINING YOUR VEHICLE 229
7
Page 266 of 277

About Your Brakes...................162,163
ABS (Anti-Lock Brake) System............. 116
Accident Damage....................... 225
Adding Engine Coolant (Antifreeze)......... 215
Adding Fuel.......................... 177
Air Conditioning....................... 146
Air Conditioning Controls................ 146
Air Conditioning, Operating Tips........... 151
Air Conditioning Refrigerant.............. 209
Air Conditioning System................. 209
Air Pressure, Tires...................164,165
Airbag................................ 33
Airbag Deployment....................36,37
Airbag Light....................37,40,48,115
Airbag Maintenance...................... 39
Alarm System.......................... 23
Alignment and Balance.................. 174
Antenna, Satellite Radio.................. 139
Antifreeze Disposal..................... 215
Antifreeze (Engine Coolant)............... 215
Anti-Lock Brake System.................. 163
Anti-Lock Warning Light................. 116
Anti-Theft Security Alarm................. 23Appearance Care....................... 223
Auto Down Power Windows............... 25
Automatic Dimming Mirror................ 54
Automatic Door Locks.................... 16
Automatic Headlights.................... 66
Automatic Off, Interior Lights.............. 64
Automatic Temperature Control............ 146
Automatic Transaxle..................157,221
Fluid and Filter Changes................ 223
Fluid Level Check..................... 222
Reset Mode......................... 158
Selection Of Lubricant................. 221
Shifting............................ 158
Special Additives..................... 223
Autostick............................. 159
Ball Joints............................ 210
Battery............................189,208
Emergency Starting.................... 189
Gas Caution......................189,208
Jump Starting........................ 189
Keyless Transmitter Replacement.......... 23
Location.........................189,208
266 INDEX
Page 271 of 277

Heater............................... 146
High Beam Indicator.................... 114
Holder, Coin........................... 53
Holder, Cup........................... 53
Holder, Pencil.......................... 53
Homelink Transmitter..................75,80
Hood Release.......................... 63
Hook, Coat............................ 54
Hoses............................218,220
Ignition
Key ................................ 12
Lock............................... 13
Illuminated Entry....................... 14
Infant Restraint......................... 41
Instrument Cluster................... 112,113
Instrument Panel and Controls............. 111
Instrument Panel Cover.................. 226
Instrument Panel Lens Cleaning............ 227
Interior Fuses.......................... 228
Interior Lights.......................... 64
Introduction............................ 4Jack Operation......................... 184
Jump Starting......................... 189
Key, Programming....................... 11
Key, Sentry............................. 9
Key-In Reminder........................ 12
Keyless Entry System..................... 18
Keys.................................. 9
Knee Bolster........................... 33
Lap/Shoulder Belts...................... 28
LATCH
(Lower Anchors and Tether for CHildren)..... 44
Leaks, Fluid............................ 48
Light Bulbs........................... 230
Lights
Airbag.........................37,48,115
Anti-Lock........................... 116
Automatic Off......................64,65
Battery Saver.......................64,65
Brake Warning....................... 117
Check Engine........................ 115
Courtesy/Reading..................... 65
INDEX 271
10
Page 275 of 277

Seat Belt Maintenance................... 227
Seat Belts.........................27,28,48
Adjustable Upper Shoulder Anchorage...... 32
Child Restraint........................ 45
Extender............................ 32
Inspection........................... 48
Reminder........................... 114
Seats................................. 57
Cleaning............................ 225
Glide-To-Exit......................... 58
Heated.............................. 59
Lumbar Support....................... 59
Power.............................. 57
Rear Folding......................... 62
Reclining............................ 58
Sentry Key............................. 9
Sentry Key Programming.................. 11
Sentry Key Replacement.................. 10
Service Assistance...................... 256
Service Contract........................ 258
Service Engine Soon Light................ 198
Service Manuals........................ 261
Setting the Clock....................... 118Shoulder Belts.......................... 32
Side Airbag............................ 38
Side View Mirror Adjustment............... 56
Side Window Demisters.................. 150
Signals, Turn........................... 68
Slippery Surfaces, Driving On............. 191
Snow Chains.......................... 170
Snow Tires............................ 170
Spare Tire............................ 169
Spark Plugs........................... 205
Speed Control.......................... 71
Speedometer.......................... 114
Starting.............................. 155
Steering
Linkage............................ 210
Power...........................163,210
Tilt Column.......................... 70
Steering Wheel Mounted Sound System
Controls............................ 142
Stuck, Freeing......................... 192
Sulfur in Gasoline...................... 177
Sun Roof............................86,87
Supplemental Restraint System - Airbag....... 33
INDEX 275
10