check engine CHRYSLER 300 SRT 2012 2.G User Guide
[x] Cancel search | Manufacturer: CHRYSLER, Model Year: 2012, Model line: 300 SRT, Model: CHRYSLER 300 SRT 2012 2.GPages: 557, PDF Size: 5.22 MB
Page 300 of 557
idle). If the charging system telltale remains on, it means
that the vehicle is experiencing a problem with the
charging system. Obtain SERVICE IMMEDIATELY. See
an authorized dealer.
If jump starting is required, refer to “Jump Starting
Procedures” in “What To Do In Emergencies”.
•Electronic Throttle Control (ETC) TelltaleThis telltale informs you of a problem with the
Electronic Throttle Control (ETC) system. If the
telltale comes on while driving, have the sys-
tem checked by an authorized dealer.
If a problem is detected, the telltale will come on while
the engine is running. Cycle the ignition key when the
vehicle has completely stopped and the shift lever is
placed in the PARK position. The telltale should turn off. If the telltale remains lit with the engine running, your
vehicle will usually be drivable. However, see an autho-
rized dealer for service as soon as possible. If the telltale
is flashing when the engine is running, immediate service
is required. You may experience reduced performance, an
elevated/rough idle or engine stall and your vehicle may
require towing.•Engine Temperature Warning Telltale
This telltale warns of an overheated engine condi-
tion. As temperatures rise and the gauge ap-
proaches H,or260°F, this telltale will illuminate
and a single chime will sound after reaching a set
threshold. Further overheating will cause the tempera-
ture gauge to pass H,or260°F, a continuous chime will
occur until the engine is allowed to cool.
298 UNDERSTANDING YOUR INSTRUMENT PANEL
Page 312 of 557
Customer Programmable Features — Uconnect
Touch™ System 8.4 Settings
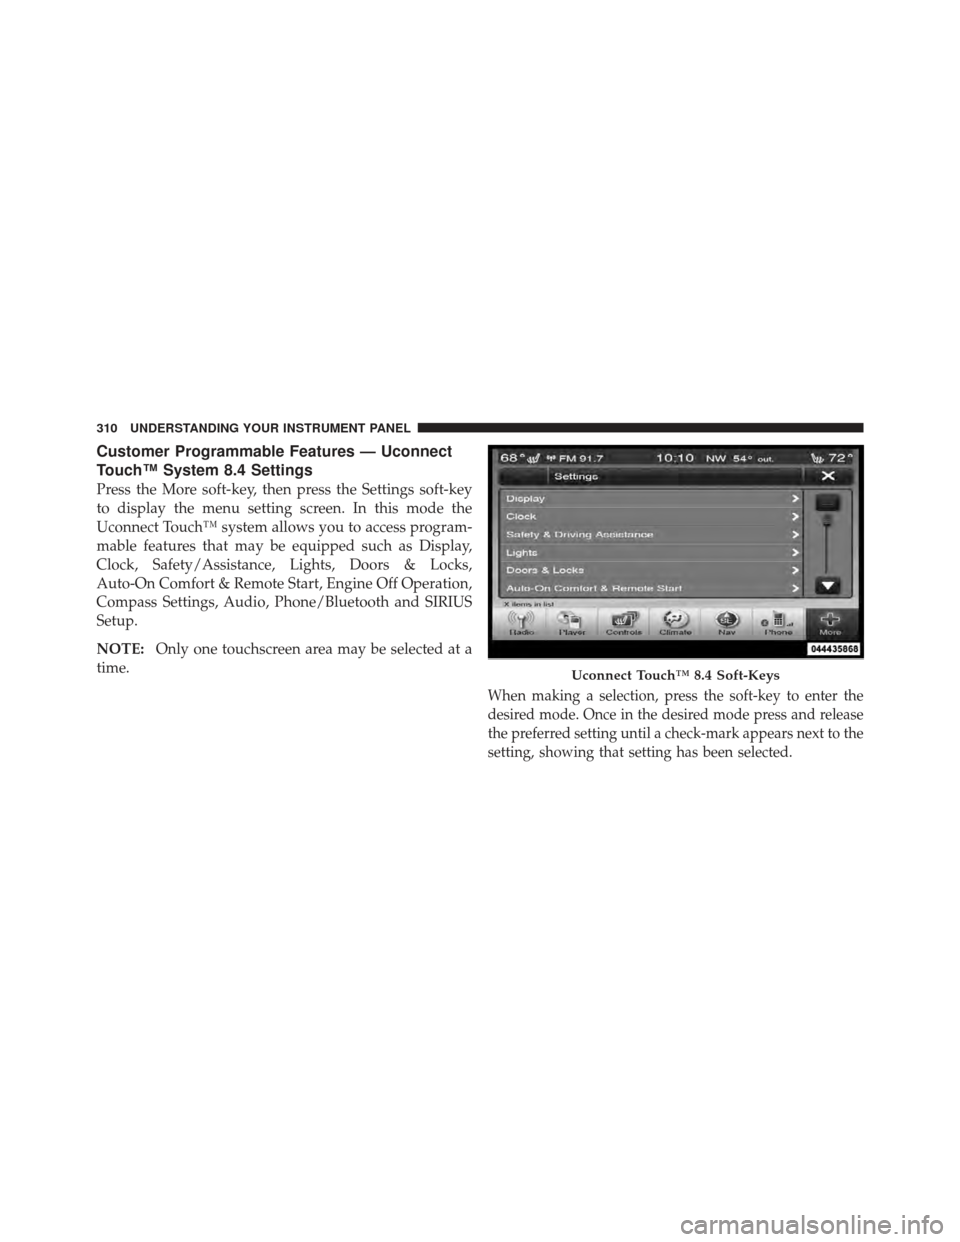
Press the More soft-key, then press the Settings soft-key
to display the menu setting screen. In this mode the
Uconnect Touch™ system allows you to access program-
mable features that may be equipped such as Display,
Clock, Safety/Assistance, Lights, Doors & Locks,
Auto-On Comfort & Remote Start, Engine Off Operation,
Compass Settings, Audio, Phone/Bluetooth and SIRIUS
Setup.
NOTE:Only one touchscreen area may be selected at a
time.
When making a selection, press the soft-key to enter the
desired mode. Once in the desired mode press and release
the preferred setting until a check-mark appears next to the
setting, showing that setting has been selected.
Uconnect Touch™ 8.4 Soft-Keys
310 UNDERSTANDING YOUR INSTRUMENT PANEL
Page 319 of 557
•Auto Dim High Beams “SmartBeam™” — If
Equipped
When this feature is selected, the high beam headlights
will deactivate automatically under certain conditions. To
make your selection, touch the Auto High Beams soft-
key, until a check-mark appears next to setting, showing
that setting has been selected. Touch the back arrow
soft-key to return to the previous menu. Refer to “Lights/
SmartBeam™ — If Equipped” in “Understanding The
Features Of Your Vehicle” for further information.
•Daytime Running Lights
When this feature is selected, the headlights will turn on
whenever the engine is running. To make your selection,
touch the Daytime Running Lights soft-key, until a
check-mark appears next to setting, showing that setting
has been selected. Touch the back arrow soft-key to
return to the previous menu.
•Steering Directed Lights
When this feature is selected, the headlights turn relative
to a change in direction of the steering wheel. To make
your selection, touch the Steering Directed Lights soft-
key, until a check-mark appears next to setting, showing
that setting has been selected. Touch the back arrow
soft-key to return to the previous menu.
•Flash Headlights With Lock
When this feature is selected, the headlights will flash
when the doors are locked or unlocked with the Remote
Keyless Entry (RKE) transmitter. This feature may be
selected with or without the sound horn on lock feature
selected. To make your selection, touch the Flash Head-
lights with Lock soft-key, until a check-mark appears
next to setting, showing that setting has been selected.
Touch the back arrow soft-key to return to the previous
menu.4
UNDERSTANDING YOUR INSTRUMENT PANEL 317
Page 322 of 557
NOTE:The seat will return to the memorized seat
location (if Recall Memory with Remote Key Unlock is set
to ON) when the Remote Keyless Entry (RKE) transmitter
is used to unlock the door. Refer to “Driver Memory
Seat” in “Understanding The Features Of Your Vehicle”
for further information.
Auto-On Comfort & Remote Start
After pressing the Auto-On Comfort & Remote Start
soft-key the following settings will be available.
•Horn With Remote Start
When this feature is selected, the horn will sound when
the remote start is activated. To make your selection,
touch the Sound Horn With Remote Start soft-key, until a
check-mark appears next to setting, showing that setting
has been selected. Touch the back arrow soft-key to
return to the previous menu.
•Auto-On Driver Heated/Ventilated Seat & Steering
Wheel With Vehicle Start — If Equipped
When this feature is selected the driver’s heated seat and
heated steering wheel will automatically turn on when
temperatures are below 40° F (4.4° C). When tempera-
tures are above 80° F (26.7° C) the driver vented seat will
turn on. To make your selection, touch the Auto Heated
Seats soft-key, until a check-mark appears next to setting,
showing that setting has been selected. Touch the back
arrow soft-key to return to the previous menu.
Engine Off Options
After pressing the Engine Off Options soft-key the fol-
lowing settings will be available.
•Easy Exit Seat
This feature provides automatic driver seat positioning to
enhance driver mobility when entering and exiting the
vehicle. To make your selection, touch the Easy Exit Seats
soft-key, until a check-mark appears next to setting,
320 UNDERSTANDING YOUR INSTRUMENT PANEL
Page 359 of 557
WARNING!
•Never use the PARK position as a substitute for
the parking brake. Always apply the parking
brake fully when parked to guard against vehicle
movement and possible injury or damage.
•Your vehicle could move and injure you and others
if it is not completely in PARK. Check by trying to
move the shift lever rearward (with the brake
pedal released), after you have placed it in PARK.
Make sure the transmission is in PARK before
leaving the vehicle.(Continued)
WARNING! (Continued)
•It is dangerous to move the shift lever out of PARK
or NEUTRAL if the engine speed is higher than
idle speed. If your foot is not firmly pressing the
brake pedal, the vehicle could accelerate quickly
forward or in reverse. You could lose control of the
vehicle and hit someone or something. Only shift
into gear when the engine is idling normally and
when your foot is firmly pressing on the brake
pedal.(Continued)
5
STARTING AND OPERATING 357
Page 372 of 557
Power Steering Fluid Check
Checking the power steering fluid level at a defined
service interval is not required. The fluid should only be
checked if a leak is suspected, abnormal noises are
apparent, and/or the system is not functioning as antici-
pated. Coordinate inspection efforts through an autho-
rized dealer.
CAUTION!
Do not use chemical flushes in your power steering
system as the chemicals can damage your power
steering components. Such damage is not covered by
the New Vehicle Limited Warranty.
WARNING!
Fluid level should be checked on a level surface and
with the engine off to prevent injury from moving
parts and to ensure accurate fluid level reading. Do
not overfill. Use only manufacturer’s recommended
power steering fluid.
If necessary, add fluid to restore to the proper indicated
level. With a clean cloth, wipe any spilled fluid from all
surfaces. Refer to “Fluids, Lubricants, and Genuine
Parts” in “Maintaining Your Vehicle” for further
information.
370 STARTING AND OPERATING
Page 376 of 557
In the event power assist is lost for any reason (for
example, repeated brake applications with the engine
OFF) the brakes will still function. The effort required to
brake the vehicle will be much greater than that required
with the power system operating.
Anti-Lock Brake System
The Anti-Lock Brake System (ABS) provides increased
vehicle stability and brake performance under most
braking conditions. The system automatically “pumps”
the brakes during severe braking conditions to prevent
wheel lock-up.
The electronic brake force distribution (EBD) prevents the
rear wheels from over-braking and provides greater control
of available braking forces applied to the rear axle.
When the vehicle is driven over 7 mph (11 km/h), you
may also hear a slight clicking sound as well as some
related motor noises. These noises are the system per-
forming its self check cycle to ensure that the ABS systemis working properly. This self check occurs each time the
vehicle is started and accelerated past 7 mph (11 km/h).
ABS is activated during braking under certain road or
stopping conditions. ABS-inducing conditions can in-
clude ice, snow, gravel, bumps, railroad tracks, loose
debris, or panic stops.
You also may experience the following when the brake
system goes into Anti-lock:
•The ABS motor running (it may continue to run for a
short time after the stop),
•The clicking sound of solenoid valves,
•Brake pedal pulsations, and
•A slight drop or fall away of the brake pedal at the end
of the stop.
These are all normal characteristics of ABS.
374 STARTING AND OPERATING
Page 387 of 557
Synchronizing ESC
If the power supply is interrupted (battery
disconnected or discharged), the “ESC
Activation/Malfunction Indicator Light” may
illuminate with the engine running. If this
should occur, turn the steering wheel completely to the
left and then to the right. The “ESC Activation/
Malfunction Indicator Light” should go out. However, if
the light remains on, have the ESC and BAS checked at
your authorized dealer as soon as possible.
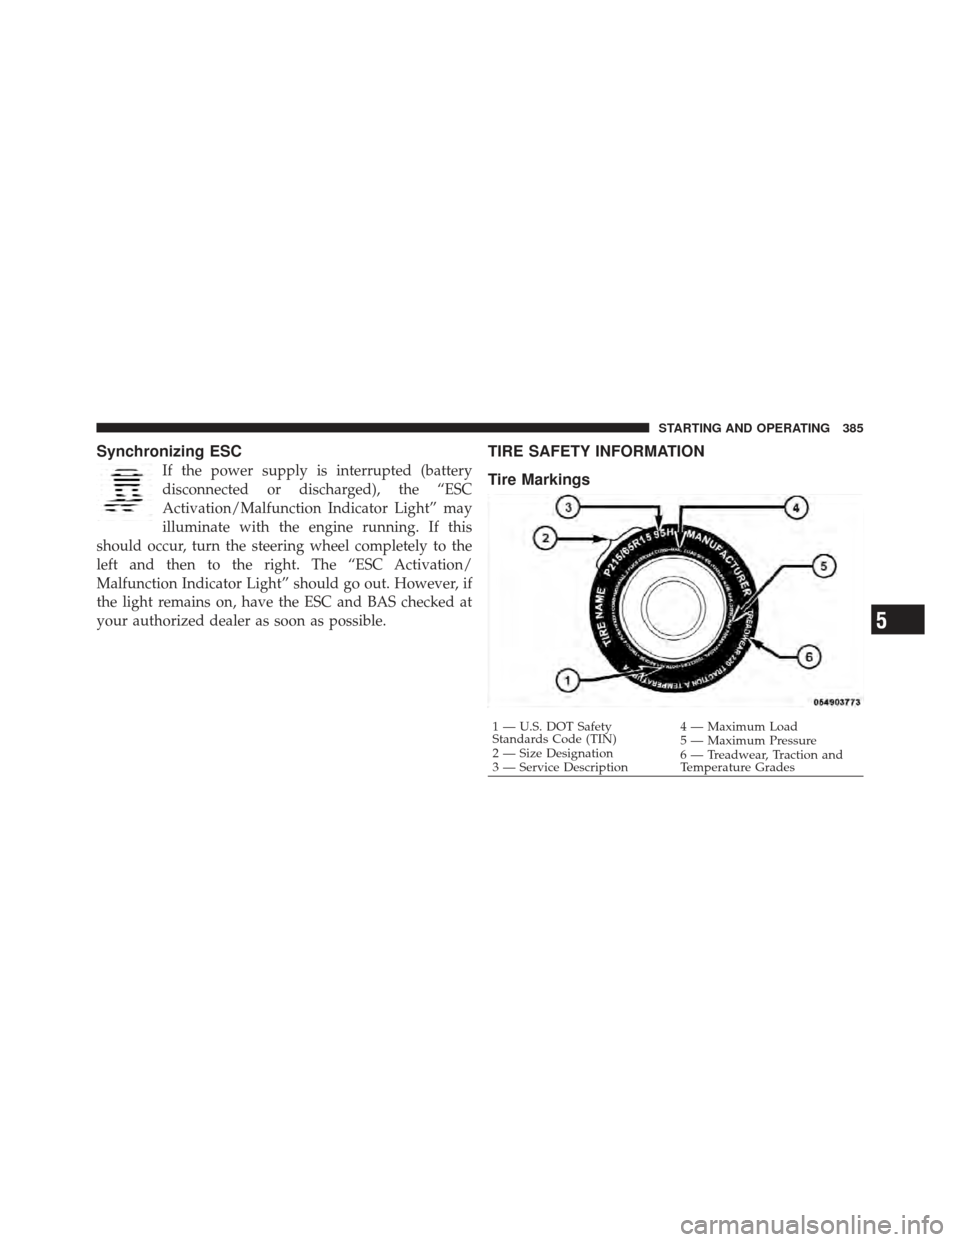
TIRE SAFETY INFORMATION
Tire Markings
1 — U.S. DOT Safety
Standards Code (TIN) 4 — Maximum Load
2 — Size Designation 5 — Maximum Pressure
3 — Service Description 6 — Treadwear, Traction and
Temperature Grades
5
STARTING AND OPERATING 385
Page 437 of 557
5. Uncoil the Power Plug (8) and insert the plug into the
vehicle’s 12 Volt power outlet.
NOTE:Do not remove foreign objects (e.g., screws or
nails) from the tire.
(C) Injecting TIREFIT Sealant Into The Deflated
Tire:
•
Always start the engine before turning ON the TIRE-
FIT kit.
NOTE: Manual transmission vehicles must have the
parking brake engaged and the shift lever in NEUTRAL.
•After pressing the Power Button (4), the sealant (white
fluid) will flow from the Sealant Bottle (1) through the
Sealant Hose (6) and into the tire.
NOTE: Sealant may leak out through the puncture in
the tire. If the sealant (white fluid) does not flow
within 0 –
10 seconds through the Sealant Hose (6):
1. Press the Power Button (4) to turn Off the TIREFIT kit.
Disconnect the Sealant Hose (6) from the valve stem.
Make sure the valve stem is free of debris. Reconnect the
Sealant Hose (6) to the valve stem. Check that the Mode
Select Knob (5) is in the Sealant Mode position and not
Air Mode. Press the Power Button (4) to turn On the
TIREFIT kit.
2. Connect the Power Plug (8) to a different 12 Volt
power outlet in your vehicle or another vehicle, if avail-
able. Make sure the engine is running before turning ON
the TIREFIT kit.
3. The Sealant Bottle (1) may be empty due to previous
use. Call for assistance.
NOTE: If the Mode Select Knob (5) is on Air Mode and
the pump is operating, air will dispense from the Air
Pump Hose (7) only, not the Sealant Hose (6).
6
WHAT TO DO IN EMERGENCIES 435
Page 457 of 557
For states that require an Inspection and Mainte-
nance (I/M), this check verifies the “Malfunction
Indicator Light (MIL)” is functioning and is not
on when the engine is running, and that the OBD II
system is ready for testing.
Normally, the OBD II system will be ready. The OBD II
system may notbe ready if your vehicle was recently
serviced, recently had a dead battery or a battery replace-
ment. If the OBD II system should be determined not
ready for the I/M test, your vehicle may fail the test.
Your vehicle has a simple ignition key-actuated test,
which you can use prior to going to the test station. To
check if your vehicle’s OBD II system is ready, you must
do the following:
1. Turn the ignition switch to the ON position, but do not
crank or start the engine.
2. If you crank or start the engine, you will have to start
this test over. 3. As soon as you turn the ignition switch to the ON
position, you will see the MIL symbol come on as part of
a normal bulb check.
4. Approximately 15 seconds later, one of two things will
happen:
a. The MIL will flash for about 10 seconds and then
return to being fully illuminated until you turn OFF
the ignition or start the engine. This means that your
vehicle’s OBD II system is not readyand you should
not proceed to the I/M station.
b. The MIL will not flash at all and will remain fully
illuminated until you turn OFF the ignition or start the
engine. This means that your vehicle’s OBD II system
is ready and you can proceed to the I/M station.
If your OBD II system is not ready,you should see your
authorized dealer or repair facility. If your vehicle was
recently serviced or had a battery failure or replacement,
you may need to do nothing more than drive your
7
MAINTAINING YOUR VEHICLE 455