key CHRYSLER 300 SRT 2013 2.G Owner's Manual
[x] Cancel search | Manufacturer: CHRYSLER, Model Year: 2013, Model line: 300 SRT, Model: CHRYSLER 300 SRT 2013 2.GPages: 132, PDF Size: 4.27 MB
Page 19 of 132

FRONT SEATS
Power Seats
• The power seat switches are located on theoutboard side of the front seat cushions.
• The seat switch controls, forward/backward, up/down or to recline the seat. The passen-
ger’s seat will move up or down, forward or
rearward.
• The recline switch controls the angle of the seatback. Press the switch forward or rear-
ward and the seatback will move in either
direction.
Power Lumbar
• Push the switch forward to increase thelumbar support. Push the switch rearward to
decrease the lumbar support.
•
Pushing upward or downward on the switch
will raise and lower the position of the support.
Memory Seat
• The memory seat feature allows you to save two different driver seating positions, driv-
er's outside mirror, adjustable brake and ac-
celerator pedals, power tilt and telescopic
steering column and radio station preset set-
tings. The memory seat buttons are located
on the driver's door panel.
• Adjust all memory profile settings, press the SET (S) button then press 1 or 2 within five
seconds.
• Your Key Fob can be programmed to recall one of two pre-programmed memory pro-
files by pressing the UNLOCK button on
the Key Fob.
GETTING STARTED
17
Page 20 of 132

To program your Key Fobs, perform the following:
• Change the ignition to OFF.
• Select desired memory profile 1 or 2.
• Once the profile has been recalled, press and release the SET (S) button on the memoryswitch, then press and release the side of the rocker switch labeled 1 or 2 accordingly.
• (1 or 2) will display in the instrument cluster if the vehicle is equipped with the EVIC.
• Press and release the LOCK button on the Key Fob within 10 seconds.
NOTE:
Your Key Fob can be unlinked to your memory settings by pressing the SET (S) button followed
by the UNLOCK button on the Key Fob in the fourth step.
• Press 1 or 2 to recall the saved positions, or press UNLOCK on the programmed Key Fob.
• Refer to the Owner's Manual on the DVD for further details.
Manual Seat
Forward/Rearward
• Lift up on the adjusting bar located at the front of the seat near the floor and release it
when the seat is at the desired position.
Then, using body pressure, move forward
and backward on the seat to be sure that the
seat adjusters have latched.
Recliner
• Lean forward in the seat and lift the reclinerlever, then lean back to the desired position
and release the lever.
• Lift the lever to return the seatback to an upright position.
CAUTION!
Do not place any article under a power seat or impede its ability to move as it may cause
damage to the seat controls. Seat travel may become limited if movement is stopped by an
obstruction in the seat’s path.
GETTING STARTED
18
Page 22 of 132

HEATED SEATS
Front Heated Seats
• The heated seats are operated using the Uconnect® System.
• Press the Controls soft-key located on theUconnect® display.
• Press the Driver or Passenger seat soft-key once to select HI-level heating. Press the
soft-key a second time to select LO-level
heating. Press the soft-key a third time to
shut the heating elements OFF.
• If the High-level setting is selected, the sys- tem will automatically switch to Low-level
after approximately 60 minutes. The Low-
level setting will turn Off automatically after
approximately 45 minutes.
Rear Heated Seats
• Second row heated seat switches are lo-cated on the rear of the center console.
• Press the switch once to select High-level heating. Press the switch a second time to
select Low-level heating. Press the switch a
third time to shut the heating elements Off.
• If the High-level setting is selected, the sys- tem will automatically switch to Low-level
after approximately 30 minutes. The Low-
level setting will turn Off automatically after
approximately 30 minutes.
WARNING!
• Persons who are unable to feel pain to the skin because of advanced age, chronic illness,
diabetes, spinal cord injury, medication, alcohol use, exhaustion or other physical condi-
tions must exercise care when using the seat heater. It may cause burns even at low
temperatures, especially if used for long periods of time.
• Do not place anything on the seat that insulates against heat, such as a blanket or cushion.
This may cause the seat heater to overheat. Sitting in a seat that has been overheated
could cause serious burns due to the increased surface temperature of the seat.
GETTING STARTED
20
Page 36 of 132

CLIMATE CONTROLS
Uconnect® 8.4 Automatic Climate Controls
Climate Control Knobs
• For your convenience the climate controls can also be operated by using the soft-keys locatedon the touch screen or the climate control knobs below the Uconnect® Touch-Screen.
OPERATING YOUR VEHICLE
34
Page 39 of 132

Pinch Protection Feature
• This feature will detect an obstruction in the opening of the sunroof during Express Closeoperation. If an obstruction in the path of the sunroof is detected, the sunroof will automati-
cally retract. Remove the obstruction if this occurs. Next, press the switch forward and release
to Express Close.
NOTE:
If three consecutive sunroof close attempts result in Pinch Protect reversals, the fourth close
attempt will be a Manual Close movement with Pinch Protect disabled.
WARNING!
• Never leave children unattended in a vehicle, and do not leave the key in the ignition switch (or leave the ignition of a vehicle equipped with Keyless Enter-N-Go™ in the ACC
or ON/Run position). Occupants, particularly unattended children, can become en-
trapped by the power sunroof while operating the power sunroof switch. Such entrapment
may result in serious injury or death.
• In a collision, there is a greater risk of being thrown from a vehicle with an open sunroof.
You could also be severely injured or killed. Always fasten your seat belt properly and make
sure all passengers are properly secured.
• Do not allow small children to operate the sunroof. Never allow your fingers, other body
parts, or any object to project through the sunroof opening. Injury may result.
WIND BUFFETING
• Wind buffeting can be described as a helicopter-type percussion sound. If buffeting occurswith the rear windows open, adjust the front and rear windows together.
• If buffeting occurs with the sunroof open, adjust the sunroof opening, or adjust any window. This will minimize buffeting.
OPERATING YOUR VEHICLE
37
Page 42 of 132

IDENTIFYING YOUR RADIO
Uconnect® 8.4 & 8.4N
• Models 8.4 and 8.4N have an 8.4” touchscreen.
• Model 8.4N has all Model 8.4 features, plus Garmin® Navigation and SiriusXM Travel
Link (1-year trial subscription included).
• Model 8.4N is identified by the unique Nav button on the main screen menu bar,
located at the bottom of the screen, and the
presence of SiriusXM Travel Link within the
More menu.
Uconnect® 8.4 & 8.4N AT A GLANCE
Displaying the Time
• If the time is not currently displayed on the radio or player main page, touch the More soft-keyand then touch the Settings soft-key. In the Settings list, touch the Clock soft-key then touch
the check box next to Show Time in Status Bar.
ELECTRONICS
40
Page 43 of 132

Setting the Time
•
Model 8.4N synchronizes time automatically via GPS, so should not require any time adjustment.
If you do need to set the time manually, follow the instructions below for Model 8.4.
• For Model 8.4, turn the unit on, then touch the time display at the top of the screen. Touch the Yes soft-key.
• If the time is not displayed at the top of the screen, touch the More soft-key and then touch the Settings soft-key. In the Settings screen, touch the Clock soft-key, then check or uncheck this
option.
• Touch + or – next to Set Time Hours and Set Time Minutes to adjust the time.
• If these features are not available, uncheck the Sync with GPS box.
• Touch the X soft-key to save your settings and exit out of the Clock Setting screen.
Audio Settings
Touch of the Audio soft-key to activate the Audio settings screen to adjust Balance\Fade, Equalizer,
and Speed Adjusted Volume.
You can return to the Radio screen by touching the X soft-key located at the top right.
Balance/Fade
Touch the Balance/Fade soft-key to Balance audio between the front speakers or fade the audio
between the rear and front speakers.
Touching the Front, Rear, Left, or Right soft-keys or touch and drag the blue Speaker Icon to adjust the
Balance/Fade.
Equalizer
Touch the Equalizer soft-key to activate the Equalizer screen.
Touch the + or - soft-keys, or by touching and dragging over the level bar for each of the equalizer
bands. The level value, which spans between plus or minus 9, is displayed at the bottom of each of the
Bands.
Speed Adjusted Volume
Touch the Speed Adjusted Volume soft-key to activate the Speed Adjusted Volume screen. The Speed
Adjusted Volume is adjusted by touching the + and - buttons or by touching and dragging over the level
bar. This alters the automatic adjustment of the audio volume with variation to vehicle speed.
ELECTRONICS
41
Page 44 of 132

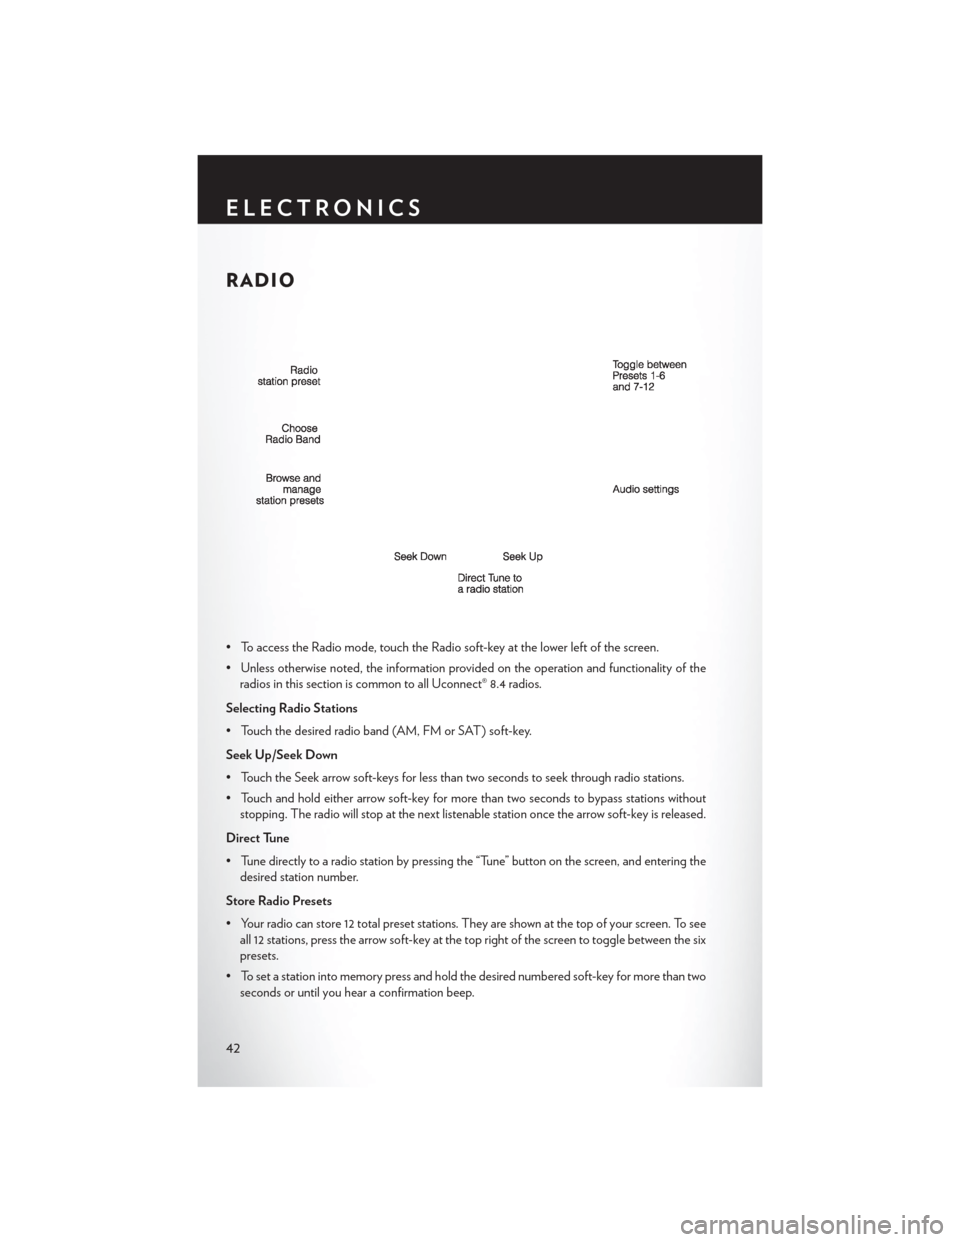
RADIO
• To access the Radio mode, touch the Radio soft-key at the lower left of the screen.
• Unless otherwise noted, the information provided on the operation and functionality of theradios in this section is common to all Uconnect® 8.4 radios.
Selecting Radio Stations
• Touch the desired radio band (AM, FM or SAT) soft-key.
Seek Up/Seek Down
• Touch the Seek arrow soft-keys for less than two seconds to seek through radio stations.
• Touch and hold either arrow soft-key for more than two seconds to bypass stations without stopping. The radio will stop at the next listenable station once the arrow soft-key is released.
Direct Tune
• Tune directly to a radio station by pressing the “Tune” button on the screen, and entering the desired station number.
Store Radio Presets
• Your radio can store 12 total preset stations. They are shown at the top of your screen. To see all 12 stations, press the arrow soft-key at the top right of the screen to toggle between the six
presets.
• To set a station into memory press and hold the desired numbered soft-key for more than two seconds or until you hear a confirmation beep.
ELECTRONICS
42
Page 45 of 132

SiriusXM SATELLITE RADIO
• SiriusXM Satellite Radio gives you over 130 channels, including 100% commercial-free musicfrom nearly every genre, plus all your favorite sports, news, talk and entertainment channels –
all with crystal clear, coast-to-coast coverage, all in one place and all at your fingertips.
• To access SiriusXM Satellite Radio, touch the SAT soft-key on the main Radio screen.
• The following describes features that are available when in SiriusXM Satellite Radio mode.
Selecting SiriusXM Satellite Channels
Seek Up/Seek Down
• Touch the Seek arrow soft-keys for less than two seconds to seek through channels in SAT mode.
• Touch and hold either arrow soft-key for more than two seconds to bypass channels without stopping. The radio will stop at the next listenable channel once the arrow soft-key is released.
Direct Tune
• Tune directly to a SAT channel by pressing the Tune soft-key on the screen, and entering the desired station number.
Jump
• Automatically tells you when Traffic & Weather for a favorite city is available, and gives you the option to switch to that channel. Touch Jump to activate the feature. After listening to Traffic
and Weather, touch Jump again to return to the previous channel.
Fav
• Activates the favorites menu. You can add up to 50 favorite artists or songs. Just touch Add Fav Artist or Add Fav Song while the song is playing. You will then be alerted any time one of
these songs, or works by these artists, is playing on other SiriusXM channels.
SiriusXM Parental Controls
• You can skip or hide certain channels from view if you do not want access to them. Touch the More soft-key, then the Settings soft-key, next touch the Sirius Setup soft-key, then select
Channel Skip. Touch the box, check-mark, next to the channel you want skipped. They will not
show up in normal usage.
• SiriusXM also offers the option to permanently block selected channels. Call 1-888-539-7474 and request the Family Package.
ELECTRONICS
43
Page 48 of 132

iPod®/CD/AUX CONTROLS
• The iPod®/CD/AUX controls are accessed by touching the source soft-key and choosebetween Disc, AUX, iPod®, Bluetooth or SD Card.
NOTE:
Uconnect® 8.4/8.4N will usually automatically switch to the appropriate mode when something is
first connected or inserted into the system.
GARMIN® NAVIGATION (8.4N ONLY)
• Uconnect® 8.4N integrates Garmin’s consumer-friendly navigation into your vehicle. Garmin Navigation includes Lane Assist and Junction View, Speed Limit information, and a database
with over 6 million points of interest.
• Touch the NAV soft-key in the menu bar to access the Navigation system.
Changing the Navigation Voice Prompt Volume
1. Program a destination.
2. While traveling on your route, touch the upper left area of the map screen where your next turn is displayed.
3. The Navigation system will then repeat the distance to your next turn.
4. While the Navigation system is speaking, use the ON/OFF VOLUME rotary knob to adjust the volume to a comfortable level. Please note the volume setting for Navigation Voice
Prompt is different than the audio system.
ELECTRONICS
46