tire pressure CHRYSLER 300 SRT 2014 2.G Service Manual
[x] Cancel search | Manufacturer: CHRYSLER, Model Year: 2014, Model line: 300 SRT, Model: CHRYSLER 300 SRT 2014 2.GPages: 590, PDF Size: 4.08 MB
Page 470 of 590
NOTE:If the Mode Select Knob (5) is on Air Mode and
the pump is operating, air will dispense from the Air
Pump Hose (7) only, not the Sealant Hose (6).
If the sealant (white fluid) does flow through the
Sealant Hose (6):
1.
Continue to operate the pump until sealant is no longer
flowing through hose (typically takes 30 - 70 seconds).
As the sealant flows through the Sealant Hose (6), the
Pressure Gauge (3) can read as high as 70 psi (4.8 Bar).
The Pressure Gauge (3) will decrease quickly from
approximately 70 psi (4.8 Bar) to the actual tire pressure
when the Sealant Bottle (1) is empty.
2. The pump will start to inject air into the tire immedi- ately after the Sealant Bottle (1) is empty. Continue to
operate the pump and inflate the tire to the pressure
indicated on the tire pressure label on the driver-side
latch pillar (recommended pressure). Check the tire
pressure by looking at the Pressure Gauge (3). If the tire does not inflate to at least 26 psi (1.8 Bar)
pressure within 15 minutes:
•
The tire is too badly damaged. Do not attempt to drive
the vehicle further. Call for assistance.
NOTE: If the tire becomes over-inflated, press the Defla-
tion Button to reduce the tire pressure to the recom-
mended inflation pressure before continuing.
If the tire inflates to the recommended pressure or is at
least 26 psi (1.8 Bar) pressure within 15 minutes:
1. Press the Power Button (4) to turn off the TIREFIT kit.
2. Remove the Speed Limit sticker from the top of the Sealant Bottle (1) and place the sticker on the instru-
ment panel.
3.
Immediately disconnect the Sealant Hose (6) from the
valve stem, reinstall the cap on the fitting at the end of
the hose, and place the TIREFIT kit in the vehicle storage
location. Quickly proceed to (D) “Drive Vehicle.”
468 WHAT TO DO IN EMERGENCIES
Page 472 of 590
3. Uncoil the Air Pump Hose (7) (black in color) andscrew the fitting at the end of hose (7) onto the valve
stem.
4. Check the pressure in the tire by reading the Pressure Gauge (3).
If tire pressure is less than 19 psi (1.3 Bar):
The tire is too badly damaged. Do not attempt to drive
the vehicle further. Call for assistance.
If the tire pressure is 19 psi (1.3 Bar) or higher:
1. Press the Power Button (4) to turn on TIREFIT and inflate the tire to the pressure indicated on the tire and
loading information label on the driver-side door
opening.
NOTE: If the tire becomes over-inflated, press the Defla-
tion Button to reduce the tire pressure to the recom-
mended inflation pressure before continuing. 2. Disconnect the TIREFIT kit from the valve stem,
reinstall the cap on the valve stem and unplug from 12
Volt outlet.
3. Place the TIREFIT kit in its proper storage area in the vehicle.
4. Have the tire inspected and repaired or replaced at the earliest opportunity at an authorized dealer or tire
service center.
5. Replace the Sealant Bottle (1) and Sealant Hose (6) assembly at your authorized dealer as soon as pos-
sible. Refer to (F) “Sealant Bottle and Hose Replace-
ment”.
NOTE: When having the tire serviced, advise the autho-
rized dealer or service center that the tire has been sealed
using the TIREFIT service kit.
470 WHAT TO DO IN EMERGENCIES
Page 502 of 590
Coolant Checks
Check engine coolant (antifreeze) protection every 12
months (before the onset of freezing weather, where
applicable). If the engine coolant (antifreeze) is dirty, the
system should be drained, flushed, and refilled with
fresh OAT coolant (conforming to MS-12106) only ac-
cording to Chrysler Service Manual procedure or by an
authorized dealer. Check the front of the radiator for any
accumulation of bugs, leaves, etc. If dirty, clean by gently
spraying water from a garden hose vertically down the
face of the condenser.
Check the coolant recovery bottle tubing for brittle rub-
ber, cracking, tears, cuts, and tightness of the connection
at the bottle and radiator. Inspect the entire system for
leaks.With the engine at normal operating temperature (but
not running), check the cooling system pressure cap for
proper vacuum sealing by draining a small amount of
engine coolant (antifreeze) from the radiator drain cock.
If the cap is sealing properly, the engine coolant (anti-
freeze) will begin to drain from the coolant recovery
bottle. DO NOT REMOVE THE COOLANT PRESSURE
CAP WHEN THE COOLING SYSTEM IS HOT.
Cooling System — Drain, Flush And Refill
If the engine coolant (antifreeze) is dirty or contains visible
sediment, have an authorized dealer clean and flush with
OAT coolant (antifreeze) (conforming to MS-12106).
Refer to the “Maintenance Schedule” for the proper
maintenance intervals.
500 MAINTAINING YOUR VEHICLE
Page 526 of 590
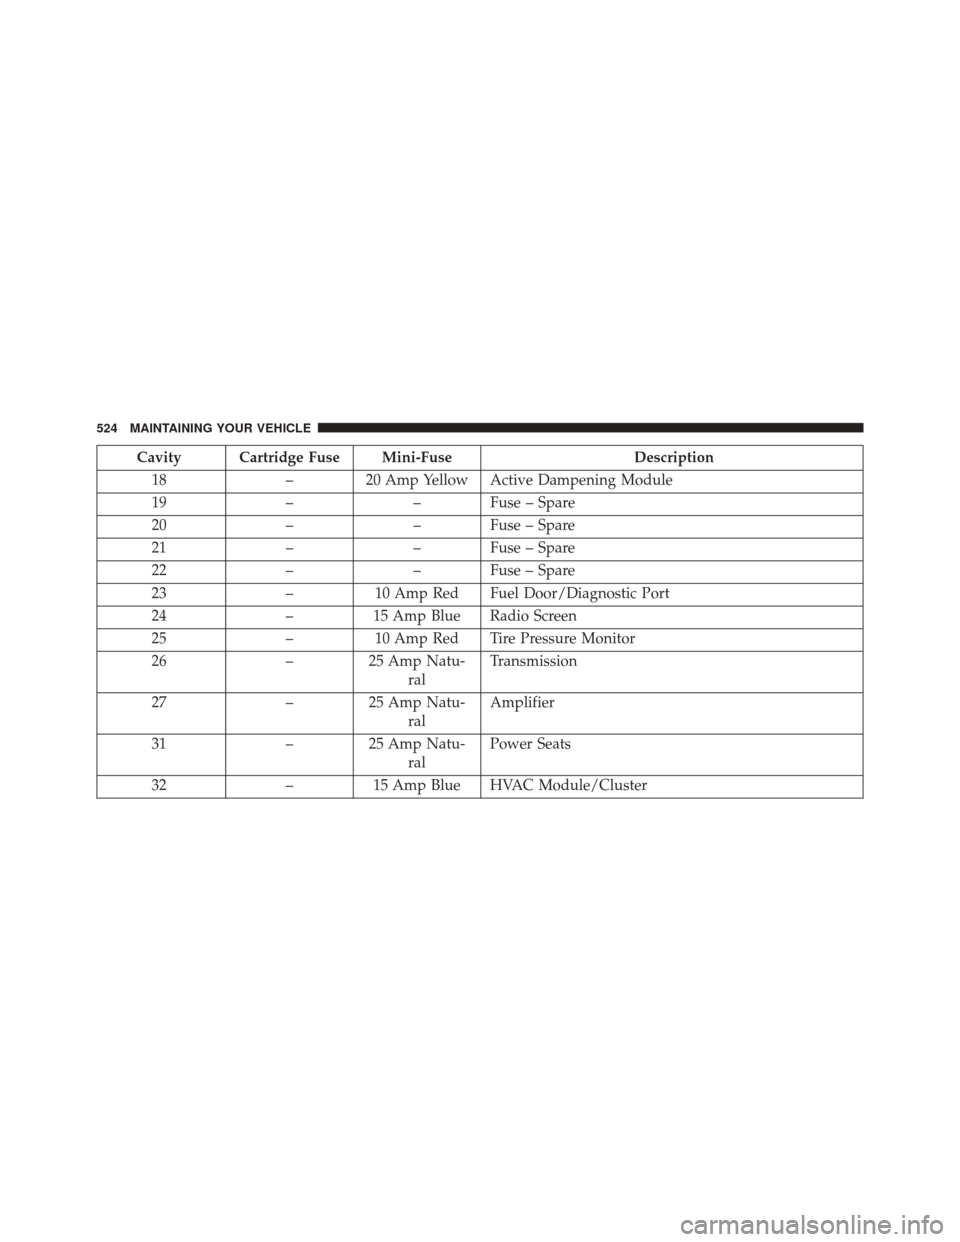
Cavity Cartridge Fuse Mini-FuseDescription
18 – 20 Amp Yellow Active Dampening Module
19 –– Fuse – Spare
20 –– Fuse – Spare
21 –– Fuse – Spare
22 –– Fuse – Spare
23 –10 Amp Red Fuel Door/Diagnostic Port
24 –15 Amp Blue Radio Screen
25 –10 Amp Red Tire Pressure Monitor
26 –25 Amp Natu-
ral Transmission
27 –25 Amp Natu-
ral Amplifier
31 –25 Amp Natu-
ral Power Seats
32 –15 Amp Blue HVAC Module/Cluster
524 MAINTAINING YOUR VEHICLE
Page 541 of 590
Your authorized dealer will reset the oil change indicator
message after completing the scheduled oil change. If a
scheduled oil change is performed by someone other
than your authorized dealer, the message can be reset by
referring to the steps described under “Electronic Vehicle
Information Center (EVIC)” in “Understanding Your
Instrument Panel” for further information.
At Each Stop For Fuel
•Check the engine oil level. Refer to “Maintenance
Procedures/Engine Oil” in “Maintaining Your Ve-
hicle” for further information.
• Check the windshield washer solvent and add if
required.
Once A Month
•
Check tire pressure and look for unusual wear or damage.
• Inspect the battery, and clean and tighten the terminals
as required. •
Check the fluid levels of the coolant reservoir, brake
master cylinder, and power steering, and add as
needed.
• Check all lights and other electrical items for correct
operation.
At Each Oil Change
• Change the engine oil filter.
• Inspect the brake hoses and lines.
CAUTION!
Failure to perform the required maintenance items
may result in damage to the vehicle.
Required Maintenance Intervals
Refer to the Maintenance Schedules on the following
pages for the required maintenance intervals.
8
M
A I
N T
E
N
A
N
C E
S
C
H E
D
U L
E
SMAINTENANCE SCHEDULES 539
Page 568 of 590
About Your Brakes....................... .397
ABS (Anti-Lock Brake System) ................400
Adaptive Cruise Control (ACC) (Cruise Control) . . .221
Adding Engine Coolant (Antifreeze) ............502
Adding Fuel ............................ .449
Adding Washer Fluid ..................... .496
Additives, Fuel .......................... .447
Adjustable Pedals ........................ .215
Airbag ..................................59
Airbag Deployment ........................71
Airbag Light .............................67
Airbag Maintenance ........................72
Airbag, Side ..............................63
Airbag, Window (Side Curtain) ................63
Air Cleaner, Engine (Engine Air Cleaner Filter) . . . .490
Air Conditioner Maintenance .................492
Air Conditioning Filter .....................365
Air Conditioning Refrigerant .................492
Air Conditioning System ....................362 Air Pressure, Tires
........................ .424
Alarm Rearming The System .....................19
Alarm Light ............................ .309
Alarm, Panic .............................24
Alarm (Security Alarm) ......................18
Alarm System (Security Alarm) ................18
Alterations/Modifications, Vehicle ...............7
Antifreeze (Engine Coolant) ..................501
Disposal ............................. .504
Anti-Lock Brake System (ABS) ................400
Anti-Lock Warning Light ....................308
Appearance Care ..........................511
Arming System (Security Alarm) ...............18
Assist, Hill Start ......................... .407
Auto Down Power Windows ..................40
Automatic Door Locks ......................32
Automatic Headlights ..................... .196
Automatic High Beams .....................197
566 INDEX
Page 570 of 590
Break-In Recommendations, New Vehicle.........99
Brightness, Interior Lights ...................204
Bulb Replacement ........................ .528
Bulbs, Light ............................ .104
Camera, Rear ........................... .260
Capacities, Fluid ......................... .534
Caps, Filler Oil (Engine) .......................... .489
Power Steering ........................ .396
Radiator (Coolant Pressure) ................503
Carbon Monoxide Warning ..................101
Cargo Area Features ...................... .295
Cargo Compartment ...................... .295
Cargo (Vehicle Loading) ....................453
Car Washes ............................ .512
Cellular Phone .......................... .355
Certification Label ........................ .453
Chains, Tire ............................ .434Chart, Tire Sizing
........................ .413
Check Engine Light (Malfunction Indicator Light) . .306
Checking Your Vehicle For Safety ..............100
Checks, Safety .......................... .100
Child Restraint ............................75
Child Restraints Child Seat Installation .....................94
Install A LATCH-compatible Child Restraint .....89
Installing Child Restraints Using The Vehicle
Seat Belt ..............................91
Lower Anchors And Tethers For Children .......83
Child Safety Locks .........................33
Clean Air Gasoline ....................... .445
Cleaning Wheels .............................. .513
Climate Control ......................... .355
Clock ................................. .351
Coin Holder ............................ .291
Cold Weather Operation ....................374
568 INDEX
Page 571 of 590
Compact Disc (CD) Maintenance..............354
Compact Spare Tire ....................... .429
Computer, Trip/Travel ..................... .327
Connector UCI................................ .351
Universal Consumer Interface (UCI) ..........351
Conserving Fuel ......................... .324
Console, Floor .......................... .291
Contract, Service ......................... .559
Coolant Pressure Cap (Radiator Cap) ...........503
Cooling System .......................... .499
Adding Coolant (Antifreeze) ...............502
Coolant Capacity ...................... .534
Coolant Level ......................... .500
Disposal of Used Coolant .................504
Drain, Flush, and Refill ...................500
Inspection ........................... .504
Points to Remember .....................505
Pressure Cap ......................... .503Radiator Cap
......................... .503
Selection of Coolant (Antifreeze) .............501
Corrosion Protection .......................511
Cruise Control (Speed Control) ................221
Cupholders ............................ .286
Customer Assistance ...................... .557
Customer Programmable Features .............332
Data Recorder, Event .......................74
Daytime Brightness, Interior Lights .............206
Daytime Running Lights ....................199
Dealer Service ........................... .486
Deck Lid, Emergency Release .................44
Deck Lid, Power Release .....................43
Defroster, Rear Window .....................297
Defroster, Windshield ..................... .102
Delay (Intermittent) Wipers ..................207
Diagnostic System, Onboard .................484
Dimmer Switch, Headlight ...................202
10
INDEX 569
Page 578 of 590
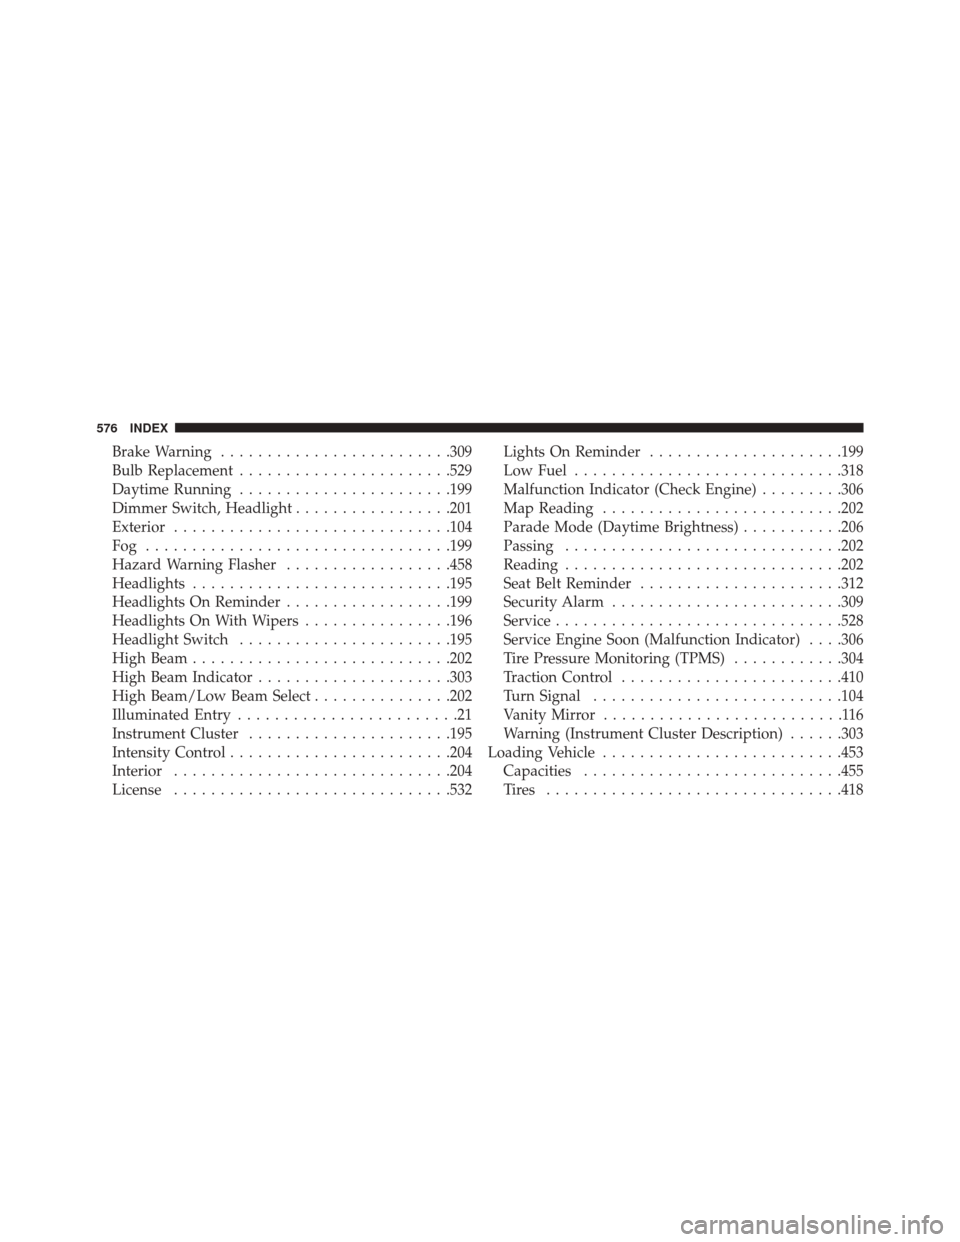
Brake Warning........................ .309
Bulb Replacement ...................... .529
Daytime Running ...................... .199
Dimmer Switch, Headlight .................201
Exterior ............................. .104
Fog ................................ .199
Hazard Warning Flasher ..................458
Headlights ........................... .195
Headlights On Reminder ..................199
Headlights On With Wipers ................196
Headlight Switch ...................... .195
High Beam ........................... .202
High Beam Indicator .....................303
High Beam/Low Beam Select ...............202
Illuminated Entry ........................21
Instrument Cluster ..................... .195
Intensity Control ....................... .204
Interior ............................. .204
License ............................. .532Lights On Reminder
.....................199
Low Fuel ............................ .318
Malfunction Indicator (Check Engine) .........306
Map Reading ......................... .202
Parade Mode (Daytime Brightness) ...........206
Passing ............................. .202
Reading ............................. .202
Seat Belt Reminder ..................... .312
Security Alarm ........................ .309
Service .............................. .528
Service Engine Soon (Malfunction Indicator) . . . .306
Tire Pressure Monitoring (TPMS) ............304
Traction Control ....................... .410
Turn Signal .......................... .104
Vanity Mirror ..........................116
Warning (Instrument Cluster Description) ......303
Loading Vehicle ......................... .453
Capacities ........................... .455
T
ires ............................... .418
576 INDEX
Page 579 of 590
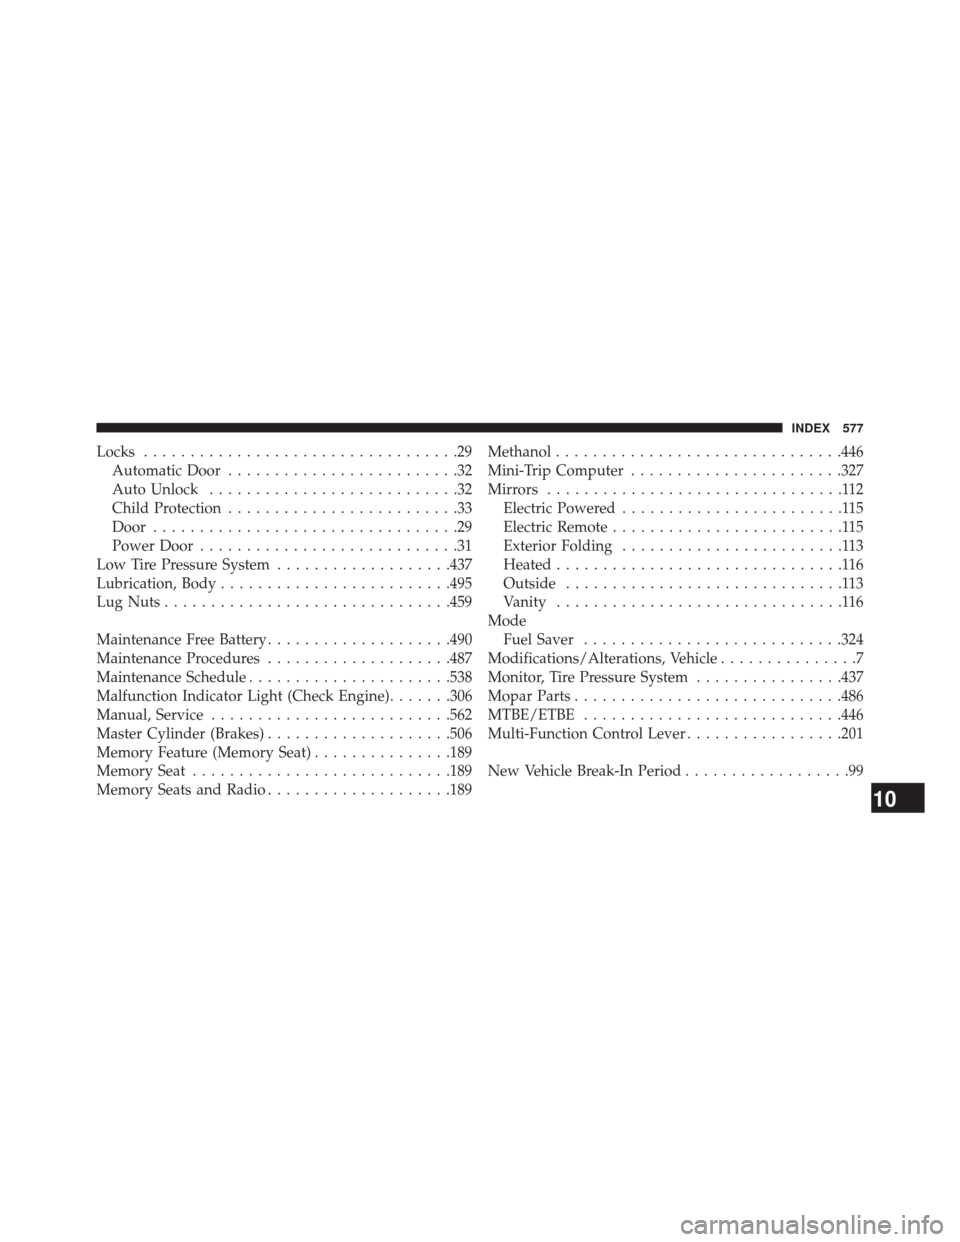
Locks..................................29
Automatic Door .........................32
Auto Unlock ...........................32
Child Protection .........................33
Door .................................29
Power Door ............................31
Low Tire Pressure System ...................437
Lubrication, Body ........................ .495
Lug Nuts .............................. .459
Maintenance Free Battery ....................490
Maintenance Procedures ....................487
Maintenance Schedule ..................... .538
Malfunction Indicator Light (Check Engine) .......306
Manual, Service ......................... .562
Master Cylinder (Brakes) ....................506
Memory Feature (Memory Seat) ...............189
Memory Seat ........................... .189
Memory Seats and Radio ....................189 Methanol
.............................. .446
Mini-Trip Computer ...................... .327
Mirrors ................................112
Electric Powered ........................115
Electric Remote .........................115
Exterior Folding ........................113
Heated ...............................116
Outside ..............................113
Vanity ...............................116
Mode Fuel Saver ........................... .324
Modifications/Alterations, Vehicle ...............7
Monitor, Tire Pressure System ................437
Mopar Parts ............................ .486
MTBE/ETBE ........................... .446
Multi-Function Control Lever .................201
New Vehicle Break-In Period ..................99
10
INDEX 577