audio CHRYSLER 300 SRT 2014 2.G User Guide
[x] Cancel search | Manufacturer: CHRYSLER, Model Year: 2014, Model line: 300 SRT, Model: CHRYSLER 300 SRT 2014 2.GPages: 132, PDF Size: 4.64 MB
Page 3 of 132
INTRODUCTION/WELCOME
WELCOME FROM CHRYSLER
GROUPLLC ..................2
CONTROLS AT A GLANCE
DRIVER COCKPIT...............4
INSTRUMENT CLUSTER ...........6
GETTING STARTED
KEYFOB ....................8
REMOTE START...............10
KEYLESS ENTER-N-GO™ ..........10
SECURITY ALARM ..............13
SEATBELT ...................14
SUPPLEMENTAL RESTRAINT
SYSTEM (SRS) — AIR BAGS .........14
CHILD RESTRAINTS .............15
FRONTSEATS ................18
REAR SEAT ...................21
HEATEDSEATS ................21
HEATED AND COOLED CUPHOLDERS..22
ADJUSTABLE PEDALS ............23
TILT/TELESCOPING STEERING
COLUMN ...................24
OPERATING YOUR VEHICLE
ENGINE BREAK-IN
RECOMMENDATIONS ............25
TURN SIGNAL/WIPER/WASHER/HIGH
BEAM LEVER . ................26
HEADLIGHT SWITCH ............27
SPEED CONTROL ..............28
ELECTRONIC SHIFTER – 3.6L ENGINE . . 32
TRANSMISSION MODES/AUTOSTICK® . . 33
CLIMATE CONTROLS ............35
BLIND SPOT MONITORING ........36
POWER SUNROOF ..............37
WIND BUFFETING ..............39
ELECTRONICS
YOUR VEHICLE'S SOUND SYSTEM ....40
IDENTIFYING YOUR RADIO ........42
Uconnect® 8.4 & 8.4N AT A GLANCE ....42
RADIO .....................44
SiriusXM SATELLITE RADIO .........45
STEERING WHEEL AUDIO CONTROLS . . 47
SETTING THE ANALOG CLOCK .....47
iPod®/CD/AUX CONTROLS .........48
GARMIN® NAVIGATION (8.4N Only) ....48
SiriusXM TRAVEL LINK (8.4N ONLY) . . . . 51
PLAYING iPod/USB/MP3 DEVICES .....52
Uconnect® PHONE (Bluetooth® HANDS FREE
CALLING)...................54
Uconnect® VOICE COMMAND
(8.4&8.4NONLY) ...............57
ELECTRONIC VEHICLE INFORMATION
CENTER (EVIC) ...............60
PROGRAMMABLE FEATURES .......61UNIVERSAL GARAGE DOOR OPENER
(HomeLink®)
..................62
POWER OUTLETS ..............64
UTILITY
TRAILER TOWING WEIGHTS (MAXIMUM
TRAILER WEIGHT RATINGS) . ......66
RECREATIONAL TOWING (BEHIND
MOTORHOME, ETC.) . . ..........66
SRTAUTOSTICK® .................67
ELECTRONIC CONTROL DAMPING
SYSTEM....................68
PERFORMANCE FEATURES ........69
SUMMER/THREE-SEASON TIRES ......71
WHAT TO DO IN EMERGENCIESROADSIDE ASSISTANCE..........72
INSTRUMENT CLUSTER WARNING
LIGHTS .....................72
IF YOUR ENGINE OVERHEATS .......76
JACKING AND TIRE CHANGING .....76
TIREFIT KIT ..................82
BATTERY LOCATION ............87
JUMP-STARTING ...............88
SHIFT LEVER OVERRIDE — 5 SPEED
TRANSMISSION ...............90
TOWING A DISABLED VEHICLE . . ....92
FREEING A STUCK VEHICLE ........93
EVENT DATA RECORDER (EDR) . . . . . . 93
MAINTAINING YOUR VEHICLEOPENING THE HOOD . . . ........95
FUEL DOOR RELEASE ...........95
ENGINE COMPARTMENT .........97
FLUIDSANDCAPACITIES .........100
MAINTENANCE SCHEDULE . . . . . . . 103
FUSES .....................112
TIRE PRESSURES ...............117
WHEEL AND WHEEL TRIM CARE . . . . . 117
EXTERIOR BULBS ..............118
CONSUMER ASSISTANCE
CHRYSLER GROUP LLC CUSTOMER
CENTER....................119
CHRYSLER CANADA INC. CUSTOMER
CENTER ....................119
PUBLICATIONS ORDERING ........119
ASSISTANCE FOR THE HEARING
IMPAIRED ...................119
REPORTING SAFETY DEFECTS IN THE
UNITEDSTATES ...............120
MOPAR® ACCESSORIESAUTHENTIC ACCESSORIES BY
MOPAR® ...................121
INDEX................... 122
FREQUENTLY ASKED QUESTIONS
FREQUENTLY ASKED QUESTIONS . . . . 125
TABLE OF CONTENTS
Page 6 of 132
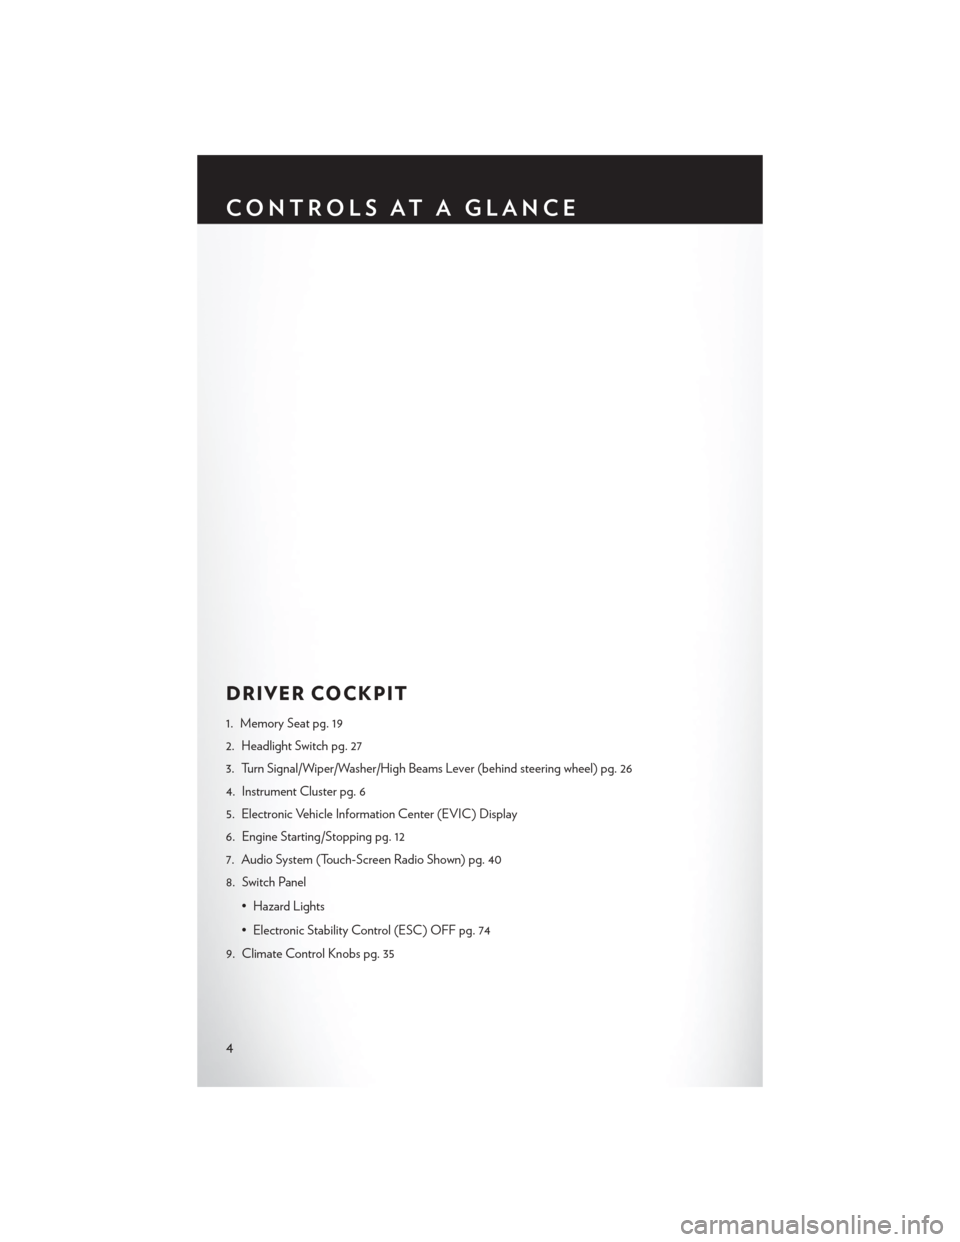
DRIVER COCKPIT
1. Memory Seat pg. 19
2. Headlight Switch pg. 27
3. Turn Signal/Wiper/Washer/High Beams Lever (behind steering wheel) pg. 26
4. Instrument Cluster pg. 6
5. Electronic Vehicle Information Center (EVIC) Display
6. Engine Starting/Stopping pg. 12
7. Audio System (Touch-Screen Radio Shown) pg. 40
8. Switch Panel• Hazard Lights
• Electronic Stability Control (ESC) OFF pg. 74
9. Climate Control Knobs pg. 35
CONTROLS AT A GLANCE
4
Page 42 of 132
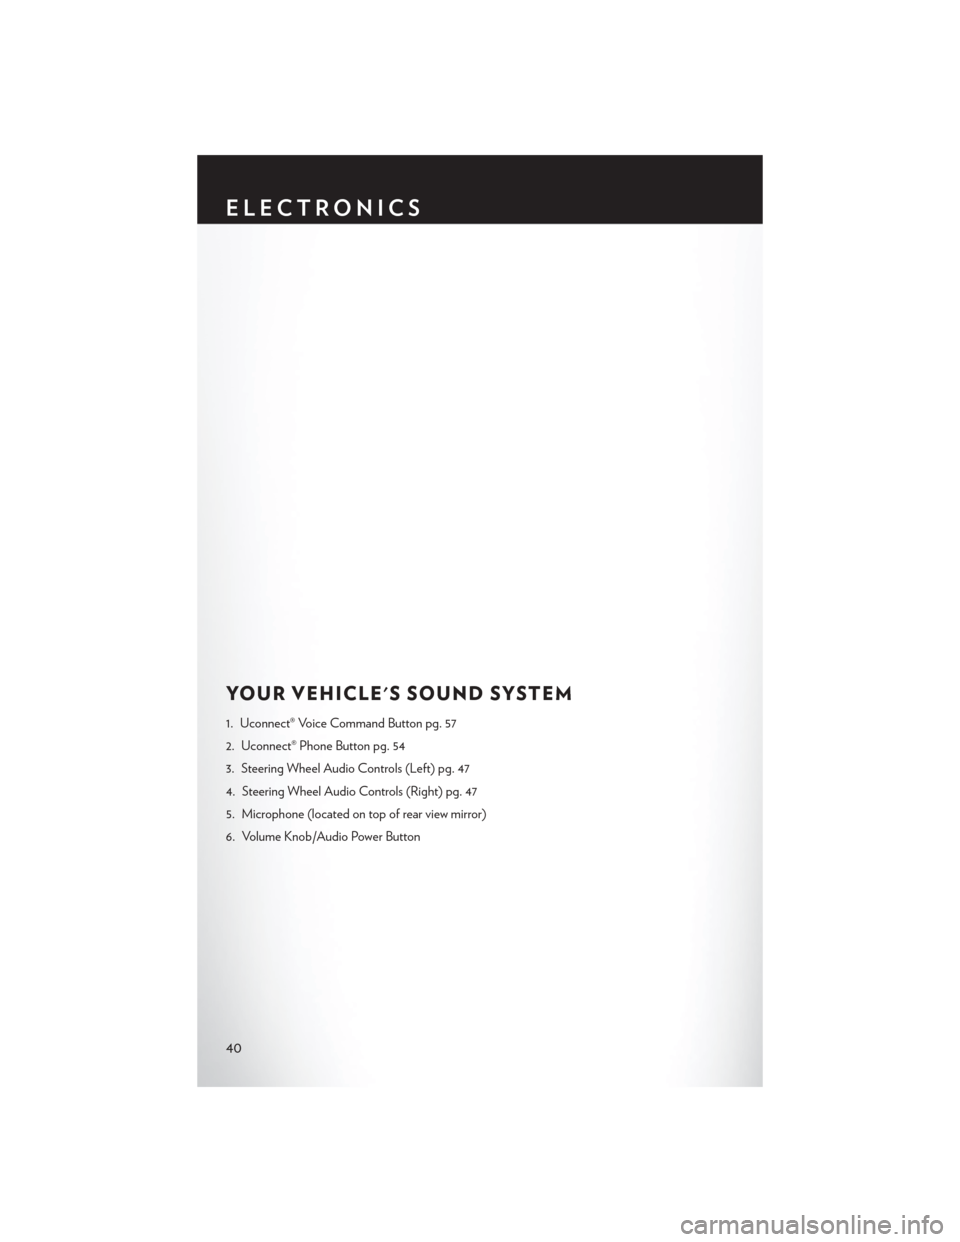
YOUR VEHICLE'S SOUND SYSTEM
1. Uconnect® Voice Command Button pg. 57
2. Uconnect® Phone Button pg. 54
3. Steering Wheel Audio Controls (Left) pg. 47
4. Steering Wheel Audio Controls (Right) pg. 47
5. Microphone (located on top of rear view mirror)
6. Volume Knob/Audio Power Button
ELECTRONICS
40
Page 43 of 132
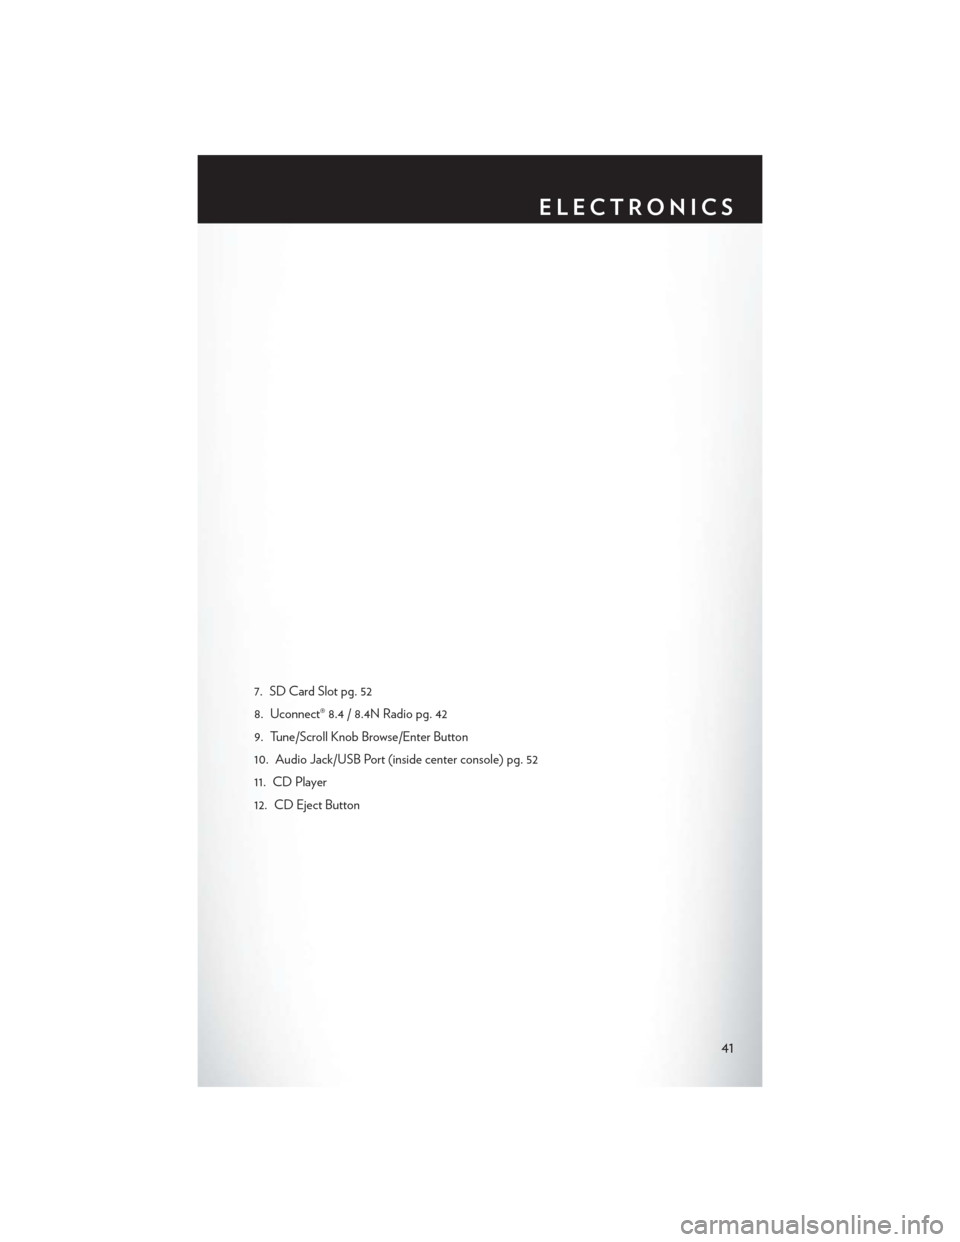
7. SD Card Slot pg. 52
8. Uconnect® 8.4 / 8.4N Radio pg. 42
9. Tune/Scroll Knob Browse/Enter Button
10. Audio Jack/USB Port (inside center console) pg. 52
11. CD Player
12. CD Eject Button
ELECTRONICS
41
Page 45 of 132
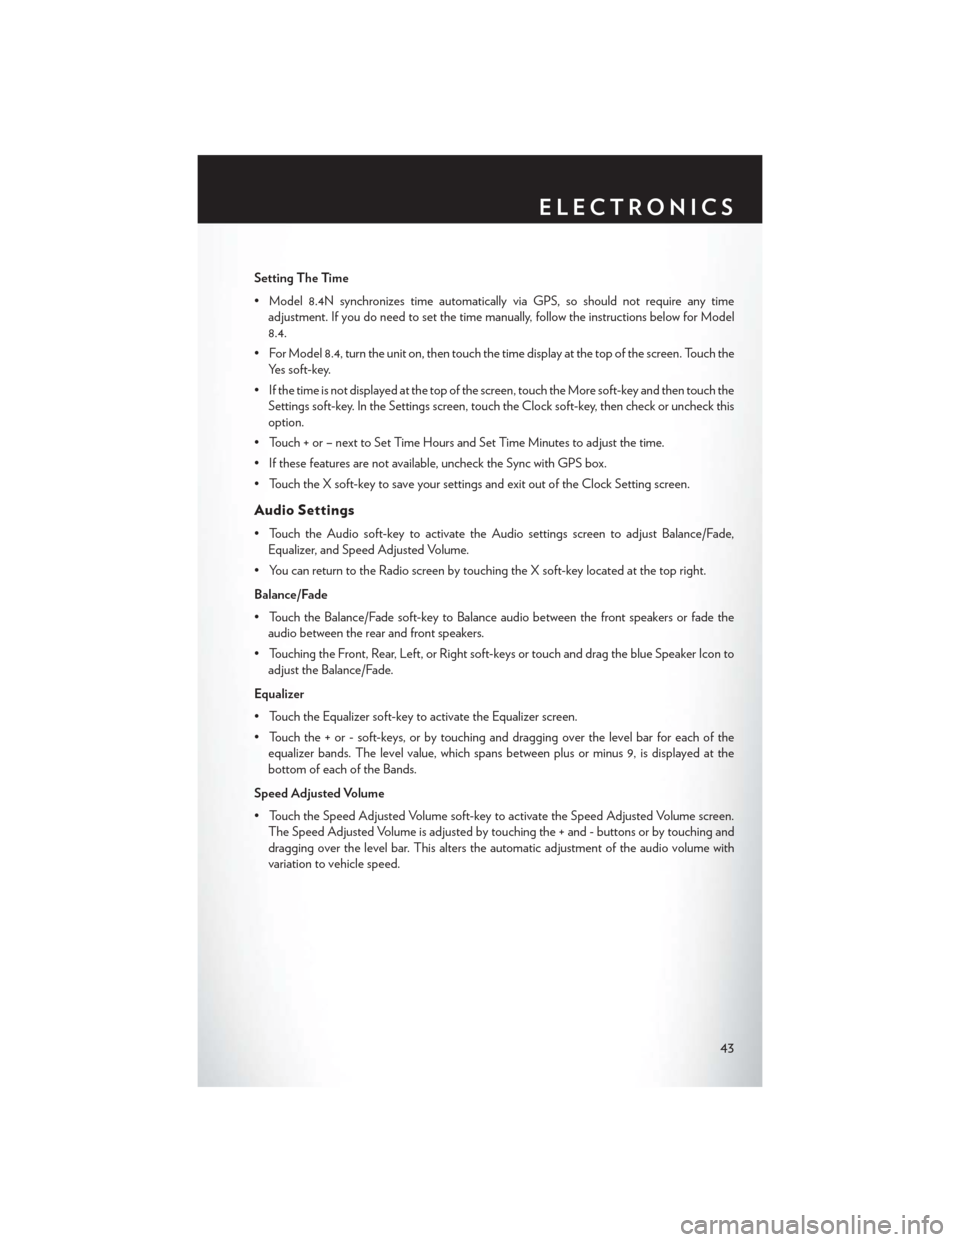
Setting The Time
• Model 8.4N synchronizes time automatically via GPS, so should not require any timeadjustment. If you do need to set the time manually, follow the instructions below for Model
8.4.
• For Model 8.4, turn the unit on, then touch the time display at the top of the screen. Touch the Yes soft-key.
• If the time is not displayed at the top of the screen, touch the More soft-key and then touch the Settings soft-key. In the Settings screen, touch the Clock soft-key, then check or uncheck this
option.
• Touch + or – next to Set Time Hours and Set Time Minutes to adjust the time.
• If these features are not available, uncheck the Sync with GPS box.
• Touch the X soft-key to save your settings and exit out of the Clock Setting screen.
Audio Settings
• Touch the Audio soft-key to activate the Audio settings screen to adjust Balance/Fade, Equalizer, and Speed Adjusted Volume.
• You can return to the Radio screen by touching the X soft-key located at the top right.
Balance/Fade
• Touch the Balance/Fade soft-key to Balance audio between the front speakers or fade the audio between the rear and front speakers.
• Touching the Front, Rear, Left, or Right soft-keys or touch and drag the blue Speaker Icon to adjust the Balance/Fade.
Equalizer
• Touch the Equalizer soft-key to activate the Equalizer screen.
• Touch the + or - soft-keys, or by touching and dragging over the level bar for each of the equalizer bands. The level value, which spans between plus or minus 9, is displayed at the
bottom of each of the Bands.
Speed Adjusted Volume
• Touch the Speed Adjusted Volume soft-key to activate the Speed Adjusted Volume screen. The Speed Adjusted Volume is adjusted by touching the + and - buttons or by touching and
dragging over the level bar. This alters the automatic adjustment of the audio volume with
variation to vehicle speed.
ELECTRONICS
43
Page 49 of 132
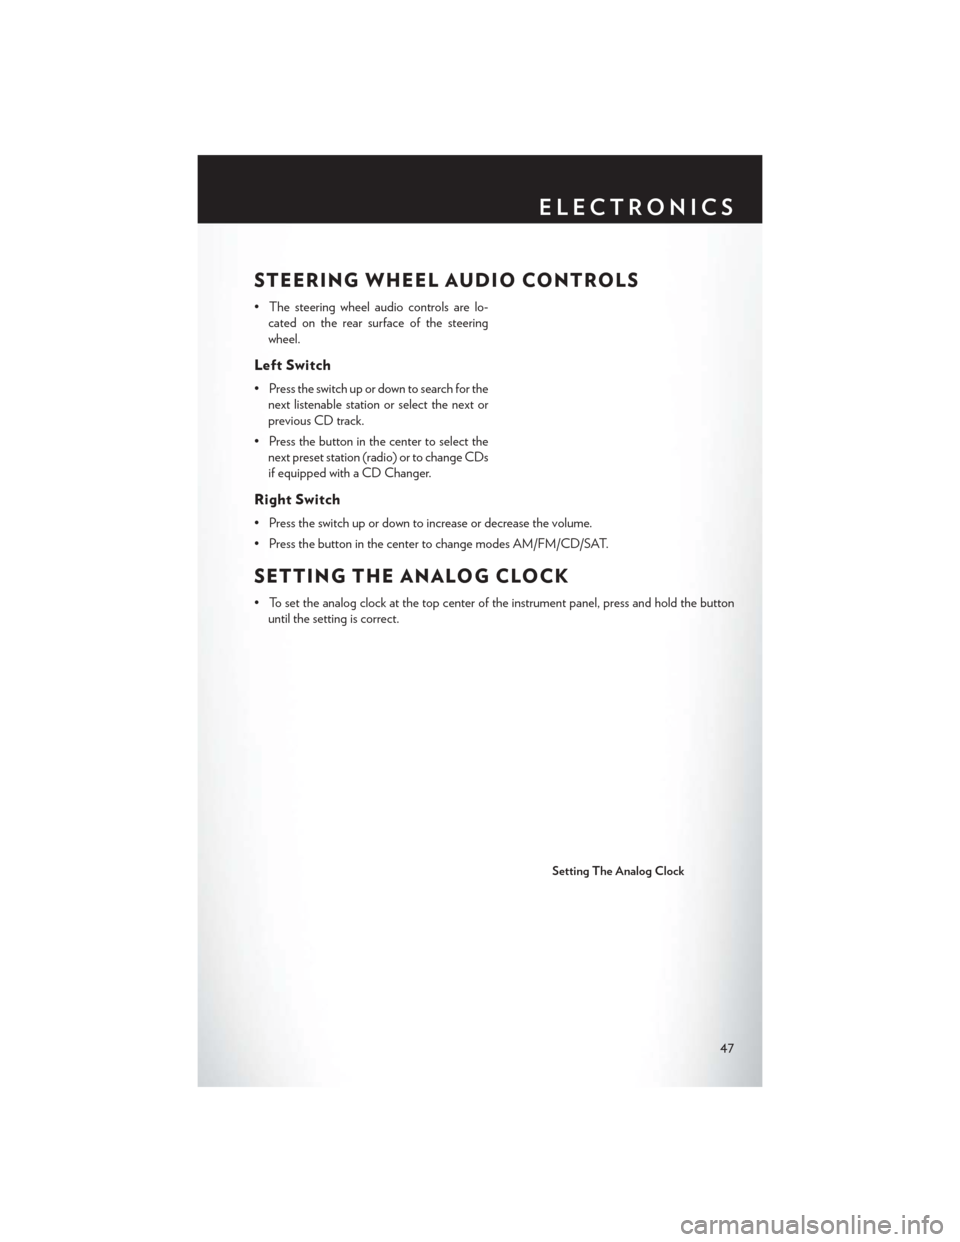
STEERING WHEEL AUDIO CONTROLS
• The steering wheel audio controls are lo-cated on the rear surface of the steering
wheel.
Left Switch
• Press the switch up or down to search for thenext listenable station or select the next or
previous CD track.
• Press the button in the center to select the next preset station (radio) or to change CDs
if equipped with a CD Changer.
Right Switch
• Press the switch up or down to increase or decrease the volume.
• Press the button in the center to change modes AM/FM/CD/SAT.
SETTING THE ANALOG CLOCK
• To set the analog clock at the top center of the instrument panel, press and hold the buttonuntil the setting is correct.
Setting The Analog Clock
ELECTRONICS
47
Page 50 of 132
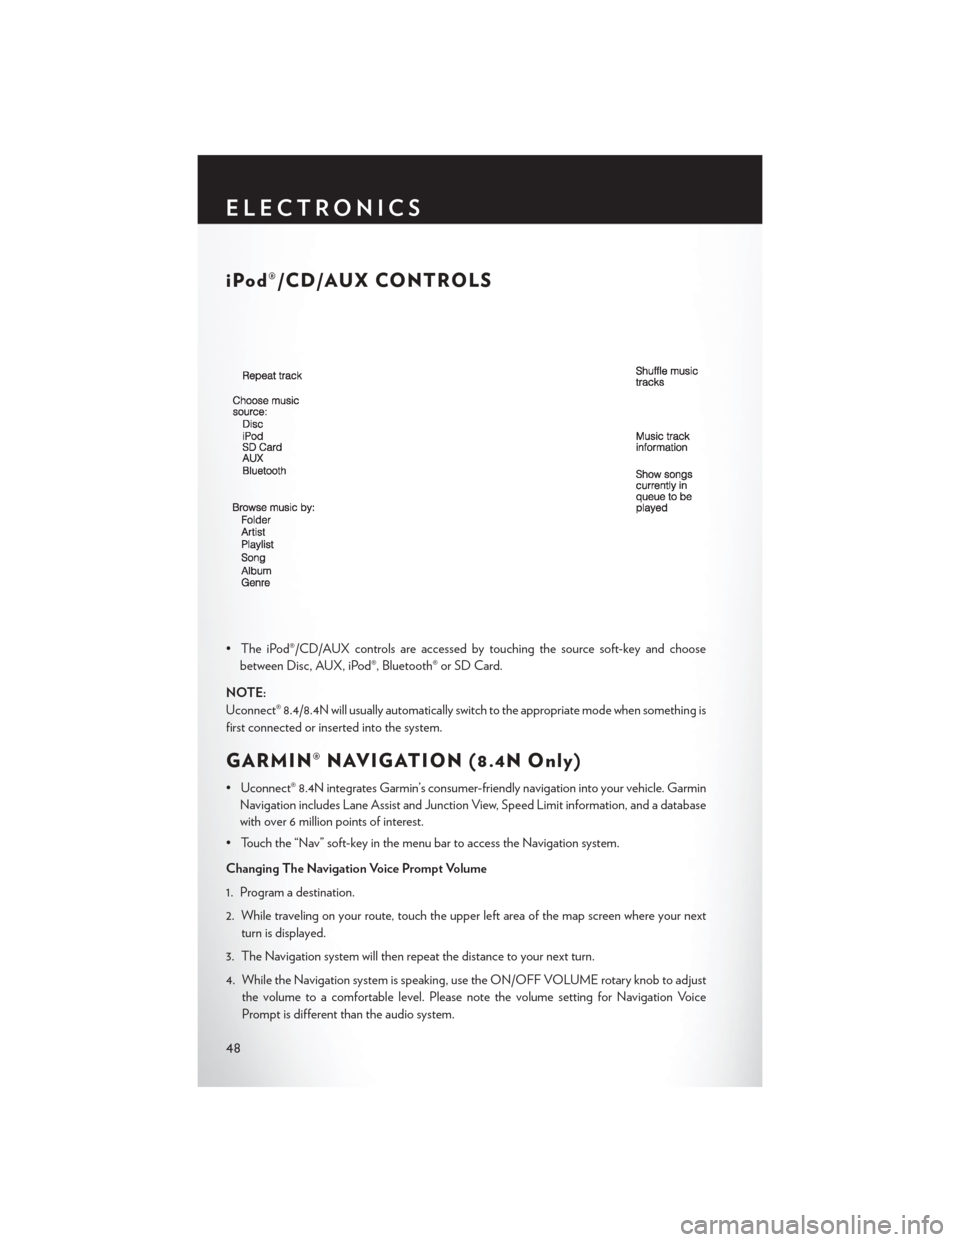
iPod®/CD/AUX CONTROLS
• The iPod®/CD/AUX controls are accessed by touching the source soft-key and choosebetween Disc, AUX, iPod®, Bluetooth® or SD Card.
NOTE:
Uconnect® 8.4/8.4N will usually automatically switch to the appropriate mode when something is
first connected or inserted into the system.
GARMIN® NAVIGATION (8.4N Only)
• Uconnect® 8.4N integrates Garmin’s consumer-friendly navigation into your vehicle. Garmin Navigation includes Lane Assist and Junction View, Speed Limit information, and a database
with over 6 million points of interest.
• Touch the “Nav” soft-key in the menu bar to access the Navigation system.
Changing The Navigation Voice Prompt Volume
1. Program a destination.
2. While traveling on your route, touch the upper left area of the map screen where your next turn is displayed.
3. The Navigation system will then repeat the distance to your next turn.
4. While the Navigation system is speaking, use the ON/OFF VOLUME rotary knob to adjust the volume to a comfortable level. Please note the volume setting for Navigation Voice
Prompt is different than the audio system.
ELECTRONICS
48
Page 54 of 132
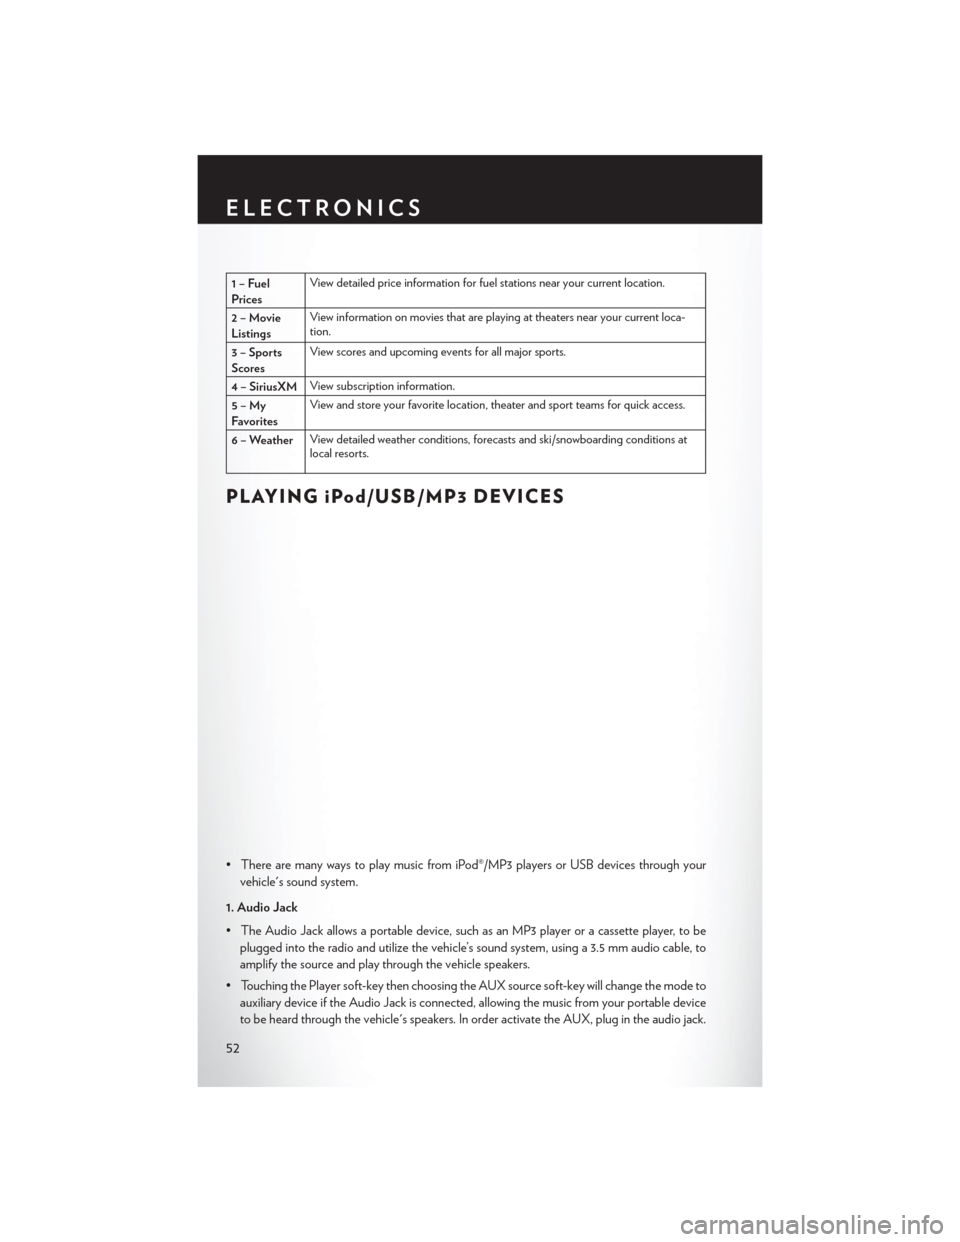
1–Fuel
PricesView detailed price information for fuel stations near your current location.
2–Movie
Listings View information on movies that are playing at theaters near your current loca-
tion.
3 – Sports
Scores View scores and upcoming events for all major sports.
4 – SiriusXM View subscription information.
5–My
Favorites View and store your favorite location, theater and sport teams for quick access.
6 – Weather View detailed weather conditions, forecasts and ski/snowboarding conditions at
local resorts.
PLAYING iPod/USB/MP3 DEVICES
• There are many ways to play music from iPod®/MP3 players or USB devices through your
vehicle's sound system.
1. Audio Jack
• The Audio Jack allows a portable device, such as an MP3 player or a cassette player, to be plugged into the radio and utilize the vehicle’s sound system, using a 3.5 mm audio cable, to
amplify the source and play through the vehicle speakers.
• Touching the Player soft-key then choosing the AUX source soft-key will change the mode to auxiliary device if the Audio Jack is connected, allowing the music from your portable device
to be heard through the vehicle's speakers. In order activate the AUX, plug in the audio jack.
ELECTRONICS
52
Page 55 of 132
• The functions of the portable device are controlled using the device buttons. The volume maybe controlled using the radio or portable device.
• To route the audio cable out of the center console, use the access cut out in the front of the console.
2. USB Port
• Connect your iPod® or compatible device using a USB cable into the USB Port. USB Memory sticks with audio files can also be used. Then, audio from the device can be played on the
vehicles sound system while providing metadata (artist, track title, album, etc.) information on
the radio display.
• When connected, the iPod®/compatible USB device can be controlled using the radio or Steering Wheel Audio Controls to play, skip to the next or previous track, browse, and list the
contents.
• The iPod® battery charges when plugged into the USB port (if supported by the specific device).
• To route the USB/iPod® cable out of the center console, use the access cut out in the front of the console.
NOTE:
When connecting your iPod® device for the first time, the system may take several minutes to
read your music, depending on the number of files. For example, the system will take approxi-
mately five minutes for every 1000 songs loaded on the device. Also during the reading process,
the Shuffle and Browse functions will be disabled. This process is needed to ensure the full use of
your iPod® features and only happens the first time it is connected. After the first time, the
reading process of your iPod® will take considerably less time unless changes are made or new
songs are added to the playlist.
• The USB port supports certain Mini, Classic, Nano, Touch, and iPhone® devices. The USB port also supports playing music from compatible external USB Mass Storage Class memory
devices. Some iPod® software versions may not fully support the USB port features. Please visit
Apple’s website for iPod® software updates.
3. SD Card
• Play songs stored on an SD card inserted into the SD card slot.
• Song playback can be controlled using the radio or Steering Wheel Audio Controls to play, skip to the next or previous track, browse, and list the contents.
4. Bluetooth® Streaming Audio
• If equipped with Uconnect® Voice Command, your Bluetooth-equipped iPod® devices, cell phones or other media players, may also be able to stream music to your vehicle's sound
system. Your connected device must be Bluetooth-compatible, and paired with your
Uconnect® system (see Uconnect® Phone for pairing instructions). You can access the music
from your connected Bluetooth® device by touching the Source soft-key while in Player mode.
ELECTRONICS
53
Page 58 of 132
Transfer Ongoing Call Between Handset And Vehicle
• During an on-going call, touch the “Transfer” soft-key on the Phone main screen to transfer anon-going call between handset and vehicle.
Common Phone Commands (Examples)
• “Call John Smith”
• “Call John Smith mobile”
• “Dial 1 248 555 1212”
• “Call Emergency”
• “Call Towing Assistance”
• “Redial”
Phonebook
• Uconnect® radios will automatically download your phonebook from your paired phone, if thisfeature is supported by your phone. Entries are updated each time that the phone is
connected. If your phone book entries do not appear, check the settings on your phone. Some
phones require you to enable this feature manually.
• Your phonebook can be browsed on your radio screen, but editing can only be done on your phone. To browse, touch the “Phone” soft-key, then the “Phonebook” soft-key.
• Favorite phonebook entries can be saved as Favorites for quicker access. Favorites are shown at the top of your main phone screen.
Voice Command Tips (8.4A And 8.4AN Only)
• Using complete names (i.e; Call John Doe vs. Call John) will result in greater system accuracy.
•
You can “chain” commands together for faster results. Say “Call John Doe, mobile”, for example.
• If you are listening to available voice command options, you do not have to listen to the entirelist. When you hear the command that you need, press the
button on the steering
wheel, wait for the beep and say your command.
Changing The Volume
• Start a dialogue by pressing the Phone button, then say a command for example -
"Help."
• Use the radio ON/OFF VOLUME rotary knob to adjust the volume to a comfortable level while the Uconnect® system is speaking. Please note the volume setting for Uconnect® is
different than the audio system.
NOTE:
To access help, press the Uconnect® Phone
button on the steering wheel and say "help."
Touch the display or push either
orbutton and say "cancel" to cancel the help
session.
ELECTRONICS
56