manual radio set CHRYSLER CARAVAN 2002 User Guide
[x] Cancel search | Manufacturer: CHRYSLER, Model Year: 2002, Model line: CARAVAN, Model: CHRYSLER CARAVAN 2002Pages: 2399, PDF Size: 57.96 MB
Page 388 of 2399

CONVENTIONAL BATTERY CHARGING TIME TABLE
Charging
Amperage5 Amps10
Amps20 Amps
Open Circuit
VoltageHours Charging @ 21É C (70É
F)
12.25 to 12.49 6 hours 3 hours 1.5
hours
12.00 to 12.24 10 hours 5 hours 2.5
hours
10.00 to 11.99 14 hours 7 hours 3.5
hours
Below 10.00 18 hours 9 hours 4.5
hours
STANDARD PROCEDURE - OPEN-CIRCUIT
VOLTAGE TEST
A battery open-circuit voltage (no load) test will
show the approximate state-of-charge of a battery.
This test can be used if no other battery tester is
available.
Before proceeding with this test, completely charge
the battery. Refer to Standard Procedures for the
proper battery charging procedures.
(1) Before measuring the open-circuit voltage, the
surface charge must be removed from the battery.
Turn on the headlamps for fifteen seconds, then
allow up to five minutes for the battery voltage to
stabilize.
(2) Disconnect and isolate both battery cables, neg-
ative cable first.
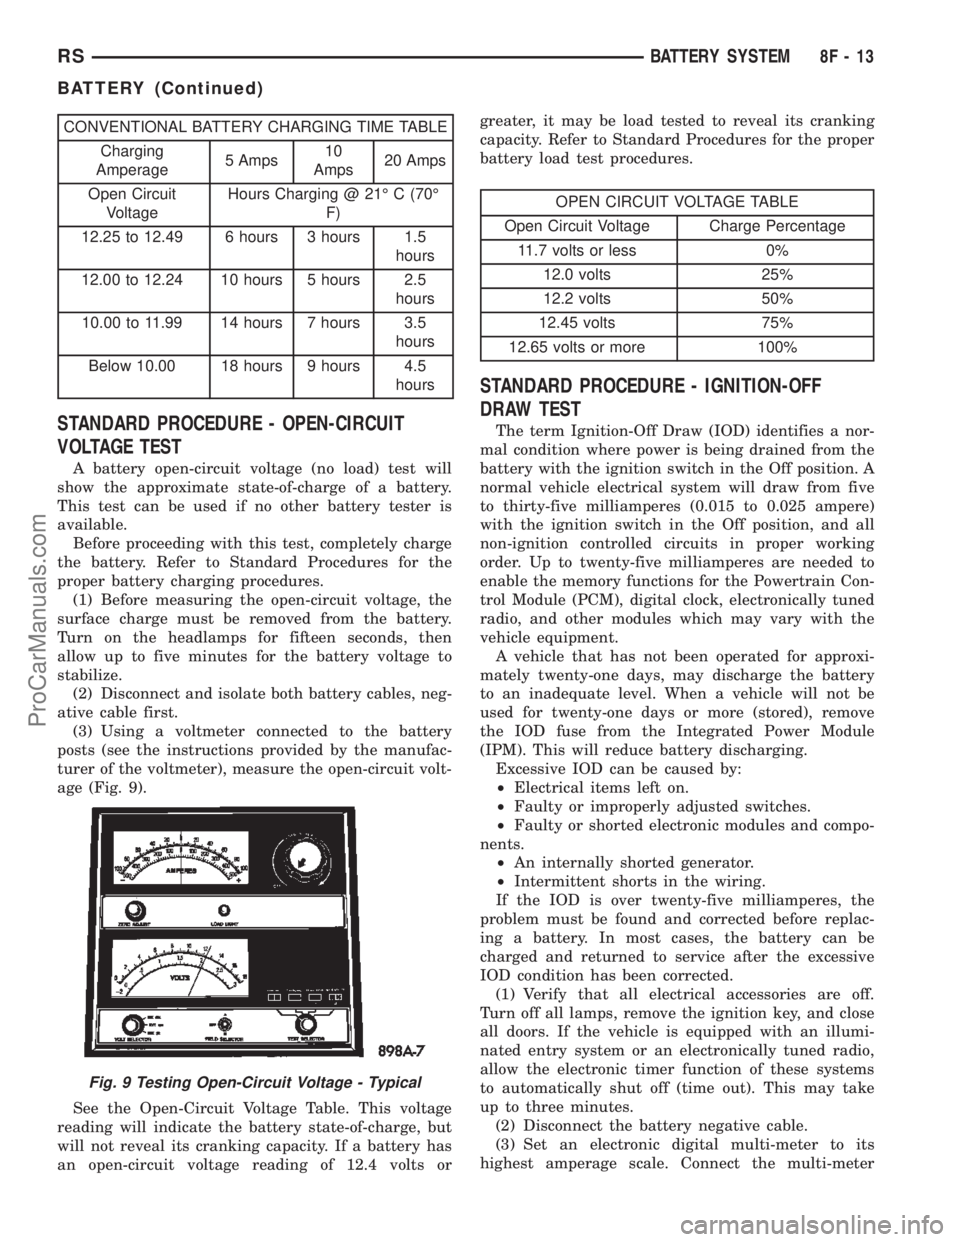
(3) Using a voltmeter connected to the battery
posts (see the instructions provided by the manufac-
turer of the voltmeter), measure the open-circuit volt-
age (Fig. 9).
See the Open-Circuit Voltage Table. This voltage
reading will indicate the battery state-of-charge, but
will not reveal its cranking capacity. If a battery has
an open-circuit voltage reading of 12.4 volts orgreater, it may be load tested to reveal its cranking
capacity. Refer to Standard Procedures for the proper
battery load test procedures.
OPEN CIRCUIT VOLTAGE TABLE
Open Circuit Voltage Charge Percentage
11.7 volts or less 0%
12.0 volts 25%
12.2 volts 50%
12.45 volts 75%
12.65 volts or more 100%
STANDARD PROCEDURE - IGNITION-OFF
DRAW TEST
The term Ignition-Off Draw (IOD) identifies a nor-
mal condition where power is being drained from the
battery with the ignition switch in the Off position. A
normal vehicle electrical system will draw from five
to thirty-five milliamperes (0.015 to 0.025 ampere)
with the ignition switch in the Off position, and all
non-ignition controlled circuits in proper working
order. Up to twenty-five milliamperes are needed to
enable the memory functions for the Powertrain Con-
trol Module (PCM), digital clock, electronically tuned
radio, and other modules which may vary with the
vehicle equipment.
A vehicle that has not been operated for approxi-
mately twenty-one days, may discharge the battery
to an inadequate level. When a vehicle will not be
used for twenty-one days or more (stored), remove
the IOD fuse from the Integrated Power Module
(IPM). This will reduce battery discharging.
Excessive IOD can be caused by:
²Electrical items left on.
²Faulty or improperly adjusted switches.
²Faulty or shorted electronic modules and compo-
nents.
²An internally shorted generator.
²Intermittent shorts in the wiring.
If the IOD is over twenty-five milliamperes, the
problem must be found and corrected before replac-
ing a battery. In most cases, the battery can be
charged and returned to service after the excessive
IOD condition has been corrected.
(1) Verify that all electrical accessories are off.
Turn off all lamps, remove the ignition key, and close
all doors. If the vehicle is equipped with an illumi-
nated entry system or an electronically tuned radio,
allow the electronic timer function of these systems
to automatically shut off (time out). This may take
up to three minutes.
(2) Disconnect the battery negative cable.
(3) Set an electronic digital multi-meter to its
highest amperage scale. Connect the multi-meter
Fig. 9 Testing Open-Circuit Voltage - Typical
RSBATTERY SYSTEM8F-13
BATTERY (Continued)
ProCarManuals.com
Page 425 of 2399

²Intermittent shorts in the wiring.
If the IOD is over twenty-five milliamperes, the
problem must be found and corrected before replac-
ing a battery. In most cases, the battery can be
charged and returned to service after the excessive
IOD condition has been corrected.
(1) Verify that all electrical accessories are off.
Turn off all lamps, remove the ignition key, and close
all doors. If the vehicle is equipped with an illumi-
nated entry system or an electronically tuned radio,
allow the electronic timer function of these systems
to automatically shut off (time out). This may take
up to three minutes.
(2) Disconnect the battery negative cable.
(3) Set an electronic digital multi-meter to its
highest amperage scale. Connect the multi-meter
between the disconnected battery negative cable ter-
minal clamp and the battery negative terminal post.
Make sure that the doors remain closed so that the
illuminated entry system is not activated. The multi-
meter amperage reading may remain high for up to
three minutes, or may not give any reading at all
while set in the highest amperage scale, depending
upon the electrical equipment in the vehicle. The
multi-meter leads must be securely clamped to the
battery negative cable terminal clamp and the bat-
tery negative terminal post. If continuity between the
battery negative terminal post and the negative cable
terminal clamp is lost during any part of the IOD
test, the electronic timer function will be activated
and all of the tests will have to be repeated.
(4) After about three minutes, the high-amperage
IOD reading on the multi-meter should become very
low or nonexistent, depending upon the electrical
equipment in the vehicle. If the amperage reading
remains high, remove and replace each fuse or circuit
breaker in the Integrated Power Module (IPM), one
at a time until the amperage reading becomes very
low, or nonexistent. Refer to the appropriate wiring
information in this service manual for complete Inte-
grated Power Module fuse, circuit breaker, and cir-
cuit identification. This will isolate each circuit and
identify the circuit that is the source of the high-am-
perage IOD. If the amperage reading remains high
after removing and replacing each fuse and circuit
breaker, disconnect the wire harness from the gener-
ator. If the amperage reading now becomes very low
or nonexistent, refer to Charging System for the
proper charging system diagnosis and testing proce-
dures. After the high-amperage IOD has been cor-
rected, switch the multi-meter to progressively lower
amperage scales and, if necessary, repeat the fuse
and circuit breaker remove-and-replace process to
identify and correct all sources of excessive IOD. It is
now safe to select the lowest milliampere scale of the
multi-meter to check the low-amperage IOD.CAUTION: Do not open any doors, or turn on any
electrical accessories with the lowest milliampere
scale selected, or the multi-meter may be damaged.
(5) Allow twenty minutes for the IOD to stabilize
and observe the multi-meter reading. The low-amper-
age IOD should not exceed twenty-five milliamperes
(0.025 ampere). If the current draw exceeds twenty-
five milliamperes, isolate each circuit using the fuse
and circuit breaker remove-and-replace process in
Step 4. The multi-meter reading will drop to within
the acceptable limit when the source of the excessive
current draw is disconnected. Repair this circuit as
required; whether a wiring short, incorrect switch
adjustment, or a component failure is at fault.
STANDARD PROCEDURE - CHECKING BATTERY
ELECTROLYTE LEVEL
The following procedure can be used to check the
electrolyte level in a low-maintenance lead-acid bat-
tery.
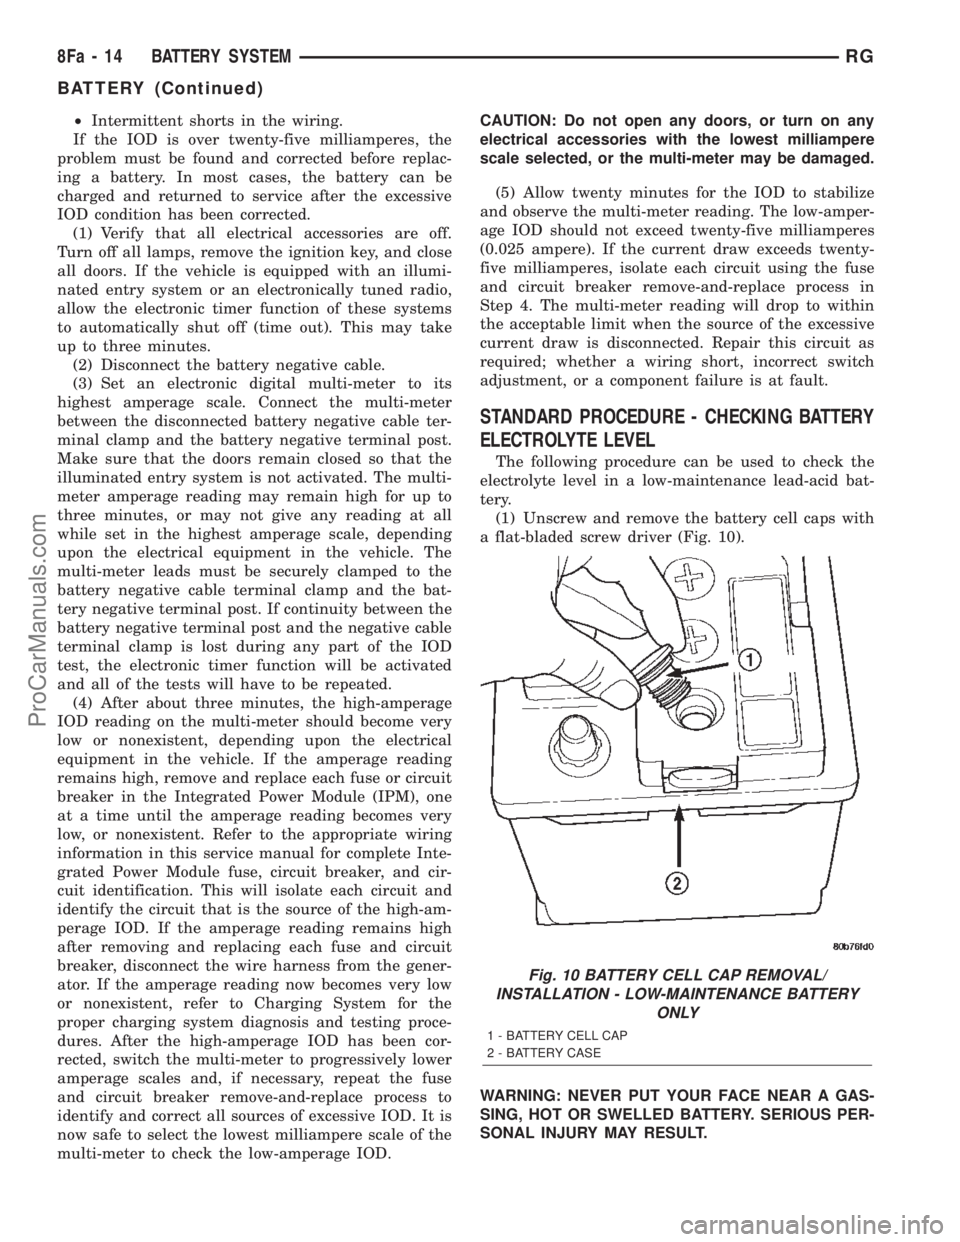
(1) Unscrew and remove the battery cell caps with
a flat-bladed screw driver (Fig. 10).
WARNING: NEVER PUT YOUR FACE NEAR A GAS-
SING, HOT OR SWELLED BATTERY. SERIOUS PER-
SONAL INJURY MAY RESULT.
Fig. 10 BATTERY CELL CAP REMOVAL/
INSTALLATION - LOW-MAINTENANCE BATTERY
ONLY
1 - BATTERY CELL CAP
2 - BATTERY CASE
8Fa - 14 BATTERY SYSTEMRG
BATTERY (Continued)
ProCarManuals.com
Page 485 of 2399

INSTALLATION
When replacing the spark plugs and spark plug
cables, route the cables correctly and secure them in
the appropriate retainers. Failure to route the cables
properly can cause the radio to reproduce ignition
noise, cross ignition of the spark plugs orshort cir-
cuit the cables to ground.
(1) To avoid cross threading, start the spark plug
into the cylinder head by hand.
(2) Tighten spark plugs to 17.5 N´m (13 ft. lbs.)
torque.
(3) Install spark plug cables over spark plugs. A
click will be heard and felt when the cable properly
attaches to the spark plug.
SPARK PLUG CABLE
DESCRIPTION
Spark Plug cables are sometimes referred to as
secondary ignition wires. The wires transfer electri-
cal current from the ignition coil pack to individual
spark plugs at each cylinder. The resistive spark plug
cables are of nonmetallic construction. The cables
provide suppression of radio frequency emissions
from the ignition system.
Check the spark plug cable connections for good
contact at the coil, and spark plugs. Terminals should
be fully seated. The insulators should be in good con-
dition and should fit tightly on the coil, and spark
plugs. Spark plug cables with insulators that are
cracked or torn must be replaced.
Clean Spark Plug cables with a cloth moistened
with a non-flammable solvent. Wipe the cables dry.
Check for brittle or cracked insulation. The spark
plug cables and spark plug boots are made from high
temperature silicone materials. All spark plug cable
leads are properly identified with cylinder numbers.
The inside of most the spark plug boot is coated with
a special high temperature silicone grease for greater
sealing and to minimize boot bonding to the spark
plug insulator.
REMOVAL
Failure to route the cables properly could cause the
radio to reproduce ignition noise, cross ignition of the
spark plugs or short circuit the cables to ground.
Remove spark plug cable from coil first.
Always remove the spark plug cable by grasping
the top of the spark plug insulator, turning the boot
1/2 turn and pulling straight up in a steady motion.
INSTALLATION
Failure to route the cables properly could cause the
radio to reproduce ignition noise, cross ignition of the
spark plugs or short circuit the cables to ground.
Install spark plug insulators over spark plugs.
Ensure the top of the spark plug insulator covers the
upper end of the spark plug tube, then connect the
other end to coil pack.
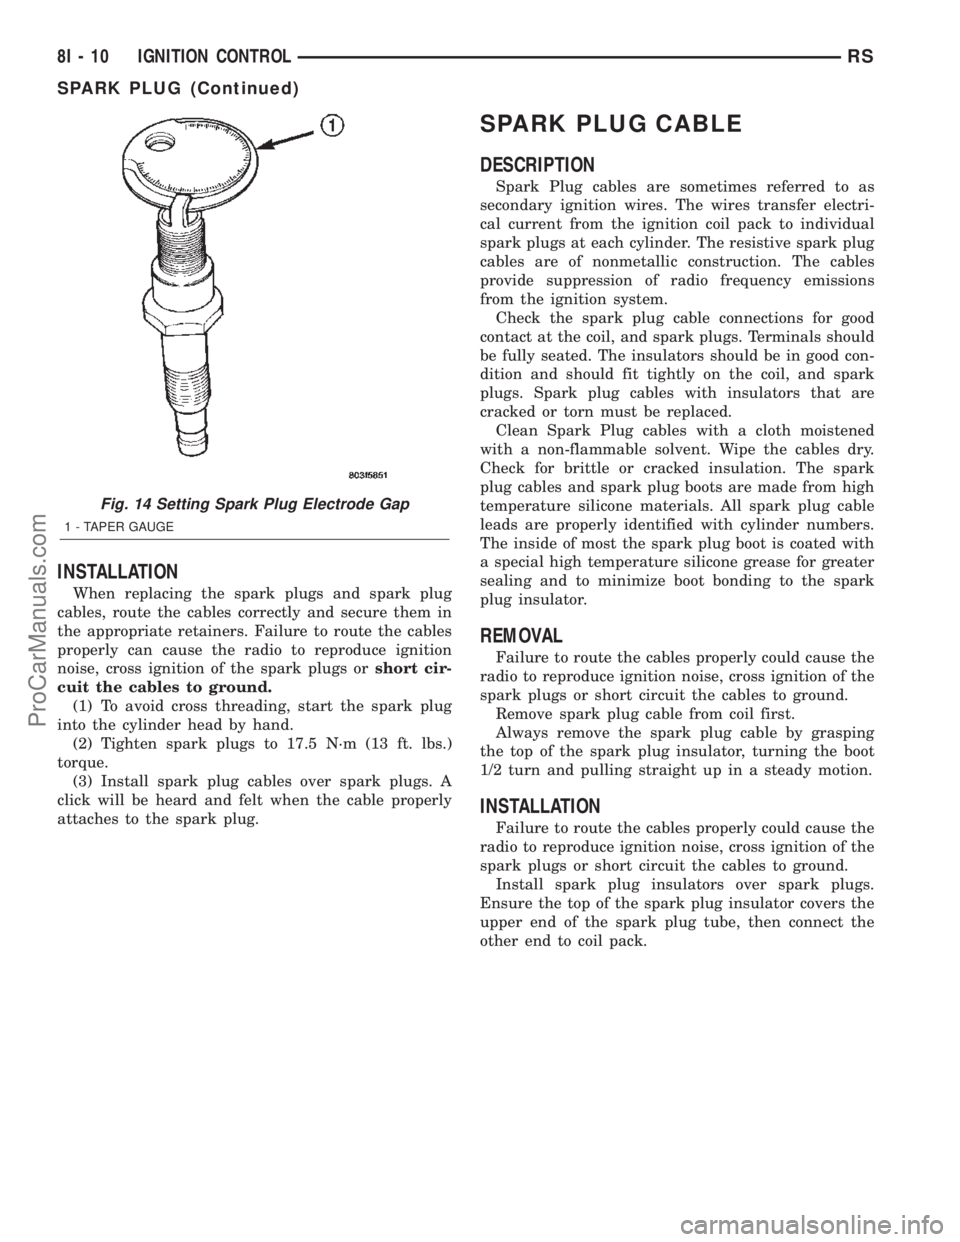
Fig. 14 Setting Spark Plug Electrode Gap
1 - TAPER GAUGE
8I - 10 IGNITION CONTROLRS
SPARK PLUG (Continued)
ProCarManuals.com
Page 593 of 2399

The eight-way power seat is also available with the
heated seat and memory seat system that automati-
cally positions the power seat for two different driv-
ers. Refer toHeated Seatsfor more information on
the heated seat option. Refer toDescription Mem-
ory Seat Systemin this section for more informa-
tion on the memory seat system.
The power seat system includes the following com-
ponents:
²Power seat recliners
²Power seat switches
²Power seat tracks
²Circuit breaker
The power seat system with memory and heated
seat options includes the following components:
²Power seat recliner
²Power seat switch
²Power seat track.
²Memory Seat Mirror Module (MSMM)
²Memory set switch
²Heated Seat Module (HSM)
²Heated seat switch
²Electronic Vehicle Information Center (EVIC)
²Programmable Communications Interface (PCI)
data bus network
Refer to Wiring Diagrams for complete circuit dia-
grams. Following are general descriptions and opera-
tions for the major components in the power seat
system and memory seat system.
DESCRIPTION - MEMORY SYSTEM
An electronic memory system is available on some
models. The memory system is able to store and
recall the driver side power seat positions (including
the power recliner position) and both outside side
view mirrors positions for two drivers. On vehicles
equipped with a factory radio, the memory system is
also able to store and recall radio station presets for
two drivers. The memory system also will store and
recall the last station listened to for each driver, even
if it is not one of the preset stations.
The memory system will automatically return to
its preset settings when the corresponding numbered
button of the memory switch is depressed, or when
the doors are unlocked using the corresponding
Remote Keyless Entry (RKE) transmitter. A customer
programmable feature of the memory system allows
the RKE recall of memory features to be disabled, if
desired. This programmable feature is internal in the
EVIC module, which is located in the overhead con-
sole.
A Memory Seat Mirror Module (MSMM) is used on
some models to control and integrate the many elec-
tronic functions and features included in the memory
seat and mirror systems.
The memory system includes the following compo-
nents:
²Memory Seat Mirror Module (MSMM)
²Memory set switch
²Position potentiometers on both outside side
view mirrors
²Position potentiometers on the driver side power
seat track and power seat recliner motors.
²Electronic Vehicle Information Center (EVIC)
²Radio receiver (if PCI data bus capable).
Certain functions of the memory system rely upon
resources shared with other electronic modules in the
vehicle over the Programmable Communications
Interface (PCI) J1850 data bus network. The PCI
data bus network allows the sharing of sensor infor-
mation. This helps to reduce wire harness complexity,
internal controller hardware, and component sensor
current loads. At the same time, this system provides
increased reliability, enhanced diagnostics, and
allows the addition of many new feature capabilities.
Initial diagnosis of these electronic modules or the
PCI data bus network requires the use of a DRB IIIt
scan tool and the proper Diagnostic Procedures man-
ual. If this method does not prove conclusive, the use
of a automotive meter such as the Fluket, the proper
wiring schematics and the service manual diagnostic
routines are required.
The other electronic modules that may affect mem-
ory system operation are as follows:
Fig. 1 Identifying a Side Airbag Equipped Seat
1 - Airbag Label
8N - 52 POWER SEAT SYSTEMRS
POWER SEAT SYSTEM (Continued)
ProCarManuals.com
Page 902 of 2399

8W-45 BODY CONTROL MODULE
Component Page
A/C- Heater Control.............. 8W-45-16, 19
Auto Temp Control............... 8W-45-16, 19
Automatic Day/Night Mirror........... 8W-45-11
Body Control Module . . . 8W-45-2, 3, 4, 5, 6, 7, 8, 9,
10, 11, 12, 13, 15, 16, 17, 18, 19, 20
Center Dome Lamp................ 8W-45-9, 13
Clockspring........................ 8W-45-17
Controller Antilock Brake............. 8W-45-13
Diagnostic Junction Port.............. 8W-45-12
Driver Door Courtesy Lamp........... 8W-45-15
Driver Door Lock Switch........... 8W-45-12, 15
Driver Heated Seat Module............ 8W-45-11
Floor Console Lamp................. 8W-45-13
Front Cigar Lighter................. 8W-45-17
Front Control Module................. 8W-45-3
Front Reading Lamps/Switch........ 8W-45-8, 13
Fuel Pump Module.................. 8W-45-15
Fuse 14............................ 8W-45-3
Fuse 19............................ 8W-45-2
Fuse 20............................ 8W-45-2
Fuse 24............................ 8W-45-2
G301.......................... 8W-45-5, 6, 8
Glove Box Lamp.................... 8W-45-19
Halo Lamp........................ 8W-45-19
Headlamp Switch.............. 8W-45-11, 16, 20
Hood Ajar Switch................... 8W-45-12
Ignition Switch...................... 8W-45-3
Instrument Cluster............ 8W-45-16, 18, 19
Instrument Panel Switch
Bank.................. 8W-45-10, 11, 17, 19
Integrated Power Module..... 8W-45-2, 3, 5, 6, 13
Left B-Pillar Switch.................. 8W-45-9
Left Cylinder Lock Switch............. 8W-45-10
Left Front Door Lock Motor/Ajar
Switch......................... 8W-45-4, 7
Left Liftgate Flood Lamp............. 8W-45-12
Left Mid Reading Lamp............ 8W-45-9, 14
Left Power Mirror................... 8W-45-20
Left Rear Lamp Assembly............ 8W-45-5, 6
Left Rear Reading Lamp............ 8W-45-9, 14
Left Remote Radio Switch............. 8W-45-17
Left Repeater Lamp................. 8W-45-20
Left Sliding Door Control Module..... 8W-45-8, 10
Left Sliding Door Lock Motor........... 8W-45-7
Left Sliding Door Lock Motor/Ajar
Switch......................... 8W-45-7, 8Component Page
Left Stop/Turn Signal Relay............ 8W-45-5
Left Visor/Vanity Lamp............... 8W-45-13
License Lamp....................... 8W-45-8
Liftgate Ajar Switch................. 8W-45-12
Liftgate Cinch/Release Motor.......... 8W-45-12
Liftgate Cylinder Lock Switch.......... 8W-45-9
Memory Set Switch................... 8W-45-4
Message Center..................... 8W-45-18
Multi- Function Switch............... 8W-45-16
Name Brand Speaker Relay............ 8W-45-3
Overhead Console................. 8W-45-4, 11
Passenger Door Courtesy Lamp........ 8W-45-15
Passenger Door Lock Switch........ 8W-45-12, 15
Passenger Folding Mirror Relay........ 8W-45-20
Passenger Heated Seat Module......... 8W-45-11
Power Folding Mirror Switch.......... 8W-45-20
Power Liftgate Module................ 8W-45-8
Power Mirror Switch................. 8W-45-16
Radio............................. 8W-45-17
Rear Auto Temp Control Switch..... 8W-45-10, 19
Rear Blower Rear Control Switch....... 8W-45-10
Rear Dome Lamp.................... 8W-45-9
Rear Wiper Motor.................... 8W-45-8
Remote Keyless Entry Module....... 8W-45-4, 16
Right B-Pillar Switch................. 8W-45-9
Right Combination Relay.............. 8W-45-5
Right Cylinder Lock Switch........... 8W-45-10
Right Front Door Lock Motor/Ajar
Switch......................... 8W-45-7, 9
Right Liftgate Flood Lamp............ 8W-45-12
Right Mid Reading Lamp........... 8W-45-9, 14
Right Power Mirror.................. 8W-45-20
Right Rear Lamp Assembly........... 8W-45-5, 6
Right Rear Reading Lamp........... 8W-45-9, 14
Right Remote Radio Switch........... 8W-45-17
Right Repeater Lamp................ 8W-45-20
Right Sliding Door Control Module.... 8W-45-8, 10
Right Sliding Door Lock Motor.......... 8W-45-7
Right Sliding Door Lock Motor/Ajar
Switch......................... 8W-45-7, 8
Right Visor/Vanity Lamp.............. 8W-45-13
Thatcham Alarm Module............. 8W-45-10
Traction Control Switch.............. 8W-45-17
RS8W-45 BODY CONTROL MODULE8W-45-1
ProCarManuals.com
Page 1035 of 2399

Component Page
Memory Set Switch.................. 8W-80-84
Message Center (High Line)........... 8W-80-85
Mode Door Actuator (ATC)............ 8W-80-85
Mode Door Actuator (MTC)............ 8W-80-85
Multi-Function Switch............... 8W-80-85
Output Speed Sensor (EATX).......... 8W-80-86
Overhead Console (Except Base)........ 8W-80-86
Oxygen Sensor 1/1 Upstream (Gas)...... 8W-80-86
Oxygen Sensor 1/2 Downstream (Gas) . . . 8W-80-87
Park/Neutral Position Switch (ATX)..... 8W-80-87
Passenger Airbag................... 8W-80-87
Passenger Blend Door Actuator (ATC) . . . 8W-80-87
Passenger Blend Door Actuator (MTC) . . . 8W-80-87
Passenger Door Courtesy Lamp........ 8W-80-88
Passenger Door Lock Switch........... 8W-80-88
Passenger Folding Mirror Relay
(Built-Up-Export)................. 8W-80-88
Passenger Heated Seat Back........... 8W-80-88
Passenger Heated Seat Cushion........ 8W-80-88
Passenger Heated Seat Module C1...... 8W-80-89
Passenger Heated Seat Module C2...... 8W-80-89
Passenger Heated Seat Module C3...... 8W-80-89
Passenger Power Seat Front Riser Motor . 8W-80-89
Passenger Power Seat Horizontal Motor . . 8W-80-90
Passenger Power Seat Rear Riser Motor . . 8W-80-90
Passenger Power Seat Recliner Motor.... 8W-80-90
Passenger Power Seat Switch.......... 8W-80-90
Passenger Power Window Motor........ 8W-80-90
Passenger Power Window Switch....... 8W-80-91
Passenger Seat Belt Switch........... 8W-80-91
Passenger Seat Belt Tensioner......... 8W-80-91
Power Folding Mirror Switch
(Built-Up-Export)................. 8W-80-91
Power Liftgate Module C1............ 8W-80-92
Power Liftgate Module C2............ 8W-80-92
Power Liftgate Motor................ 8W-80-92
Power Mirror Switch................. 8W-80-93
Power Outlet....................... 8W-80-93
Power Seat Circuit Breaker (30A)....... 8W-80-93
Power Window Circuit Breaker (25A).... 8W-80-93
Power Window Switch (Lowline)........ 8W-80-94
Powertrain Control Module C1 (Gas).... 8W-80-94
Powertrain Control Module C2 (Gas).... 8W-80-95
Radiator Fan No. 1 (Diesel)........... 8W-80-96
Radiator Fan No. 1 (Gas)............. 8W-80-96
Radiator Fan No. 2 (Diesel)........... 8W-80-96
Radiator Fan No. 2 (Gas)............. 8W-80-96
Radiator Fan Relay (Gas)............. 8W-80-96
Radiator Fan Relay No. 1 (Diesel)....... 8W-80-97
Radiator Fan Relay No. 2 (Diesel)....... 8W-80-97
Radiator Fan Relay No. 3 (Diesel)....... 8W-80-97
Radio C1.......................... 8W-80-98
Radio C2.......................... 8W-80-98
Radio Choke....................... 8W-80-99Component Page
Rear A/C-Heater Unit (3 Zone HVAC).... 8W-80-99
Rear Auto Temp Control Switch (ATC) . . . 8W-80-99
Rear Blower Front Control Switch
(3 Zone HVAC)................... 8W-80-99
Rear Blower Motor Power Module
C1(ATC) ....................... 8W-80-100
Rear Blower Motor Power Module C2
(ATC).......................... 8W-80-100
Rear Blower Rear Control Switch C1
(3 Zone HVAC).................. 8W-80-100
Rear Blower Rear Control Switch C2
(3 Zone HVAC).................. 8W-80-100
Rear Dome Lamp (Except Luxury)..... 8W-80-100
Rear Mode Motor (ATC)............. 8W-80-101
Rear Power Outlet................. 8W-80-101
Rear Temperature Motor (ATC)........ 8W-80-101
Rear Washer Pump Motor............ 8W-80-101
Rear Wiper Motor.................. 8W-80-101
Recirculation Door Actuator (ATC)..... 8W-80-102
Recirculation Door Actuator (MTC)..... 8W-80-102
Remote Keyless Entry Antenna
(Japan)........................ 8W-80-102
Remote Keyless Entry Module........ 8W-80-102
Right B-Pillar Switch
(Power Sliding Door).............. 8W-80-102
Right Cinch/Release Motor
(Power Sliding Door).............. 8W-80-103
Right Combination Relay (Trailer Tow) . . 8W-80-103
Right Cylinder Lock Switch.......... 8W-80-103
Right Door Speaker................. 8W-80-103
Right Fog Lamp (Built-Up-Export)..... 8W-80-103
Right Fog Lamp (Except
Built-Up-Export)................. 8W-80-104
Right Front Door Ajar Switch (Base).... 8W-80-104
Right Front Door Lock Motor/Ajar
Switch (Except Base).............. 8W-80-104
Right Front Park/Turn Signal Lamp
(Except Built-Up-Export).......... 8W-80-104
Right Front Wheel Speed Sensor...... 8W-80-104
Right Full Open Switch
(Power Sliding Door).............. 8W-80-105
Right Headlamp (Except
Built-Up-Export)................. 8W-80-105
Right Headlamp Leveling Motor
(Built-Up-Export)................ 8W-80-105
Right High Beam Lamp
(Built-Up-Export)................ 8W-80-105
Right Instrument Panel Speaker...... 8W-80-105
Right Liftgate Flood Lamp........... 8W-80-106
Right Low Beam Lamp
(Built-Up-Export)................ 8W-80-106
Right Mid Reading Lamp
(Premium/Luxury)................ 8W-80-106
Right Park Lamp (Built-Up-Export).... 8W-80-106
Right Power Mirror................. 8W-80-106
8W - 80 - 4 8W-80 CONNECTOR PIN-OUTSRS
ProCarManuals.com
Page 1970 of 2399

(a) Align the valve notch in the wheel cover with
the valve stem on the wheel.
(b) At the same time, align the two holes in the
wheel cover having the retaining tabs with the two
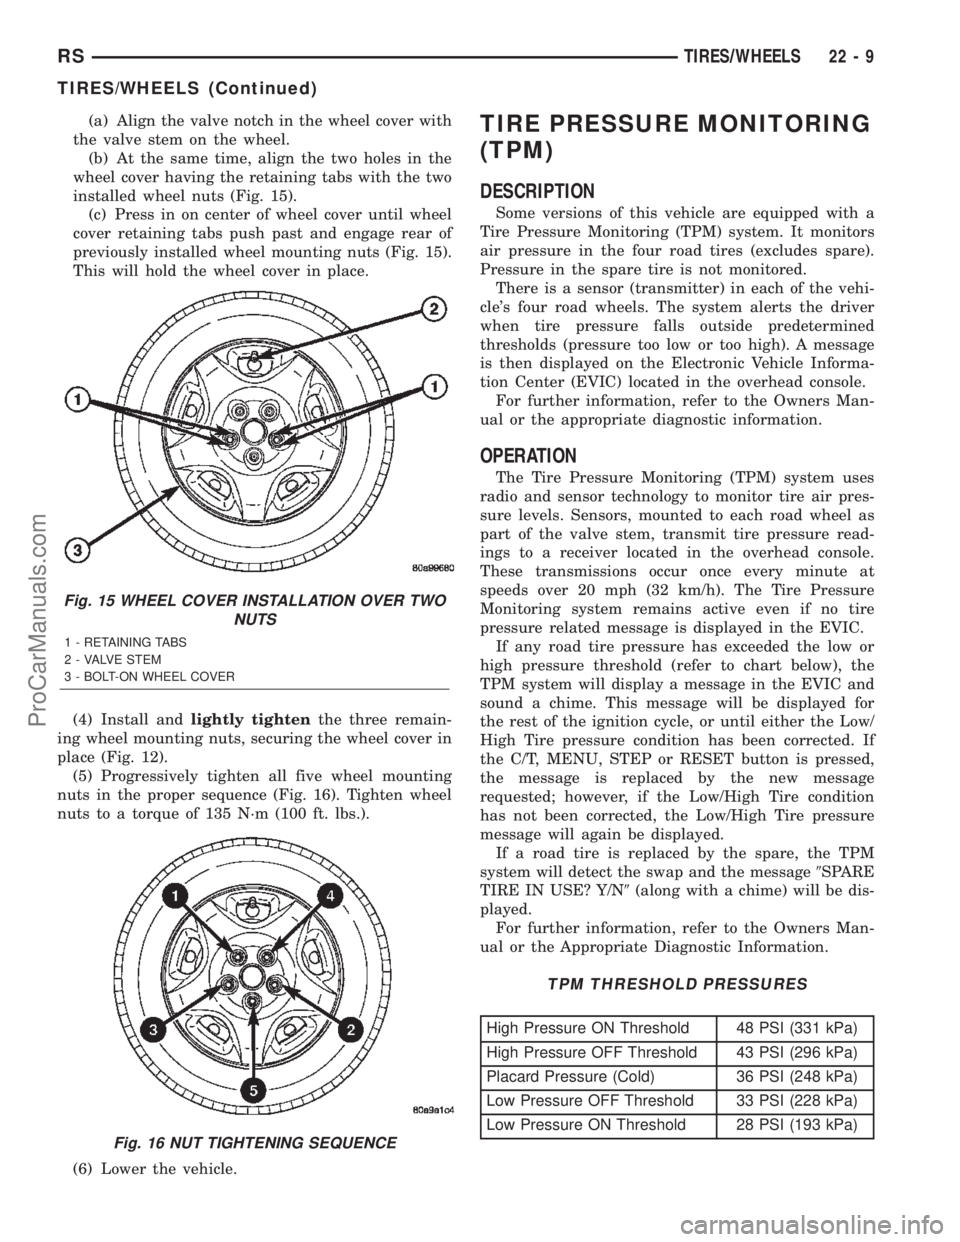
installed wheel nuts (Fig. 15).
(c) Press in on center of wheel cover until wheel
cover retaining tabs push past and engage rear of
previously installed wheel mounting nuts (Fig. 15).
This will hold the wheel cover in place.
(4) Install andlightly tightenthe three remain-
ing wheel mounting nuts, securing the wheel cover in
place (Fig. 12).
(5) Progressively tighten all five wheel mounting
nuts in the proper sequence (Fig. 16). Tighten wheel
nuts to a torque of 135 N´m (100 ft. lbs.).
(6) Lower the vehicle.TIRE PRESSURE MONITORING
(TPM)
DESCRIPTION
Some versions of this vehicle are equipped with a
Tire Pressure Monitoring (TPM) system. It monitors
air pressure in the four road tires (excludes spare).
Pressure in the spare tire is not monitored.
There is a sensor (transmitter) in each of the vehi-
cle's four road wheels. The system alerts the driver
when tire pressure falls outside predetermined
thresholds (pressure too low or too high). A message
is then displayed on the Electronic Vehicle Informa-
tion Center (EVIC) located in the overhead console.
For further information, refer to the Owners Man-
ual or the appropriate diagnostic information.
OPERATION
The Tire Pressure Monitoring (TPM) system uses
radio and sensor technology to monitor tire air pres-
sure levels. Sensors, mounted to each road wheel as
part of the valve stem, transmit tire pressure read-
ings to a receiver located in the overhead console.
These transmissions occur once every minute at
speeds over 20 mph (32 km/h). The Tire Pressure
Monitoring system remains active even if no tire
pressure related message is displayed in the EVIC.
If any road tire pressure has exceeded the low or
high pressure threshold (refer to chart below), the
TPM system will display a message in the EVIC and
sound a chime. This message will be displayed for
the rest of the ignition cycle, or until either the Low/
High Tire pressure condition has been corrected. If
the C/T, MENU, STEP or RESET button is pressed,
the message is replaced by the new message
requested; however, if the Low/High Tire condition
has not been corrected, the Low/High Tire pressure
message will again be displayed.
If a road tire is replaced by the spare, the TPM
system will detect the swap and the message9SPARE
TIRE IN USE? Y/N9(along with a chime) will be dis-
played.
For further information, refer to the Owners Man-
ual or the Appropriate Diagnostic Information.
TPM THRESHOLD PRESSURES
High Pressure ON Threshold 48 PSI (331 kPa)
High Pressure OFF Threshold 43 PSI (296 kPa)
Placard Pressure (Cold) 36 PSI (248 kPa)
Low Pressure OFF Threshold 33 PSI (228 kPa)
Low Pressure ON Threshold 28 PSI (193 kPa)
Fig. 15 WHEEL COVER INSTALLATION OVER TWO
NUTS
1 - RETAINING TABS
2 - VALVE STEM
3 - BOLT-ON WHEEL COVER
Fig. 16 NUT TIGHTENING SEQUENCE
RSTIRES/WHEELS22-9
TIRES/WHEELS (Continued)
ProCarManuals.com