CHRYSLER CONCORDE 2004 2.G Owners Manual
Manufacturer: CHRYSLER, Model Year: 2004, Model line: CONCORDE, Model: CHRYSLER CONCORDE 2004 2.GPages: 273, PDF Size: 6 MB
Page 221 of 273
CAUTION!
Do not use abrasive or strong cleaning materials
such as steel wool or scouring powder, which will
scratch metal and painted surfaces.
Special Care
•
If you drive on salted or dusty roads or if you drive
near the ocean, hose off the undercarriage at least once
a month.
•It is important that the drain holes in the lower edges
of the doors, rocker panels and rear deck lid be kept
clear and open.
•If you detect any stone chips or scratches in the paint,
touch them up immediately. The cost of such repairs is
considered the responsibility of the owner.
•Use Mopar touch up paint on scratches or chips as
soon as possible. Your dealer has touch up paint to
match the color of your vehicle.
•If your vehicle is damaged due to an accident or
similar cause which destroys the paint and protective
coating have your vehicle repaired as soon as possible.
The cost of such repairs is considered the responsibil-
ity of the owner.
•Aluminum wheels should be cleaned regularly with
mild soap and water to prevent corrosion. To remove
heavy soil, select a non abrasive, non-acidic cleaner.
Do not use scouring pads or metal polishes. Avoid
automatic car washes that use acidic solutions or harsh
brushes that may damage the wheels’ protective fin-
ish.
•If you carry special cargo such as chemicals, fertilizers,
deicer salt, etc., be sure that such materials are well
packaged and sealed.
•If a lot of driving is done on gravel roads, consider
mud or stone shields behind each wheel.
Interior Care
Use Mopar Fabric Cleaner to clean fabric upholstery and
carpeting.
MAINTAINING YOUR VEHICLE 221
7
Page 222 of 273
Use a mild soap and warm water solution to clean vinyl
or leather upholstery. For stubborn stains, use Mopar
Vinyl Cleaner.
Mopar Vinyl Cleaner is specifically recommended for
vinyl trim.
WARNING!
Do not use volatile solvents for cleaning purposes.
Many are potentially flammable, and if used in
closed areas they may cause respiratory harm.
CAUTION!
The use of vinyl, leather or plastic protectants may
cause excessive gloss and/or discoloration of interior
trim parts.
Leather Seat Care and Cleaning
Leather is best preserved by regular cleaning with a
damp soft cloth. Small particles of dirt can act as anabrasive and damage the leather surface and should be
removed immediately with a damp cloth. Stubborn soils
can be removed easily with a soft cloth and Mopar Total
Clean. Care should be taken to avoid soaking the leather
with any liquid. Please do not use polishes, oils, cleaning
fluids, solvents, detergents, or ammonia based cleaners
to clean the leather. Application of a leather conditioner is
not required to maintain the original condition.
Wooden Steering Wheel Care — If Equipped
If your vehicle is equipped with a wood steering wheel,
it is finished with a clear topcoat. Please take care to
avoid scratching the surface with sharp or abrasive
materials.
Cleaning Headlights
Your vehicle has plastic headlights that are lighter and
less susceptible to stone breakage than glass headlights.
Plastic is not as scratch resistant as glass and therefore
different lens cleaning procedures must be followed.
222 MAINTAINING YOUR VEHICLE
Page 223 of 273
To minimize the possibility of scratching the lenses and
reducing light output, avoid wiping with a dry cloth. To
remove road dirt, wash with a mild soap solution fol-
lowed by rinsing.
Do not use abrasive cleaning components, solvents, steel
wool or other aggressive material to clean the lenses.
Glass Surfaces
All glass surfaces should be cleaned on a regular basis
with any commercial household-type glass cleaner.
Never use an abrasive type cleaner. Use caution when
cleaning inside rear windows equipped with electric
defrosters. Do not use scrapers or other sharp instru-
ments which may scratch the elements.
Instrument Panel Cover
The instrument panel cover has a low glare surface which
minimizes reflections in the windshield. Do not use
protectants or other products which may cause undesir-
able reflections. Use soap and warm water to restore the
low glare surface.
Cleaning Plastic Instrument Cluster Lenses
The lenses in front of the instruments in this vehicle are
molded in clear plastic. When cleaning the lenses, care
must be taken to avoid scratching the plastic.
•Clean with a wet soft rag. A mild soap solution may be
used, but do not use high alcohol content or abrasive
cleaners. If soap is used, wipe clean with a clean damp
rag.
•Dry with a soft tissue.
Seat Belt Maintenance
Do not bleach, dye or clean the belts with chemical
solvents or abrasive cleaners. This will weaken the fabric.
If the belts need cleaning, use a mild soap solution or
lukewarm water. Do not remove the belts from the
vehicle to wash them.
Replace the belts if they appear frayed or worn or if the
buckles do not work properly.
MAINTAINING YOUR VEHICLE 223
7
Page 224 of 273
FUSES
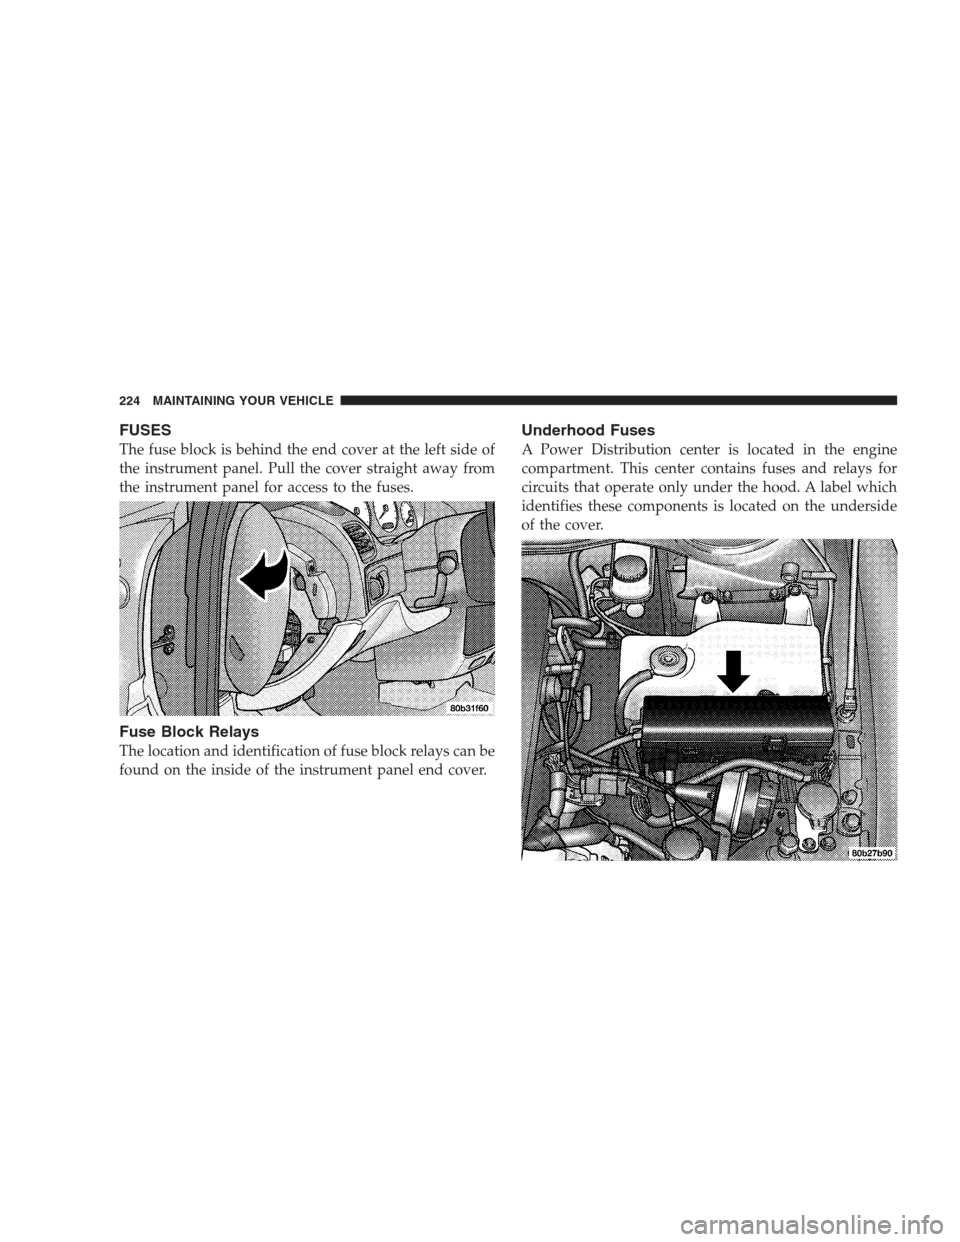
The fuse block is behind the end cover at the left side of
the instrument panel. Pull the cover straight away from
the instrument panel for access to the fuses.
Fuse Block Relays
The location and identification of fuse block relays can be
found on the inside of the instrument panel end cover.
Underhood Fuses
A Power Distribution center is located in the engine
compartment. This center contains fuses and relays for
circuits that operate only under the hood. A label which
identifies these components is located on the underside
of the cover.
224 MAINTAINING YOUR VEHICLE
Page 225 of 273
CAUTION!
When replacing a blown fuse, it is important to use
only a fuse having the correct amperage rating. The
use of a fuse with a rating other than indicated may
result in a dangerous electrical system overload. If a
properly rated fuse continues to blow, it indicates a
problem in the circuit that must be corrected.
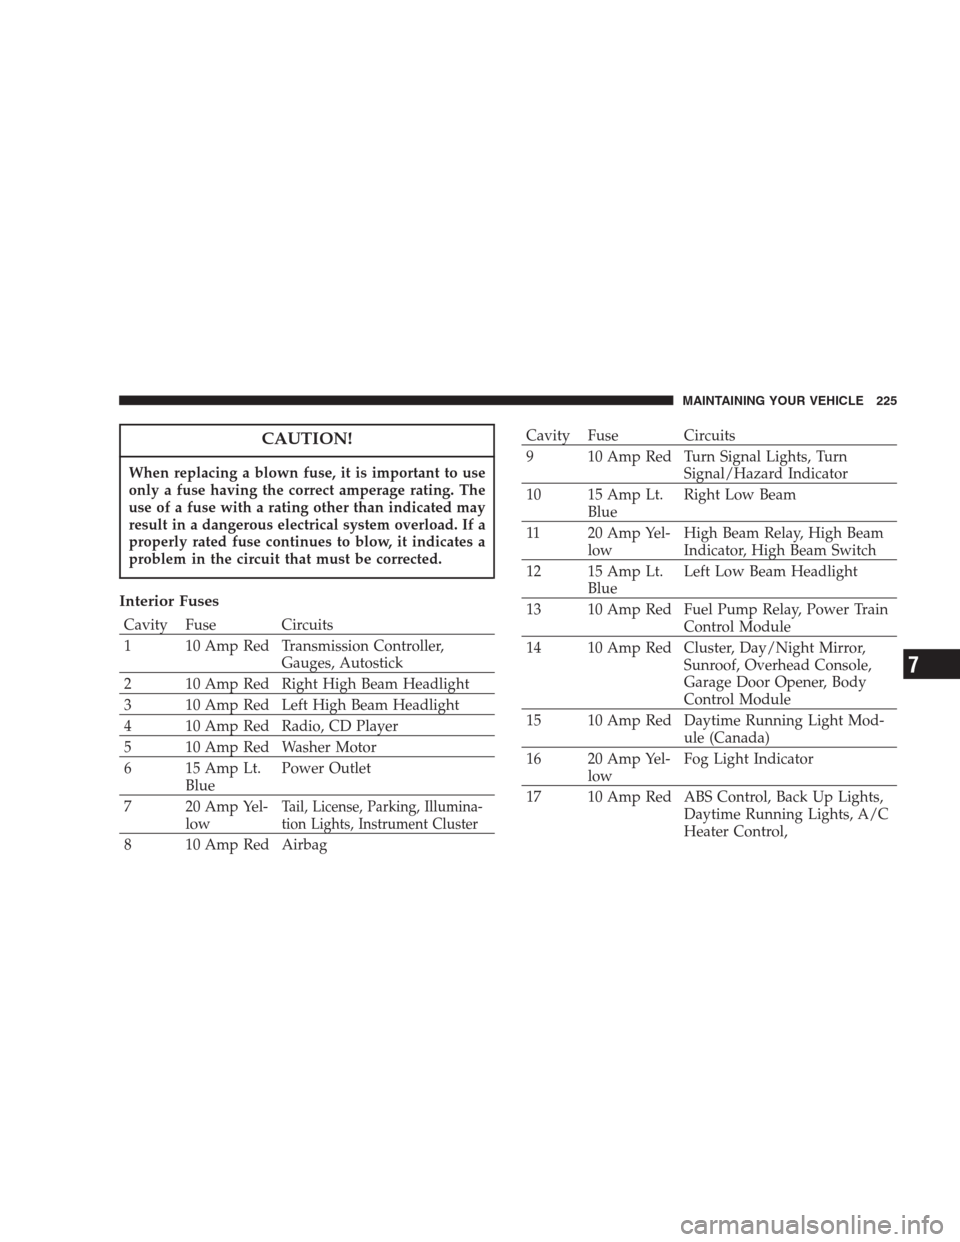
Interior Fuses
Cavity Fuse Circuits
1 10 Amp Red Transmission Controller,
Gauges, Autostick
2 10 Amp Red Right High Beam Headlight
3 10 Amp Red Left High Beam Headlight
4 10 Amp Red Radio, CD Player
5 10 Amp Red Washer Motor
6 15 Amp Lt.
BluePower Outlet
7 20 Amp Yel-
low
Tail, License, Parking, Illumina-
tion Lights, Instrument Cluster
8 10 Amp Red Airbag
Cavity Fuse Circuits
9 10 Amp Red Turn Signal Lights, Turn
Signal/Hazard Indicator
10 15 Amp Lt.
BlueRight Low Beam
11 20 Amp Yel-
lowHigh Beam Relay, High Beam
Indicator, High Beam Switch
12 15 Amp Lt.
BlueLeft Low Beam Headlight
13 10 Amp Red Fuel Pump Relay, Power Train
Control Module
14 10 Amp Red Cluster, Day/Night Mirror,
Sunroof, Overhead Console,
Garage Door Opener, Body
Control Module
15 10 Amp Red Daytime Running Light Mod-
ule (Canada)
16 20 Amp Yel-
lowFog Light Indicator
17 10 Amp Red ABS Control, Back Up Lights,
Daytime Running Lights, A/C
Heater Control,
MAINTAINING YOUR VEHICLE 225
7
Page 226 of 273
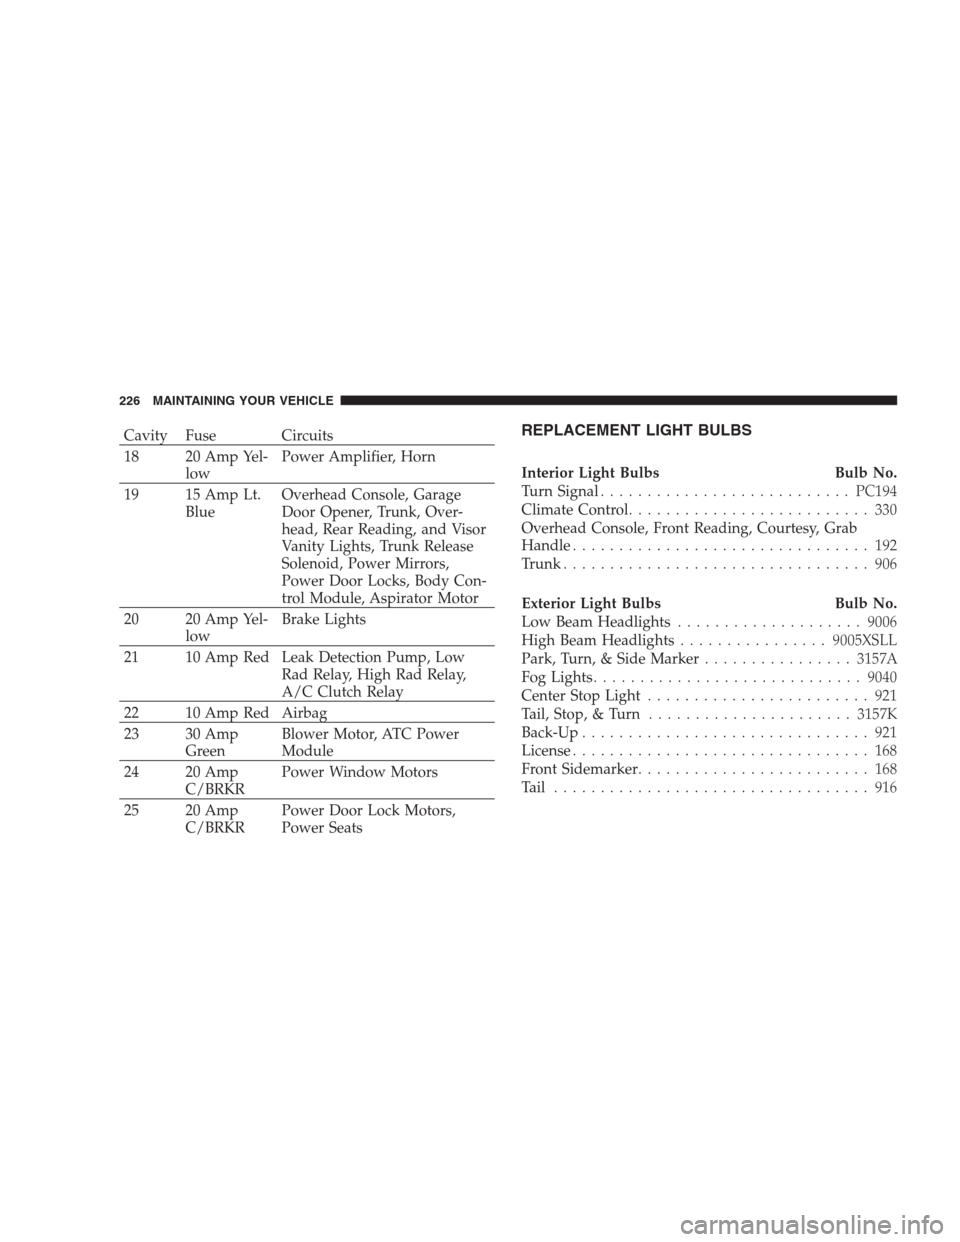
Cavity Fuse Circuits
18 20 Amp Yel-
lowPower Amplifier, Horn
19 15 Amp Lt.
BlueOverhead Console, Garage
Door Opener, Trunk, Over-
head, Rear Reading, and Visor
Vanity Lights, Trunk Release
Solenoid, Power Mirrors,
Power Door Locks, Body Con-
trol Module, Aspirator Motor
20 20 Amp Yel-
lowBrake Lights
21 10 Amp Red Leak Detection Pump, Low
Rad Relay, High Rad Relay,
A/C Clutch Relay
22 10 Amp Red Airbag
23 30 Amp
GreenBlower Motor, ATC Power
Module
24 20 Amp
C/BRKRPower Window Motors
25 20 Amp
C/BRKRPower Door Lock Motors,
Power SeatsREPLACEMENT LIGHT BULBS
Interior Light Bulbs Bulb No.
Turn Signal...........................PC194
Climate Control.......................... 330
Overhead Console, Front Reading, Courtesy, Grab
Handle................................ 192
Trunk................................. 906
Exterior Light Bulbs Bulb No.
Low Beam Headlights....................9006
High Beam Headlights................9005XSLL
Park, Turn, & Side Marker................3157A
Fog Lights.............................9040
Center Stop Light........................ 921
Tail, Stop, & Turn......................3157K
Back-Up............................... 921
License................................ 168
Front Sidemarker......................... 168
Tail.................................. 916
226 MAINTAINING YOUR VEHICLE
Page 227 of 273
BULB REPLACEMENT
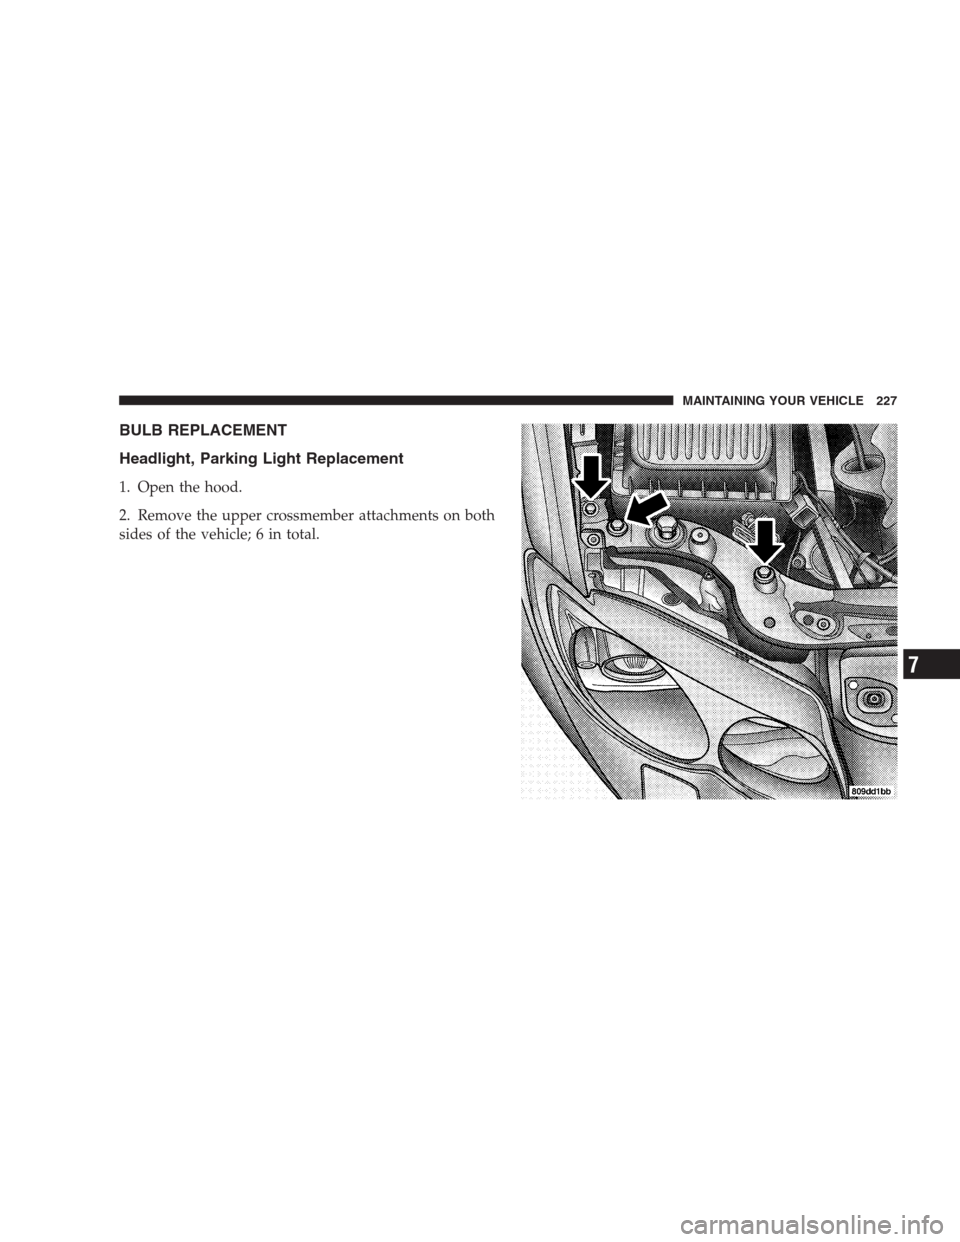
Headlight, Parking Light Replacement
1. Open the hood.
2. Remove the upper crossmember attachments on both
sides of the vehicle; 6 in total.
MAINTAINING YOUR VEHICLE 227
7
Page 228 of 273
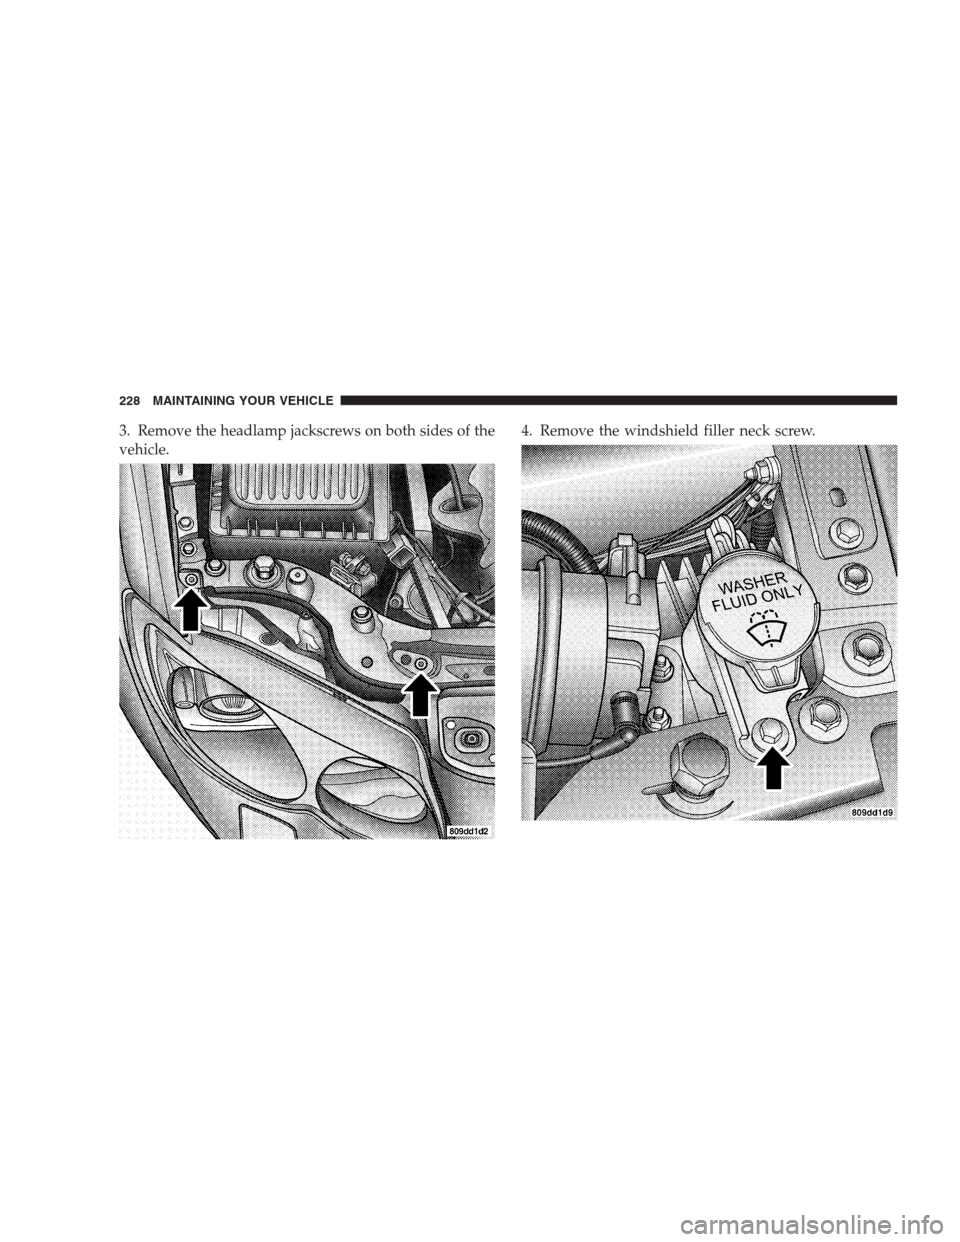
3. Remove the headlamp jackscrews on both sides of the
vehicle.4. Remove the windshield filler neck screw.
228 MAINTAINING YOUR VEHICLE
Page 229 of 273
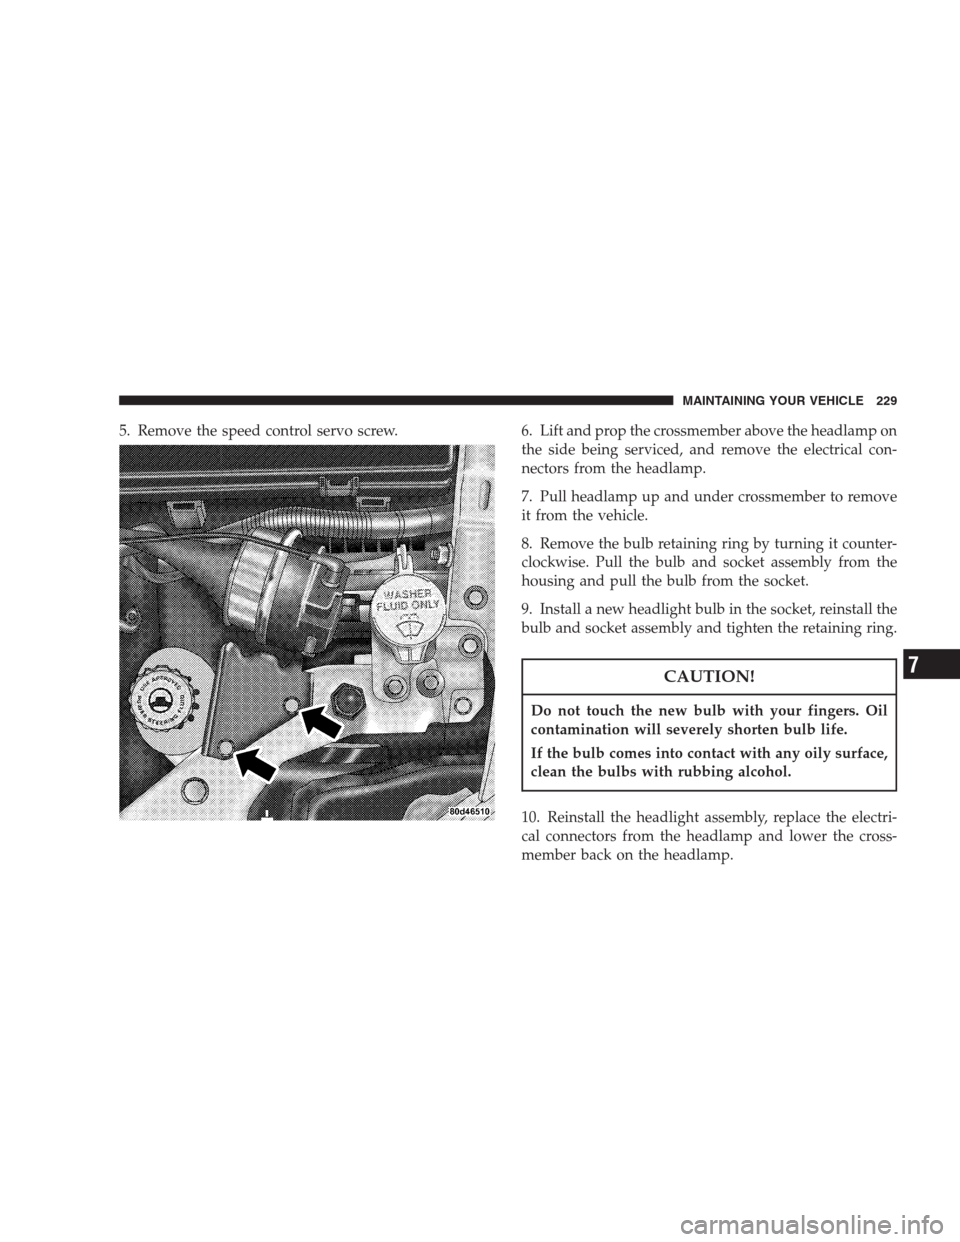
5. Remove the speed control servo screw. 6. Lift and prop the crossmember above the headlamp on
the side being serviced, and remove the electrical con-
nectors from the headlamp.
7. Pull headlamp up and under crossmember to remove
it from the vehicle.
8. Remove the bulb retaining ring by turning it counter-
clockwise. Pull the bulb and socket assembly from the
housing and pull the bulb from the socket.
9. Install a new headlight bulb in the socket, reinstall the
bulb and socket assembly and tighten the retaining ring.
CAUTION!
Do not touch the new bulb with your fingers. Oil
contamination will severely shorten bulb life.
If the bulb comes into contact with any oily surface,
clean the bulbs with rubbing alcohol.
10. Reinstall the headlight assembly, replace the electri-
cal connectors from the headlamp and lower the cross-
member back on the headlamp.
MAINTAINING YOUR VEHICLE 229
7
Page 230 of 273
11. Reinstall the upper crossmember attachments, head-
lamp jackscrews, windshield filler neck screw and speed
control servo screw.
Front Park and Turn Signal Light
1. Remove the headlight assembly from the vehicle.
2. Turn the park/turn signal bulb and socket assembly
counterclockwise and remove it from the housing.
3. Pull the bulb from the socket and install a new bulb.
4. Reinstall the bulb and socket assembly.
5. Reinstall the headlight assembly.
Front Sidemarker Light
1. Reach up under the fascia and grasp the light bulb
socket.
2. Turn the socket counterclockwise to remove it from
the housing.
3. Pull the bulb out of the socket.
4. Replace the bulb and reinstall the socket. Turn the
socket clockwise to secure it in the housing.
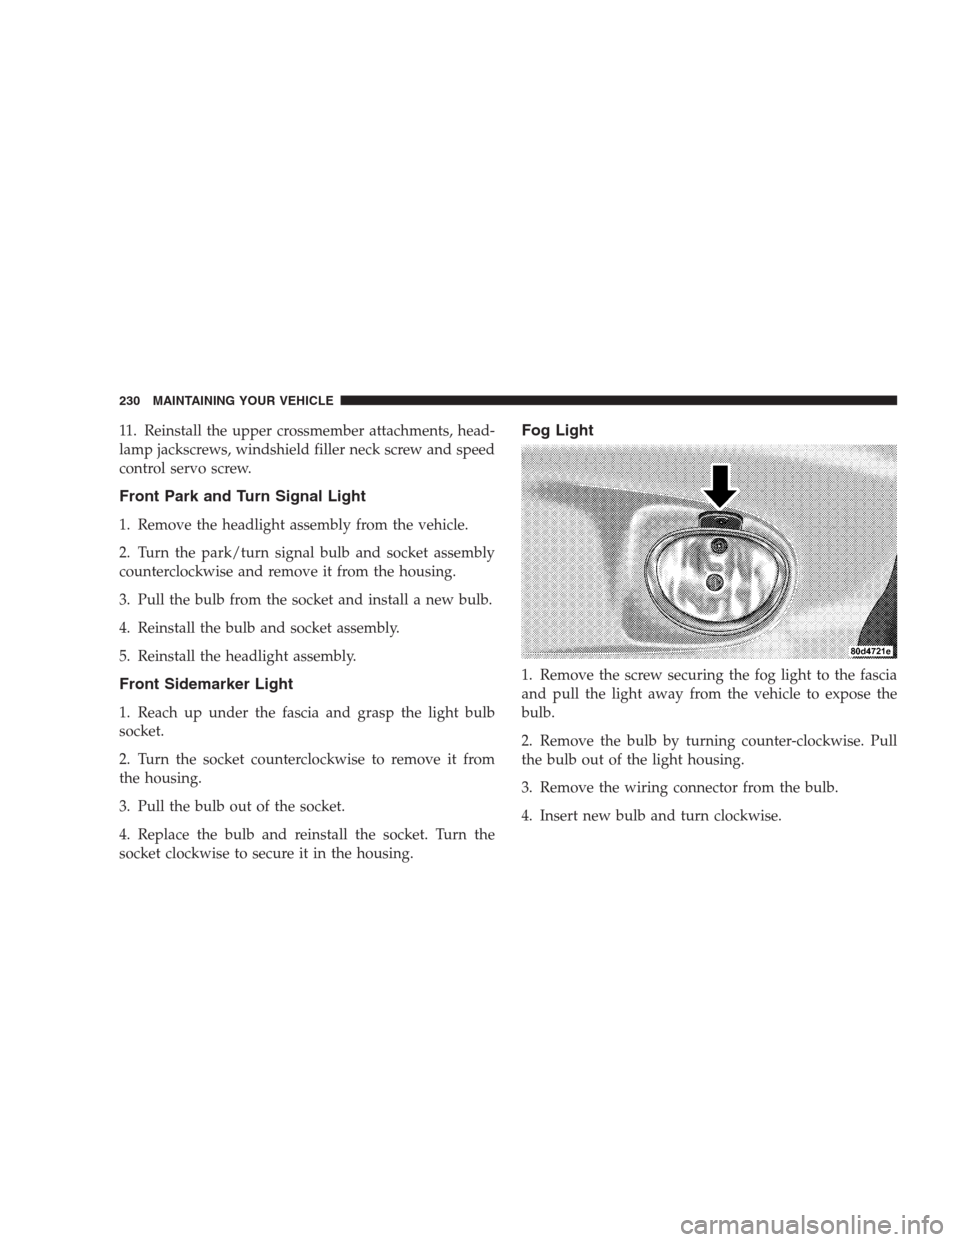
Fog Light
1. Remove the screw securing the fog light to the fascia
and pull the light away from the vehicle to expose the
bulb.
2. Remove the bulb by turning counter-clockwise. Pull
the bulb out of the light housing.
3. Remove the wiring connector from the bulb.
4. Insert new bulb and turn clockwise.
230 MAINTAINING YOUR VEHICLE