heater CHRYSLER CROSSFIRE 2007 1.G Owners Manual
[x] Cancel search | Manufacturer: CHRYSLER, Model Year: 2007, Model line: CROSSFIRE, Model: CHRYSLER CROSSFIRE 2007 1.GPages: 299, PDF Size: 8.26 MB
Page 111 of 299

UNDERSTANDING YOUR INSTRUMENT PANEL
CONTENTS
mInstruments And Controls................112
mInstrument Cluster.....................113
mInstrument Cluster Description............114
mªInfinity Modulusº AM/FM Stereo Radio With
Single-Disc CD Player And GPS Navigation
. . 126
mAM/FM Stereo Radio With Single-Disc
CD Player
...........................126
NInfinity Modulus Entertainment Systems.....126
NCD Player Operation...................130
NUser Menu..........................132
NUser Memory (User ± 1, 2, 3).............132
NMono/Stereo........................133NDriver ± L/R........................133
NTelephone Mute Characteristics...........133
mCompact Disc Maintenance...............134
mRadio Antenna........................134
mRadio Operation And Cellular Phones.......135
mClimate Controls......................135
NTemperature Control...................136
NFan Control.........................136
NBasic Setting - Heater..................136
NBasic Setting - Air Conditioner............137
NDust Filter (If Equipped)................140
NOperating Tips.......................141
4
Page 136 of 299

The settings and controls are as follows:
Temperature Control
Use the driver or passenger temperature control to
regulate the temperature of the air inside the passenger
compartment. The blue area of the control indicates
cooler temperatures, while the red area indicates warmer
temperatures.
The temperature selector should be left at the desired
temperature setting so that the system can automatically
reach that selection as quickly as possible. The inside
temperature will not heat or cool any quicker by setting
the selector higher or lower upon initial start up.
Fan Control
Use this control to regulate the amount of air
volume moving through the system in any
mode you select. Turn the control clockwise to
increase fan speed; counterclockwise to de-
crease fan speed.
Basic Setting - Heater
Select a temperature for each side of the pas-
senger compartment. Select air volume with
the fan control switch and set the fan control at
least to position 2 to prevent windows from
fogging up. Set the air distribution control switch to the
tri-level setting. Turn the defroster outlets for the side
windows to the detent positions. Open center air outlets
as desired.
Select a temperature for each side of the pas-
senger compartment. Select air volume with
the fan control switch. Then select the panel
setting on the air distribution control switch to
force air from the panel outlets.
Select a temperature for each side of the pas-
senger compartment. Select air volume with
the fan control switch. Then select the Bi-Level
setting on the air distribution control switch to
force air from both the upper panel outlets and the floor
outlets.
136 UNDERSTANDING YOUR INSTRUMENT PANEL
Page 146 of 299
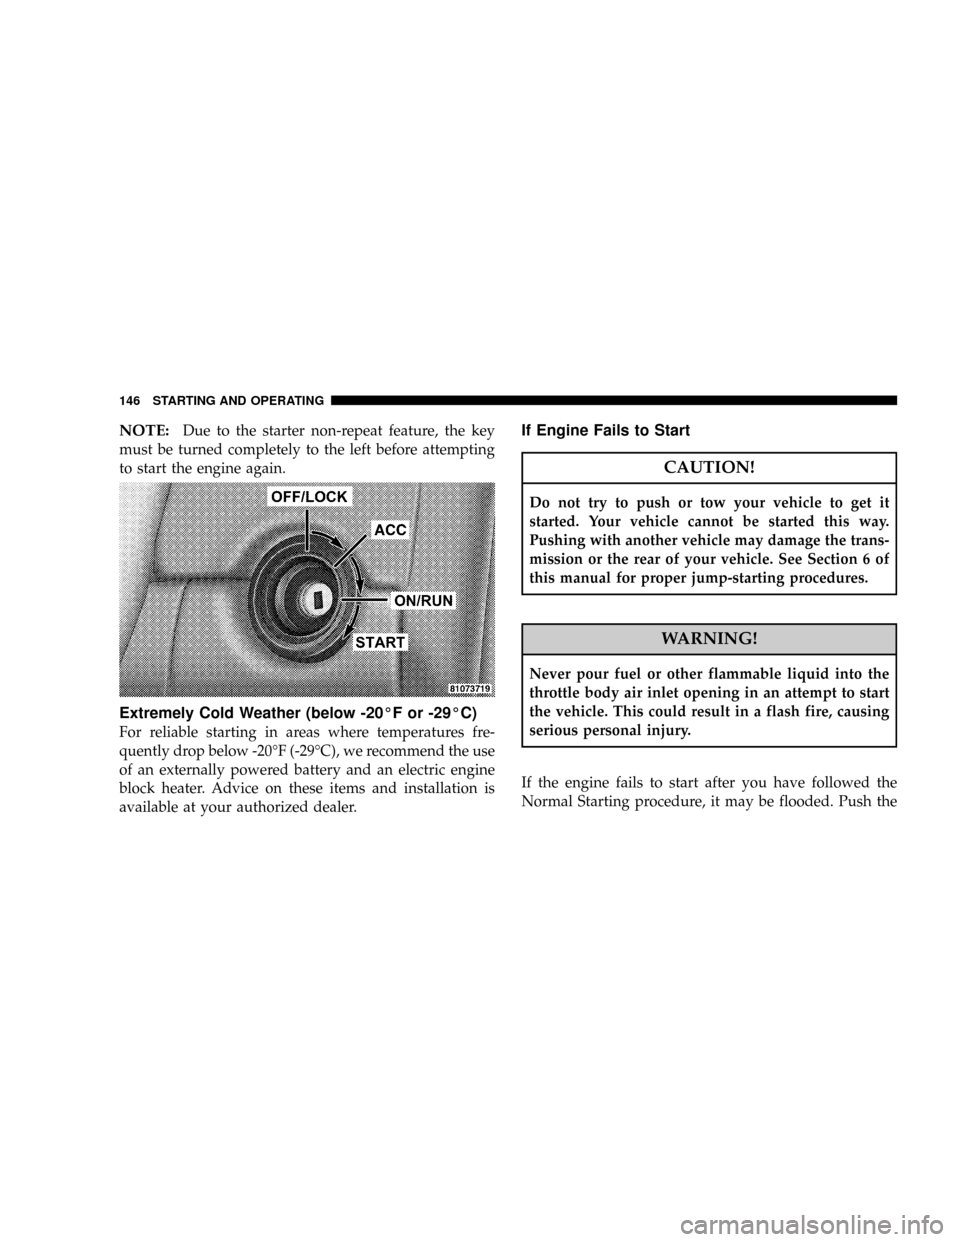
NOTE:Due to the starter non-repeat feature, the key
must be turned completely to the left before attempting
to start the engine again.
Extremely Cold Weather (below -20ÉF or -29ÉC)
For reliable starting in areas where temperatures fre-
quently drop below -20ÉF (-29ÉC), we recommend the use
of an externally powered battery and an electric engine
block heater. Advice on these items and installation is
available at your authorized dealer.
If Engine Fails to Start
CAUTION!
Do not try to push or tow your vehicle to get it
started. Your vehicle cannot be started this way.
Pushing with another vehicle may damage the trans-
mission or the rear of your vehicle. See Section 6 of
this manual for proper jump-starting procedures.
WARNING!
Never pour fuel or other flammable liquid into the
throttle body air inlet opening in an attempt to start
the vehicle. This could result in a flash fire, causing
serious personal injury.
If the engine fails to start after you have followed the
Normal Starting procedure, it may be flooded. Push the
146 STARTING AND OPERATING
Page 195 of 299
NOTE:There are steps that you can take to slow down
an impending overheat condition. If your air conditioner
is on, turn it off. The air conditioning system adds heat to
the cooling system and turning off the A/C removes this
heat. You can also turn the temperature control to maxi-
mum heat, the mode control to floor, and the fan control
to high. This allows the heater core to act as a supplement
to the radiator and aids in removing heat from the
cooling system.
CAUTION!
Driving with a hot cooling system could damage
your vehicle. If temperature gauge reads ªH,º pull
over and stop the vehicle. Idle the vehicle with the air
conditioner turned off until the pointer drops back
into the normal range. If the pointer remains on the
ªH,º turn the engine off immediately, and call for
service.
WARNING!
A hot cooling system is dangerous. You or others
could be badly burned by steam or boiling coolant. If
your temperature gauge pointer is in the red area,
turn off the engine immediately. You may want to call
an authorized dealer for service. If you decide to look
under the hood yourself, see Section 7 of this manual.
Follow the warnings under the Cooling System Pres-
sure Cap paragraph.
TIREFIT TIRE REPAIR AND JACKING
TIREFIT
Small punctures, particularly those in the tread, can be
sealed with TIREFIT. Foreign objects (e.g., screws or
nails) should not be removed from the tire. TIREFIT can
be used in outside temperatures down to approximately
-4ÉF (-20ÉC).
WHAT TO DO IN EMERGENCIES 195
6
Page 204 of 299

1. Wear eye protection and remove any metal jewelry
such as watch bands or bracelets that might make an
inadvertent electrical contact.
2. When boost is provided by a battery in another
vehicle, park that vehicle within booster cable reach but
without letting the vehicles touch. Set the parking brake,
place the transmission in Neutral and turn the ignition
OFF for both vehicles.
3. Turn off the heater, radio and all unnecessary electrical
loads.4. Connect one end of a jumper cable to the positive
jump-start attachment of the booster battery. Connect the
other end of the same cable to the positive jump-start
attachment of the discharged battery.
5. Connect the other cable, first to the negative jump-
start attachment of the booster battery and then to the
engine of the vehicle with the discharged battery. Make
sure you have good contact on the engine.
204 WHAT TO DO IN EMERGENCIES
Page 255 of 299
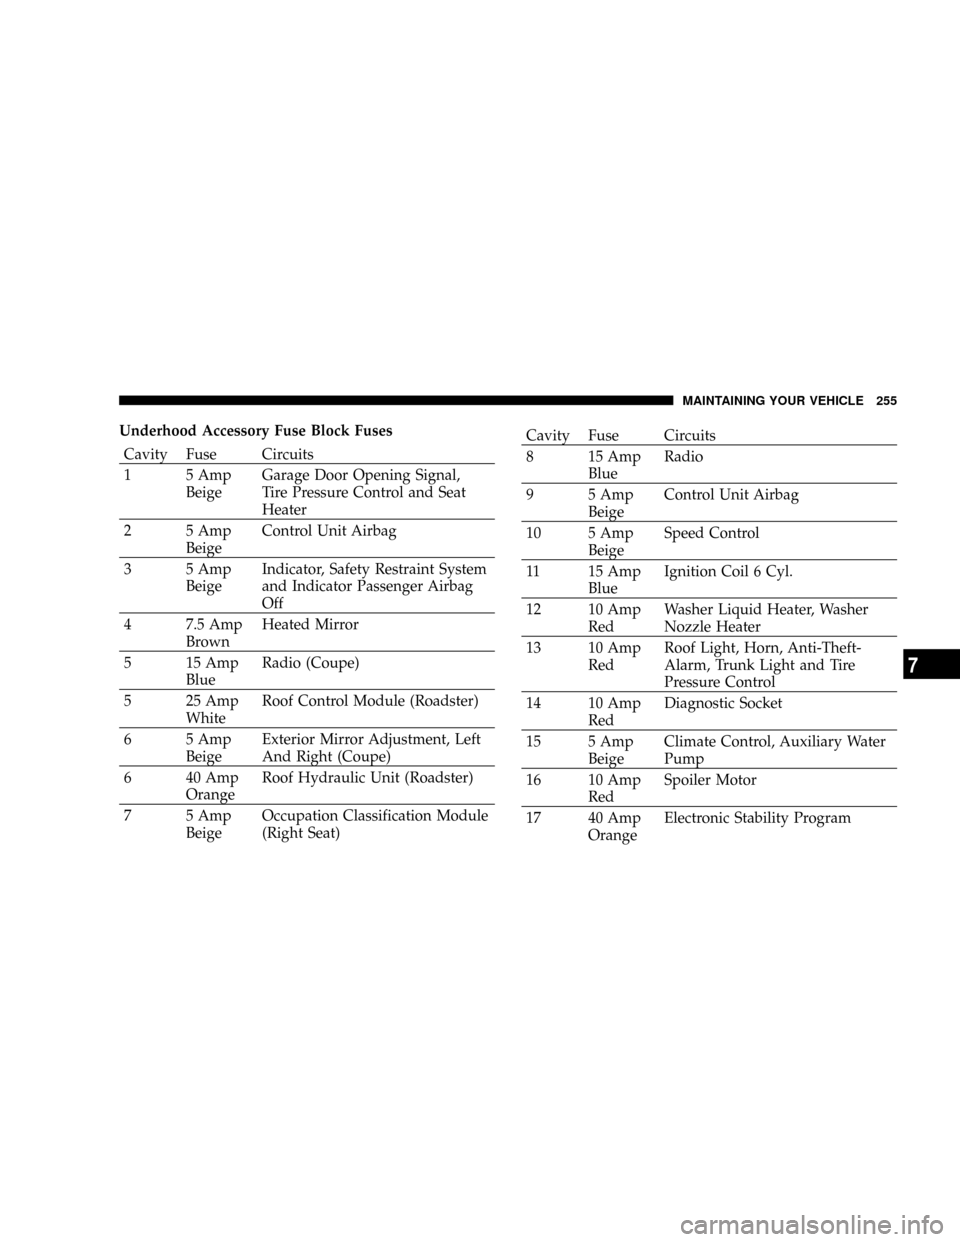
Underhood Accessory Fuse Block Fuses
Cavity Fuse Circuits
1 5 Amp
BeigeGarage Door Opening Signal,
Tire Pressure Control and Seat
Heater
2 5 Amp
BeigeControl Unit Airbag
3 5 Amp
BeigeIndicator, Safety Restraint System
and Indicator Passenger Airbag
Off
4 7.5 Amp
BrownHeated Mirror
5 15 Amp
BlueRadio (Coupe)
5 25 Amp
WhiteRoof Control Module (Roadster)
6 5 Amp
BeigeExterior Mirror Adjustment, Left
And Right (Coupe)
6 40 Amp
OrangeRoof Hydraulic Unit (Roadster)
7 5 Amp
BeigeOccupation Classification Module
(Right Seat)
Cavity Fuse Circuits
8 15 Amp
BlueRadio
9 5 Amp
BeigeControl Unit Airbag
10 5 Amp
BeigeSpeed Control
11 15 Amp
BlueIgnition Coil 6 Cyl.
12 10 Amp
RedWasher Liquid Heater, Washer
Nozzle Heater
13 10 Amp
RedRoof Light, Horn, Anti-Theft-
Alarm, Trunk Light and Tire
Pressure Control
14 10 Amp
RedDiagnostic Socket
15 5 Amp
BeigeClimate Control, Auxiliary Water
Pump
16 10 Amp
RedSpoiler Motor
17 40 Amp
OrangeElectronic Stability Program
MAINTAINING YOUR VEHICLE 255
7
Page 256 of 299

Cavity Fuse Circuits
18 40 Amp
OrangeElectronic Stability Program
19 40 Amp
OrangePower Window, Front
20 30 Amp
GreenWiper Motor
21 30 Amp
GreenSeat Adjustment Right Side
22 30 Amp
GreenSeat Adjustment Left Side
23 15 Amp
BlueSound Booster (Amplifier)
24 30 Amp
GreenSeat Heater
25 20 Amp
YellowPneumatic Control Unit, Rear
Window Defroster
26 20 Amp
YellowCentral Locking
30 Spare (Coupe)
30 15 Amp
BlueRadio (Roadster)Cavity Fuse Circuits
31 15 Amp
BlueCigar Lighter, Glove Compart-
ment Light
32 15 Amp
BlueWiper, Washer Pump, Headlight
Flasher
33 5 Amp
BeigeControl Unit
34 Spare (Coupe)
34 30 Amp
GreenClimate Control (Roadster)
35 15 Amp
BlueRadio Frequency Remote Control,
Hazard Warning Flasher, Instru-
ment Cluster, Climate Control
36 30 Amp
GreenClimate Control (Coupe)
36 5 Amp
BeigeExterior Mirror Adjustment
(Roadster)
37 7.5 Amp
BrownCirculating Air, Instrument Clus-
ter, Radio Frequency Remote
Control, Climate Control, Central
Control Unit
256 MAINTAINING YOUR VEHICLE
Page 267 of 299
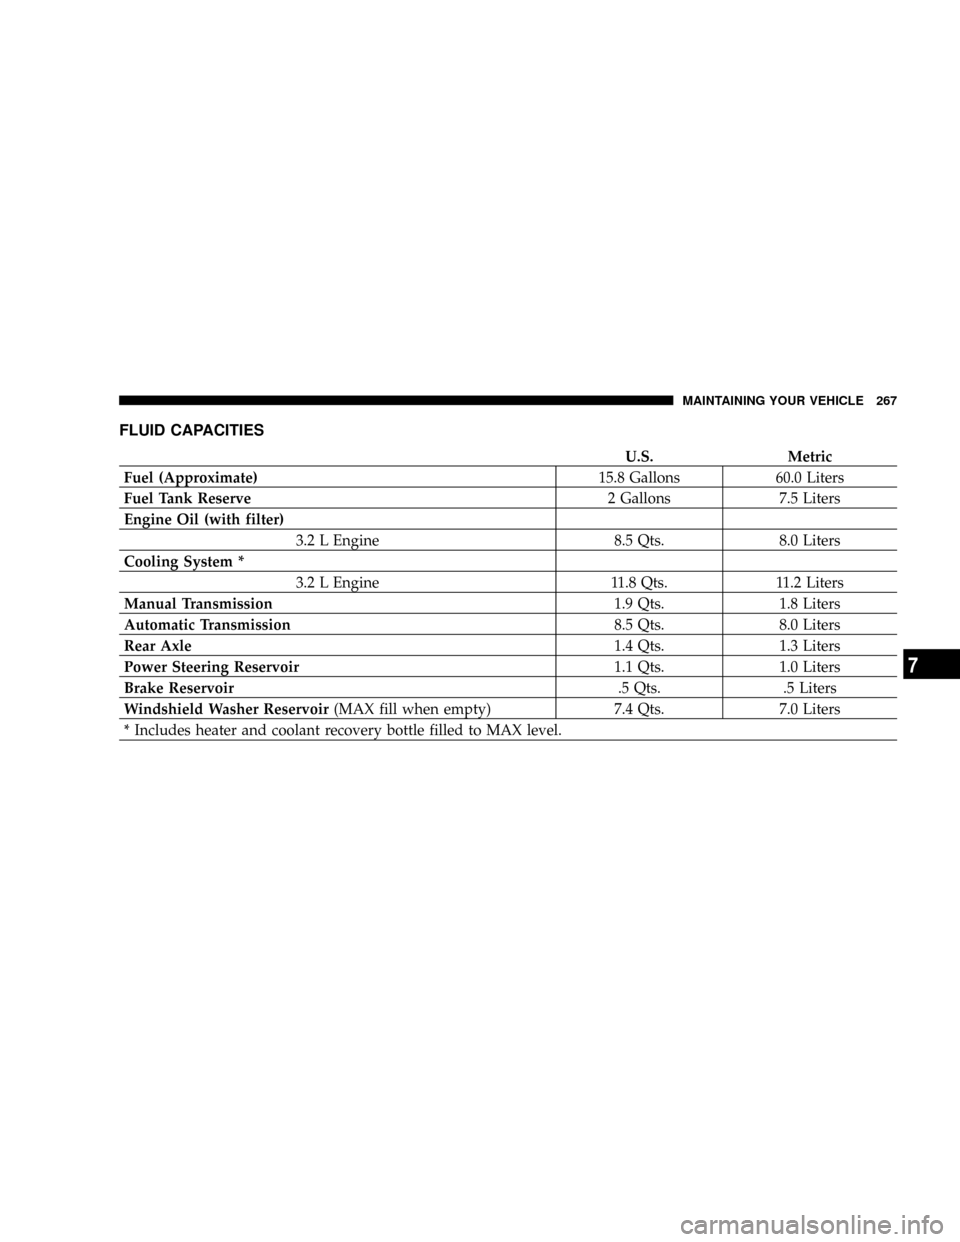
FLUID CAPACITIES
U.S. Metric
Fuel (Approximate)15.8 Gallons 60.0 Liters
Fuel Tank Reserve2 Gallons 7.5 Liters
Engine Oil (with filter)
3.2 L Engine 8.5 Qts. 8.0 Liters
Cooling System *
3.2 L Engine 11.8 Qts. 11.2 Liters
Manual Transmission1.9 Qts. 1.8 Liters
Automatic Transmission8.5 Qts. 8.0 Liters
Rear Axle1.4 Qts. 1.3 Liters
Power Steering Reservoir1.1 Qts. 1.0 Liters
Brake Reservoir.5 Qts. .5 Liters
Windshield Washer Reservoir(MAX fill when empty) 7.4 Qts. 7.0 Liters
* Includes heater and coolant recovery bottle filled to MAX level.
MAINTAINING YOUR VEHICLE 267
7
Page 293 of 299

Octane Rating........................ 186
Fuses................................ 253
Garage Door Opener (HomeLinkt) .......... 105
Gas Cap (Fuel Filler Cap)................. 189
Gasoline (Fuel)......................... 267
Gasoline/Oxygenate Blends............... 187
Gear Ratios........................... 265
General Information..................... 183
Glass Cleaning......................... 250
Glove Compartment..................... 76
Hazard Warning Flasher.................. 194
Headlights
Aiming............................. 262
Cleaning............................ 249
Dimmer Switch....................... 89
Heater............................... 135
Hood Latch Maintenance................. 235
Hood Release.......................... 84
Hoses............................... 241Ignition
Key ................................. 9
Wiring System (Spark Plug Wires)......... 231
Illuminated Entry....................... 86
Infant Restraint......................... 48
Inside Rearview Mirror................... 77
Instrument Cluster...................... 113
Instrument Panel and Controls............. 112
Instrument Panel Cover.................. 250
Instrument Panel Lens Cleaning............ 250
Interior Appearance Care................. 249
Introduction............................ 4
Jack Location.......................... 200
Jack Operation......................... 195
Jump Starting......................... 203
Key-In Reminder........................ 10
Keyless Entry System..................... 14
Keys.................................. 9
Knee Bolster........................... 30
INDEX 293
10
Page 299 of 299

INTRODUCTION INTRODUCTION HOW TO USE THIS MANUAL WARNINGS AND CAUTIONS VEHICLE IDENTIFICATION NUMBER THINGS TO KNOW BEFORE STARTING YOUR VEHICLE A WORD ABOUT YOUR KEYS KeysObtaining Replacement KeysIgnition
Key RemovalKey-In-Ignition ReminderGLOVE COMPARTMENT LOCK DOOR LOCKS Central Locking SwitchAutomatic Central LockingGeneral Notes On the Central Locking SystemEmergency Unlocking FeatureStart LockoutREMOTE KEYLESS ENTRY To Unlock the
DoorsTo Lock The DoorsPanic AlarmTo Use the Panic AlarmGeneral InformationTransmitter Battery ServiceSECURITY ALARM SYSTEM Tow-Away AlarmDECKLID INTERNAL EMERGENCY RELEASE - ROADSTER POWER WINDOWS Power Window Operation With
The Convertible Top Switch (Roadster Only)REAR LIFTGATE/DECKLID RELEASE OCCUPANT RESTRAINTS Lap/Shoulder BeltsSeat Belts and Pregnant WomenSeat Belt ExtenderSupplemental Restraint System (SRS) - Airbag Child RestraintENGINE BREAK-IN
RECOMMENDATIONS SAFETY TIPS Exhaust GasSafety Checks You Should Make Inside the VehiclePeriodic Safety Checks You Should Make Outside the VehicleUNDERSTANDING THE FEATURES OF YOUR VEHICLE CONVERTIBLE TOP OPERATION To Lower
The TopTo Raise The TopConvertible Top Lamp and Audible Signal ChartCONSOLE FEATURES Storage Compartments (If Equipped)AshtrayCoin HolderPower Outlet/Cigar LighterGlove CompartmentCUPHOLDER (If Equipped) MIRRORS Inside Day/Night MirrorExterior
Mirrors Folding FeatureHeated Remote Control Mirrors (If Equipped)Outside MirrorsPower Remote Control Outside MirrorsVanity Mirrors SEATS Manual Seat Adjustments (If Equipped)Driver Eight-Way Power Seat (If Equipped)Passenger Four-Way Power Seat (If Equipped)
Heated Seats (If Equipped)TO OPEN AND CLOSE THE HOOD INTERIOR LIGHTS Front Map/Reading LightsBattery Saver FeatureInstrument Panel LightingNightSecurity IlluminationEXTERIOR LIGHTS Headlights and Parking LightsDaytime Running Lights (Where
Applicable)Fog Lights (If Equipped)Standing LightsMULTIFUNCTION CONTROL LEVER Turn SignalsHeadlight Dimmer SwitchPassing LightWindshield Wipers And WasherMist FunctionTELESCOPING STEERING COLUMN TIRE PRESSURE MONITOR SYSTEM (if
equipped) REAR SPOILER BRAKE ASSIST SYSTEM (BAS) ELECTRONIC STABILITY PROGRAM (ESP) Synchronizing ESPELECTRONIC SPEED CONTROL To Vary The Speed SettingTo DeactivateTo Resume SpeedUsing Speed Control On HillsGARAGE DOOR
OPENER (If Equipped) Programming The Universal TransceiverGate Operator/Canadian ProgrammingUsing the Universal TransceiverErasing Universal Transceiver ButtonsReprogramming a Single ButtonSecurityUMBRELLA HOOK UNDERSTANDING YOUR
INSTRUMENT PANEL INSTRUMENTS AND CONTROLS INSTRUMENT CLUSTER INSTRUMENT CLUSTER DESCRIPTION INFINITY MODULUS AM/FM STEREO RADIO WITH SINGLE-DISC CD PLAYER AND GPS NAVIGATION AM/FM STEREO RADIO WITH
SINGLE-DISC CD PLAYER INFINITY MODULUS Entertainment SystemsCD Player OperationUser MenuUser Memory (USER - 1, 2, 3)Mono/StereoDriver - L/RTelephone mute characteristicsCOMPACT DISC MAINTENANCE RADIO ANTENNA RADIO OPERATION AND
CELLULAR PHONES CLIMATE CONTROLS Temperature ControlFan ControlBasic Setting - HeaterBasic Setting - Air ConditionerDust Filter (If Equipped)Operating Tips STARTING AND OPERATING STARTING PROCEDURES Normal StartingExtremely Cold Weather
(below -20 degrees F or -29 degrees C)If Engine Fails to StartAfter StartingTRANSMISSION SHIFTING Manual Transmission Recommended Shift SpeedsAutomatic Transmission StoppingManeuveringPark PositionReverseNeutralDriveAutoStick Gear selectionGear Ranges
Program mode selector switchEmergency Operation (Limp Home Mode)PARKING BRAKE BRAKE SYSTEM Brake Assist System (BAS)Electronic Stability Program (ESP)Synchronizing ESPESP Control switchAnti-Lock Brake System (ABS)Brake Pad Break-InPOWER
STEERING TIRE SAFETY INFORMATION Tire Markings Tire Identification Number (TIN)Tire Loading and Tire PressureTIRES-GENERAL INFORMATION Tire PressureTire Inflation PressuresRadial-Ply TiresTire SpinningTread Wear IndicatorsReplacement TiresAlignment
And BalanceTIRE PRESSURE MONITOR SYSTEM (If Equipped) General InformationTIRE CHAINS ORIGINAL EQUIPMENT TIRES SNOW TIRES TIRE ROTATION RECOMMENDATIONS FUEL REQUIREMENTS Reformulated GasolineGasoline/Oxygenate BlendsMMT
in GasolineMaterials Added to FuelSulfur in GasolineADDING FUEL Fuel Filler Cap (Gas Cap)VEHICLE LOADING Roof Luggage RackTRAILER TOWING WHAT TO DOIN EMERGENCIES HAZARD WARNING FLASHER IF YOUR ENGINE OVERHEATS TIREFIT TIRE
REPAIR AND JACKING TIREFITPreparations for JackingJack Location and Instructions JUMP-STARTING THE BATTERY DRIVING ON SLIPPERY SURFACES Traction FREEING A STUCK VEHICLE TOWING A DISABLED VEHICLE Towing EyesTow-Away Alarm
CONVERTIBLE TOP EMERGENCY OPERATION Relieving Hydraulic PressureOpening a Locked DecklidMAINTAINING YOUR VEHICLE 3.2L ENGINE ONBOARD DIAGNOSTIC SYSTEM (OBD II) EMISSIONS INSPECTION AND MAINTENANCE PROGRAMS
REPLACEMENT PARTS DEALER SERVICE MAINTENANCE PROCEDURES Engine OilIgnition Wiring SystemCrankcase Emission Control SystemMaintenance-Free BatteryAir ConditionerPower Steering FluidChassis LubricationBody LubricationWindshield Wiper Blades
Windshield Wiper Blade ReplacementWindshield Washer ReservoirExhaust SystemCooling SystemHoses And Vacuum/Vapor HarnessesBrakesAutomatic TransmissionManual TransmissionAppearance Care and Protection from CorrosionCONVERTIBLE TOP CARE
WashingGeneral CleaningWeather Strip CareFUSES Underhood Accessory Fuse Block FusesRelay Control Module Fuses Interior Fuses REPLACEMENT BULBSInterior Light BulbsExterior Light BulbsEXTERIOR LIGHT BULB SERVICE HeadlightsFront Turn Signal and
Parking/Standing LightsFront and Rear Sidemarker LightsTail, Stop, Back Up and Turn Signal LightsLicense Plate LightHeadlight AimingVEHICLE STORAGE SPECIFICATIONS FLUID CAPACITIES RECOMMENDED FLUIDS, LUBRICANTS AND GENUINE PARTS Engine
ChassisBodyMAINTENANCE SCHEDULES INTRODUCTION WARRANTY EMISSION CONTROL SYSTEM MAINTENANCE MAINTENANCE SCHEDULES SCOPE OF WORK FOR A SCHEDULE MAINTENANCE SERVICESCOPE OF WORK FOR B SCHEDULE
MAINTENANCE SERVICEFSS SYSTEM REGULAR CHECK-UPS Additional Periodic MaintenanceSPECIAL MAINTENANCE REQUIREMENTS CoolantDust Filter for Heating/Ventilation Replacement (If Equipped)ENGINE OIL CHANGE AND FILTER REPLACEMENT IF
YOU NEED CONSUMER ASSISTANCE SUGGESTIONS FOR OBTAINING SERVICE FOR YOUR VEHICLE Prepare For The AppointmentPrepare A ListBe Reasonable With RequestsIF YOU NEED ASSISTANCE WARRANTY INFORMATION MOPAR PARTS REPORTING
SAFETY DEFECTS In CanadaPUBLICATION ORDER FORMS DEPARTMENT OF TRANSPORTATION UNIFORM TIRE QUALITY GRADES TreadwearTraction GradesTemperature GradesINDEX