remote start CHRYSLER CROSSFIRE 2007 1.G Owners Manual
[x] Cancel search | Manufacturer: CHRYSLER, Model Year: 2007, Model line: CROSSFIRE, Model: CHRYSLER CROSSFIRE 2007 1.GPages: 299, PDF Size: 8.26 MB
Page 7 of 299

THINGS TO KNOW BEFORE STARTING YOUR VEHICLE
CONTENTS
mA Word About Your Keys................. 9
NKeys............................... 9
NObtaining Replacement Keys.............. 9
NIgnition Key Removal...................10
NKey-In-Ignition Reminder................10
mGlove Compartment Lock.................11
mDoor Locks...........................11
NCentral Locking Switch..................12
NAutomatic Central Locking...............13
NGeneral Notes On The Central Locking
System..............................13
NEmergency Unlocking Feature.............14NStart Lockout.........................14
mRemote Keyless Entry....................14
NTo Unlock The Doors...................15
NTo Lock The Doors.....................16
NPanic Alarm..........................17
NTo Use The Panic Alarm.................17
NGeneral Information....................17
NTransmitter Battery Service...............18
mSecurity Alarm System...................19
NTow-Away Alarm......................19
mDecklid Internal Emergency
Release - Roadster
......................20
2
Page 9 of 299
A WORD ABOUT YOUR KEYS
You can insert the double-sided keys into the locks with
either side up.
The dealer that sold you your new vehicle has the key
code numbers for your vehicle locks. These numbers can
be used to order duplicate keys only from an authorized
dealer. Ask your dealer for these numbers and keep them
in a safe place.
CAUTION!
An unlocked car is an invitation to thieves. Always
remove the key from the ignition and lock all the
doors when leaving the vehicle unattended.
NOTE:To avoid discharging the battery, the key must
be removed from the ignition when the vehicle is parked.
Keys
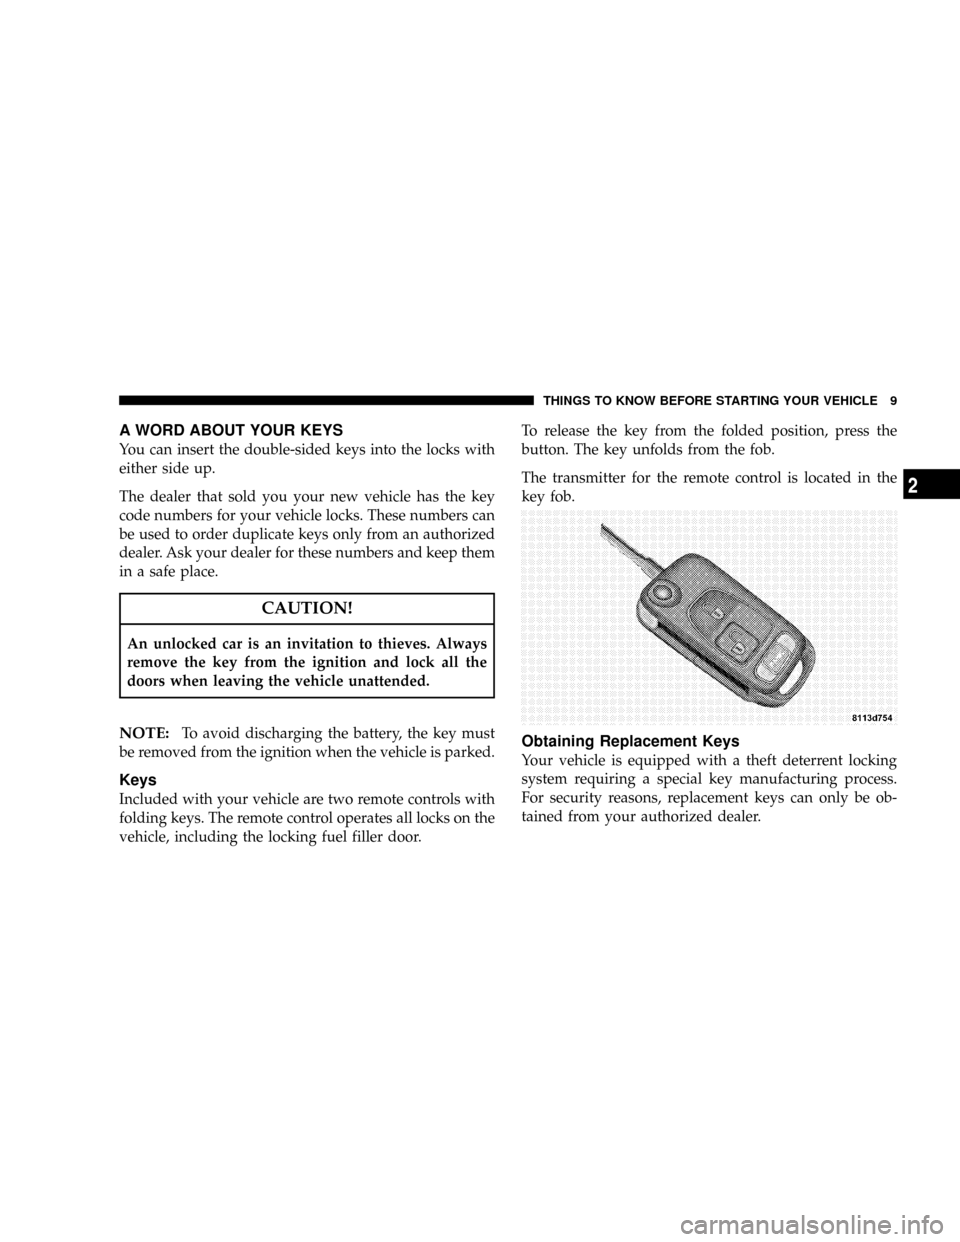
Included with your vehicle are two remote controls with
folding keys. The remote control operates all locks on the
vehicle, including the locking fuel filler door.To release the key from the folded position, press the
button. The key unfolds from the fob.
The transmitter for the remote control is located in the
key fob.
Obtaining Replacement Keys
Your vehicle is equipped with a theft deterrent locking
system requiring a special key manufacturing process.
For security reasons, replacement keys can only be ob-
tained from your authorized dealer.
THINGS TO KNOW BEFORE STARTING YOUR VEHICLE 9
2
Page 12 of 299
The doors can be unlocked by pulling on the inside door
handle, pressing and releasing the top portion of the
central locking switch located in the console, or by
pressing and releasing the Unlock transmit button on the
key fob. Both doors can also be unlocked by turning the
key counterclockwise in the driver's door.
NOTE:If the key in the ignition switch is in the
ON/RUN position, the vehicle cannot be locked or
unlocked with the remote control.
When you lock the vehicle, both door lock buttons
should move down. If either one stays up, the respective
door is not properly closed. You should then unlock the
vehicle, open and reclose the door, and lock the vehicle
again.
Each individual door can be locked with the respective
door lock button - the driver's door can only be locked
when it is closed. If the vehicle has previously been
locked from the outside, only the door being opened
from the inside will unlock, and the alarm will come on.
The other door, the rear liftgate/decklid, fuel filler door,
and center console (roadster only) will remain locked.
NOTE:In case of a malfunction in the central locking
system, the doors can be locked and unlocked individu-
ally. To lock, turn the key in the driver's door lock
clockwise, or push down the lock buttons. To unlock,
turn the key in the driver's door lock counterclockwise,
or pull the inside door handles.
WARNING!
For personal security and safety in the event of an
accident, lock the vehicle doors as you drive and
when you park and leave the vehicle.
Central Locking Switch
The central locking switch is located in the console. The
doors and rear liftgate/decklid can only be locked with
the central locking switch if both doors are closed.
If the vehicle was previously locked with the remote
control or key, the doors and rear liftgate/decklid cannot
be unlocked with the central locking switch. If the vehicle
12 THINGS TO KNOW BEFORE STARTING YOUR VEHICLE
Page 13 of 299

was previously locked with the central locking switch,
the complete vehicle is unlocked when a door is opened
from the inside.
NOTE:The fuel filler door and center console (roadster
only) cannot be locked or unlocked with the central
locking switch.
Automatic Central Locking
The central locking switch also operates the automatic
central locking feature. With the automatic central lock-
ing feature activated, the doors and rear liftgate/decklid
are locked at vehicle speeds of approximately 9 mph (15
km/h) or more; however, the fuel filler door remains
unlocked.
To activate this feature, turn the key to the ON/RUN
position and hold the upper portion of the switch for a
minimum of five seconds. To deactivate, turn the key to
the ON/RUN position and hold the lower portion of the
switch for a minimum of five seconds.
NOTE:If the doors are unlocked with the central
locking switch after activating the automatic central
locking feature and neither door is opened, the doors
remain unlocked even at vehicle speeds of approximately
9 mph (15 km/h) or more.
NOTE:If you attempt to lock the doors with the key in
the ignition and the driver's door open, the doors will not
lock.
General Notes On the Central Locking System
If the key in the ignition switch is in the ON/RUN
position, the vehicle cannot be locked or unlocked with
the remote control.
If the vehicle cannot be locked or unlocked at any time
with the remote control, it may be necessary to change
the batteries in the remote.
THINGS TO KNOW BEFORE STARTING YOUR VEHICLE 13
2
Page 14 of 299

NOTE:To help prevent the vehicle battery from dis-
charging during short periods of inactivity, perform the
following:
1. Make sure that the rear liftgate/decklid, hood and
doors are completely closed.
2. Make sure that remote transmitter is operating and
that the battery is good.
3. Make sure that the hood, rear liftgate/decklid and
door switches are in adjustment.
Perform the quick system check which follows: Use
the remote transmitter to set the alarm. If the parking
lamps flash three times, the system is operating prop-
erly. If not, there is a problem with a switch or the
system. See your authorized dealer for service.
Emergency Unlocking Feature
In the case of an accident, the doors unlock automatically
a short time after a strong deceleration is detected, such
as in a collision (this is intended to aid rescue and exit).
However, the key must still be in the ignition.
Start Lockout
Removing the key from the ignition switch activates the
start lockout. The engine cannot be started. Turning the
key to the ON/RUN position deactivates the start lock-
out. If the engine cannot be started, and the messages
START and ERROR are shown in the odometer display
field, the system is not operational. Contact an autho-
rized dealer.
REMOTE KEYLESS ENTRY
This feature allows you to lock or unlock the vehicle from
remote locations using a hand-held transmitter located in
the key fob. You don't have to point the transmitter at the
vehicle to activate the system. The vehicle doors, rear
liftgate/decklid, fuel filler door, and center console (road-
ster only) can be locked and unlocked using the remote
control.
14 THINGS TO KNOW BEFORE STARTING YOUR VEHICLE
Page 16 of 299

To Lock The Doors
Press the Lock button on the key fob once. All turn signal
lights blink three times to indicate that the vehicle is
locked. If the turn signal lights do not blink, a door or
rear liftgate/decklid is not closed properly.
The entire vehicle, including the fuel filler door, may be
locked or unlocked by using the key in the driver's door.
The doors and liftgate/decklid can be locked or unlocked
by pressing the central locking switch located in the
center console.
If the vehicle cannot be locked or unlocked by pressing
the transmit button, then it may be necessary to change
the batteries in the remote control.
16 THINGS TO KNOW BEFORE STARTING YOUR VEHICLE
Page 19 of 299

approximately 30 seconds, insert the key in the ignition
and turn it to the ON/RUN position. The remote control
should once again be operational.
SECURITY ALARM SYSTEM
The system monitors the doors, rear liftgate/decklid,
hood, and ignition for unauthorized operation. The se-
curity alarm system is automatically armed or disarmed
with the remote control or any of your vehicle's keys by
locking or unlocking the vehicle.
The antitheft alarm is armed within approximately 10
seconds after locking the vehicle. A blinking light in the
tow away alarm switch indicates that the alarm is armed.
Once the alarm system has been armed, the exterior
vehicle lights will flash and an alarm will sound when a
door, the rear liftgate/decklid, the hood, or glove com-
partment is opened, or if someone attempts to raise the
vehicle for towing. The alarm will flash the exterior
lamps for approximately three minutes and sound an
audible alarm for 30 seconds. The alarm will stay on even
if the activating element is immediately closed.
Tow-Away Alarm
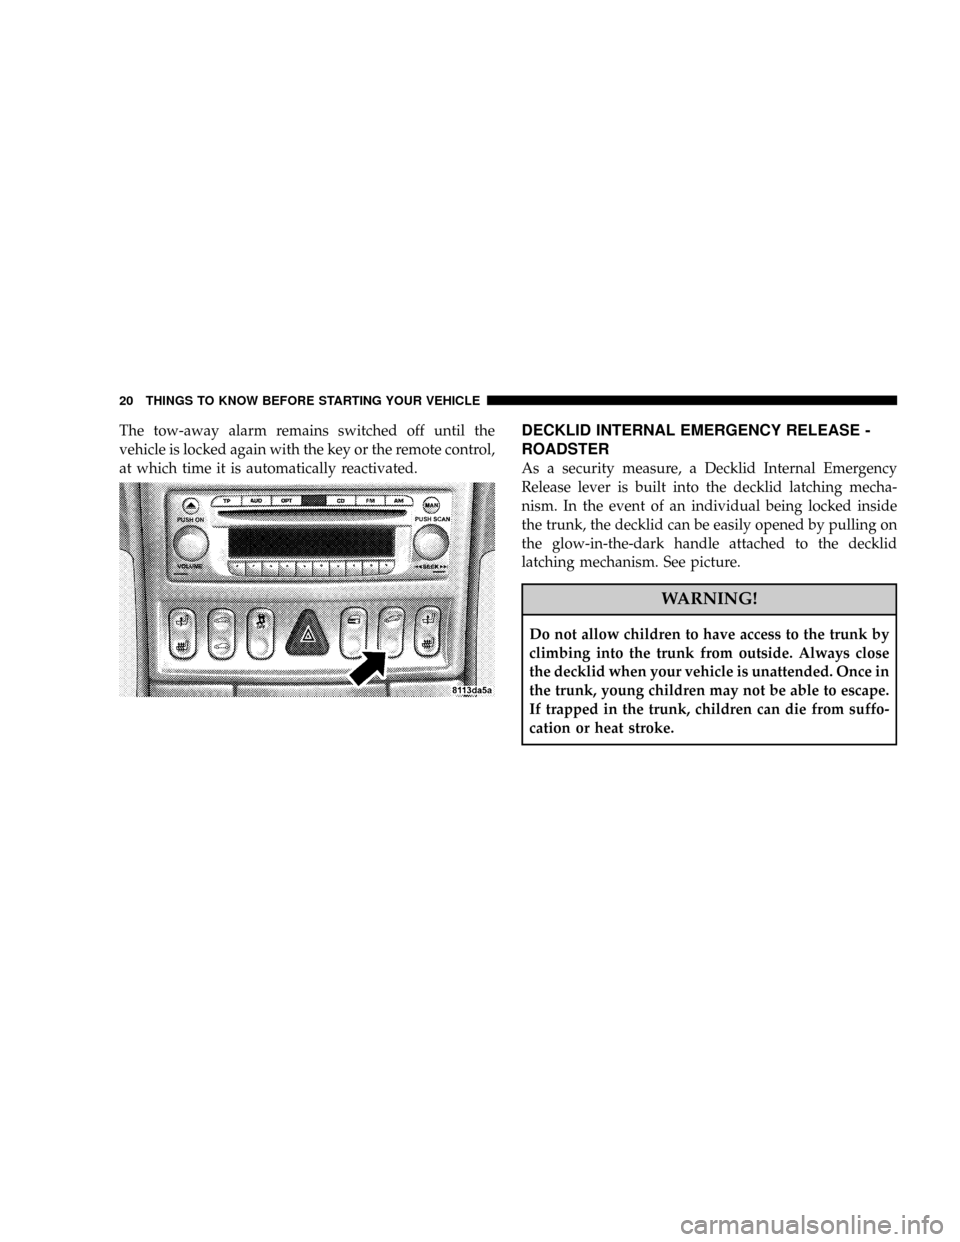
The tow-away alarm switch is located on the console. To
deactivate for towing or jacking up the vehicle, press and
release the upper portion of the switch. Press and release
the upper portion to activate it again.
After the alarm system has been armed, the exterior
vehicle lights will flash and an alarm will sound when
someone attempts to raise the vehicle. The alarm will
flash the exterior lamps for approximately three minutes
and sound an audible alarm for 30 seconds. The alarm
will stay on even if the vehicle is immediately lowered.
To cancel the alarm, insert the key into the ignition switch
or press a transmit button on the key fob.
To prevent triggering the tow-away alarm feature when
parking on a surface subject to movement (such as a
ferry), switch off the tow-away alarm. To do so, turn the
key in the ignition switch to the OFF/LOCK or ACC
position, or remove the key from the ignition switch.
Press the tow-away alarm switch and the indicator light
will illuminate briefly. Exit the vehicle, and lock the
vehicle with the key or the remote control.
THINGS TO KNOW BEFORE STARTING YOUR VEHICLE 19
2
Page 20 of 299
The tow-away alarm remains switched off until the
vehicle is locked again with the key or the remote control,
at which time it is automatically reactivated.DECKLID INTERNAL EMERGENCY RELEASE -
ROADSTER
As a security measure, a Decklid Internal Emergency
Release lever is built into the decklid latching mecha-
nism. In the event of an individual being locked inside
the trunk, the decklid can be easily opened by pulling on
the glow-in-the-dark handle attached to the decklid
latching mechanism. See picture.
WARNING!
Do not allow children to have access to the trunk by
climbing into the trunk from outside. Always close
the decklid when your vehicle is unattended. Once in
the trunk, young children may not be able to escape.
If trapped in the trunk, children can die from suffo-
cation or heat stroke.
20 THINGS TO KNOW BEFORE STARTING YOUR VEHICLE
Page 263 of 299
the vehicle and then readjust the headlights to the
original position. If any further adjustments are neces-
sary contact your manufacturer's dealer. A detailed ser-
vice procedure is contained in the manufacturer's Service
Manual. Information on purchasing a Service Manual can
be found at the back of this Owner's Manual.
VEHICLE STORAGE
We recommend that you follow these guidelines before
storing your Crossfire for extended periods.
²Fill the gas tank. This will prevent water condensation
inside the tank. If you plan on storing your vehicle
more than two months, add an anti-oxidant fuel
stabilizer to the gas tank.
²Change the oil to remove any corrosive combustion-
related acids in the crankcase.
²Wash and wax the vehicle to protect the finish.
²Cover the vehicle whenever possible to prevent acci-
dental damage to the finish.
²Store the vehicle in a dry, well-ventilated location.
²If the vehicle will be subjected to freezing tempera-
tures, remove the battery and store it in a dry, well-
ventilated place. If the vehicle is not going to be driven
in the next three weeks, follow the battery recharge
procedure in the Service Manual, then disconnect the
battery at the negative terminal.
CAUTION!
Use care when disconnecting the remote positive
cable. It is connected to the battery and can short out
to any metal on the vehicle. Always tape or wrap the
exposed cable end to prevent electrical shorts.
Disconnecting the battery causes the engine control sys-
tem to lose memory of some ªlearnedº functions. The
engine may run rough when first started after a battery
disconnect until the control module ªrelearnsº these
functions.
Check the battery every four to six weeks to ensure that
the voltage is above 12.40. Voltage will drop more rapidly
MAINTAINING YOUR VEHICLE 263
7
Page 299 of 299

INTRODUCTION INTRODUCTION HOW TO USE THIS MANUAL WARNINGS AND CAUTIONS VEHICLE IDENTIFICATION NUMBER THINGS TO KNOW BEFORE STARTING YOUR VEHICLE A WORD ABOUT YOUR KEYS KeysObtaining Replacement KeysIgnition
Key RemovalKey-In-Ignition ReminderGLOVE COMPARTMENT LOCK DOOR LOCKS Central Locking SwitchAutomatic Central LockingGeneral Notes On the Central Locking SystemEmergency Unlocking FeatureStart LockoutREMOTE KEYLESS ENTRY To Unlock the
DoorsTo Lock The DoorsPanic AlarmTo Use the Panic AlarmGeneral InformationTransmitter Battery ServiceSECURITY ALARM SYSTEM Tow-Away AlarmDECKLID INTERNAL EMERGENCY RELEASE - ROADSTER POWER WINDOWS Power Window Operation With
The Convertible Top Switch (Roadster Only)REAR LIFTGATE/DECKLID RELEASE OCCUPANT RESTRAINTS Lap/Shoulder BeltsSeat Belts and Pregnant WomenSeat Belt ExtenderSupplemental Restraint System (SRS) - Airbag Child RestraintENGINE BREAK-IN
RECOMMENDATIONS SAFETY TIPS Exhaust GasSafety Checks You Should Make Inside the VehiclePeriodic Safety Checks You Should Make Outside the VehicleUNDERSTANDING THE FEATURES OF YOUR VEHICLE CONVERTIBLE TOP OPERATION To Lower
The TopTo Raise The TopConvertible Top Lamp and Audible Signal ChartCONSOLE FEATURES Storage Compartments (If Equipped)AshtrayCoin HolderPower Outlet/Cigar LighterGlove CompartmentCUPHOLDER (If Equipped) MIRRORS Inside Day/Night MirrorExterior
Mirrors Folding FeatureHeated Remote Control Mirrors (If Equipped)Outside MirrorsPower Remote Control Outside MirrorsVanity Mirrors SEATS Manual Seat Adjustments (If Equipped)Driver Eight-Way Power Seat (If Equipped)Passenger Four-Way Power Seat (If Equipped)
Heated Seats (If Equipped)TO OPEN AND CLOSE THE HOOD INTERIOR LIGHTS Front Map/Reading LightsBattery Saver FeatureInstrument Panel LightingNightSecurity IlluminationEXTERIOR LIGHTS Headlights and Parking LightsDaytime Running Lights (Where
Applicable)Fog Lights (If Equipped)Standing LightsMULTIFUNCTION CONTROL LEVER Turn SignalsHeadlight Dimmer SwitchPassing LightWindshield Wipers And WasherMist FunctionTELESCOPING STEERING COLUMN TIRE PRESSURE MONITOR SYSTEM (if
equipped) REAR SPOILER BRAKE ASSIST SYSTEM (BAS) ELECTRONIC STABILITY PROGRAM (ESP) Synchronizing ESPELECTRONIC SPEED CONTROL To Vary The Speed SettingTo DeactivateTo Resume SpeedUsing Speed Control On HillsGARAGE DOOR
OPENER (If Equipped) Programming The Universal TransceiverGate Operator/Canadian ProgrammingUsing the Universal TransceiverErasing Universal Transceiver ButtonsReprogramming a Single ButtonSecurityUMBRELLA HOOK UNDERSTANDING YOUR
INSTRUMENT PANEL INSTRUMENTS AND CONTROLS INSTRUMENT CLUSTER INSTRUMENT CLUSTER DESCRIPTION INFINITY MODULUS AM/FM STEREO RADIO WITH SINGLE-DISC CD PLAYER AND GPS NAVIGATION AM/FM STEREO RADIO WITH
SINGLE-DISC CD PLAYER INFINITY MODULUS Entertainment SystemsCD Player OperationUser MenuUser Memory (USER - 1, 2, 3)Mono/StereoDriver - L/RTelephone mute characteristicsCOMPACT DISC MAINTENANCE RADIO ANTENNA RADIO OPERATION AND
CELLULAR PHONES CLIMATE CONTROLS Temperature ControlFan ControlBasic Setting - HeaterBasic Setting - Air ConditionerDust Filter (If Equipped)Operating Tips STARTING AND OPERATING STARTING PROCEDURES Normal StartingExtremely Cold Weather
(below -20 degrees F or -29 degrees C)If Engine Fails to StartAfter StartingTRANSMISSION SHIFTING Manual Transmission Recommended Shift SpeedsAutomatic Transmission StoppingManeuveringPark PositionReverseNeutralDriveAutoStick Gear selectionGear Ranges
Program mode selector switchEmergency Operation (Limp Home Mode)PARKING BRAKE BRAKE SYSTEM Brake Assist System (BAS)Electronic Stability Program (ESP)Synchronizing ESPESP Control switchAnti-Lock Brake System (ABS)Brake Pad Break-InPOWER
STEERING TIRE SAFETY INFORMATION Tire Markings Tire Identification Number (TIN)Tire Loading and Tire PressureTIRES-GENERAL INFORMATION Tire PressureTire Inflation PressuresRadial-Ply TiresTire SpinningTread Wear IndicatorsReplacement TiresAlignment
And BalanceTIRE PRESSURE MONITOR SYSTEM (If Equipped) General InformationTIRE CHAINS ORIGINAL EQUIPMENT TIRES SNOW TIRES TIRE ROTATION RECOMMENDATIONS FUEL REQUIREMENTS Reformulated GasolineGasoline/Oxygenate BlendsMMT
in GasolineMaterials Added to FuelSulfur in GasolineADDING FUEL Fuel Filler Cap (Gas Cap)VEHICLE LOADING Roof Luggage RackTRAILER TOWING WHAT TO DOIN EMERGENCIES HAZARD WARNING FLASHER IF YOUR ENGINE OVERHEATS TIREFIT TIRE
REPAIR AND JACKING TIREFITPreparations for JackingJack Location and Instructions JUMP-STARTING THE BATTERY DRIVING ON SLIPPERY SURFACES Traction FREEING A STUCK VEHICLE TOWING A DISABLED VEHICLE Towing EyesTow-Away Alarm
CONVERTIBLE TOP EMERGENCY OPERATION Relieving Hydraulic PressureOpening a Locked DecklidMAINTAINING YOUR VEHICLE 3.2L ENGINE ONBOARD DIAGNOSTIC SYSTEM (OBD II) EMISSIONS INSPECTION AND MAINTENANCE PROGRAMS
REPLACEMENT PARTS DEALER SERVICE MAINTENANCE PROCEDURES Engine OilIgnition Wiring SystemCrankcase Emission Control SystemMaintenance-Free BatteryAir ConditionerPower Steering FluidChassis LubricationBody LubricationWindshield Wiper Blades
Windshield Wiper Blade ReplacementWindshield Washer ReservoirExhaust SystemCooling SystemHoses And Vacuum/Vapor HarnessesBrakesAutomatic TransmissionManual TransmissionAppearance Care and Protection from CorrosionCONVERTIBLE TOP CARE
WashingGeneral CleaningWeather Strip CareFUSES Underhood Accessory Fuse Block FusesRelay Control Module Fuses Interior Fuses REPLACEMENT BULBSInterior Light BulbsExterior Light BulbsEXTERIOR LIGHT BULB SERVICE HeadlightsFront Turn Signal and
Parking/Standing LightsFront and Rear Sidemarker LightsTail, Stop, Back Up and Turn Signal LightsLicense Plate LightHeadlight AimingVEHICLE STORAGE SPECIFICATIONS FLUID CAPACITIES RECOMMENDED FLUIDS, LUBRICANTS AND GENUINE PARTS Engine
ChassisBodyMAINTENANCE SCHEDULES INTRODUCTION WARRANTY EMISSION CONTROL SYSTEM MAINTENANCE MAINTENANCE SCHEDULES SCOPE OF WORK FOR A SCHEDULE MAINTENANCE SERVICESCOPE OF WORK FOR B SCHEDULE
MAINTENANCE SERVICEFSS SYSTEM REGULAR CHECK-UPS Additional Periodic MaintenanceSPECIAL MAINTENANCE REQUIREMENTS CoolantDust Filter for Heating/Ventilation Replacement (If Equipped)ENGINE OIL CHANGE AND FILTER REPLACEMENT IF
YOU NEED CONSUMER ASSISTANCE SUGGESTIONS FOR OBTAINING SERVICE FOR YOUR VEHICLE Prepare For The AppointmentPrepare A ListBe Reasonable With RequestsIF YOU NEED ASSISTANCE WARRANTY INFORMATION MOPAR PARTS REPORTING
SAFETY DEFECTS In CanadaPUBLICATION ORDER FORMS DEPARTMENT OF TRANSPORTATION UNIFORM TIRE QUALITY GRADES TreadwearTraction GradesTemperature GradesINDEX