turn signal bulb CHRYSLER CROSSFIRE 2007 1.G Owners Manual
[x] Cancel search | Manufacturer: CHRYSLER, Model Year: 2007, Model line: CROSSFIRE, Model: CHRYSLER CROSSFIRE 2007 1.GPages: 299, PDF Size: 8.26 MB
Page 56 of 299

²To avoid drawing exhaust gases into the vehicle, close
the rear liftgate/decklid while driving. However, if for
some reason it must remain open, close all windows.
Adjust the heating or cooling system to force outside
air into the vehicle. Set the blower at high speed.
Safety Checks You Should Make Inside the
Vehicle
Seat Belts
Inspect the belt system periodically, checking for cuts,
frays and loose parts. Damaged parts must be replaced
immediately. Do not disassemble or modify the system.
Seat belt assemblies must be replaced after an accident if
they have been damaged (bent retractor, torn webbing,
etc.). If there is any question regarding belt or retractor
condition, see your authorized dealer.
Airbag Light
The light should come on and remain on for
four seconds as a bulb check when the ignition
switch is first turned ON. If the bulb is not litduring starting, have it replaced. If the light stays on or
comes on while driving, have the system checked by an
authorized dealer.
Defrosters
Check operation by pressing the A/C control button,
selecting the defrost mode and placing the blower control
on high speed. You should be able to feel the air directed
against the windshield.
Periodic Safety Checks You Should Make Outside
the Vehicle
Tires
Examine tires for excessive tread wear or uneven wear
patterns. Check for stones, nails, glass, or other objects
lodged in the tread. Inspect for tread cuts or sidewall
cracks. Check wheel nuts for tightness and tires for
proper pressure.
Lights
Have someone observe the operation of exterior lights
while you work the controls. Check turn signal and high
beam indicator lights on the instrument panel.
56 THINGS TO KNOW BEFORE STARTING YOUR VEHICLE
Page 88 of 299

CAUTION!
Standing lamps are intended for short term use when
parking. If these lights are left on for a long period of
time, your car's battery may drain, causing a possible
starting problem. Assure that the headlamp switch is
in the OFF position when leaving the vehicle.
MULTIFUNCTION CONTROL LEVERTurn Signals
Move the multifunction control lever up to activate the
right turn signal; move the lever down to activate the left
turn signal. An arrow on the inside of the speedometer
will flash to indicate operation.
To signal minor directional changes, such as changing
lanes, move the control lever just to the point of resis-
tance, and hold it there.
To operate the turn signals continuously, move the con-
trol lever up or down past the point of resistance. The
operation is automatically canceled when the steering
wheel is turned to a large enough degree.
If one of the turn signal lights fail, the turn signal
indicator system flashes and sounds at a faster than
normal rate. If an indicator fails to light when the control
lever is moved, it may mean that the fuse or indicator
bulb is defective.
88 UNDERSTANDING THE FEATURES OF YOUR VEHICLE
Page 220 of 299

NManual Transmission..................245
NAppearance Care And Protection From
Corrosion...........................246
mConvertible Top Care...................251
NWashing............................251
NGeneral Cleaning.....................252
NWeather Strip Care....................252
mFuses...............................253
NUnderhood Accessory Fuse Block Fuses.....253
NRelay Control Module Fuses.............257
NInterior Fuses........................258
mReplacement Bulbs.....................259
NInterior Light Bulbs....................259
NExterior Light Bulbs...................259
mExterior Light Bulb Service...............260NHeadlights..........................260
NFront Turn Signal And Parking/Standing
Lights.............................261
NFront And Rear Sidemarker Lights.........261
NTail, Stop, Back Up And Turn Signal Lights . . . 261
NLicense Plate Light....................262
NHeadlight Aiming.....................262
mVehicle Storage........................263
mSpecifications.........................265
mFluid Capacities.......................267
mRecommended Fluids, Lubricants And
Genuine Parts
.........................268
NEngine.............................268
NChassis............................269
NBody..............................270
220 MAINTAINING YOUR VEHICLE
Page 259 of 299

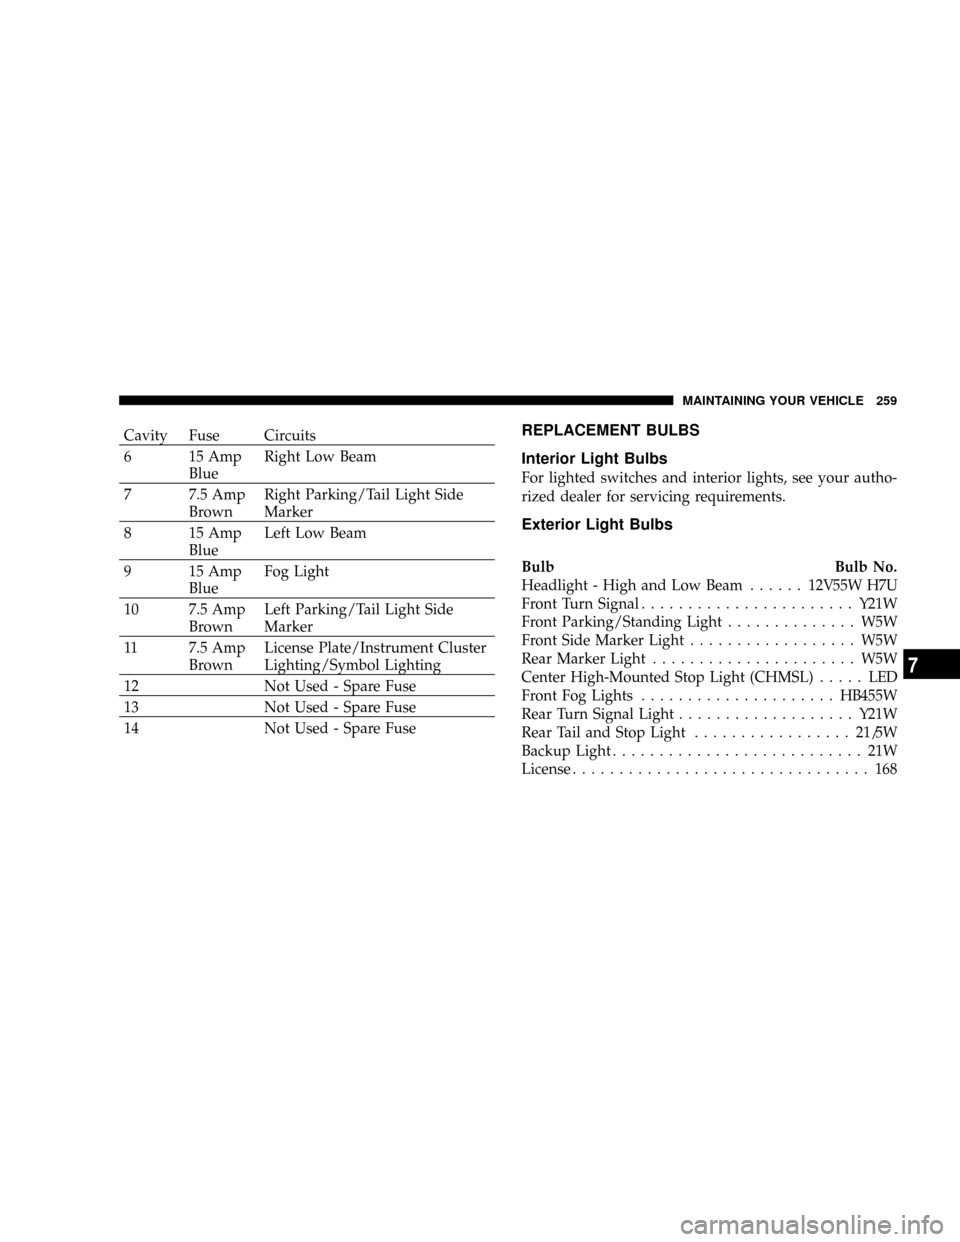
Cavity Fuse Circuits
6 15 Amp
BlueRight Low Beam
7 7.5 Amp
BrownRight Parking/Tail Light Side
Marker
8 15 Amp
BlueLeft Low Beam
9 15 Amp
BlueFog Light
10 7.5 Amp
BrownLeft Parking/Tail Light Side
Marker
11 7.5 Amp
BrownLicense Plate/Instrument Cluster
Lighting/Symbol Lighting
12 Not Used - Spare Fuse
13 Not Used - Spare Fuse
14 Not Used - Spare FuseREPLACEMENT BULBS
Interior Light Bulbs
For lighted switches and interior lights, see your autho-
rized dealer for servicing requirements.
Exterior Light Bulbs
Bulb Bulb No.
Headlight - High and Low Beam......12V55W H7U
Front Turn Signal.......................Y21W
Front Parking/Standing Light.............. W5W
Front Side Marker Light.................. W5W
Rear Marker Light...................... W5W
Center High-Mounted Stop Light (CHMSL)..... LED
Front Fog Lights.....................HB455W
Rear Turn Signal Light...................Y21W
Rear Tail and Stop Light.................21/5W
Backup Light........................... 21W
License................................ 168
MAINTAINING YOUR VEHICLE 259
7
Page 261 of 299

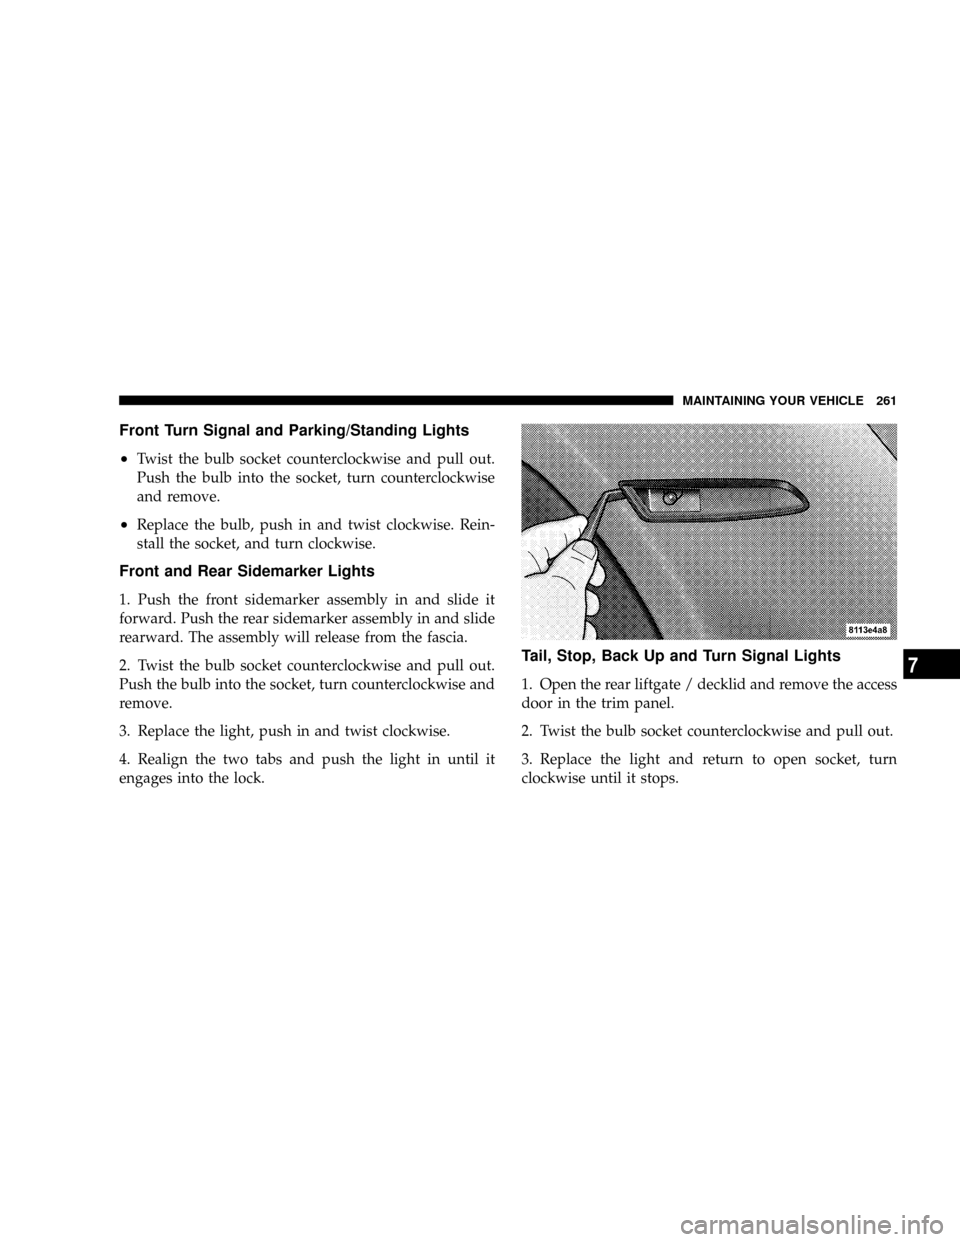
Front Turn Signal and Parking/Standing Lights
²
Twist the bulb socket counterclockwise and pull out.
Push the bulb into the socket, turn counterclockwise
and remove.
²Replace the bulb, push in and twist clockwise. Rein-
stall the socket, and turn clockwise.
Front and Rear Sidemarker Lights
1. Push the front sidemarker assembly in and slide it
forward. Push the rear sidemarker assembly in and slide
rearward. The assembly will release from the fascia.
2. Twist the bulb socket counterclockwise and pull out.
Push the bulb into the socket, turn counterclockwise and
remove.
3. Replace the light, push in and twist clockwise.
4. Realign the two tabs and push the light in until it
engages into the lock.
Tail, Stop, Back Up and Turn Signal Lights
1. Open the rear liftgate / decklid and remove the access
door in the trim panel.
2. Twist the bulb socket counterclockwise and pull out.
3. Replace the light and return to open socket, turn
clockwise until it stops.
MAINTAINING YOUR VEHICLE 261
7
Page 294 of 299

Lap/Shoulder Belts...................... 24
Light Bulbs........................... 259
Lights
Airbag...........................35,123
Anti-Lock Warning.................... 118
Back-Up............................ 261
Daytime Running...................... 87
Exterior............................. 86
Exterior Check........................ 56
Fog ................................ 87
Hazard Warning Flasher................ 194
Headlights........................... 86
Instrument Cluster..................... 86
Interior...........................85,259
License............................. 262
Lights On Reminder.................... 87
Malfunction Indicator (Check Engine)...... 124
Map Reading......................... 85
Park.............................86,261
Rear Tail............................ 261
Seat Belt Reminder.................... 118
Turn Signal.......................... 261
Loading Vehicle........................ 172Capacities........................... 191
Tires ............................... 172
Lubrication, Body....................... 235
Maintenance Free Battery................. 231
Maintenance Procedures.................. 225
Maintenance Schedules.................. 273
Malfunction Indicator Light
(Check Engine)......................124,223
Manual Override, Convertible Top.......... 211
Manual, Service........................ 286
Manual Transmission.................147,245
Fluid Level Check..................... 245
Frequency of Fluid Change.............. 246
Lubricant Selection.................... 245
Marker Lights, Side..................... 261
Master Cylinder (Brakes)................. 243
Mirrors............................... 77
Electric Powered....................... 78
Electric Remote....................... 77
Exterior Folding....................... 77
Heated.............................. 77
Outside............................. 77
294 INDEX
Page 299 of 299

INTRODUCTION INTRODUCTION HOW TO USE THIS MANUAL WARNINGS AND CAUTIONS VEHICLE IDENTIFICATION NUMBER THINGS TO KNOW BEFORE STARTING YOUR VEHICLE A WORD ABOUT YOUR KEYS KeysObtaining Replacement KeysIgnition
Key RemovalKey-In-Ignition ReminderGLOVE COMPARTMENT LOCK DOOR LOCKS Central Locking SwitchAutomatic Central LockingGeneral Notes On the Central Locking SystemEmergency Unlocking FeatureStart LockoutREMOTE KEYLESS ENTRY To Unlock the
DoorsTo Lock The DoorsPanic AlarmTo Use the Panic AlarmGeneral InformationTransmitter Battery ServiceSECURITY ALARM SYSTEM Tow-Away AlarmDECKLID INTERNAL EMERGENCY RELEASE - ROADSTER POWER WINDOWS Power Window Operation With
The Convertible Top Switch (Roadster Only)REAR LIFTGATE/DECKLID RELEASE OCCUPANT RESTRAINTS Lap/Shoulder BeltsSeat Belts and Pregnant WomenSeat Belt ExtenderSupplemental Restraint System (SRS) - Airbag Child RestraintENGINE BREAK-IN
RECOMMENDATIONS SAFETY TIPS Exhaust GasSafety Checks You Should Make Inside the VehiclePeriodic Safety Checks You Should Make Outside the VehicleUNDERSTANDING THE FEATURES OF YOUR VEHICLE CONVERTIBLE TOP OPERATION To Lower
The TopTo Raise The TopConvertible Top Lamp and Audible Signal ChartCONSOLE FEATURES Storage Compartments (If Equipped)AshtrayCoin HolderPower Outlet/Cigar LighterGlove CompartmentCUPHOLDER (If Equipped) MIRRORS Inside Day/Night MirrorExterior
Mirrors Folding FeatureHeated Remote Control Mirrors (If Equipped)Outside MirrorsPower Remote Control Outside MirrorsVanity Mirrors SEATS Manual Seat Adjustments (If Equipped)Driver Eight-Way Power Seat (If Equipped)Passenger Four-Way Power Seat (If Equipped)
Heated Seats (If Equipped)TO OPEN AND CLOSE THE HOOD INTERIOR LIGHTS Front Map/Reading LightsBattery Saver FeatureInstrument Panel LightingNightSecurity IlluminationEXTERIOR LIGHTS Headlights and Parking LightsDaytime Running Lights (Where
Applicable)Fog Lights (If Equipped)Standing LightsMULTIFUNCTION CONTROL LEVER Turn SignalsHeadlight Dimmer SwitchPassing LightWindshield Wipers And WasherMist FunctionTELESCOPING STEERING COLUMN TIRE PRESSURE MONITOR SYSTEM (if
equipped) REAR SPOILER BRAKE ASSIST SYSTEM (BAS) ELECTRONIC STABILITY PROGRAM (ESP) Synchronizing ESPELECTRONIC SPEED CONTROL To Vary The Speed SettingTo DeactivateTo Resume SpeedUsing Speed Control On HillsGARAGE DOOR
OPENER (If Equipped) Programming The Universal TransceiverGate Operator/Canadian ProgrammingUsing the Universal TransceiverErasing Universal Transceiver ButtonsReprogramming a Single ButtonSecurityUMBRELLA HOOK UNDERSTANDING YOUR
INSTRUMENT PANEL INSTRUMENTS AND CONTROLS INSTRUMENT CLUSTER INSTRUMENT CLUSTER DESCRIPTION INFINITY MODULUS AM/FM STEREO RADIO WITH SINGLE-DISC CD PLAYER AND GPS NAVIGATION AM/FM STEREO RADIO WITH
SINGLE-DISC CD PLAYER INFINITY MODULUS Entertainment SystemsCD Player OperationUser MenuUser Memory (USER - 1, 2, 3)Mono/StereoDriver - L/RTelephone mute characteristicsCOMPACT DISC MAINTENANCE RADIO ANTENNA RADIO OPERATION AND
CELLULAR PHONES CLIMATE CONTROLS Temperature ControlFan ControlBasic Setting - HeaterBasic Setting - Air ConditionerDust Filter (If Equipped)Operating Tips STARTING AND OPERATING STARTING PROCEDURES Normal StartingExtremely Cold Weather
(below -20 degrees F or -29 degrees C)If Engine Fails to StartAfter StartingTRANSMISSION SHIFTING Manual Transmission Recommended Shift SpeedsAutomatic Transmission StoppingManeuveringPark PositionReverseNeutralDriveAutoStick Gear selectionGear Ranges
Program mode selector switchEmergency Operation (Limp Home Mode)PARKING BRAKE BRAKE SYSTEM Brake Assist System (BAS)Electronic Stability Program (ESP)Synchronizing ESPESP Control switchAnti-Lock Brake System (ABS)Brake Pad Break-InPOWER
STEERING TIRE SAFETY INFORMATION Tire Markings Tire Identification Number (TIN)Tire Loading and Tire PressureTIRES-GENERAL INFORMATION Tire PressureTire Inflation PressuresRadial-Ply TiresTire SpinningTread Wear IndicatorsReplacement TiresAlignment
And BalanceTIRE PRESSURE MONITOR SYSTEM (If Equipped) General InformationTIRE CHAINS ORIGINAL EQUIPMENT TIRES SNOW TIRES TIRE ROTATION RECOMMENDATIONS FUEL REQUIREMENTS Reformulated GasolineGasoline/Oxygenate BlendsMMT
in GasolineMaterials Added to FuelSulfur in GasolineADDING FUEL Fuel Filler Cap (Gas Cap)VEHICLE LOADING Roof Luggage RackTRAILER TOWING WHAT TO DOIN EMERGENCIES HAZARD WARNING FLASHER IF YOUR ENGINE OVERHEATS TIREFIT TIRE
REPAIR AND JACKING TIREFITPreparations for JackingJack Location and Instructions JUMP-STARTING THE BATTERY DRIVING ON SLIPPERY SURFACES Traction FREEING A STUCK VEHICLE TOWING A DISABLED VEHICLE Towing EyesTow-Away Alarm
CONVERTIBLE TOP EMERGENCY OPERATION Relieving Hydraulic PressureOpening a Locked DecklidMAINTAINING YOUR VEHICLE 3.2L ENGINE ONBOARD DIAGNOSTIC SYSTEM (OBD II) EMISSIONS INSPECTION AND MAINTENANCE PROGRAMS
REPLACEMENT PARTS DEALER SERVICE MAINTENANCE PROCEDURES Engine OilIgnition Wiring SystemCrankcase Emission Control SystemMaintenance-Free BatteryAir ConditionerPower Steering FluidChassis LubricationBody LubricationWindshield Wiper Blades
Windshield Wiper Blade ReplacementWindshield Washer ReservoirExhaust SystemCooling SystemHoses And Vacuum/Vapor HarnessesBrakesAutomatic TransmissionManual TransmissionAppearance Care and Protection from CorrosionCONVERTIBLE TOP CARE
WashingGeneral CleaningWeather Strip CareFUSES Underhood Accessory Fuse Block FusesRelay Control Module Fuses Interior Fuses REPLACEMENT BULBSInterior Light BulbsExterior Light BulbsEXTERIOR LIGHT BULB SERVICE HeadlightsFront Turn Signal and
Parking/Standing LightsFront and Rear Sidemarker LightsTail, Stop, Back Up and Turn Signal LightsLicense Plate LightHeadlight AimingVEHICLE STORAGE SPECIFICATIONS FLUID CAPACITIES RECOMMENDED FLUIDS, LUBRICANTS AND GENUINE PARTS Engine
ChassisBodyMAINTENANCE SCHEDULES INTRODUCTION WARRANTY EMISSION CONTROL SYSTEM MAINTENANCE MAINTENANCE SCHEDULES SCOPE OF WORK FOR A SCHEDULE MAINTENANCE SERVICESCOPE OF WORK FOR B SCHEDULE
MAINTENANCE SERVICEFSS SYSTEM REGULAR CHECK-UPS Additional Periodic MaintenanceSPECIAL MAINTENANCE REQUIREMENTS CoolantDust Filter for Heating/Ventilation Replacement (If Equipped)ENGINE OIL CHANGE AND FILTER REPLACEMENT IF
YOU NEED CONSUMER ASSISTANCE SUGGESTIONS FOR OBTAINING SERVICE FOR YOUR VEHICLE Prepare For The AppointmentPrepare A ListBe Reasonable With RequestsIF YOU NEED ASSISTANCE WARRANTY INFORMATION MOPAR PARTS REPORTING
SAFETY DEFECTS In CanadaPUBLICATION ORDER FORMS DEPARTMENT OF TRANSPORTATION UNIFORM TIRE QUALITY GRADES TreadwearTraction GradesTemperature GradesINDEX