buttons CHRYSLER CROSSFIRE 2008 1.G Owners Manual
[x] Cancel search | Manufacturer: CHRYSLER, Model Year: 2008, Model line: CROSSFIRE, Model: CHRYSLER CROSSFIRE 2008 1.GPages: 358, PDF Size: 4.7 MB
Page 15 of 358
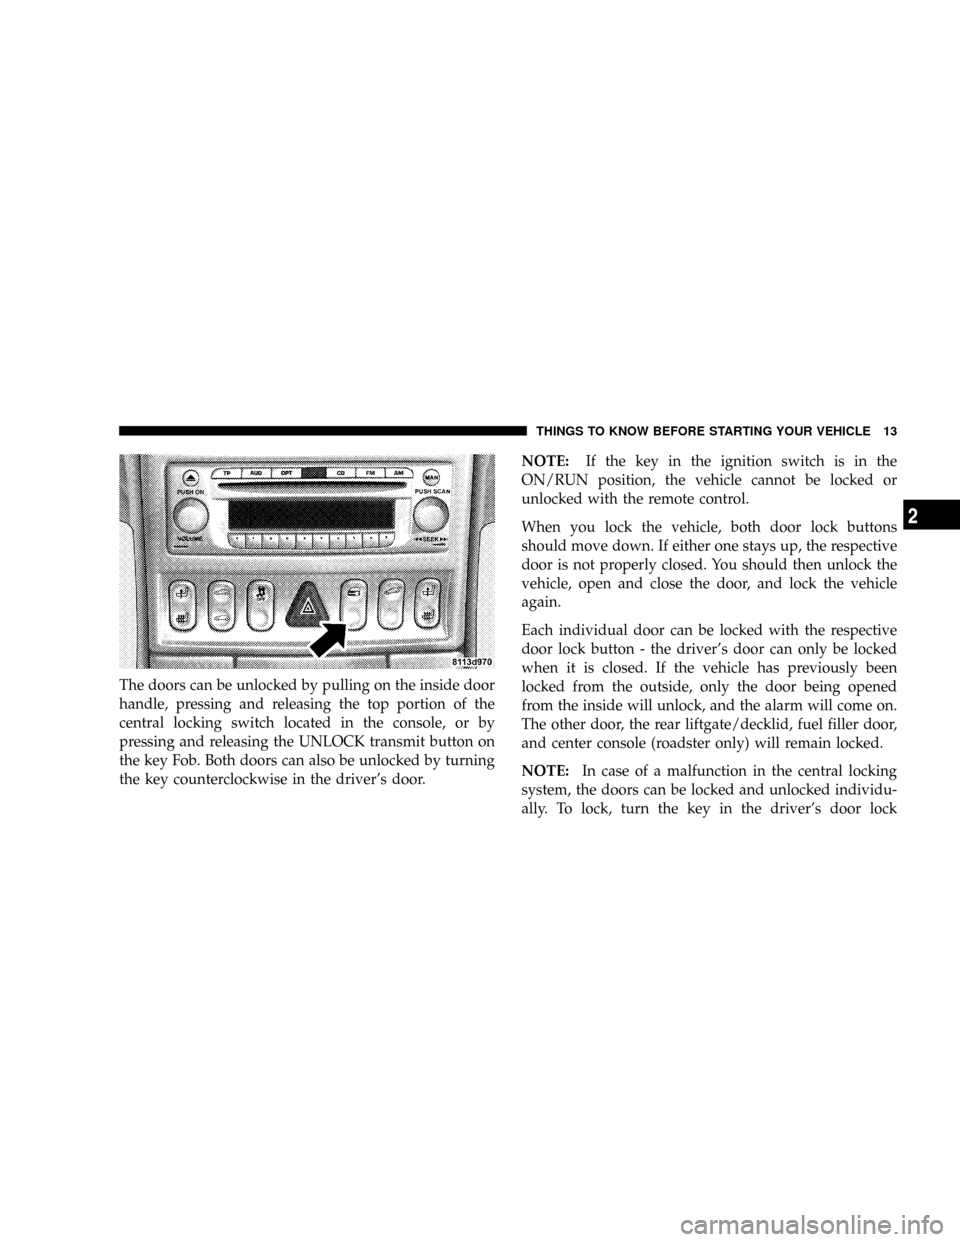
The doors can be unlocked by pulling on the inside door
handle, pressing and releasing the top portion of the
central locking switch located in the console, or by
pressing and releasing the UNLOCK transmit button on
the key Fob. Both doors can also be unlocked by turning
the key counterclockwise in the driver's door.NOTE:If the key in the ignition switch is in the
ON/RUN position, the vehicle cannot be locked or
unlocked with the remote control.
When you lock the vehicle, both door lock buttons
should move down. If either one stays up, the respective
door is not properly closed. You should then unlock the
vehicle, open and close the door, and lock the vehicle
again.
Each individual door can be locked with the respective
door lock button - the driver's door can only be locked
when it is closed. If the vehicle has previously been
locked from the outside, only the door being opened
from the inside will unlock, and the alarm will come on.
The other door, the rear liftgate/decklid, fuel filler door,
and center console (roadster only) will remain locked.
NOTE:In case of a malfunction in the central locking
system, the doors can be locked and unlocked individu-
ally. To lock, turn the key in the driver's door lock
THINGS TO KNOW BEFORE STARTING YOUR VEHICLE 13
2
Page 16 of 358
clockwise, or push down the LOCK buttons. To unlock,
turn the key in the driver's door lock counterclockwise,
or pull the inside door handles.
WARNING!
For personal security and safety in the event of an
accident, lock the vehicle doors as you drive and
when you park and leave the vehicle.
Central Locking Switch
The central locking switch is located in the console. The
doors and rear liftgate/decklid can only be locked with
the central locking switch if both doors are closed.
If the vehicle was previously locked with the remote
control or key, the doors and rear liftgate/decklid cannot
be unlocked with the central locking switch. If the vehiclewas previously locked with the central locking switch,
the complete vehicle is unlocked when a door is opened
from the inside.
NOTE:The fuel filler door and center console (roadster
only) cannot be locked or unlocked with the central
locking switch.
Automatic Central Locking
The central locking switch also operates the automatic
central locking feature. With the automatic central lock-
ing feature activated, the doors and rear liftgate/decklid
are locked at vehicle speeds of approximately 9 mph (15
km/h) or more; however, the fuel filler door remains
unlocked.
To activate this feature, turn the key to the ON/RUN
position and hold the upper portion of the switch for a
minimum of five seconds. To deactivate, turn the key to
the ON/RUN position and hold the lower portion of the
switch for a minimum of five seconds.
14 THINGS TO KNOW BEFORE STARTING YOUR VEHICLE
Page 69 of 358
mBrake Assist System (BAS)................108
mElectronic Stability Program (ESP)...........110
NSynchronizing ESP....................113
mElectronic Speed Control..................113
NTo Vary The Speed Setting...............115
NTo Deactivate........................115
NTo Resume Speed.....................116
NUsing Speed Control On Hills............116mGarage Door Opener (If Equipped)..........117
NProgramming The Universal Transceiver.....118
NGate Operator/Canadian Programming.....121
NUsing The Universal Transceiver..........122
NErasing Universal Transceiver Buttons.......122
NReprogramming a Single Button...........122
NSecurity............................122
mUmbrella Hook........................123
UNDERSTANDING THE FEATURES OF YOUR VEHICLE 67
3
Page 121 of 358
WARNING!
Your motorized door or gate will open and close
while you are programming the universal trans-
ceiver. Do not program the transceiver if people or
pets are in the path of the door or gate. A moving
door or gate can cause serious injury or death to
people and pets or damage to objects.
2. Turn the ignition to the ON/RUN position.
3. Erase the factory test codes by pressing the two
outside buttons. Release the buttons when the light in the
overhead console display begins to flash (about 20 sec-
onds).
NOTE:Step 3 does not have to be followed to program
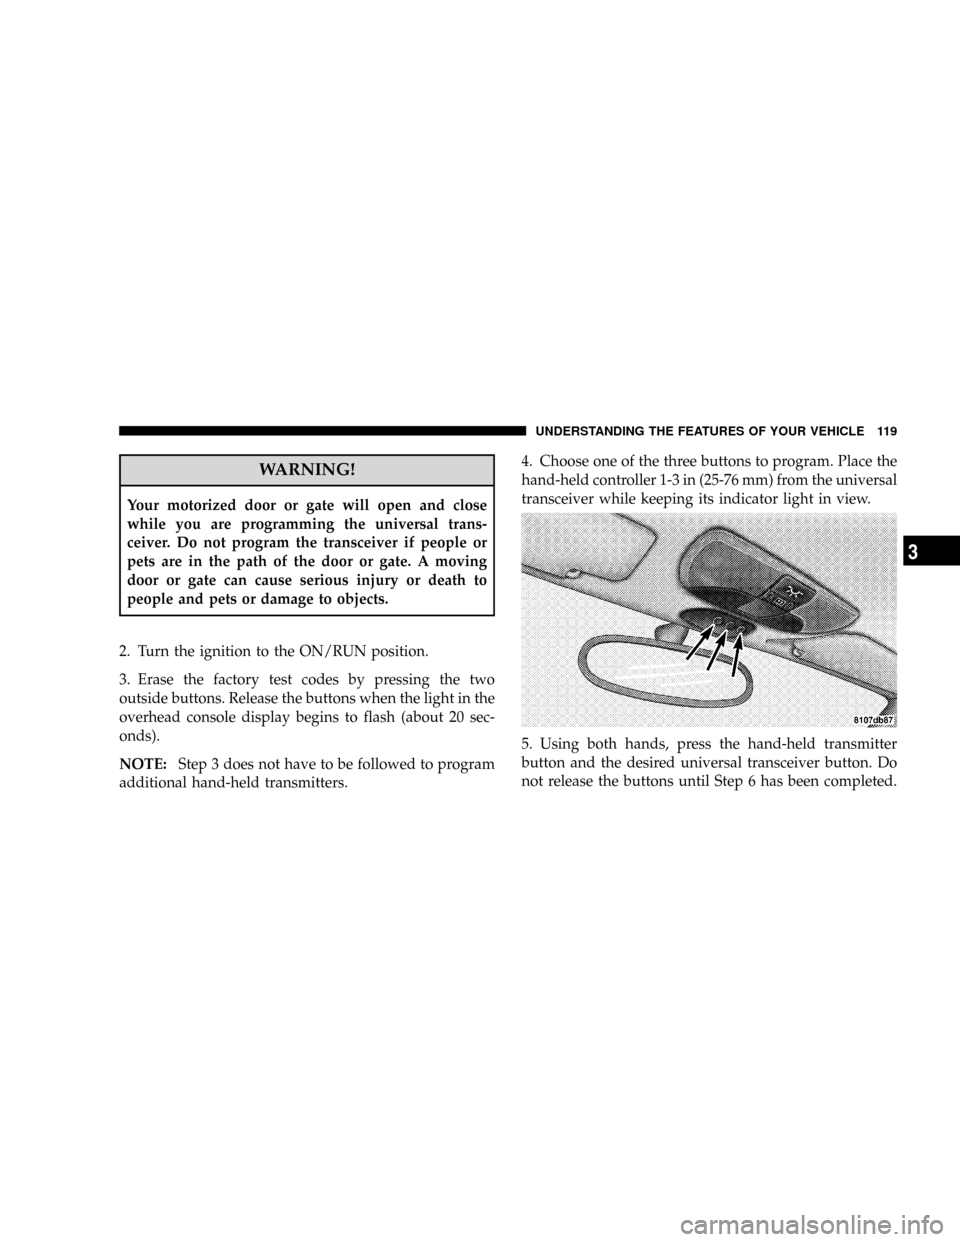
additional hand-held transmitters.4. Choose one of the three buttons to program. Place the
hand-held controller 1-3 in (25-76 mm) from the universal
transceiver while keeping its indicator light in view.
5. Using both hands, press the hand-held transmitter
button and the desired universal transceiver button. Do
not release the buttons until Step 6 has been completed.
UNDERSTANDING THE FEATURES OF YOUR VEHICLE 119
3
Page 122 of 358
NOTE:Some gate operators and garage door openers
may require you to replace this Programming Step 5 with
procedures noted in the ªGate Operator/Canadian Pro-
grammingº section.
6. The indicator light in the universal transceiver will
begin to flash, first slowly and then rapidly. Release both
buttons after the indicator light changes from slow to
rapid flash. If, after 90 seconds, the indicator does not
flash rapidly or goes out, return to Step 1 and repeat the
procedure.
7. Press and hold the just programmed universal trans-
ceiver button and observe the indicator light. If the
indicator stays on constantly, programming is complete
and your device should activate when the universal
transceiver button is pressed and released.
NOTE:To program the remaining two universal trans-
ceiver buttons, begin with Programming Step 4. Do not
repeat Steps 1, 2, and 3.If the indicator light blinks rapidly for two seconds and
then turns to a constant light, continue with Program-
ming Steps 8-10 to complete programming of a rolling
code equipped device (most commonly a garage door
opener).
8. At the garage door opener receiver (motor-head unit)
in the garage, locate the ªlearnº or ªsmartº button. This
can usually be found where the hanging antenna wire is
attached to the motor-head unit.
9. Firmly press and release the ªlearnº or ªsmartº but-
ton. (The name and color of the button may vary by
manufacturer.)
NOTE:There are 30 seconds in which to initiate Step 10.
10. Return to the vehicle and firmly press, hold for two
seconds and release the programmed universal trans-
ceiver button. Repeat the ªpress/hold/releaseº sequence
a second time, and, depending on the brand of the garage
120 UNDERSTANDING THE FEATURES OF YOUR VEHICLE
Page 124 of 358
Using the Universal Transceiver
To operate the universal transceiver, simply press and
release the programmed button. Activation will now
occur for the programmed device (i.e., garage door
opener, gate operator, security system, entry door lock,
home/office lighting, etc.) For convenience, the hand-
held transmitter of the device may also be used at any
time.
Erasing Universal Transceiver Buttons
To erase programming from the three buttons (individual
buttons cannot be erased but can be reprogrammed ± see
below), follow this procedure:
²Press and hold the two outer universal transceiver
buttons until the indicator light begins to flash after 20
seconds. Release both buttons. Do not hold for longer
than 30 seconds. The universal transceiver is now inthe program (or learning) mode and can be pro-
grammed at any time beginning with Programming
Step 4.
Reprogramming a Single Button
To program a device using a universal transceiver button
previously programmed, follow these steps:
1. Press and hold the desired universal transceiver but-
ton. DO NOT release the button.
2. The indicator light will begin to flash after 20 seconds.
Without releasing the universal transceiver button, pro-
ceed with Programming Step 4.
Security
If you sell your vehicle, be sure to erase the frequencies.
To erase all of the previously programmed frequencies,
hold down both outside buttons until the light begins to
flash.
122 UNDERSTANDING THE FEATURES OF YOUR VEHICLE
Page 148 of 358
NOTE:After six seconds without any action, or by
pressing OPT, CD, AM, FM, or TP, the current setting is
cancelled, and the new setting is stored.
FM1 ± FM2 ± FM AS ± BEST FM
The system has four FM memory modes that can be
selected by repeatedly pressing the FM button.
FM1 ± One of ten memorized FM station frequencies can
be selected by pressing a multifunction button.
FM2 ± A second set of ten memorized FM station
frequencies can be selected by pressing a multifunction
button.
FM AS ± An autostore feature will store the 9 current
stations with the strongest signal on station buttons 1-9 in
the order of their signal quality.
Press the FM button repeatedly until FM AS is displayed
to perform an autostore scan. Press the multifunctionbutton labeled AS repeatedly until AS-SEEK is displayed.
To select the stored stations, press the 1-9 buttons.
BEST FM ± The BEST FM function automatically memo-
rizes and continuously updates the frequencies of sta-
tions in order of their signal strength.
The strongest station comes up first when BEST FM is
selected. Stations with stronger or weaker signals are
selected by turning the right rotary knob.
To select the displayed station, press the right rotary
control/push button.
Tuning FM stations ± Rotating the right rotary control to
the right or left will change the FM frequency to the next
higher or lower station with a strong signal. To manually
step through each frequency or tune in a station with a
weaker signal, press the MAN button first, and then
rotate the rotary control right or left.
146 UNDERSTANDING YOUR INSTRUMENT PANEL
Page 151 of 358
Once the scan search begins, it will continue until either
a station is retained or until another mode is selected.
Tuning AM stations ± Rotating the right rotary control to
the right or left will change the AM frequency to the next
higher or lower station with a strong signal. To manually
step through each frequency or tune in a station with a
weaker signal, press the MAN button first, and then
rotate the rotary control right or left.
Storing AM stations ± 10 frequencies can be stored on AM
by pressing a multifunction button for three seconds; a
tone will confirm that the selection was set.
AM AS ± An autostore feature will store the 9 current
stations with the strongest signal on station buttons 1-9 in
the order of their signal quality. Press the AM button
repeatedly until AM AS is displayed to perform an
autostore scan. Press the multifunction button labeled AS
repeatedly until AS-SEEK is displayed. To select the
stored stations, press the 1-9 buttons.General Information
This radio complies with Part 15 of FCC rules and with
RSS-210 of Industry Canada. Operation is subject to the
following conditions:
1. This device may not cause harmful interference,
2. This device must accept any interference received,
including interference that may cause undesired opera-
tion.
NOTE:Changes or modifications not expressly ap-
proved by the party responsible for compliance could
void the user's authority to operate the equipment.
CD Player Operation
To activate the CD function, press the CD button; CDS is
shown in the display. If no CD disc is present, the display
briefly shows NO CDS and the radio mode remains
active.
UNDERSTANDING YOUR INSTRUMENT PANEL 149
4
Page 154 of 358
²PHONE ± Telephone Characteristics
To enter the USER menu, press the OPT button for more
than three seconds. USER then appears on the display,
and another user action must be entered within six
seconds or this menu is exited automatically. Your cur-
rent setting can be cancelled and the selections made will
be saved by pressing either the CD, AM, FM or TP
buttons momentarily.
User Memory (USER ± 1, 2, 3)
You can program up to three user memories, which saves
the sound settings, and the last received station when the
unit is switched off. To activate, first enter the user menu.
One of the three users can now be selected by turning the
right rotary/push button. You can also call up the
Mono/Stereo setting by pressing the right rotary/push
button at this time.
Mono/Stereo
In order to suppress reception-related interference, three
different parameters can be set to optimize reception.
To activate, call up the user menu, then press the right
rotary control/push button repeatedly until STEREO,
STO AUTO or MONO is displayed (depending on the
currently selected setting, you may need to turn the knob
also for your selection).
²STO AUTO ± Setting for normal operation. The unit
switches from stereo to mono and back, depending on
the reception conditions (for nearly all reception areas,
this is the optimal setting).
²STEREO ± Setting for exceptional conditions. The unit
is constantly set for stereo reception (primarily for
private broadcasters in urban areas).
²MONO ± Setting for receptions with constant reflec-
tion, the unit is constantly set for monaural reception.
152 UNDERSTANDING YOUR INSTRUMENT PANEL
Page 355 of 358

INTRODUCTION INTRODUCTION HOW TO USE THIS MANUAL WARNINGS AND CAUTIONS VEHICLE IDENTIFICATION NUMBER THINGS TO KNOW BEFORE STARTING YOUR VEHICLE A WORD ABOUT YOUR KEYS KeysObtaining Replacement KeysIgnition
Key RemovalKey-In-Ignition ReminderGLOVE COMPARTMENT LOCK DOOR LOCKS Central Locking SwitchAutomatic Central LockingGeneral Notes On the Central Locking SystemEmergency Unlocking FeatureStart LockoutREMOTE KEYLESS ENTRY To Unlock the
DoorsTo Lock The DoorsPanic AlarmTo Use the Panic AlarmGeneral InformationTransmitter Battery ServiceSECURITY ALARM SYSTEM Tow-Away AlarmDECKLID INTERNAL EMERGENCY RELEASE - ROADSTER POWER WINDOWS Power Window Operation With
The Convertible Top Switch (Roadster Only)REAR LIFTGATE/DECKLID RELEASE OCCUPANT RESTRAINTS Lap/Shoulder BeltsSeat Belts and Pregnant WomenSeat Belt ExtenderSupplemental Restraint System (SRS) - AirbagChild RestraintENGINE BREAK-IN
RECOMMENDATIONS SAFETY TIPS Exhaust GasSafety Checks You Should Make Inside the VehiclePeriodic Safety Checks You Should Make Outside the VehicleUNDERSTANDING THE FEATURES OF YOUR VEHICLE CONVERTIBLE TOP OPERATION To Lower
The TopTo Raise The TopConvertible Top Lamp and Audible Signal ChartCONSOLE FEATURES Storage Compartments (If Equipped)AshtrayCoin HolderPower Outlet/Cigar LighterGlove CompartmentCUPHOLDER (If Equipped) MIRRORS Inside Day/Night MirrorExterior
Mirrors Folding FeatureHeated Remote Control Mirrors (If Equipped)Outside MirrorsPower Remote Control Outside MirrorsVanity Mirrors SEATS Manual Seat Adjustments (If Equipped)Driver Eight-Way Power Seat (If Equipped)Passenger Four-Way Power Seat (If Equipped)
Heated Seats (If Equipped)TO OPEN AND CLOSE THE HOOD INTERIOR LIGHTS Front Map/Reading LightsBattery Saver FeatureInstrument Panel LightingNightSecurity IlluminationEXTERIOR LIGHTS Headlights and Parking LightsDaytime Running Lights (Where
Applicable)Fog Lights (If Equipped)Standing LightsMULTIFUNCTION CONTROL LEVER Turn SignalsHeadlight Dimmer SwitchPassing LightWindshield Wipers And WasherMist FunctionTELESCOPING STEERING COLUMN REAR SPOILER BRAKE ASSIST SYSTEM
(BAS) ELECTRONIC STABILITY PROGRAM (ESP) Synchronizing ESPELECTRONIC SPEED CONTROL To Vary The Speed SettingTo DeactivateTo Resume SpeedUsing Speed Control On HillsGARAGE DOOR OPENER (If Equipped) Programming The Universal
TransceiverGate Operator/Canadian ProgrammingUsing the Universal TransceiverErasing Universal Transceiver ButtonsReprogramming a Single ButtonSecurityUMBRELLA HOOK UNDERSTANDING YOUR INSTRUMENT PANEL INSTRUMENTS AND CONTROLS
NSTRUMENT CLUSTER INSTRUMENT CLUSTER DESCRIPTION INFINITY MODULUS AM/FM STEREO RADIO WITH SINGLE-DISC CD PLAYER AND GPS NAVIGATION AM/FM STEREO RADIO WITH SINGLE-DISC CD PLAYER INFINITY MODULUS Entertainment
SystemsCD Player OperationUser MenuUser Memory (USER - 1, 2, 3)Mono/StereoDriver - L/RTelephone mute characteristicsCOMPACT DISC MAINTENANCE RADIO ANTENNA RADIO OPERATION AND CELLULAR PHONES CLIMATE CONTROLS Temperature Control
Fan ControlBasic Setting - HeaterBasic Setting - Air ConditionerDust Filter (If Equipped)Operating Tips STARTING AND OPERATING STARTING PROCEDURES Normal StartingExtremely Cold Weather (below -20 degrees F or -29 degrees C)If Engine Fails to StartAfter
StartingTRANSMISSION SHIFTING Manual Transmission Recommended Shift SpeedsAutomatic Transmission StoppingManeuveringPark PositionReverseNeutralDriveAutoStick Gear selectionGear RangesProgram mode selector switchEmergency Operation (Limp Home
Mode)DRIVING ON SLIPPERY SURFACES Traction DRIVING THROUGH WATER Flowing/Rising WaterPARKING BRAKE BRAKE SYSTEM Brake Assist System (BAS)Electronic Stability Program (ESP)Synchronizing ESPESP Control switchAnti-Lock Brake System (ABS)
Brake Pad Break-InPOWER STEERING TIRE SAFETY INFORMATION TIRE MARKINGS TIRE LOADING AND TIRE PRESSURETIRES - GENERAL INFORMATION Tire PressureTire Inflation PressuresTire Pressures For High Speed OperationRadial-Ply TiresTire Spinning
Tread Wear IndicatorsLife Of TireReplacement TiresAlignment And BalanceTIRE PRESSURE MONITOR SYSTEM General InformationTIRE CHAINS ORIGINAL EQUIPMENT TIRES SNOW TIRES TIRE ROTATION RECOMMENDATIONS FUEL REQUIREMENTS
Reformulated GasolineGasoline/Oxygenate BlendsMMT in GasolineMaterials Added to FuelSulfur in GasolineADDING FUEL Fuel Filler Cap (Gas Cap)VEHICLE LOADING Roof Luggage RackTRAILER TOWING WHAT TO DO IN EMERGENCIES HAZARD WARNING
FLASHER IF YOUR ENGINE OVERHEATS TIREFIT TIRE REPAIR AND JACKING TIREFITPreparations for JackingJack Location and Instructions JUMP-STARTING THEBATTERY FREEING A STUCK VEHICLE TOWING A DISABLED VEHICLE Towing EyesTow-Away
AlarmCONVERTIBLE TOP EMERGENCY OPERATION Relieving Hydraulic PressureOpening a Locked DecklidMAINTAINING YOUR VEHICLE 3.2L ENGINE ONBOARD DIAGNOSTIC SYSTEM (OBD II) EMISSIONS INSPECTION AND MAINTENANCE PROGRAMS
REPLACEMENT PARTS AUTHORIZED DEALER SERVICE MAINTENANCE PROCEDURES Engine OilIgnition Wiring SystemCrankcase Emission Control SystemMaintenance-Free BatteryAir ConditionerPower Steering FluidChassis LubricationBody LubricationWindshield
Wiper BladesWindshield Wiper Blade ReplacementWindshield Washer ReservoirExhaust SystemCooling SystemHoses And Vacuum/Vapor HarnessesBrakesAutomatic TransmissionManual TransmissionAppearance Care and Protection from CorrosionCONVERTIBLE TOP
CARE WashingGeneral CleaningWeather Strip CareFUSES Underhood Accessory Fuse Block FusesRelay Control Module Fuses Interior Fuses REPLACEMENT BULBS Interior Light BulbsExterior Light BulbsEXTERIOR LIGHT BULB SERVICE HeadlightsFront Turn Signal
and Parking/Standing LightsFront and Rear Sidemarker LightsTail, Stop, Back Up and Turn Signal LightsLicense Plate LightHeadlight AimingVEHICLESTORAGE SPECIFICATIONS FLUID CAPACITIES RECOMMENDED FLUIDS, LUBRICANTS AND GENUINE PARTS
EngineChassisBodyMAINTENANCE SCHEDULES INTRODUCTION WARRANTY EMISSION CONTROL SYSTEM MAINTENANCE MAINTENANCE SCHEDULES SCOPE OF WORK FOR A SCHEDULE MAINTENANCE SERVICESCOPE OF WORK FOR B SCHEDULE
MAINTENANCE SERVICEFSS SYSTEM REGULAR CHECK-UPS Additional Periodic MaintenanceSPECIAL MAINTENANCE REQUIREMENTS CoolantDust Filter for Heating/Ventilation Replacement (If Equipped)ENGINE OIL CHANGE AND FILTER REPLACEMENT IF
YOU NEED CONSUMER ASSISTANCE SUGGESTIONS FOR OBTAINING SERVICE FOR YOUR VEHICLE Prepare For The AppointmentPrepare A ListBe Reasonable With RequestsIF YOU NEED ASSISTANCE Chrysler Motors LLC Customer CenterChrysler Canada
Inc. Customer CenterIn Mexico contactCustomer Assistance For The Hearing Or Speech Impaired (TDD/TTY)Service ContractWARRANTY INFORMATION (U.S. Vehicles Only) MOPAR PARTS REPORTING SAFETY DEFECTS In The 50 United States And Washington,
D.CIn CanadaPUBLICATION ORDER FORMS DEPARTMENT OF TRANSPORTATION UNIFORM TIRE QUALITY GRADES TreadwearTraction GradesTemperature GradesINDEX