CHRYSLER CROSSFIRE SRT 2005 1.G Owners Manual
Manufacturer: CHRYSLER, Model Year: 2005, Model line: CROSSFIRE SRT, Model: CHRYSLER CROSSFIRE SRT 2005 1.GPages: 280, PDF Size: 14.34 MB
Page 171 of 280

WARNING!
Do not attempt to repair a tire on the side of the
vehicle close to traffic. Pull far enough off the road to
avoid the danger of being hit when operating the
jack or repairing a tire.
Jacking the vehicle should only be necessary in the event
that a tire has been severely damaged, and must be
replaced. (See TIREFIT Tire Repair section for a descrip-
tion of cuts and punctures that may be repairable with
TIREFIT.)
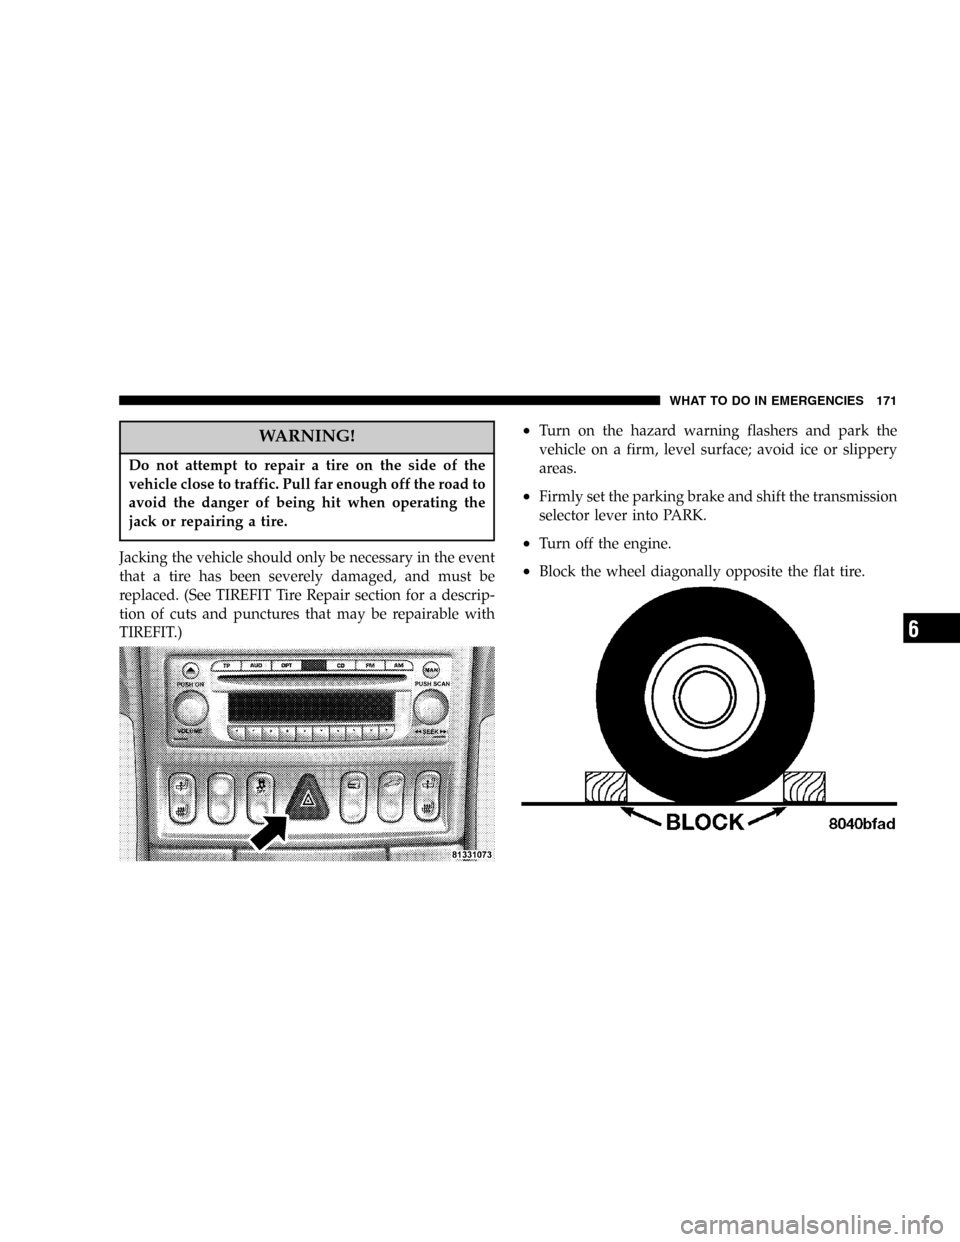
•Turn on the hazard warning flashers and park the
vehicle on a firm, level surface; avoid ice or slippery
areas.
•Firmly set the parking brake and shift the transmission
selector lever into PARK.
•Turn off the engine.
•Block the wheel diagonally opposite the flat tire.
WHAT TO DO IN EMERGENCIES 171
6
Page 172 of 280

•Passengers must not remain in the vehicle when the
vehicle is jacked.
NOTE:The jack is designed exclusively for jacking up
the vehicle at the specified jack location points built
beneath either side of the vehicle.
Jack Location and Instructions
1. Remove the jack and jack handle from stowage be-
neath the cargo compartment carpet.2. The lifting points for the jack are located beneath the
outer edge of the body side, directly behind the front
wheel housings, and in front of the rear wheel housings.
172 WHAT TO DO IN EMERGENCIES
Page 173 of 280

NOTE:Do not raise the vehicle until you are sure the
jack is securely engaged, as shown.3. Holding the jack, insert the cradle under the lifting
points. Crank the handle clockwise until the jack base
meets the ground. Place the jack on firm ground. Position
the jack so that it is always level, even if the vehicle is
parked on an incline. Raise the vehicle only until the tire
just clears the surface. Minimum tire lift provides maxi-
mum stability.
4. Replace the tire.
5. Lower the vehicle by cranking the handle counter-
clockwise, then remove the jack assembly.
WHAT TO DO IN EMERGENCIES 173
6
Page 174 of 280

NOTE:Before storing the jack, it should be fully
collapsed.
6. Ensure proper tire pressure.
WARNING!
Raising the vehicle higher than necessary can make
the vehicle less stable. It could slip off the jack and
hurt someone near it. Raise the vehicle only enough
to make the necessary repair.
WARNING!
A loose jack or tool thrown forward in a collision or
hard stop could endanger the occupants of the ve-
hicle. Always stow the jack parts and tools in the
places provided.
JUMP-STARTING THE BATTERY
WARNING!
Take care to avoid the radiator cooling fan whenever
the hood is raised. It can start any time the ignition
switch is on. You can be hurt by the fan.
CAUTION!
Do not try to push or tow your vehicle to get it
started. Your vehicle cannot be started this way.
Pushing with another vehicle may damage the trans-
mission or the rear of your vehicle. If your vehicle
has a discharged (dead) battery, booster cables may
be used to obtain a start from another vehicle. This
type of start can be dangerous if done improperly, so
follow the procedure carefully.
174 WHAT TO DO IN EMERGENCIES
Page 175 of 280

WARNING!
Battery fluid is a corrosive acid solution; do not
allow battery fluid to contact eyes, skin or clothing.
Don’t lean over battery when attaching clamps or
allow the clamps to touch each other. If acid splashes
in eyes or on skin, flush contaminated area immedi-
ately with large quantities of water.
A battery generates hydrogen gas that is flammable
and explosive. Keep flame or spark away from the
vent holes. Do not use a booster battery or any other
booster source with an output that exceeds 12 volts.
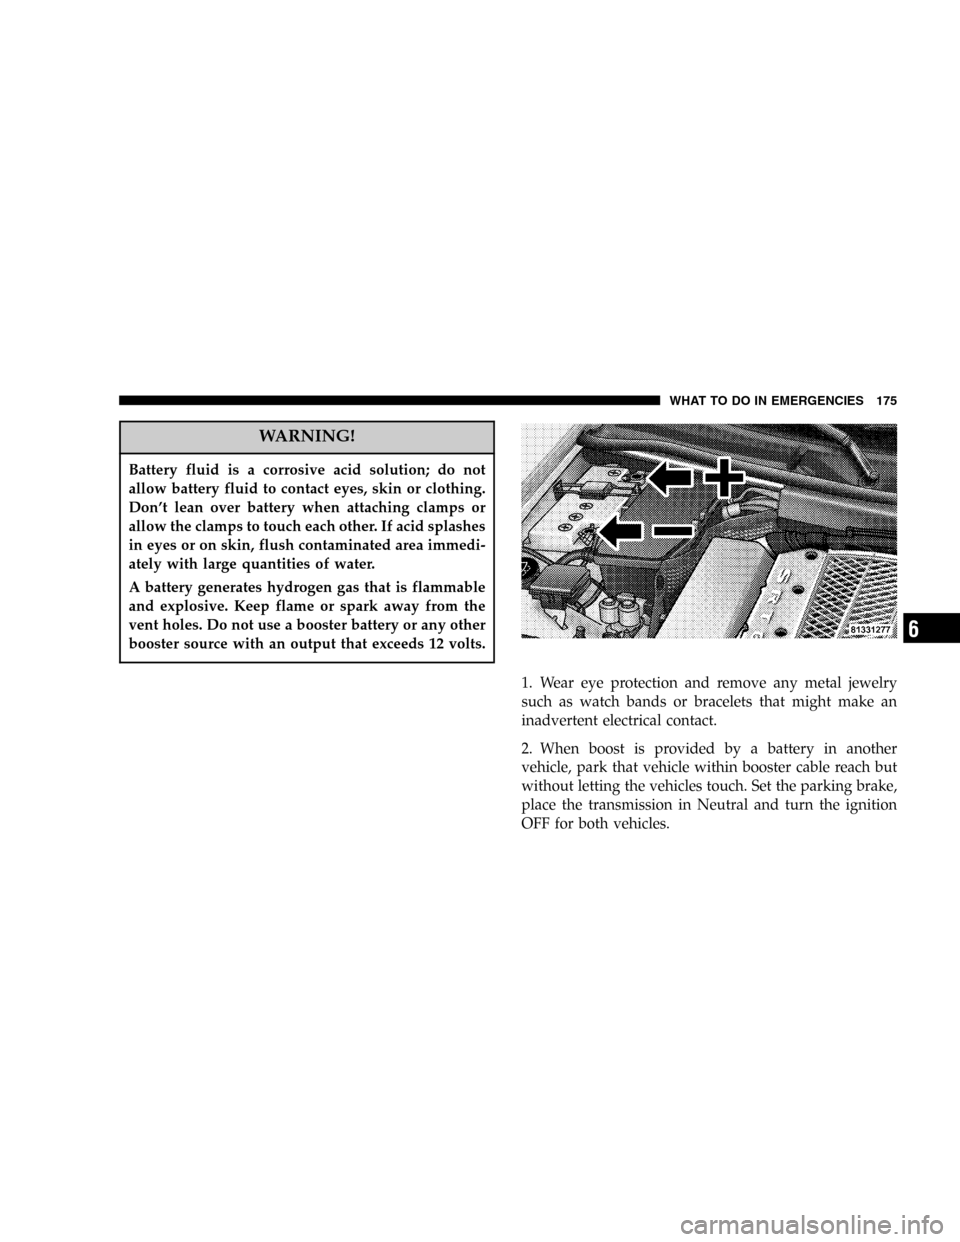
1. Wear eye protection and remove any metal jewelry
such as watch bands or bracelets that might make an
inadvertent electrical contact.
2. When boost is provided by a battery in another
vehicle, park that vehicle within booster cable reach but
without letting the vehicles touch. Set the parking brake,
place the transmission in Neutral and turn the ignition
OFF for both vehicles.
WHAT TO DO IN EMERGENCIES 175
6
Page 176 of 280

3. Turn off the heater, radio and all unnecessary electrical
loads.
4. Connect one end of a jumper cable to the positive
jump-start attachment of the booster battery. Connect the
other end of the same cable to the positive jump-start
attachment of the discharged battery.
5. Connect the other cable, first to the negative jump-
start attachment of the booster battery and then to the
engine of the vehicle with the discharged battery. Make
sure you have good contact on the engine.6. Start the engine in the vehicle which has the booster
battery, let the engine idle a few minutes, then start the
engine in the vehicle with the discharged battery.
7. When removing the jumper cables, reverse the above
sequence exactly. Be careful of the moving belts and fans.
NOTE:If engine does not run after several unsuccessful
starting attempts, have it checked at the nearest autho-
rized dealer.
DRIVING ON SLIPPERY SURFACES
WARNING!
Rapid acceleration on slippery surfaces is danger-
ous. You could lose control of the vehicle and possi-
bly have an accident. Accelerate slowly and carefully
whenever there is likely to be poor traction (ice,
snow, rain, mud, loose sand, etc.).
176 WHAT TO DO IN EMERGENCIES
Page 177 of 280

Traction
When driving on wet or slushy roads, it is possible for a
wedge of water to build up between the tire and road
surface. This is hydroplaning and may cause partial or
complete loss of vehicle control and stopping ability. To
reduce this possibility, the following precautions should
be observed:
1. Slow down during rainstorms or when roads are
slushy.
2. Slow down if the road has standing water or puddles.
3. Replace tires when tread wear indicators first become
visible.
4. Keep tires properly inflated.
5. Maintain enough distance between your vehicle and
the vehicle in front to avoid a collision in a sudden stop.
FREEING A STUCK VEHICLE
In order to free a stuck vehicle you must turn off the
Electronic Stability Program (ESP) before attempting to
“rock”the vehicle.
If your vehicle becomes stuck in mud, sand or snow, it
can often be moved by a rocking motion. Turn your
steering wheel right and left to clear the area around the
front wheels. Then shift back and forth between Reverse
and Drive. Usually the least accelerator pedal pressure to
maintain the rocking motion without spinning the
wheels is most effective.
NOTE:ESP should be turned on again after freeing the
vehicle from a stuck condition.
CAUTION!
Racing the engine or spinning the wheels too fast
may lead to transmission/axle overheating and fail-
ure. It can also damage the tires. Do not spin the
wheels above 30 mph (48 km/h).
WHAT TO DO IN EMERGENCIES 177
6
Page 178 of 280

TOWING A DISABLED VEHICLE
We recommend that the vehicle be transported using flat
bed equipment. This method is preferable to other types
of towing.
CAUTION!
Important! If towing the vehicle, please note the
following: With the automatic central locking acti-
vated and the key in the ignition switch turned to the
ON/RUN position, the vehicle doors lock if the left
front wheel and the right rear wheel are turning at
vehicle speeds of approximately 9 mph (15 km/h) or
more. To prevent the vehicle door locks from lock-
ing, deactivate the automatic central locking.
CAUTION!
If the vehicle is towed with the front wheels raised,
the engine must be shut off (key in the ignition
switch turned to the OFF/LOCK or ACC positions).
Otherwise, the ESP will immediately be engaged
and will apply the rear wheel brakes. Switch off the
tow-away alarm as well as the automatic central
locking system.
Towing restrictions for vehicles with automatic transmis-
sion: The vehicle may be towed with all wheels on the
ground and the transmission selector lever in the Neutral
position for distances up to 30 miles (48 km) and at a
speed not to exceed 30 mph (48 km/h). The key must be
turned to the ON/RUN position in the ignition. To be
certain to avoid a possibility of damage to the transmis-
sion, however, we recommend the drive shaft be discon-
nected at the rear axle drive flange for any towing
beyond a short tow to a nearby garage.
Always comply with applicable state or local towing
ordinances.
178 WHAT TO DO IN EMERGENCIES
Page 179 of 280

CAUTION!
•Do not attempt to tow this vehicle from the front
with sling-type towing equipment. Damage to the
front fascia will result.
•Always use wheel lift equipment when towing
from the front. The only other approved method
of towing is with a flatbed truck.
•Do not tow the vehicle from the rear. Damage to
the rear sheet metal and fascia will occur.
•Do not push or tow this vehicle with another
vehicle as damage to the bumper fascia and trans-
mission may result.
Towing Eyes
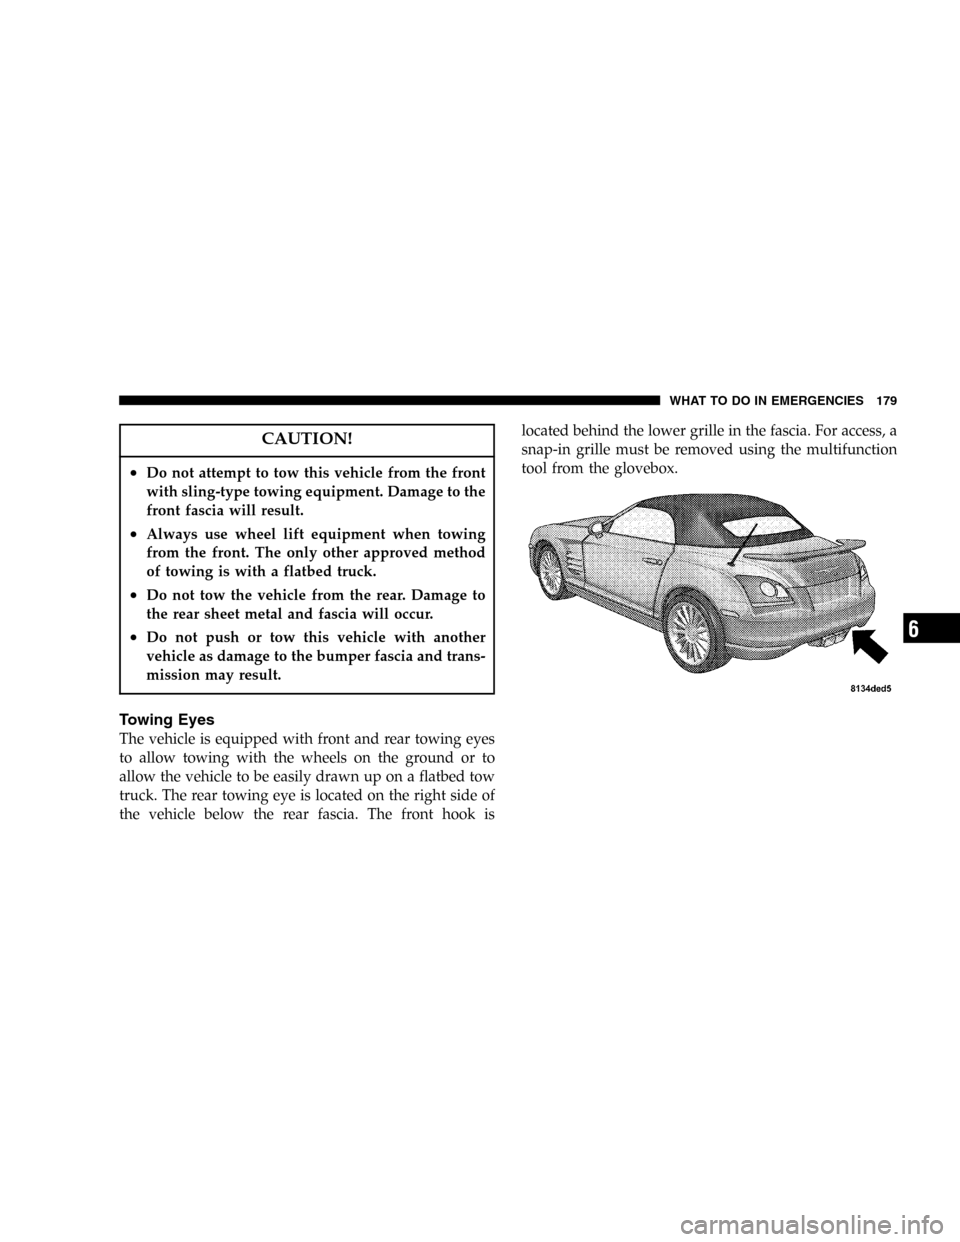
The vehicle is equipped with front and rear towing eyes
to allow towing with the wheels on the ground or to
allow the vehicle to be easily drawn up on a flatbed tow
truck. The rear towing eye is located on the right side of
the vehicle below the rear fascia. The front hook islocated behind the lower grille in the fascia. For access, a
snap-in grille must be removed using the multifunction
tool from the glovebox.
WHAT TO DO IN EMERGENCIES 179
6
Page 180 of 280

Insert the tool (or similar sized screwdriver) into the slot
in the grille as shown (the tool must be inserted far
enough to engage the clip on the left side of the grille).
Push the tool to the left to disengage the clip and detach
the grille. The front towing eye is now accessible.
180 WHAT TO DO IN EMERGENCIES