automatic transmission CHRYSLER PACIFICA 2004 1.G User Guide
[x] Cancel search | Manufacturer: CHRYSLER, Model Year: 2004, Model line: PACIFICA, Model: CHRYSLER PACIFICA 2004 1.GPages: 361, PDF Size: 5.21 MB
Page 205 of 361

²You can start out in first, second, or third gear. Shifting
into fourth gear can occur only after vehicle speed
reaches 15 mph (24 km/h).
²The transmission will automatically downshift to first
gear when coming to a stop.
²Starting out in third gear is helpful in snowy or icy
conditions.
²While in the Autostick mode, Speed Control will only
function in third or fourth gear.
Downshifting out of third gear will turn off the speed
control.
²If the system detects powertrain overheating, the
transmission will revert to the automatic shift mode
and remain in that mode until the powertrain cools off.
²If the system detects a problem it will disable the
Autostick mode and the transmission will return to the
automatic mode until the problem is corrected.
ALL WHEEL DRIVE Ð IF EQUIPPED
This feature provides full time, on-demand, All Wheel
Drive (AWD). The system is automatic with no driver
inputs or additional driving skills required. Under nor-
mal driving conditions, the front wheels provide most of
the traction. If the front wheels begin to lose traction,
power is shifted automatically to the rear wheels. The
greater the front wheel traction loss, the greater the
power transfer to the rear wheels.
STARTING AND OPERATING 205
5
Page 246 of 361

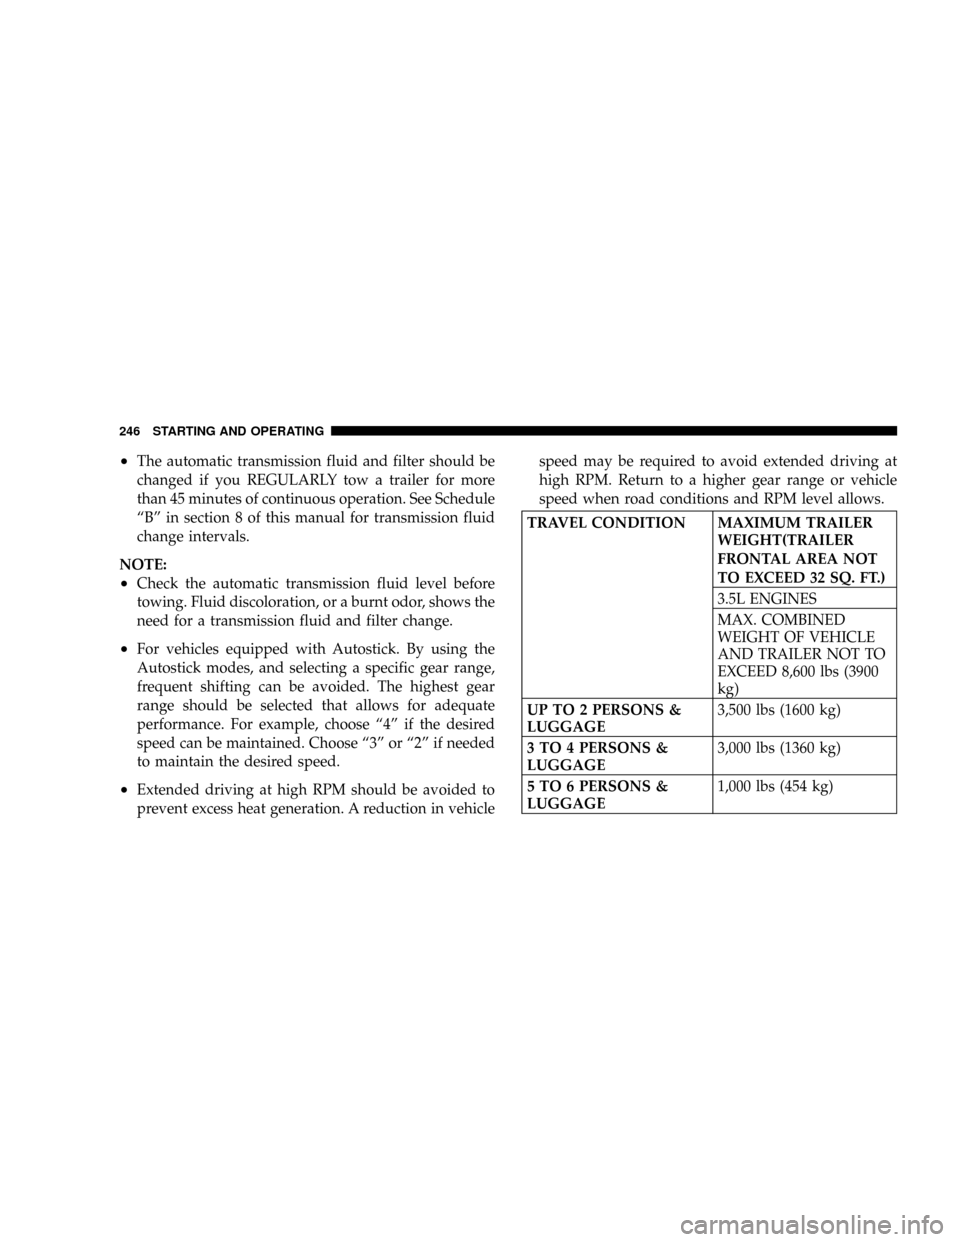
²The automatic transmission fluid and filter should be
changed if you REGULARLY tow a trailer for more
than 45 minutes of continuous operation. See Schedule
ªBº in section 8 of this manual for transmission fluid
change intervals.
NOTE:
²Check the automatic transmission fluid level before
towing. Fluid discoloration, or a burnt odor, shows the
need for a transmission fluid and filter change.
²For vehicles equipped with Autostick. By using the
Autostick modes, and selecting a specific gear range,
frequent shifting can be avoided. The highest gear
range should be selected that allows for adequate
performance. For example, choose ª4º if the desired
speed can be maintained. Choose ª3º or ª2º if needed
to maintain the desired speed.
²Extended driving at high RPM should be avoided to
prevent excess heat generation. A reduction in vehiclespeed may be required to avoid extended driving at
high RPM. Return to a higher gear range or vehicle
speed when road conditions and RPM level allows.
TRAVEL CONDITION MAXIMUM TRAILER
WEIGHT(TRAILER
FRONTAL AREA NOT
TO EXCEED 32 SQ. FT.)
3.5L ENGINES
MAX. COMBINED
WEIGHT OF VEHICLE
AND TRAILER NOT TO
EXCEED 8,600 lbs (3900
kg)
UP TO 2 PERSONS &
LUGGAGE3,500 lbs (1600 kg)
3 TO 4 PERSONS &
LUGGAGE3,000 lbs (1360 kg)
5 TO 6 PERSONS &
LUGGAGE1,000 lbs (454 kg)
246 STARTING AND OPERATING
Page 259 of 361

1. Wear eye protection and remove any metal jewelry
such as watch bands or bracelets that might make an
inadvertent electrical contact.
2. When boost is provided by a battery in another
vehicle, park that vehicle within booster cable reach and
without letting the vehicles touch. Set the parking brake,
place the automatic transmission in PARK and turn the
ignition switch to the OFF position for both vehicles.
3. Turn off the heater, radio and all unnecessary electrical
loads.
4. Connect one end of a jumper cable to the positive
terminal of the discharged battery. Connect the other end
of the same cable to the positive terminal of the booster
battery.5. Connect the other cable, first to the negative terminal
of the booster battery andthen to the engine of the
vehicle with the discharged battery.Make sure you have
a good contact on the engine.
6. Start the engine in the vehicle which has the booster
battery, let the engine idle a few minutes, then start the
engine in the vehicle with the discharged battery.
7. When removing the jumper cables, reverse the above
sequence exactly. Be careful of the moving belts and fan.
DRIVING ON SLIPPERY SURFACES
Acceleration
Rapid acceleration on snow covered, wet, or other slip-
pery surfaces may cause the front wheels to pull errati-
cally to the right or left. This phenomenon occurs when
there is a difference in the surface traction under the front
(driving) wheels.
WHAT TO DO IN EMERGENCIES 259
6
Page 263 of 361

If it is necessary to use the accessories while being towed
(wipers, defrosters, etc.), the key must be in the ON
position, not the ACCESSORY position. Make certain the
transmission remains in NEUTRAL.
Without The Ignition Key
Special care must be taken when the vehicle is towed
with the ignition in the LOCK position. The only ap-
proved method of towing with out the ignition key is
with a flat bed truck. Proper towing equipment is neces-
sary to prevent damage to the vehicle.
TOWING THIS VEHICLE BEHIND ANOTHER
VEHICLE (Flat towing with all four wheels on the
ground)
Flat towing of vehicles equipped with an automatic
transmission, is only permitted within the limitations
described in this section.
TOWING THIS VEHICLE BEHIND ANOTHER
VEHICLE WITH A TOW DOLLEY
The manufacturedoes not recommendthat you tow an
All-Wheel Drive (AWD) or front wheel drive vehicle on a
tow dolley. Vehicle damage may occur.
WHAT TO DO IN EMERGENCIES 263
6
Page 266 of 361

NSteering Shaft Seal....................283
NSteering Linkage......................283
NDrive Shaft Universal Joints..............283
NBody Lubrication.....................284
NWindshield Wiper Blades................284
NWindshield And Rear Window Washers.....285
NExhaust System......................285
NCooling System.......................286
NHoses And Vacuum/Vapor Harnesses.......291
NBrakes.............................292
NMaster Cylinder Ð ABS Brakes Brake Fluid
Level Check.........................293
NFuel System Hoses....................294NAutomatic Transmission................295
NAll Wheel Drive (AWD) Ð If Equipped.....298
NFront And Rear Wheel Bearings...........300
NAppearance Care And Protection From
Corrosion...........................300
NCleaning The Center Console Cup Holders . . . 304
mIntegrated Power Module (IPM)............305
mVehicle Storage........................306
mReplacement Light Bulbs.................306
mBulb Replacement......................307
NStandard Quad Headlights...............307
NHigh Intensity Discharge Headlights (HID)
Ð If Equipped.......................308
266 MAINTAINING YOUR VEHICLE
Page 269 of 361

ONBOARD DIAGNOSTIC SYSTEM Ð OBD II
Your vehicle is equipped with a sophisticated onboard
diagnostic system called OBD II. This system monitors
the performance of the emissions, engine, and automatic
transmission control systems. When these systems are
operating properly, your vehicle will provide excellent
performance and fuel economy, as well as engine emis-
sions well within current government regulations.
If any of these systems require service, the OBD II system
will turn on the ªMalfunction Indicator Light.º It will
also store diagnostic codes and other information to
assist your service technician in making repairs. Al-
though your vehicle will usually be drivable and not
need towing, see your dealer for service as soon as
possible.CAUTION!
Prolonged driving with the ªMalfunction Indicator
Lightº on could cause further damage to the emis-
sion control system. It could also affect fuel economy
and driveability. The vehicle must be serviced before
any emissions tests can be performed.
If the ªMalfunction Indicator Lightº is flashing
while the engine is running, severe catalytic con-
verter damage and power loss will soon occur. Im-
mediate service is required.
MAINTAINING YOUR VEHICLE 269
7
Page 295 of 361

You are urged to use only the manufacture specified
hoses with quick connect fittings, or their equivalent in
material and specification, in any fuel system servicing. It
is mandatory to replace any damaged hoses or quick
connect fittings that have been removed during service.
Care should be taken in installing quick connect fittings
to insure they are properly installed and fully connected.
See your authorized dealer for service.
Automatic Transmission
The automatic transmission and differential assembly are
contained within a single housing.
All automatic transmissions are equipped with a conven-
tional filler tube and dipstick. If fluid is added, it should
be added through the dipstick hole in the case.The dipstick is located just behind the radiator, lower
right side.
Selection of Lubricant
It is important that the proper lubricant is used in the
transmission to assure optimum transmission perfor-
mance. Use only manufacturers recommended transmis-
sion fluid, refer to Recommended Fluids, Lubricants and
Genuine Parts for correct fluid type. It is important that
the transmission fluid be maintained at the prescribed
level using the recommended fluid.
MAINTAINING YOUR VEHICLE 295
7
Page 296 of 361

CAUTION!
Using a transmission fluid other than the manufac-
turers recommended fluid may cause deterioration
in transmission shift quality and/or torque converter
shudder. Using a transmission fluid other than the
manufacturers recommended fluid will result in
more frequent fluid and filter changes. Refer to
Recommended Fluids, Lubricants and Genuine Parts
for correct fluid type.
Procedure For Checking Fluid Level
The fluid level in the automatic transmission should be
checked whenever the vehicle is serviced. Operation with
an improper fluid level will greatly reduce the life of the
transmission and of the fluid.
To properly check the automatic transmission fluid level,
the following procedure must be used:
1. The vehicle must be on level ground.
2. The engine should be running at curb idle speed for a
minimum of 60 seconds.
3. Fully apply parking brake.
4. Place the gear selector momentarily in each gear
position ending with the lever in P (PARK). Wipe the area
around the dipstick clean to eliminate the possibility of
dirt entering the transmission.
296 MAINTAINING YOUR VEHICLE
Page 297 of 361

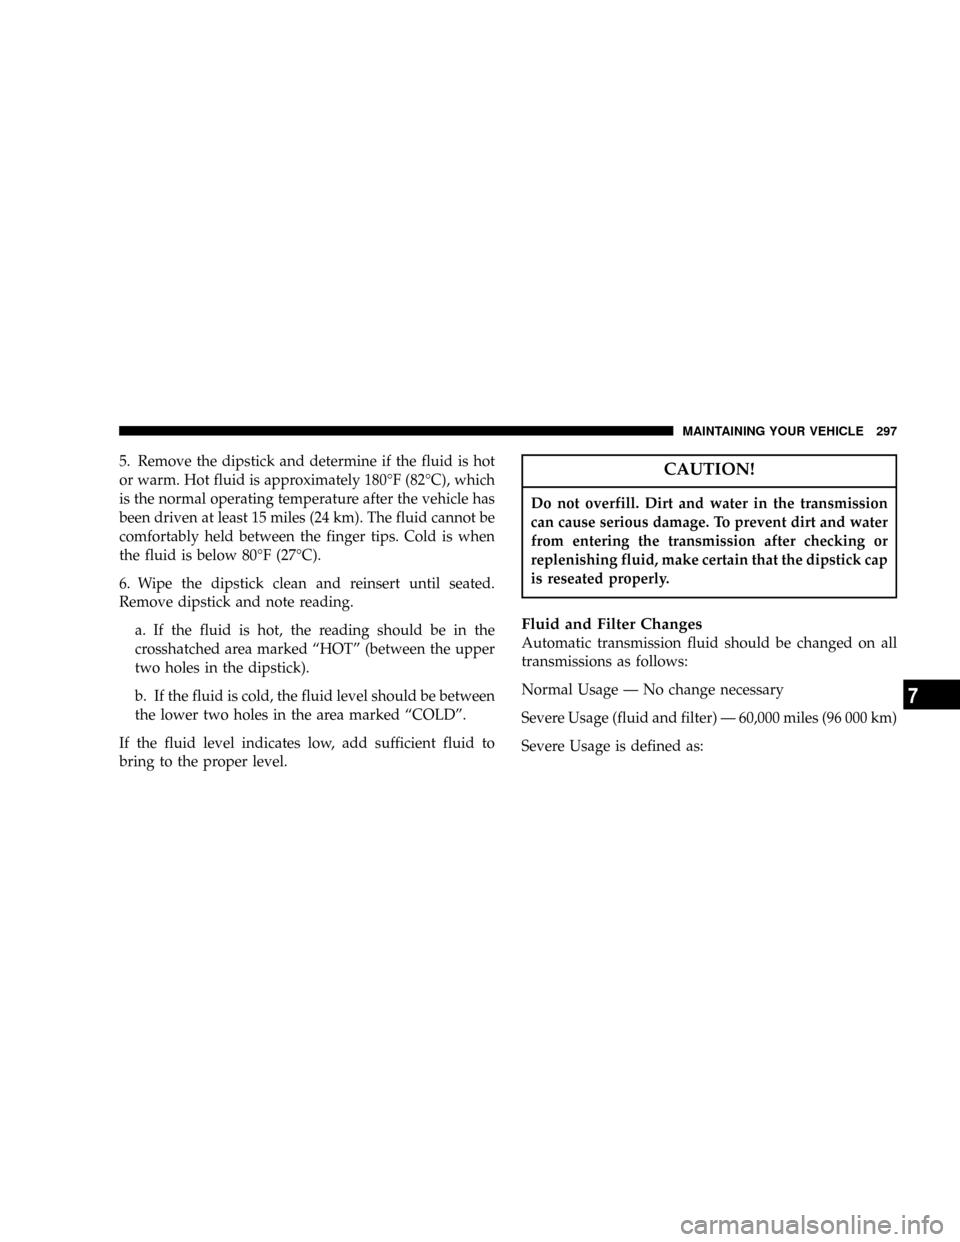
5. Remove the dipstick and determine if the fluid is hot
or warm. Hot fluid is approximately 180ÉF (82ÉC), which
is the normal operating temperature after the vehicle has
been driven at least 15 miles (24 km). The fluid cannot be
comfortably held between the finger tips. Cold is when
the fluid is below 80ÉF (27ÉC).
6. Wipe the dipstick clean and reinsert until seated.
Remove dipstick and note reading.
a. If the fluid is hot, the reading should be in the
crosshatched area marked ªHOTº (between the upper
two holes in the dipstick).
b. If the fluid is cold, the fluid level should be between
the lower two holes in the area marked ªCOLDº.
If the fluid level indicates low, add sufficient fluid to
bring to the proper level.CAUTION!
Do not overfill. Dirt and water in the transmission
can cause serious damage. To prevent dirt and water
from entering the transmission after checking or
replenishing fluid, make certain that the dipstick cap
is reseated properly.
Fluid and Filter Changes
Automatic transmission fluid should be changed on all
transmissions as follows:
Normal Usage Ð No change necessary
Severe Usage (fluid and filter) Ð 60,000 miles (96 000 km)
Severe Usage is defined as:
MAINTAINING YOUR VEHICLE 297
7
Page 313 of 361

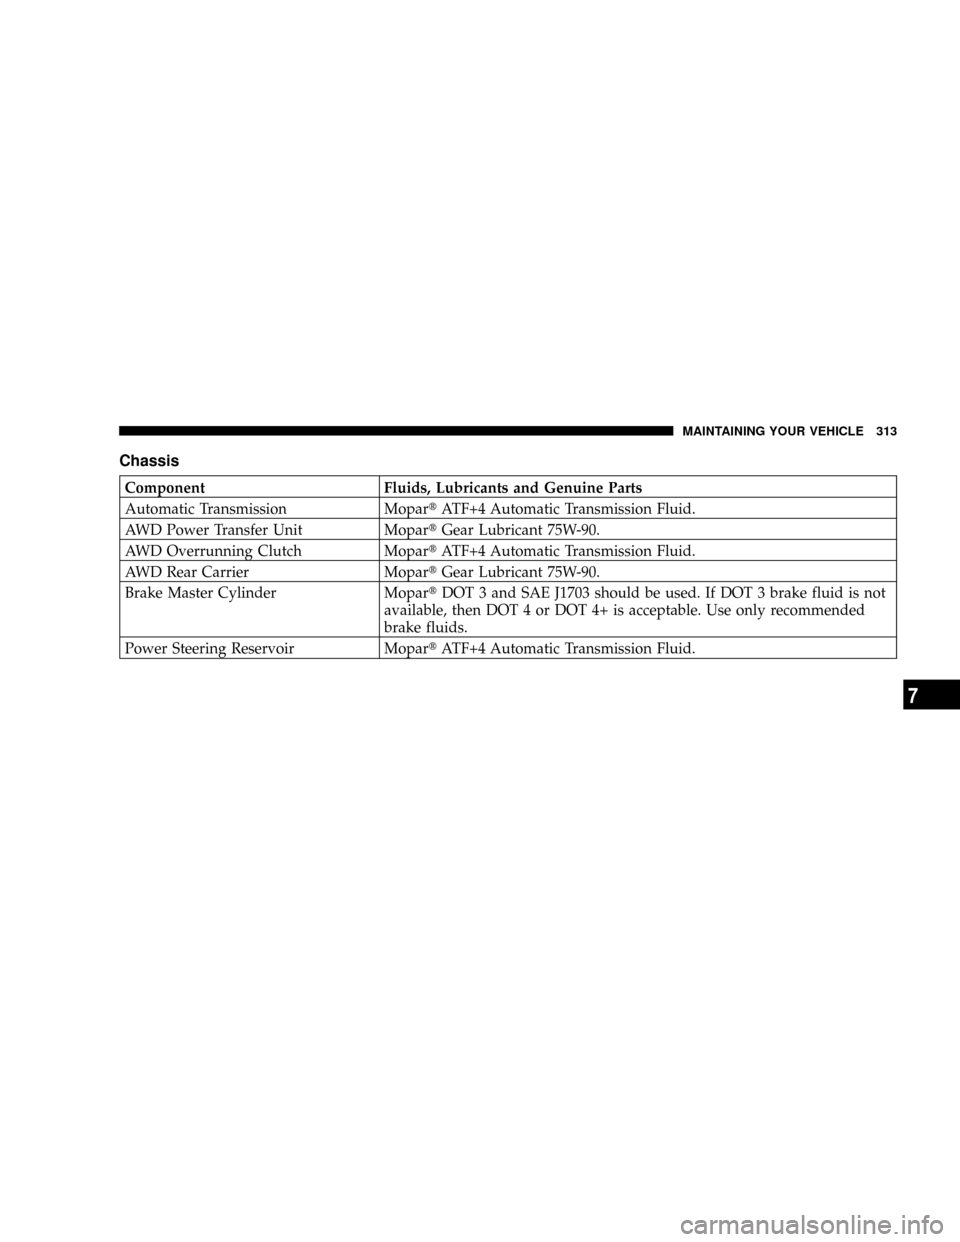
Chassis
Component Fluids, Lubricants and Genuine Parts
Automatic Transmission MopartATF+4 Automatic Transmission Fluid.
AWD Power Transfer Unit MopartGear Lubricant 75W-90.
AWD Overrunning Clutch MopartATF+4 Automatic Transmission Fluid.
AWD Rear Carrier MopartGear Lubricant 75W-90.
Brake Master Cylinder MopartDOT 3 and SAE J1703 should be used. If DOT 3 brake fluid is not
available, then DOT 4 or DOT 4+ is acceptable. Use only recommended
brake fluids.
Power Steering Reservoir MopartATF+4 Automatic Transmission Fluid.
MAINTAINING YOUR VEHICLE 313
7