remote control CHRYSLER PACIFICA 2004 1.G Owners Manual
[x] Cancel search | Manufacturer: CHRYSLER, Model Year: 2004, Model line: PACIFICA, Model: CHRYSLER PACIFICA 2004 1.GPages: 361, PDF Size: 5.21 MB
Page 19 of 361

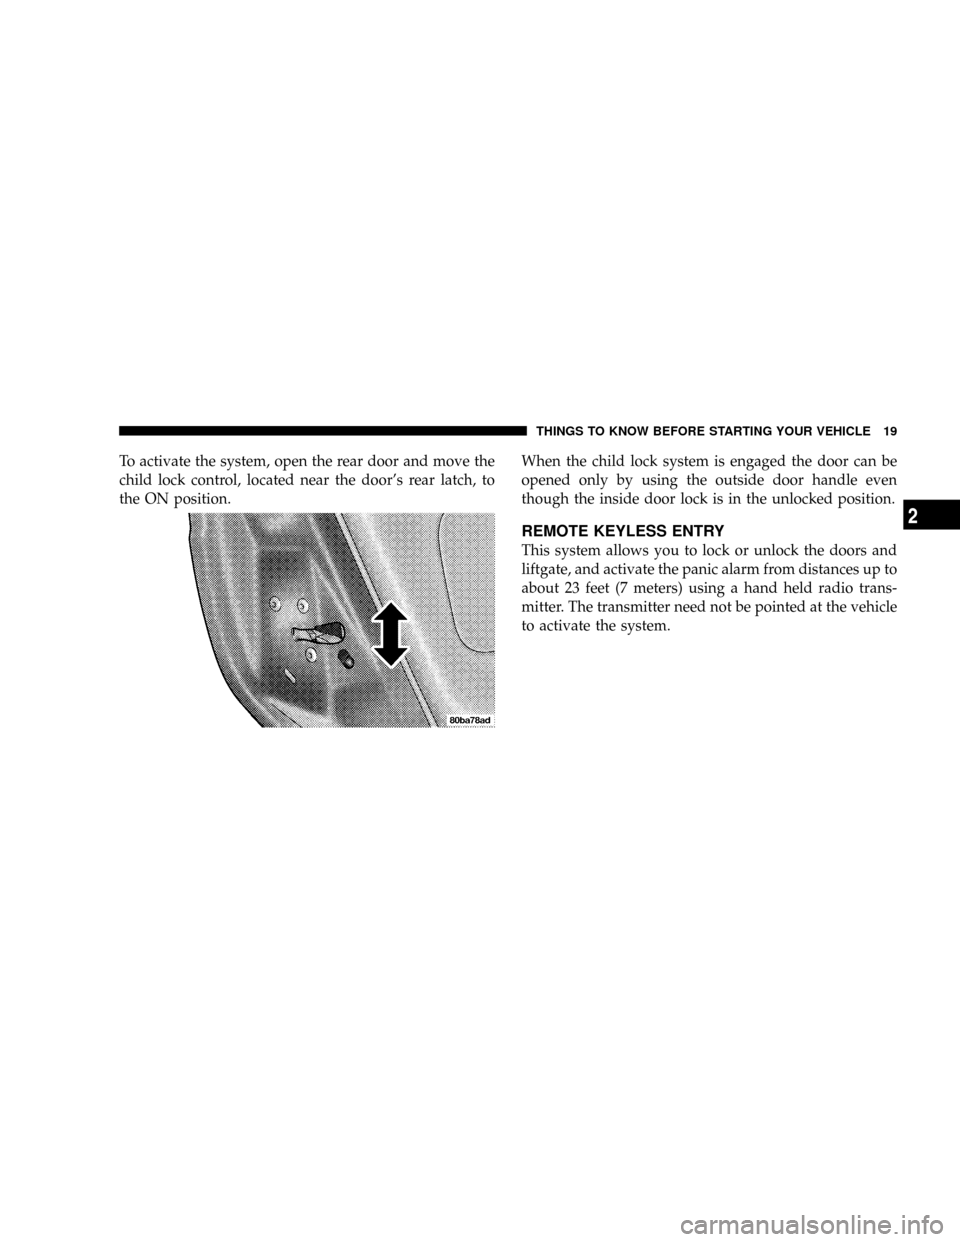
To activate the system, open the rear door and move the
child lock control, located near the door's rear latch, to
the ON position.When the child lock system is engaged the door can be
opened only by using the outside door handle even
though the inside door lock is in the unlocked position.
REMOTE KEYLESS ENTRY
This system allows you to lock or unlock the doors and
liftgate, and activate the panic alarm from distances up to
about 23 feet (7 meters) using a hand held radio trans-
mitter. The transmitter need not be pointed at the vehicle
to activate the system.
THINGS TO KNOW BEFORE STARTING YOUR VEHICLE 19
2
Page 65 of 361

UNDERSTANDING THE FEATURES OF YOUR VEHICLE
CONTENTS
mMirrors...............................69
NInside Day/Night Mirror.................69
NAutomatic Dimming Mirror Ð If Equipped....70
NDriver's Side Outside Mirror Auto Dimmer Ð If
Equipped............................70
NExterior Mirrors Folding Feature...........70
NOutside Mirror Ð Driver's Side............71
NOutside Mirror Ð Passenger's Side..........71
NPower Remote-Control Mirrors.............72NHeated Remote Control Mirrors............72
NIlluminated Vanity Mirrors................73
mHands±Free Communication (UConnectŸ) Ð If
Equipped.............................73
NOperation............................75
NPhone Call Features....................79
NAdvanced Phone Connectivity.............81
NUConnectŸ System Features..............82
3
Page 72 of 361

Power Remote-Control Mirrors
Use the mirror select switch, located on the driver's door
trim panel above the power window switches, to adjust
the view obtained in the outside mirrors.Press the rocker switch to the L or R for Left or Right
mirror selection. Use the center off position to guard
against accidentally moving a mirror position.
Select a mirror and press one of the four arrows for the
direction you want the mirror to move.
Power mirror preselected positions can be controlled by
the optional Memory Seat Feature. Refer to ªMemory
Seatº in section 3 of this manual.
Heated Remote Control Mirrors
These mirrors are heated to melt frost or ice. This feature
is activated whenever you turn on the Rear Window
Defrost.
72 UNDERSTANDING THE FEATURES OF YOUR VEHICLE
Page 91 of 361

5. Within 5 seconds, press and release the UNLOCK
button on the remote keyless entry transmitters. A chime
will sound signaling you that the transmitter link has
been successfully disabled. A message will also be dis-
played in the Electronic Vehicle Information Center
(EVIC), indicating the transmitter has been disabled.
To disable another transmitter from memory positions 1
or 2, repeat steps 1± 4 for each transmitter.
NOTE:This function can be selected using the ªCus-
tomer Programmable Featuresº in the Electronic Vehicle
Information Center (EVIC) section, Otherwise see your
authorized dealer.
Second Row Manual Seat Recliner
The recliner mechanism control is on the outboard side of
the seat. To recline, lean forward slightly, lift the lever,
then push back to the desired position and release the
lever. Lean forward and lift the lever to return theseatback to its normal position. Using body pressure, lean
forward and rearward on the seat to be sure the seatback
has latched.
NOTE:When using the recliner mechanism with the 3rd
row seat folded down, the second row seat may need to
be adjusted forward to achieve full recline.
UNDERSTANDING THE FEATURES OF YOUR VEHICLE 91
3
Page 100 of 361

²The pedalscannotbe adjusted when the vehicle is in R
(Reverse) or when the Speed Control is ON. A message
will be displayed in the Electronic Vehicle Information
Center (EVIC) if the pedals are attempted to be ad-
justed when the system is locked out (ªAdjustable
Pedal Disabled Ð Cruise Control Engagedº or ªAd-
justable Pedal Disabled Ð Vehicle In Reverseº).
NOTE:If your vehicle is equipped with memory seat
feature, your remote keyless entry transmitter or memory
seat buttons on the driver's door panel can be used to
recall the adjustable pedals to saved positions.CAUTION!
Do not place any article under the adjustable pedals
or impede its ability to move as it may cause damage
to the pedal controls. Pedal travel may become
limited if movement is stopped by an obstruction in
the adjustable pedal's path.
TO OPEN AND CLOSE THE HOOD
To open the hood, two latches must be released. First pull
the hood release lever located under the left side of the
instrument panel.
100 UNDERSTANDING THE FEATURES OF YOUR VEHICLE
Page 115 of 361

The lights also turn on when a front door, a rear door or
the liftgate is opened. The lights will also turn on when
the unlock button on the remote keyless entry transmitter
is pressed.
Sunglasses Storage
At the rear of the console a compartment is provided for
the storage of a pair of sunglasses.
Press the door latch to open the compartment. The door
will slowly rotate to an open position.
GARAGE DOOR OPENER Ð IF EQUIPPED
The HomeLinktUniversal Transceiver replaces up to
three remote controls (hand held transmitters) that oper-
ate devices such as garage door openers, motorized
gates, or home lighting. It triggers these devices at the
push of a button. The Universal Transceiver operates off
your vehicle's battery and charging system; no batteries
are needed.For additional information on HomeLinkt, call 1±800±
355±3515, or on the internet at www.homelink.com.
WARNING!
A moving garage door can cause injury to people and
pets in the path of the door. People or pets could be
seriously or fatally injured. Only use this transceiver
with a garage door opener that has a ªstop and
reverseº feature as required by federal safety stan-
dards. This includes most garage door opener mod-
els manufactured after 1982. Do not use a garage
door opener without these safety features it could
cause injury or death. Call toll-free 1±800±355±3515
or, on the Internet at www.homelink.com for safety
information or assistance.
UNDERSTANDING THE FEATURES OF YOUR VEHICLE 115
3
Page 134 of 361

NRadio Operation......................160
NTape Player Operation..................164
NCD Player Operation...................166
NCD/DVD Changer Operation Ð If Equipped . 168
m6 Disc CD/Digital Video Disc (DVD) Changer . . 170
NOperating Instructions Ð CD/DVD Changer . . 170
NEject (EJT) Button.....................171
NOperating Instructions Ð Remote Control....172
NOperating Instructions Ð Video Screen......174
NOperating Instructions Ð Headphones......175
NOperating Instructions Ð MP3 Player.......177
NOperating Instructions Ð Video
Games/Camcorders...................177mRemote Sound System Controls.............178
NRadio Operation......................178
NTape Player.........................178
NCD Player..........................179
mRadio General Information................179
NRadio Broadcast Signals.................179
NTwo Types Of Signals..................179
NElectrical Disturbances..................179
NAM Reception.......................180
NFM Reception........................180
mCassette Tape And Player Maintenance.......180
mCD/DVD Disc Maintenance...............181
mRadio Operation And Cellular Phones........182
134 UNDERSTANDING YOUR INSTRUMENT PANEL
Page 170 of 361

6 DISC CD/DIGITAL VIDEO DISC (DVD) CHANGER
The Rear Seat Audio/Video System allows passengers to
listen to a CD or DVD from the 6 disc CD/DVD changer
through the headphones, while the front seat passengers
listen to either AM/FM, Cassette or CDs from the radio.
A remote control is provided for functions such as
changing tracks or DVD functions, as well as selecting
discs loaded in the 6 disc CD/DVD changer while
listening to the Rear Audio/Video System.
Operating Instructions Ð CD/DVD Changer
Loading The CD/DVD Changer
The CD/DVD changer is a multi-disc changer,
and will accept up to six discs. Gently insert
one disc into the CD/DVD changer with the
label facing up. The disc will automatically be
pulled into the CD/DVD changer.
To insert additional discs into the changer, follow the
instructions shown:
1. Select and press any numbered button without an
illuminated light above it.
2. Insert the disc while the light above the chosen button
is flashing and the light below the loading slot is illumi-
nated.
3. Upon insertion, the disc will begin to play, and both
the button light and the light below the loading slot will
illuminate.
170 UNDERSTANDING YOUR INSTRUMENT PANEL
Page 171 of 361

4. Repeat the process for loading any additional CD/
DVDs. The CD/DVD changer will stop while additional
CD/DVDs are loaded.
If the volume control is ON, the unit will switch from
radio to CD/DVD mode and begin to play. The radio
display will show the chapter number and index time in
hours and minutes of the DVD, and the track number,
minutes and second of the CD. Play will begin automati-
cally in approximately 20 seconds. If the DVD does not
play automatically, press the ªENTERº button on the
remote control or on the side of the video screen to select
play from the menu options.
NOTE:
²You may eject a disc with the radio OFF. The ignition
switch must be in the ON or ACC position to insert a
disc with the radio OFF.
²If you insert a disc with the ignition ON and the radio
OFF, the DVD will automatically be pulled into the
DVD changer and the display will show the time of
day.
EJECT (EJT) Button
If there is a single disc in the changer, press the EJT
button and the disc will eject. The unit will switch to the
radio mode. If you do not remove the disc within 10
seconds, it will be reloaded and the display will show
PAUSE. The radio mode will continue to operate.
To eject additional discs from the changer, first select the
numbered button where the disc is located and then press
the EJT button.
The disc can be ejected with the radio OFF.
UNDERSTANDING YOUR INSTRUMENT PANEL 171
4
Page 172 of 361

Operating Instructions Ð Remote Control
Power Button (PWR)
Pressing the ªPOWERº button will turn the rear audio/
video system ON/OFF. The headphone symbol will flash
for approximately 5 seconds in the radio display and
sound can be heard from the headphones.
NOTE:
²The power button on the headphones must be turned
ON before sound can be heard from the headphones.
²When the rear audio/video system is ON, sound can
only be heard from the front speakers. The rear
speakers will turn back on when the rear audio/video
system is turned OFF.
MENU Button
This button only functions in the DVD video mode. Press
this button once to go to the on-screen menu, press the
button a second time to go to the main menu. When the
DVD is in stop mode, pressing the menu button for 3
seconds will display the set-up screen.
PAUSE/STOP/ PLAY Button
This button only functions in the DVD video mode. Press
this button once to pause the video, press a second time
to play the video. Press and hold this button for more
than 6 seconds to stop playing the video.
ENTER/ARROW Buttons
These buttons only function in the DVD video mode. Use
the ªENTERº button to play the DVD video or to enter
selections from the menu screens. Use the arrow buttons
to toggle through the menu screen options.
172 UNDERSTANDING YOUR INSTRUMENT PANEL