tire CHRYSLER PACIFICA 2008 1.G Repair Manual
[x] Cancel search | Manufacturer: CHRYSLER, Model Year: 2008, Model line: PACIFICA, Model: CHRYSLER PACIFICA 2008 1.GPages: 457, PDF Size: 6.7 MB
Page 356 of 457

Jacking Instructions
WARNING!
²Getting under a jacked-up vehicle is dangerous.
The vehicle could slip off the jack and fall on you.
You could be crushed. Never get any part of your
body under a vehicle that is on a jack. Never start
or run the engine while the vehicle is on a jack. If
you need to get under a raised vehicle, take it to a
service center where it can be raised on a lift.
²The jack is designed to use as a tool for changing
tires only. The jack should not be used to lift the
vehicle for service purposes. The vehicle should
be jacked on a firm level surface only. Avoid ice or
slippery areas.
WARNING!
Carefully follow these tire changing warnings to help pre-
vent personal injury or damage to your vehicle:
²Always park on a firm, level surface as far from the edge
of the roadway as possible before raising the vehicle.
²Block the wheel diagonally opposite the wheel to be
raised.
²Apply the parking brake firmly before jacking.
²Never start the engine with the vehicle on a jack.
²Do not let anyone sit in the vehicle when it is on a jack.
²Do not get under the vehicle when it is on a jack.
²Only use the jack in the positions indicated.
²If working on or near a roadway, be extremely careful of
motor traffic.
²To assure that spare tires, flat or inflated are securely
stowed, spares must be stowed with the value stem
facing the ground.
356 WHAT TO DO IN EMERGENCIES
Page 358 of 457

location.Do not raise the vehicle until you are sure the
jack is securely engaged. Never jack up the vehicle
using any suspension components.
6. Raise the vehicle by turning the jack screw to the right,
using the swivel wrench. Raise the vehicle only until the
tire just clears the surface and enough clearance is
obtained to install the spare tire. Minimum tire lift
provides maximum stability.
WARNING!
Raising the vehicle higher than necessary can make
the vehicle less stable. It could slip off the jack and
hurt someone near it. Raise the vehicle only enough
to remove the tire.7. Remove the wheel lug nuts, for vehicles with wheel
covers, remove the cover from the wheel by hand. Do not
pry the wheel cover off. Then pull the wheel off the hub.
8. Install the spare wheel, for vehicles with wheel covers,
align the notch in the wheel cover with the valve stem on
the wheel. Install the cover on the wheel by hand only
and install the wheel lug nuts with the cone shaped end
of the nut toward the wheel. Lightly tighten the lug nuts.
To avoid the risk of forcing the vehicle off the jack, do not
tighten the lug nuts fully until the vehicle has been
lowered.
NOTE:Do not install the wheel cover on the compact
spare.
Do not use a hammer or force to install the wheel covers.
9. Lower the vehicle by turning the jack screw to the left.
10. Finish tightening the lug nuts. Push down on the
wrench while tightening for increased leverage. Alternate
358 WHAT TO DO IN EMERGENCIES
Page 359 of 457

lug nuts until each nut has been tightened twice. Correct
wheel nut tightness is 130 N´m (95 ft. lbs). If in doubt
about the correct tightness, have them checked with a
torque wrench by your dealer or at a service station.
11. Lower the jack to its fully closed position.
WARNING!
A loose tire or jack, thrown forward in a collision or
hard stop could endanger the occupants of the ve-
hicle. Always stow the jack parts and the spare tire in
the places provided.
NOTE:The full size flat tire will not store under the
vehicle. It should be repaired /or replaced, and rein-
stalled on the vehicle as soon as possible.
12. Secure the spare tire as follows:
²Turn the wheel so that the valve-stem is down. Slide
the wheel retainer through the center of the wheel
and position it properly across the wheel opening.
²For convenience in checking the spare tire inflation,
stow with the valve-stem toward the rear of the
vehicle.
²Using the jack-handle, rotate the drive nut to the
right until the wheel is drawn into place against the
underside of the vehicle.
²Continue to rotate the nut until you hear the mecha-
nism click three times. It cannot be overtightened.
Push against the tire several times to be sure it is
securely in place.
13. Stow the jack and jack handle.
14. Check the tire pressure as soon as possible. Correct
pressure as required.
WHAT TO DO IN EMERGENCIES 359
6
Page 360 of 457

NOTE:When reinstalling the wheel center cap, insure
that the valve stem symbol on the back of the cap is
pointed toward the wheel valve stem. Install the center
cap using hand pressure only. Do not use a hammer.
Wheel Nuts
All wheel nuts should be tightened occasionally to elimi-
nate the possibility of wheel studs being sheared or the
bolt holes in the wheels becoming elongated. This is
especially important during the first few hundred miles
of operation, and after each time a tire is changed, to
allow the wheel nuts to become properly set. All nuts
should first be firmly seated against the wheel. The nuts
should then be tightened to recommended torque.
Tighten the nuts to final torque in increments. Progress
around the bolt circle, tightening the nut opposite to the
nut just previously tightened until final torque is
achieved. Recommended torque is 130 N´m (95 ft. lbs).
JUMP-STARTING PROCEDURE
WARNING!
²Do not attempt to push or tow your vehicle to get it started.
Vehicles equipped with an automatic transmission cannot
be started this way. Unburned fuel could enter the catalytic
converter and once the engine has started, ignite and
damage the converter and vehicle. If the vehicle has a
discharged battery, booster cables may be used to obtain a
start from another vehicle. This type of start can be danger-
ous if done improperly, so follow this procedure carefully.
²Battery fluid is a corrosive acid solution; do not allow
battery fluid to contact eyes, skin or clothing. Don't lean
over battery when attaching clamps or allow the clamps to
touch each other. If acid splashes in eyes or on skin, flush
contaminated area immediately with large quantities of
water.
²A battery generates hydrogen gas which is flammable and
explosive. Keep flame or spark away from the vent holes.
Do not use a booster battery or any other booster source
with an output that exceeds 12 volts.
²Take care to avoid the radiator cooling fan whenever the
hood is raised. It can start anytime the ignition switch is on.
You can be hurt by the fan.
360 WHAT TO DO IN EMERGENCIES
Page 363 of 457

and Drive. Usually the least accelerator pedal pressure to
maintain the rocking motion without spinning the
wheels is most effective.
WARNING!
Fast spinning tires can be dangerous. Forces gener-
ated by excessive wheel speeds may cause tire dam-
age or failure. A tire could explode and injure some-
one. Do not spin your vehicle's wheels faster than 35
mph (55 km/h) when you are stuck. And don't let
anyone near a spinning wheel, no matter what the
speed.
CAUTION!
Racing the engine or spinning the wheels too fast
may lead to transmission overheating and failure. It
can also damage the tires. Do not spin the wheels
above 35 mph (55 km/h).
TOWING A DISABLED VEHICLE
With Ignition Key
Front Wheel Drive
Your vehicle may be towed under the following condi-
tions: The gear selector must be in NEUTRAL, the
distance to be traveled must not exceed 100 miles (160
km), the towing speed must not exceed 44 mph (72
km/h), and both front and rear wheels must be on the
ground. Exceeding these towing limits may cause a
transmission geartrain failure. If the transmission is not
WHAT TO DO IN EMERGENCIES 363
6
Page 379 of 457

Materials Added to Engine Oil
The manufacture strongly recommends against the addi-
tion of any additives (other than leak detection dyes) to
the engine oil. Engine oil is an engineered product and
it's performance may be impaired by supplemental ad-
ditives.
Disposing of Used Engine Oil And Oil Filters
Care should be taken in disposing of used engine oil and
oil filters from your vehicle. Used oil and oil filters,
indiscriminately discarded, can present a problem to the
environment. Contact your dealer, service station, or
governmental agency for advice on how and where used
oil and oil filters can be safely discarded in your area.
Engine Oil Filter
The engine oil filter should be replaced at every engine
oil change.
Engine Oil Filter Selection
This manufacture's engines have a full-flow type oil filter.
Use a filter of this type for replacement. The quality of
replacement filters varies considerably. Only high quality
filters should be used to assure most efficient service.
Mopar Engine Oil Filters are a high quality oil filter and
are recommended.
Drive Belt
At the mileage indicated in section 8: ªMaintenance
Scheduleº, replace the drive belt with a new drive belt.
NOTE:The belt must be routed correctly to ensure
proper drive function.
Spark Plugs
Spark plugs must fire properly to assure engine perfor-
mance and emission control. New plugs should be in-
stalled at the specified mileage. The entire set should be
replaced if there is any malfunction due to a faulty spark
MAINTAINING YOUR VEHICLE 379
7
Page 389 of 457

Cooling System
WARNING!
²When working near the radiator cooling fan, dis-
connect the fan motor lead or turn the ignition
switch to the OFF position. The fan is temperature
controlled and can start at any time the ignition
switch is in the ON position.
²You or others can be badly burned by hot coolant
or steam from your radiator. If you see or hear
steam coming from under the hood, don't open the
hood until the radiator has had time to cool. Never
try to open a cooling system pressure cap when the
radiator is hot.
Engine Coolant Checks
Check the engine coolant (antifreeze) protection every 12
months (before the onset of freezing weather, where
applicable). If coolant is dirty or rusty in appearance, the
system should be drained, flushed and refilled with fresh
coolant. Check the front of the A/C condenser for any
accumulation of bugs, leaves, etc. If dirty, clean by gently
spraying water from a garden hose vertically down the
face of the condenser.
Check the coolant recovery bottle tubing for brittle rub-
ber, cracking, tears, cuts and tightness of the connection
at the bottle and radiator. Inspect the entire system for
leaks.
With the engine at normal operating temperature (but
not running), check the cooling system pressure cap for
proper vacuum sealing by draining a small amount of
coolant from the radiator drain cock. If the cap is sealing
properly, the engine coolant (antifreeze) will begin to
MAINTAINING YOUR VEHICLE 389
7
Page 421 of 457

NOTE:
²The oil change indicator message will not monitor the
time since the last oil change. Change your vehicles oil
if it has been 6 months since your last oil change even
if the oil change indicator message is NOT illumi-
nated.
²Change your engine oil more often if you drive your
vehicle off-road for an extended period of time.
²Under no circumstances should oil change intervals
exceed 6,000 miles (10,000 km) or 6 months, whichever
comes first.
Your dealer will reset the oil change indicator message
after completing the scheduled oil change. If this sched-
uled oil change is performed by someone other than your
dealer the message can be reset by referring to the steps
described under ªOil Change Requiredº in ªUse FactorySettingsº of the EVIC section in this manual or under
ªOdometer/Trip Odometerº in the ªInstrument Cluster
Descriptions section of this manual.
At Each Stop for Fuel
²Check the engine oil level about 5 minutes after a fully
warmed engine is shut off. Checking the oil level while
the vehicle is on level ground will improve the accu-
racy of the oil level reading. Add oil only when the
level is at or below the ADD or MIN mark.
²Check the windshield washer solvent and add if
required.
Once a Month
²Check tire pressure and look for unusual wear or
damage.
²Inspect the battery and clean and tighten the terminals
as required.
MAINTENANCE SCHEDULES 421
8
M
A
I
N
T
E
N
A
N
C
E
S
C
H
E
D
U
L
E
S
Page 423 of 457
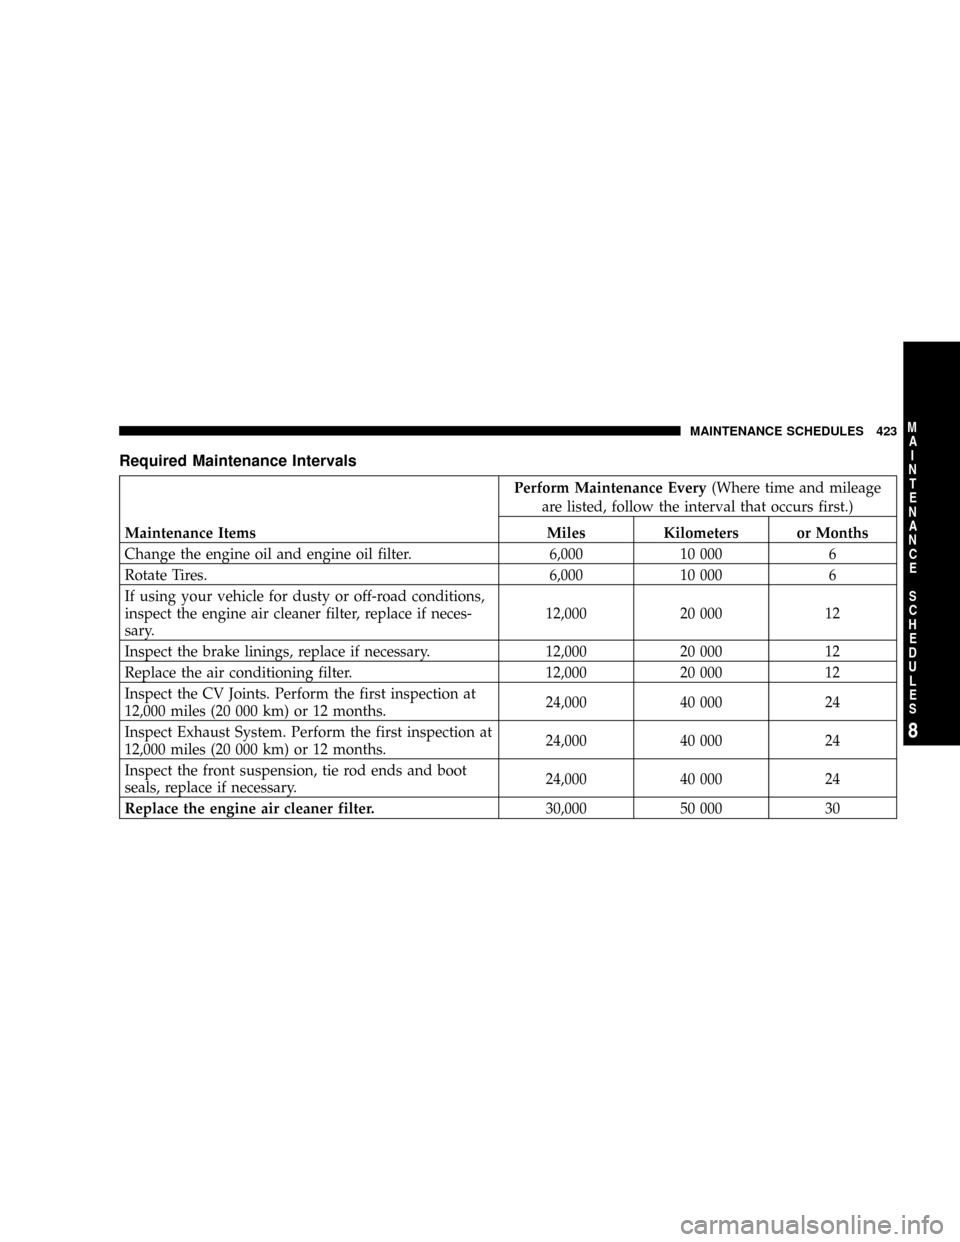
Required Maintenance Intervals
Perform Maintenance Every(Where time and mileage
are listed, follow the interval that occurs first.)
Maintenance Items Miles Kilometers or Months
Change the engine oil and engine oil filter. 6,000 10 000 6
Rotate Tires. 6,000 10 000 6
If using your vehicle for dusty or off-road conditions,
inspect the engine air cleaner filter, replace if neces-
sary.12,000 20 000 12
Inspect the brake linings, replace if necessary. 12,000 20 000 12
Replace the air conditioning filter. 12,000 20 000 12
Inspect the CV Joints. Perform the first inspection at
12,000 miles (20 000 km) or 12 months.24,000 40 000 24
Inspect Exhaust System. Perform the first inspection at
12,000 miles (20 000 km) or 12 months.24,000 40 000 24
Inspect the front suspension, tie rod ends and boot
seals, replace if necessary.24,000 40 000 24
Replace the engine air cleaner filter.30,000 50 000 30
MAINTENANCE SCHEDULES 423
8
M
A
I
N
T
E
N
A
N
C
E
S
C
H
E
D
U
L
E
S
Page 427 of 457

IF YOU NEED CONSUMER ASSISTANCE
CONTENTS
mSuggestions For Obtaining Service For Your
Vehicle..............................428
NPrepare For The Appointment............428
NPrepare A List........................428
NBe Reasonable With Requests.............428
mIf You Need Assistance...................428
mWarranty Information (U.S. Vehicles Only).....431
mMopartParts.........................431mReporting Safety Defects..................431
NIn Canada..........................432
mPublication Order Forms..................432
mDepartment Of Transportation Uniform Tire
Quality Grades........................434
NTreadwear..........................434
NTraction Grades......................434
NTemperature Grades...................435
9