buttons CHRYSLER PACIFICA 2017 2.G User Guide
[x] Cancel search | Manufacturer: CHRYSLER, Model Year: 2017, Model line: PACIFICA, Model: CHRYSLER PACIFICA 2017 2.GPages: 828, PDF Size: 7.58 MB
Page 99 of 828
Push the switch once to select HI-level heating. Push the
switch a second time to select LO-level heating. Push the
switch a third time to shut the heating elements OFF.
NOTE:Once a heat setting is selected, heat will be felt
within two to five minutes.
When the HI-level setting is selected, the heater will
provide a boosted heat level during the initial stages of
operation. Then, the heat output will drop to the normal
HI-level. If the HI-level setting is selected, the system will
automatically switch to LO-level after approximately 60
minutes of continuous operation. At that time, the dis-
play will change from HI to LO, indicating the change.
The LO-level setting will turn OFF automatically after
approximately 45 minutes.
Ventilated Seats — If Equipped
Located in the first row seat cushions are small fans that
draw the air from the passenger compartment and move air through fine perforations in the seat cover to help
keep the driver and front passenger cooler in higher
ambient temperatures. The fans operate at two speeds,
HI and LO.
The front ventilated seats control buttons are located
within the climate or controls screen of the touchscreen.
•
Press the ventilated seat button
once to choose HI.
•Press the ventilated seat buttona second time to
choose LO.
• Press the ventilated seat buttona third time to
turn the ventilated seat OFF.
NOTE: The engine must be running for the ventilated
seats to operate.
3
GETTING TO KNOW YOUR VEHICLE 97
Page 127 of 828
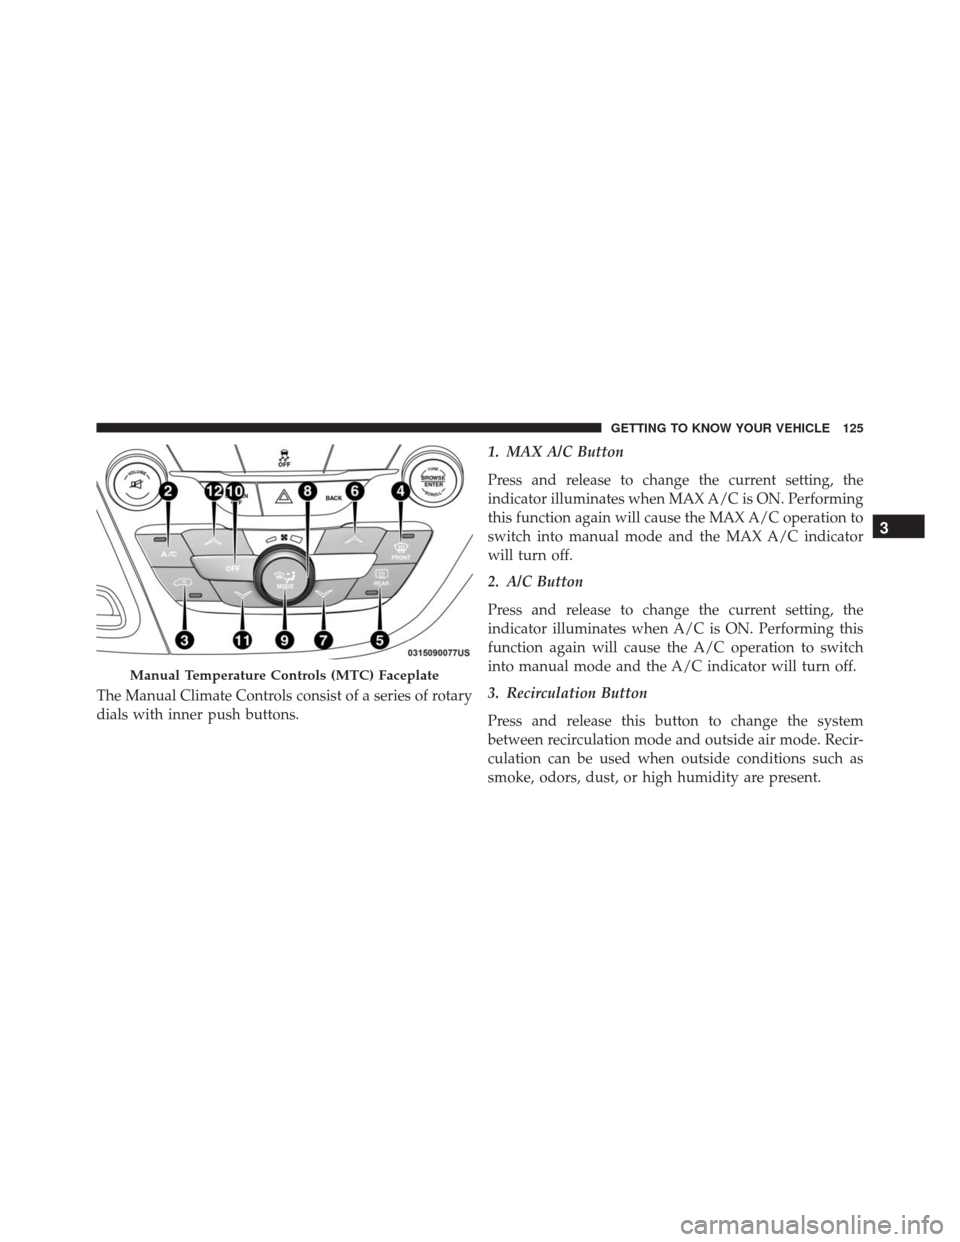
The Manual Climate Controls consist of a series of rotary
dials with inner push buttons.1. MAX A/C Button
Press and release to change the current setting, the
indicator illuminates when MAX A/C is ON. Performing
this function again will cause the MAX A/C operation to
switch into manual mode and the MAX A/C indicator
will turn off.
2. A/C Button
Press and release to change the current setting, the
indicator illuminates when A/C is ON. Performing this
function again will cause the A/C operation to switch
into manual mode and the A/C indicator will turn off.
3. Recirculation Button
Press and release this button to change the system
between recirculation mode and outside air mode. Recir-
culation can be used when outside conditions such as
smoke, odors, dust, or high humidity are present.
Manual Temperature Controls (MTC) Faceplate
3
GETTING TO KNOW YOUR VEHICLE 125
Page 130 of 828
automatic mode to switch to manual operation. The
speeds can be selected using either the blower control
knob on the faceplate or the buttons on the touchscreen
as follows:
Blower Control Knob On The Faceplate
The blower speed increases as you turn the blower
control knob clockwise from the lowest blower setting.
The blower speed decreases as you turn the blower
control knob counterclockwise.
Button On The Touchscreen
Use the small blower icon to reduce the blower setting
and the large blower icon to increase the blower setting.
Blower can also be selected by pressing the blower bar
area between the icons.
9. Mode Control
Push this button to change the system between Modes
(Panel, Bi-Level, Floor, Mix, Defrost).•
Panel
Air comes from the outlets in the instrument
panel. Each of these outlets can be individu-
ally adjusted to direct the flow of air. The air
vanes of the center outlets and outboard outlets can
be moved up and down or side to side to regulate
airflow direction. There is a shut off wheel located
below the air vanes to shut off or adjust the amount
of airflow from these outlets.
• Bi-Level
Air comes from the instrument panel outlets
and floor outlets. A slight amount of air is
directed through the defrost and side window
demister outlets.
NOTE: BI-LEVEL mode is designed under comfort con-
ditions to provide cooler air out of the panel outlets and
warmer air from the floor outlets.
128 GETTING TO KNOW YOUR VEHICLE
Page 132 of 828
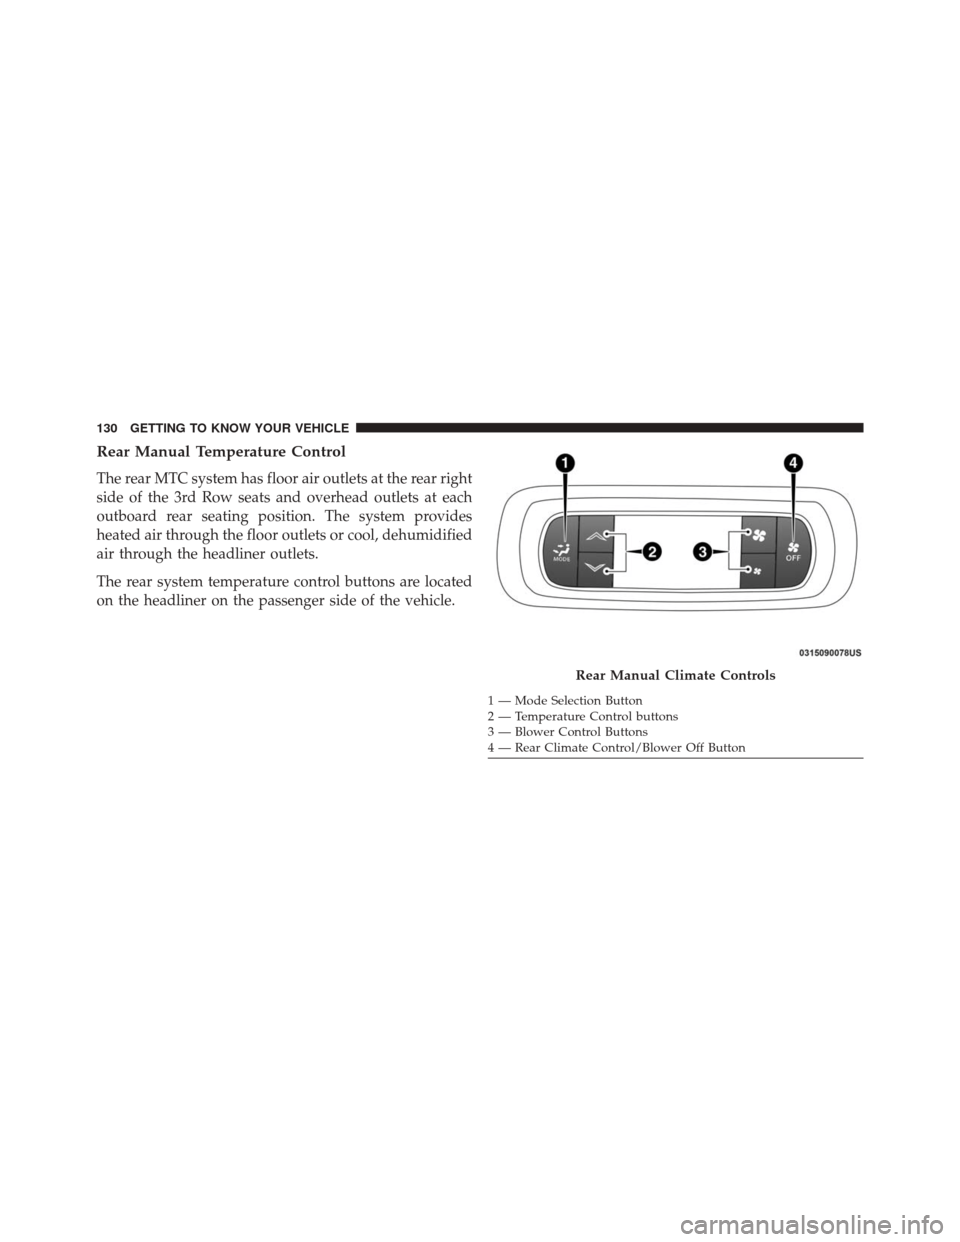
Rear Manual Temperature Control
The rear MTC system has floor air outlets at the rear right
side of the 3rd Row seats and overhead outlets at each
outboard rear seating position. The system provides
heated air through the floor outlets or cool, dehumidified
air through the headliner outlets.
The rear system temperature control buttons are located
on the headliner on the passenger side of the vehicle.
Rear Manual Climate Controls
1 — Mode Selection Button
2 — Temperature Control buttons
3 — Blower Control Buttons
4 — Rear Climate Control/Blower Off Button
130 GETTING TO KNOW YOUR VEHICLE
Page 134 of 828
CAUTION!
Interior air enters the Rear Automatic Temperature
Control System through an intake grille, located in
floor under the passengers’ seats. Do not block or
place objects directly in front of the inlet grille or
heater outlets. The electrical system could overload
causing damage to the blower motor.
Rear Climate Control/Blower Off
To manually set the rear blower controls to off, press the
Rear Climate Control/Blower Off button.
Automatic Temperature Control (ATC) – 3 Zone —
If Equipped
Buttons On The Faceplate
The buttons on the faceplate are located below the
Uconnect screen.
Uconnect 5.0 Automatic Climate Controls — Buttons On The Touchscreen
132 GETTING TO KNOW YOUR VEHICLE
Page 135 of 828
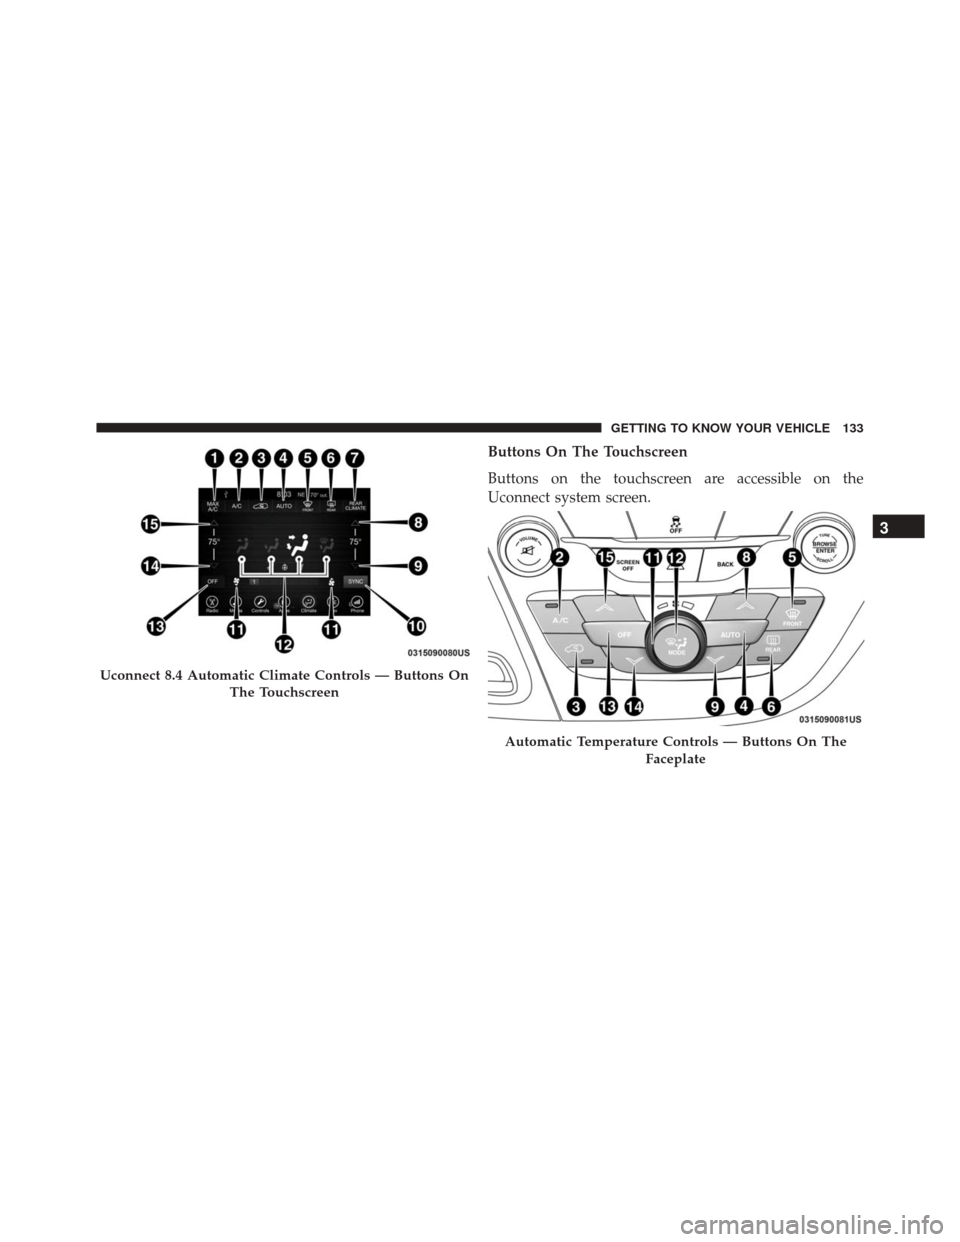
Buttons On The Touchscreen
Buttons on the touchscreen are accessible on the
Uconnect system screen.
Uconnect 8.4 Automatic Climate Controls — Buttons OnThe Touchscreen
Automatic Temperature Controls — Buttons On The Faceplate
3
GETTING TO KNOW YOUR VEHICLE 133
Page 136 of 828

Button Descriptions (Applies To Both Buttons On The
Faceplate And Buttons On The Touchscreen)
1. MAX A/C Button
Press and release to change the current setting, the
indicator illuminates when MAX A/C is ON. Performing
this function again will cause the MAX A/C operation to
switch into manual mode and the MAX A/C indicator
will turn off.
2. A/C Button
Press and release to change the current setting, the
indicator illuminates when A/C is ON. Performing this
function again will cause the A/C operation to switch
into manual mode and the A/C indicator will turn off.3. Recirculation Button
Press and release this button to change the system
between recirculation mode and outside air mode. Recir-
culation can be used when outside conditions such as
smoke, odors, dust, or high humidity are present.
4. AUTO Operation Button
Automatically controls the interior cabin temperature by
adjusting airflow distribution and amount. Performing
this function will cause the system to switch between
manual mode and automatic modes. Refer to “Automatic
Operation” for more information.
5. Front Defrost Button
Press and release to change the current airflow setting to
Defrost mode. The indicator illuminates when this fea-
ture is ON. Air comes from the windshield and side
window demist outlets. When the defrost button is
selected, the blower level will increase. Use Defrost mode
134 GETTING TO KNOW YOUR VEHICLE
Page 139 of 828
11. Blower Control
Blower control is used to regulate the amount of air
forced through the climate system. There are seven
blower speeds available. Adjusting the blower will cause
automatic mode to switch to manual operation. The
speeds can be selected using either the blower control
knob on the faceplate or the buttons on the touchscreen
as follows:
Blower Control Knob On The Faceplate
The blower speed increases as you turn the blower
control knob clockwise from the lowest blower setting.
The blower speed decreases as you turn the blower
control knob counterclockwise.
Button On The Touchscreen
Use the small blower icon to reduce the blower setting
and the large blower icon to increase the blower setting.
Blower can also be selected by pressing the blower bar
area between the icons.12. Modes
Push the button in the center of the knob to change the
airflow distribution mode. The airflow distribution mode
can be adjusted so air comes from the instrument panel
outlets, floor outlets, defrost outlets and demist outlets.
The Mode settings are as follows:
•Panel Mode
Air comes from the outlets in the instrument
panel. Each of these outlets can be individu-
ally adjusted to direct the flow of air. The air vanes of
the center outlets and outboard outlets can be moved
up and down or side to side to regulate airflow
direction. There is a shut off wheel located below the
air vanes to shut off or adjust the amount of airflow
from these outlets.
3
GETTING TO KNOW YOUR VEHICLE 137
Page 147 of 828
Rear Blower Control
The rear blower control head can be manually set to off,
or any fixed blower speed, by pushing the blower control
buttons. This allows the rear seat occupants to control the
volume of air circulated in the rear of the vehicle.
CAUTION!
Interior air enters the Rear Automatic Temperature
Control System through an intake grille, located in
floor under the passengers’ seats. Do not block or
place objects directly in front of the inlet grille or
heater outlets. The electrical system could overload
causing damage to the blower motor.
Rear Temperature Control
To change the temperature in the rear of the vehicle, push
the temperature buttons. The rear temperature settings
are displayed in the rear ATC panel.When rear controls are locked by the front system, the
Rear Temperature Lock symbol on the ATC panel is
illuminated and any rear overhead adjustments are ig-
nored.
When the Sync feature is active, the rear temperature is
synchronized to the driver ’s temperature setting. If the
rear temperature is changed, the Sync feature will deac-
tivate.
Rear Mode Control
Auto Mode
The rear system automatically maintains the correct
mode and comfort level desired by the rear seat occu-
pants.
3
GETTING TO KNOW YOUR VEHICLE 145
Page 172 of 828
2. Open front vacuum storage compartments to accessthe attachments if needed.
3. Pull out the vacuum hose and push the power buttonlocated under the vacuum head. Begin to vacuum
(Dry use only).
Front Storage Compartments
1 — Retractable Vacuum Head/Hose Location
2 — Attachment Compartment Location
Power Buttons
1 — Low Power Indicator Light
2 — On/Off Button
170 GETTING TO KNOW YOUR VEHICLE