CHRYSLER PACIFICA 2018 Owners Manual
Manufacturer: CHRYSLER, Model Year: 2018, Model line: PACIFICA, Model: CHRYSLER PACIFICA 2018Pages: 696, PDF Size: 8.48 MB
Page 141 of 696
Sunroof Maintenance
Use only a non-abrasive cleaner and a soft cloth to clean the
glass panel.
Ignition Off Operation
The power sunroof switch will remain active for up to
approximately 10 minutes after the ignition switch is
turned to the OFF/LOCK position. Opening either front
door will cancel this feature.
NOTE:Ignition Off time is programmable through the
Uconnect System. Refer to “Uconnect Settings” in “Multi-
media” for further information.
HOOD
Opening
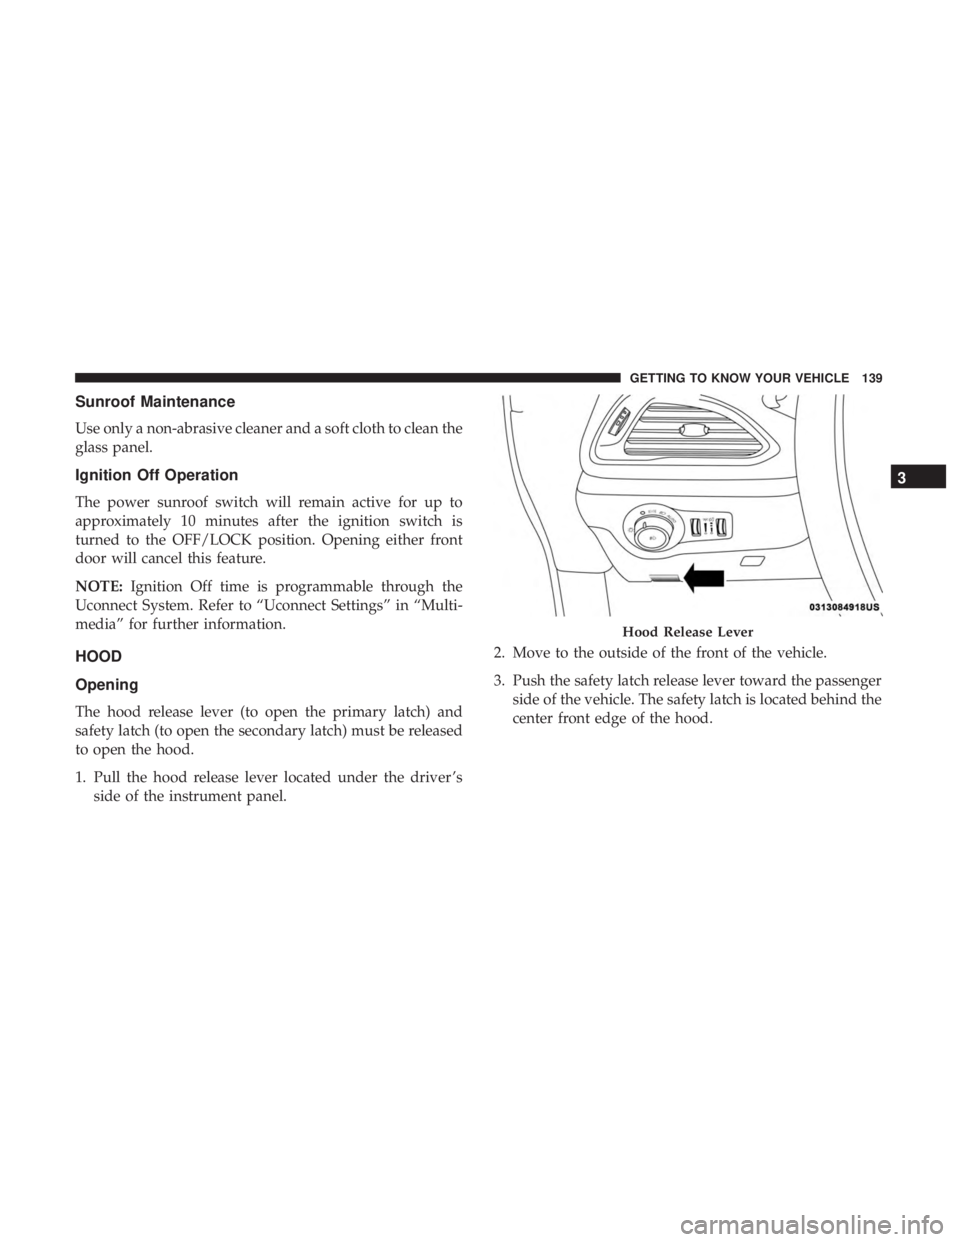
The hood release lever (to open the primary latch) and
safety latch (to open the secondary latch) must be released
to open the hood.
1. Pull the hood release lever located under the driver ’s side of the instrument panel. 2. Move to the outside of the front of the vehicle.
3. Push the safety latch release lever toward the passenger
side of the vehicle. The safety latch is located behind the
center front edge of the hood.
Hood Release Lever
3
GETTING TO KNOW YOUR VEHICLE 139
Page 142 of 696
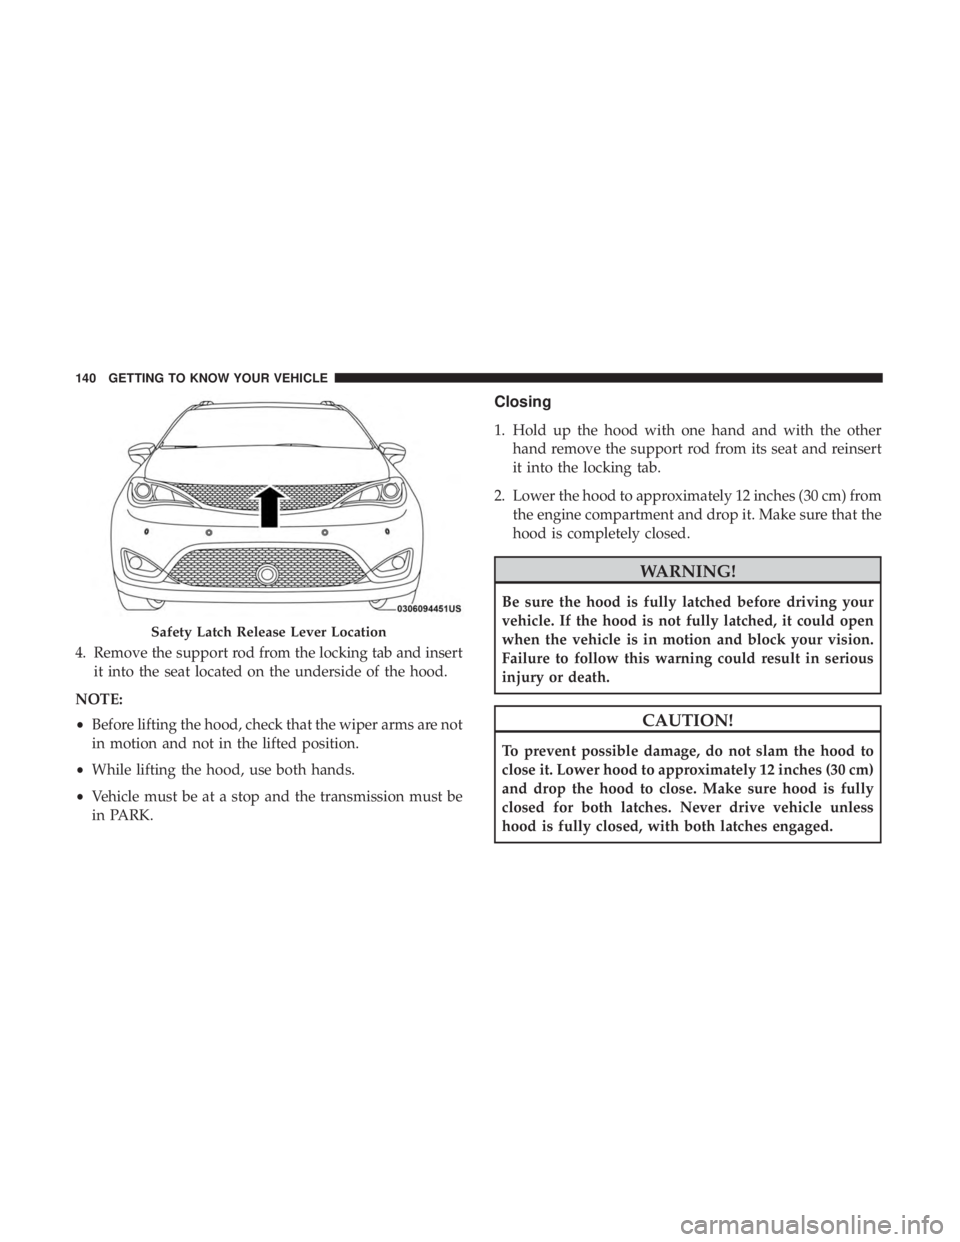
4. Remove the support rod from the locking tab and insertit into the seat located on the underside of the hood.
NOTE:
• Before lifting the hood, check that the wiper arms are not
in motion and not in the lifted position.
• While lifting the hood, use both hands.
• Vehicle must be at a stop and the transmission must be
in PARK.
Closing
1. Hold up the hood with one hand and with the other
hand remove the support rod from its seat and reinsert
it into the locking tab.
2. Lower the hood to approximately 12 inches (30 cm) from the engine compartment and drop it. Make sure that the
hood is completely closed.
WARNING!
Be sure the hood is fully latched before driving your
vehicle. If the hood is not fully latched, it could open
when the vehicle is in motion and block your vision.
Failure to follow this warning could result in serious
injury or death.
CAUTION!
To prevent possible damage, do not slam the hood to
close it. Lower hood to approximately 12 inches (30 cm)
and drop the hood to close. Make sure hood is fully
closed for both latches. Never drive vehicle unless
hood is fully closed, with both latches engaged.
Safety Latch Release Lever Location
140 GETTING TO KNOW YOUR VEHICLE
Page 143 of 696
LIFTGATE
Opening
To Unlock/Enter The Liftgate
The liftgate may be released in several ways:
•Overhead console liftgate button
• Key fob
• Outside handle
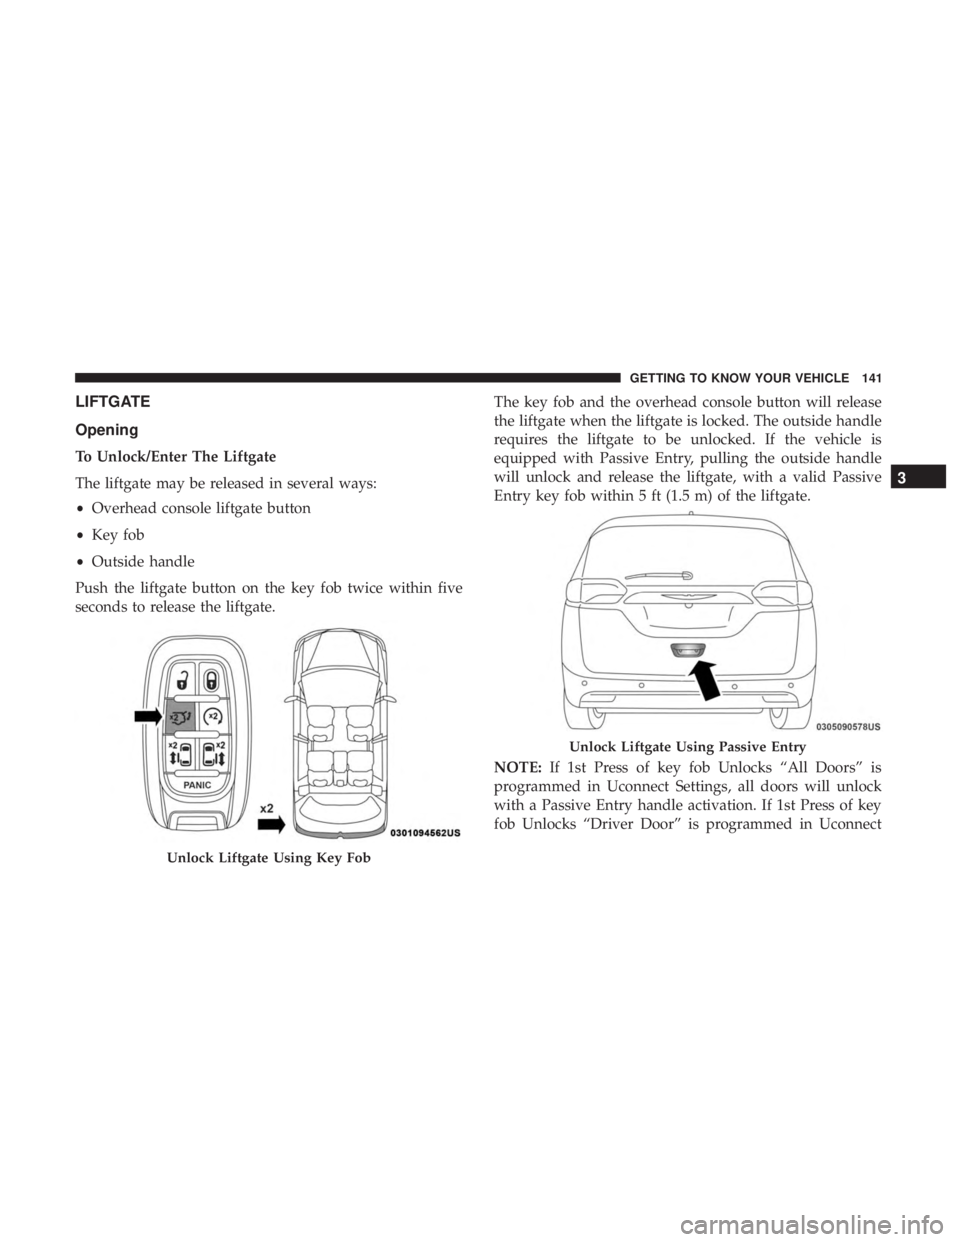
Push the liftgate button on the key fob twice within five
seconds to release the liftgate. The key fob and the overhead console button will release
the liftgate when the liftgate is locked. The outside handle
requires the liftgate to be unlocked. If the vehicle is
equipped with Passive Entry, pulling the outside handle
will unlock and release the liftgate, with a valid Passive
Entry key fob within 5 ft (1.5 m) of the liftgate.
NOTE:
If 1st Press of key fob Unlocks “All Doors” is
programmed in Uconnect Settings, all doors will unlock
with a Passive Entry handle activation. If 1st Press of key
fob Unlocks “Driver Door” is programmed in Uconnect
Unlock Liftgate Using Key Fob
Unlock Liftgate Using Passive Entry
3
GETTING TO KNOW YOUR VEHICLE 141
Page 144 of 696
Settings, the liftgate will only unlock with handle activa-
tion. Refer to “Uconnect Settings” in “Multimedia” for
further information.
Closing
To Close The Liftgate
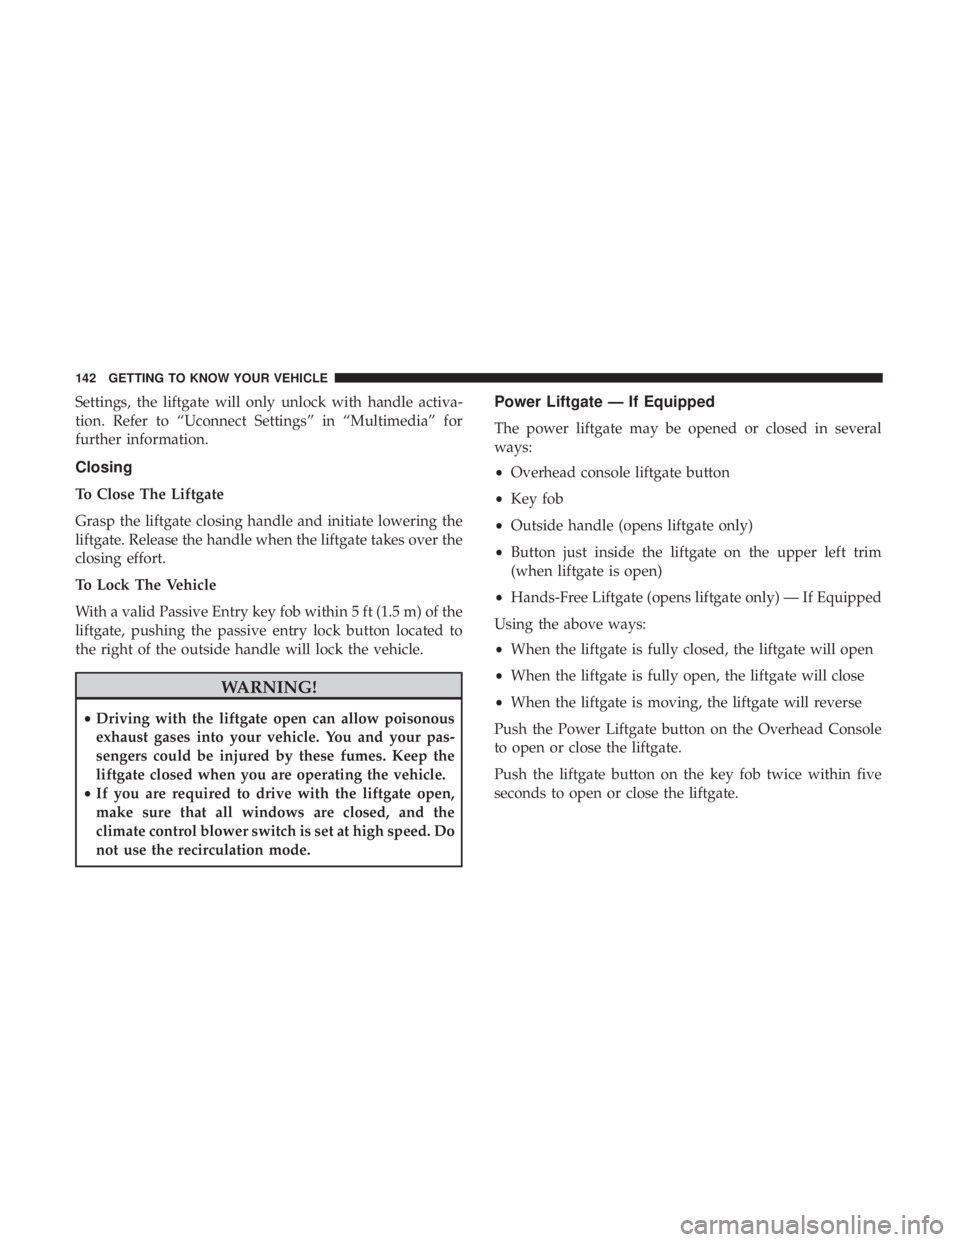
Grasp the liftgate closing handle and initiate lowering the
liftgate. Release the handle when the liftgate takes over the
closing effort.
To Lock The Vehicle
With a valid Passive Entry key fob within 5 ft (1.5 m) of the
liftgate, pushing the passive entry lock button located to
the right of the outside handle will lock the vehicle.
WARNING!
•Driving with the liftgate open can allow poisonous
exhaust gases into your vehicle. You and your pas-
sengers could be injured by these fumes. Keep the
liftgate closed when you are operating the vehicle.
• If you are required to drive with the liftgate open,
make sure that all windows are closed, and the
climate control blower switch is set at high speed. Do
not use the recirculation mode.
Power Liftgate — If Equipped
The power liftgate may be opened or closed in several
ways:
• Overhead console liftgate button
• Key fob
• Outside handle (opens liftgate only)
• Button just inside the liftgate on the upper left trim
(when liftgate is open)
• Hands-Free Liftgate (opens liftgate only) — If Equipped
Using the above ways:
• When the liftgate is fully closed, the liftgate will open
• When the liftgate is fully open, the liftgate will close
• When the liftgate is moving, the liftgate will reverse
Push the Power Liftgate button on the Overhead Console
to open or close the liftgate.
Push the liftgate button on the key fob twice within five
seconds to open or close the liftgate.
142 GETTING TO KNOW YOUR VEHICLE
Page 145 of 696
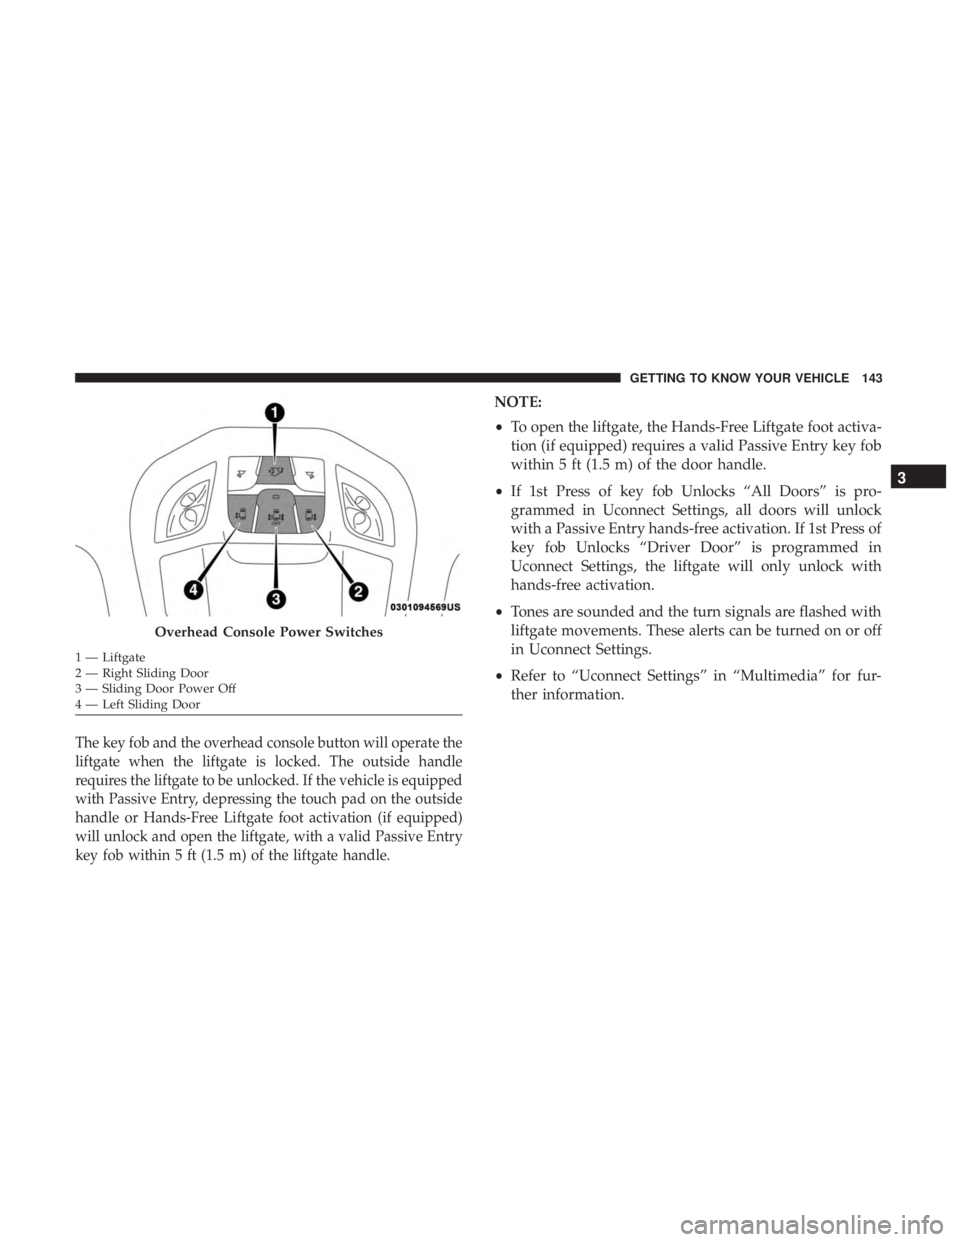
The key fob and the overhead console button will operate the
liftgate when the liftgate is locked. The outside handle
requires the liftgate to be unlocked. If the vehicle is equipped
with Passive Entry, depressing the touch pad on the outside
handle or Hands-Free Liftgate foot activation (if equipped)
will unlock and open the liftgate, with a valid Passive Entry
key fob within 5 ft (1.5 m) of the liftgate handle.
NOTE:
•To open the liftgate, the Hands-Free Liftgate foot activa-
tion (if equipped) requires a valid Passive Entry key fob
within 5 ft (1.5 m) of the door handle.
• If 1st Press of key fob Unlocks “All Doors” is pro-
grammed in Uconnect Settings, all doors will unlock
with a Passive Entry hands-free activation. If 1st Press of
key fob Unlocks “Driver Door” is programmed in
Uconnect Settings, the liftgate will only unlock with
hands-free activation.
• Tones are sounded and the turn signals are flashed with
liftgate movements. These alerts can be turned on or off
in Uconnect Settings.
• Refer to “Uconnect Settings” in “Multimedia” for fur-
ther information.
Overhead Console Power Switches
1 — Liftgate
2 — Right Sliding Door
3 — Sliding Door Power Off
4 — Left Sliding Door
3
GETTING TO KNOW YOUR VEHICLE 143
Page 146 of 696
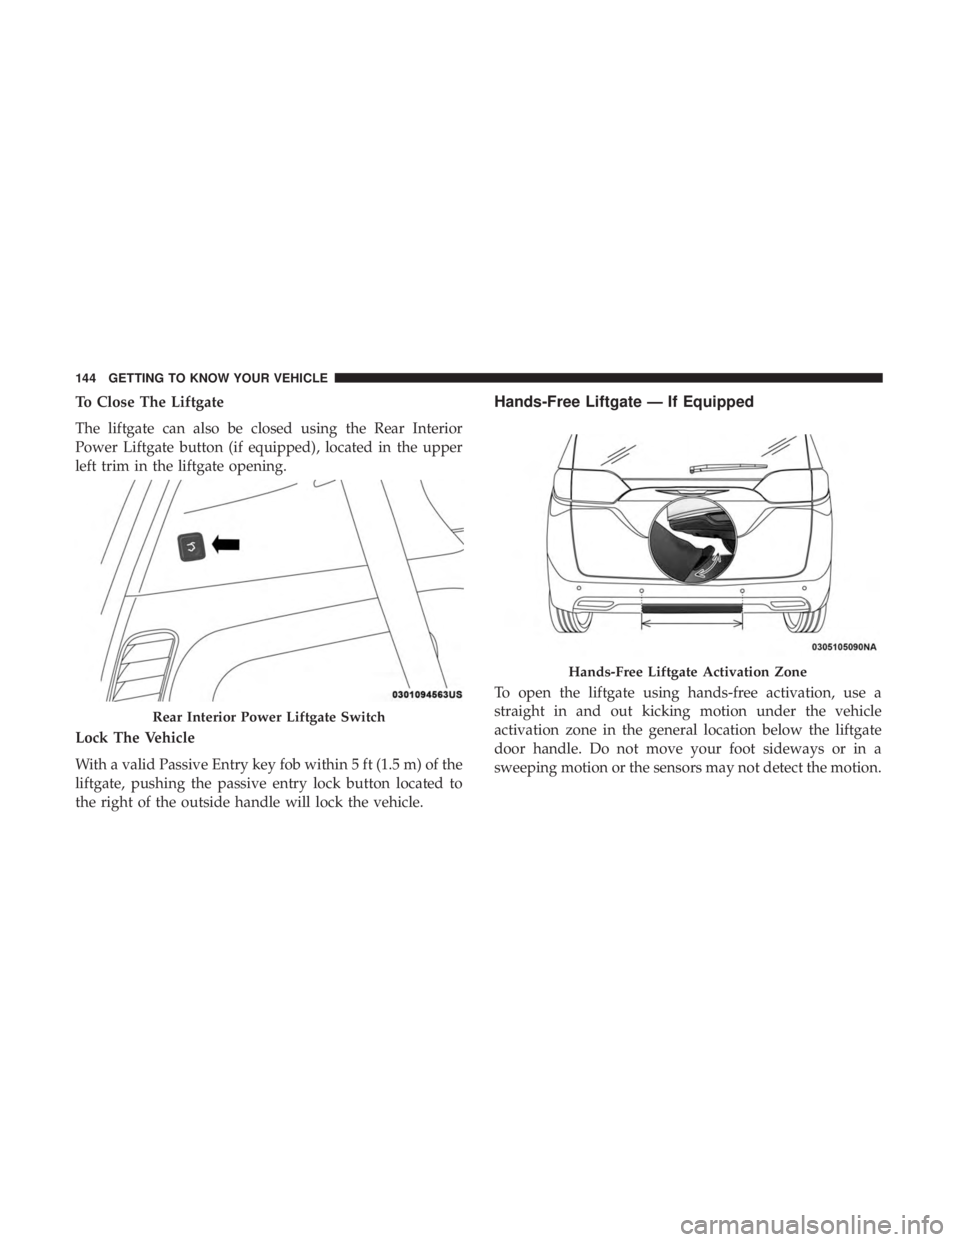
To Close The Liftgate
The liftgate can also be closed using the Rear Interior
Power Liftgate button (if equipped), located in the upper
left trim in the liftgate opening.
Lock The Vehicle
With a valid Passive Entry key fob within 5 ft (1.5 m) of the
liftgate, pushing the passive entry lock button located to
the right of the outside handle will lock the vehicle.Hands-Free Liftgate — If Equipped
To open the liftgate using hands-free activation, use a
straight in and out kicking motion under the vehicle
activation zone in the general location below the liftgate
door handle. Do not move your foot sideways or in a
sweeping motion or the sensors may not detect the motion.
Rear Interior Power Liftgate Switch
Hands-Free Liftgate Activation Zone
144 GETTING TO KNOW YOUR VEHICLE
Page 147 of 696
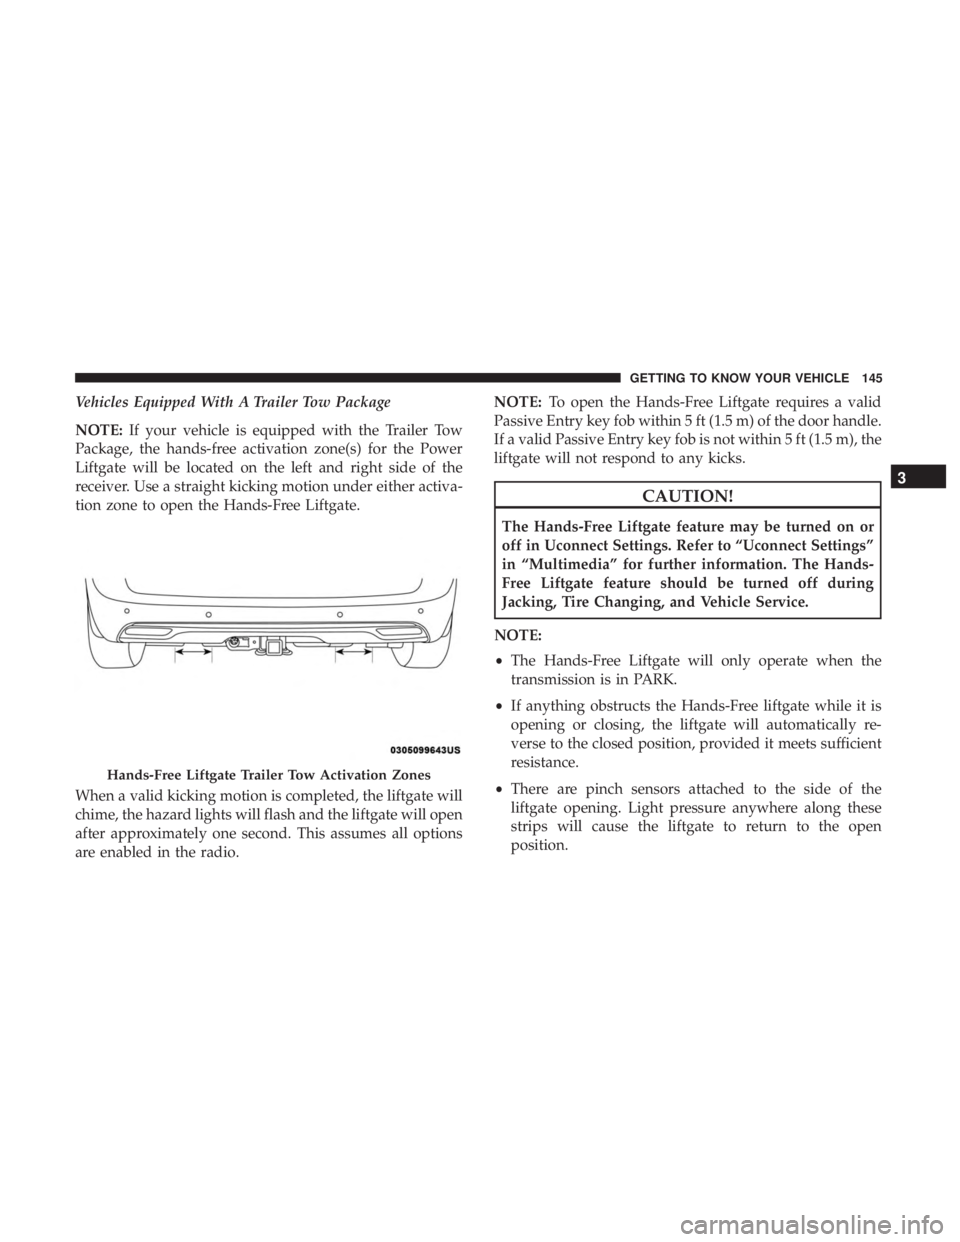
Vehicles Equipped With A Trailer Tow Package
NOTE:If your vehicle is equipped with the Trailer Tow
Package, the hands-free activation zone(s) for the Power
Liftgate will be located on the left and right side of the
receiver. Use a straight kicking motion under either activa-
tion zone to open the Hands-Free Liftgate.
When a valid kicking motion is completed, the liftgate will
chime, the hazard lights will flash and the liftgate will open
after approximately one second. This assumes all options
are enabled in the radio. NOTE:
To open the Hands-Free Liftgate requires a valid
Passive Entry key fob within 5 ft (1.5 m) of the door handle.
If a valid Passive Entry key fob is not within 5 ft (1.5 m), the
liftgate will not respond to any kicks.
CAUTION!
The Hands-Free Liftgate feature may be turned on or
off in Uconnect Settings. Refer to “Uconnect Settings”
in “Multimedia” for further information. The Hands-
Free Liftgate feature should be turned off during
Jacking, Tire Changing, and Vehicle Service.
NOTE:
• The Hands-Free Liftgate will only operate when the
transmission is in PARK.
• If anything obstructs the Hands-Free liftgate while it is
opening or closing, the liftgate will automatically re-
verse to the closed position, provided it meets sufficient
resistance.
• There are pinch sensors attached to the side of the
liftgate opening. Light pressure anywhere along these
strips will cause the liftgate to return to the open
position.
Hands-Free Liftgate Trailer Tow Activation Zones
3
GETTING TO KNOW YOUR VEHICLE 145
Page 148 of 696
•If the power liftgate encounters multiple obstructions
within the same cycle, the system will automatically
stop. If this occurs, the liftgate must be operated manu-
ally.
• The power liftgate will release, but not power open, in
temperatures below �12° F (�24° C). Be sure to remove
any buildup of snow or ice from the liftgate before
opening the liftgate.
• If the liftgate is left open for an extended period of time,
the liftgate may need to be closed manually to reset
power liftgate functionality.
WARNING!
•Driving with the liftgate open can allow poisonous
exhaust gases into your vehicle. You and your pas-
sengers could be injured by these fumes. Keep the
liftgate closed when you are operating the vehicle.
• If you are required to drive with the liftgate open,
make sure that all windows are closed, and the
climate control blower switch is set at high speed. Do
not use the recirculation mode. Gas props support the liftgate in the open position. How-
ever, because the gas pressure drops with temperature, it
may be necessary to assist the props when opening the
liftgate in cold weather.
NOTE:
Allow the power system to open the liftgate.
Manually pushing or pulling the liftgate may activate the
liftgate obstacle detection feature and stop the power
operation or reverse its direction.
WARNING!
During power operation, personal injury or cargo
damage may occur. Ensure the liftgate travel path is
clear. Make sure the liftgate is closed and latched
before driving away.
Cargo Area Features
Cargo Area Storage
When the third row seats are not in the stowed position,
there is a large area for cargo storage.
146 GETTING TO KNOW YOUR VEHICLE
Page 149 of 696
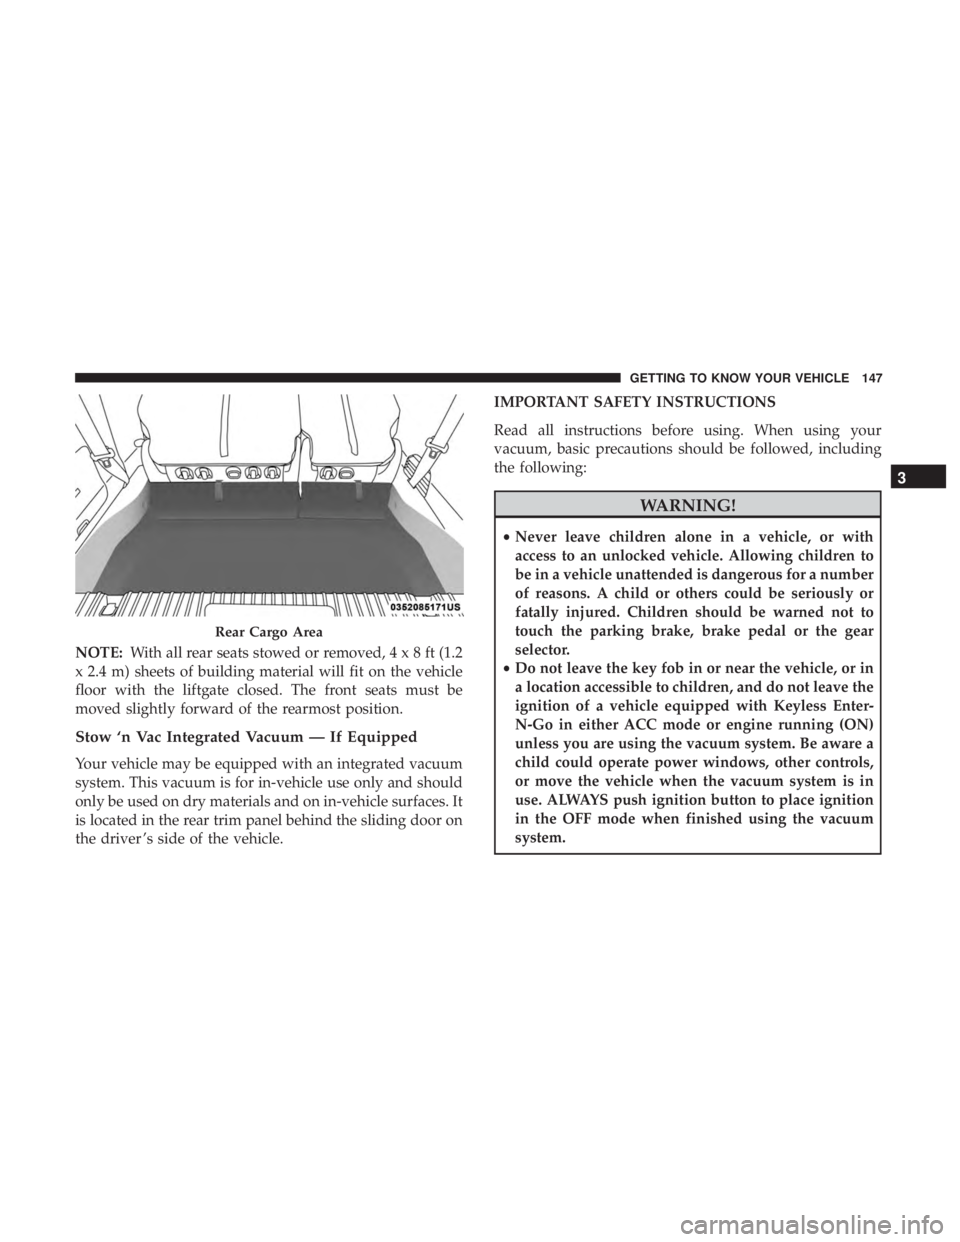
NOTE:With all rear seats stowed or removed,4x8ft(1.2
x 2.4 m) sheets of building material will fit on the vehicle
floor with the liftgate closed. The front seats must be
moved slightly forward of the rearmost position.
Stow ‘n Vac Integrated Vacuum — If Equipped
Your vehicle may be equipped with an integrated vacuum
system. This vacuum is for in-vehicle use only and should
only be used on dry materials and on in-vehicle surfaces. It
is located in the rear trim panel behind the sliding door on
the driver ’s side of the vehicle. IMPORTANT SAFETY INSTRUCTIONS
Read all instructions before using. When using your
vacuum, basic precautions should be followed, including
the following:
WARNING!
•
Never leave children alone in a vehicle, or with
access to an unlocked vehicle. Allowing children to
be in a vehicle unattended is dangerous for a number
of reasons. A child or others could be seriously or
fatally injured. Children should be warned not to
touch the parking brake, brake pedal or the gear
selector.
• Do not leave the key fob in or near the vehicle, or in
a location accessible to children, and do not leave the
ignition of a vehicle equipped with Keyless Enter-
N-Go in either ACC mode or engine running (ON)
unless you are using the vacuum system. Be aware a
child could operate power windows, other controls,
or move the vehicle when the vacuum system is in
use. ALWAYS push ignition button to place ignition
in the OFF mode when finished using the vacuum
system.
Rear Cargo Area
3
GETTING TO KNOW YOUR VEHICLE 147
Page 150 of 696
WARNING!
To reduce the risk of fire, serious injury or death:
•Do not use vacuum while vehicle is in motion or
while driving.
•Do not vacuum wet surfaces or any liquids.
• Do not use to vacuum up anything outside of the
vehicle.
• Do not vacuum any flammable liquids, such as
gasoline, or use around explosive vapors. Vapors
from flammable liquids may form an explosive mix-
ture with air and can be ignited by heat, sparks, or
flames. Vapors may travel to a source of ignition and
explode.
•Do not vacuum anything that is burning or smoking,
such as cigarettes, matches, or hot ashes/embers.
(Continued)
WARNING! (Continued)
•Do not allow to be used as a toy. Close attention is
necessary when used by or near children.
• Do not leave the vacuum running while unattended.
• Use only as described in this manual. Use only
attachments provided with your vehicle.
• Do not put any object into openings. Do not use with
any opening blocked; keep free of dust, lint, hair,
and anything that may reduce air flow.
• Do not vacuum toxic material such as chlorine
bleach, ammonia, drain cleaner, etc.
• Do not vacuum hard or sharp objects such as glass,
nails, screws, coins, etc.
• Keep hair, loose clothing, fingers, and all parts of
body away from openings and moving parts.
• Only use with filter in place. Periodically check that
the filter is in place and in good condition.
148 GETTING TO KNOW YOUR VEHICLE