how to use CHRYSLER PACIFICA 2018 Owner's Manual
[x] Cancel search | Manufacturer: CHRYSLER, Model Year: 2018, Model line: PACIFICA, Model: CHRYSLER PACIFICA 2018Pages: 696, PDF Size: 8.48 MB
Page 257 of 696
3. Allow the seat belt to retract. As the seat belt retracts,you will hear a clicking sound. This indicates the seat
belt is now in the Automatic Locking Mode.
How To Disengage The Automatic Locking Mode
Unbuckle the combination lap/shoulder belt and allow it
to retract completely to disengage the Automatic Locking
Mode and activate the vehicle sensitive (emergency) lock-
ing mode.
WARNING!
• The seat belt assembly must be replaced if the
switchable Automatic Locking Retractor (ALR) fea-
ture or any other seat belt function is not working
properly when checked according to the procedures
in the Service Manual.
• Failure to replace the seat belt assembly could in-
crease the risk of injury in collisions.
•
Do not use the Automatic Locking Mode to restrain
occupants who are wearing the seat belt or children
who are using booster seats. The locked mode is only
used to install rear-facing or forward-facing child
restraints that have a harness for restraining the child.
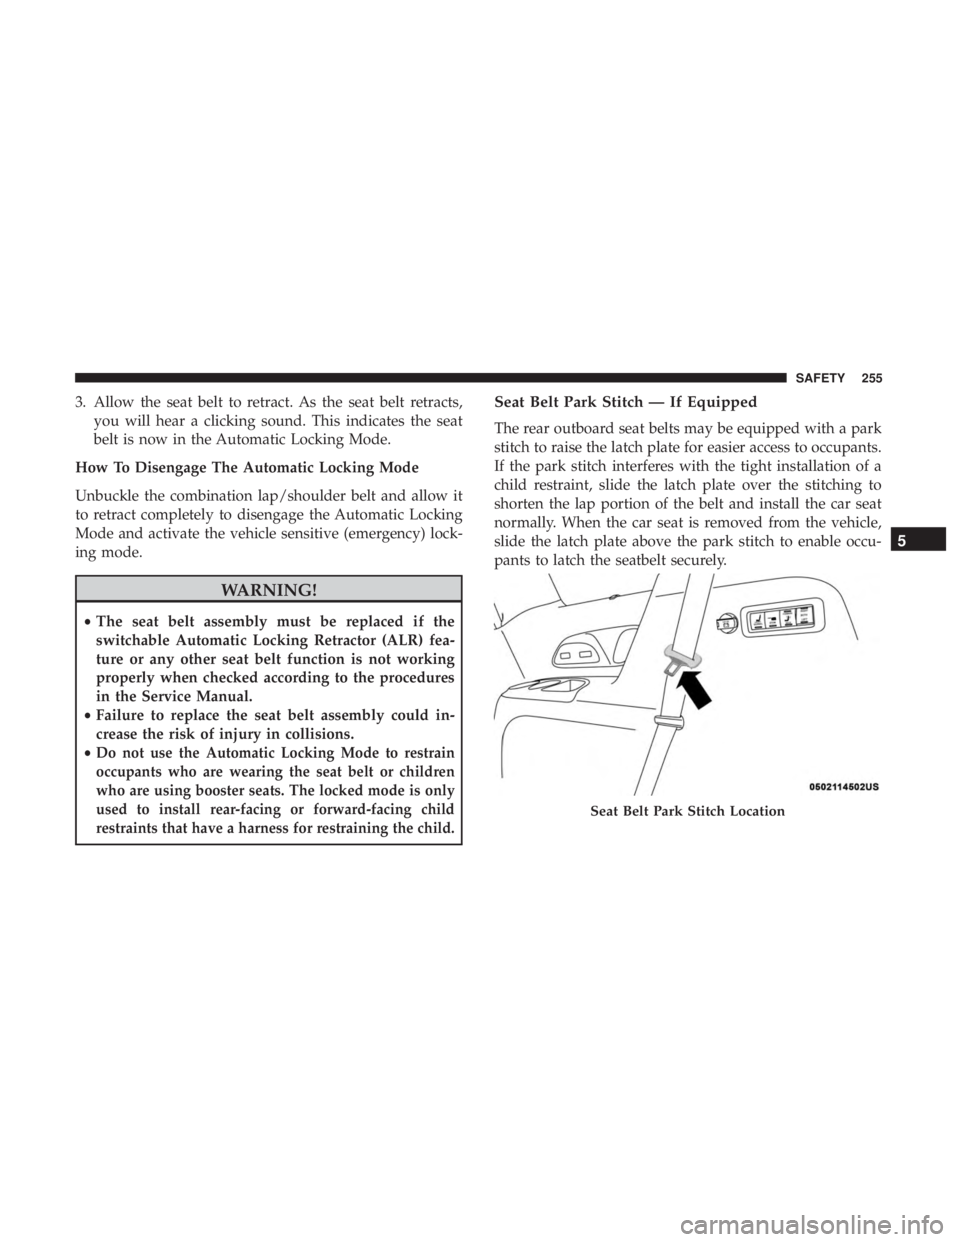
Seat Belt Park Stitch — If Equipped
The rear outboard seat belts may be equipped with a park
stitch to raise the latch plate for easier access to occupants.
If the park stitch interferes with the tight installation of a
child restraint, slide the latch plate over the stitching to
shorten the lap portion of the belt and install the car seat
normally. When the car seat is removed from the vehicle,
slide the latch plate above the park stitch to enable occu-
pants to latch the seatbelt securely.
Seat Belt Park Stitch Location
5
SAFETY 255
Page 275 of 696
quickly. However, if you haven’t healed significantly
within a few days, or if you have any blistering, see your
doctor immediately.
•
As the air bags deflate, you may see some smoke-like
particles. The particles are a normal by-product of the
process that generates the non-toxic gas used for air bag
inflation. These airborne particles may irritate the skin,
eyes, nose, or throat. If you have skin or eye irritation,
rinse the area with cool water. For nose or throat irritation,
move to fresh air. If the irritation continues, see your
doctor. If these particles settle on your clothing, follow the
garment manufacturer ’s instructions for cleaning.
Do not drive your vehicle after the air bags have deployed.
If you are involved in another collision, the air bags will
not be in place to protect you.
WARNING!
Deployed air bags and seat belt pretensioners cannot
protect you in another collision. Have the air bags, seat
belt pretensioners, and the seat belt retractor assem-
blies replaced by an authorized dealer immediately.
Also, have the Occupant Restraint Controller System
serviced as well. NOTE:
•
Air bag covers may not be obvious in the interior trim,
but they will open during air bag deployment.
• After any collision, the vehicle should be taken to an
authorized dealer immediately.
Enhanced Accident Response System
In the event of an impact, if the communication network
remains intact, and the power remains intact, depending
on the nature of the event, the ORC will determine whether
to have the Enhanced Accident Response System perform
the following functions:
•Cut off fuel to the engine (If Equipped)
• Cut off battery power to the electric motor (If Equipped)
• Flash hazard lights as long as the battery has power
• Turn on the interior lights, which remain on as long as
the battery has power or for 15 minutes from the
intervention of the Enhanced Accident Response Sys-
tem.
• Unlock the power door locks.5
SAFETY 273
Page 277 of 696
WARNING!(Continued)
•It is dangerous to try to repair any part of the air bag
system yourself. Be sure to tell anyone who works on
your vehicle that it has an air bag system.
• Do not attempt to modify any part of your air bag
system. The air bag may inflate accidentally or may
not function properly if modifications are made.
Take your vehicle to an authorized dealer for any air
bag system service. If your seat, including your trim
cover and cushion, needs to be serviced in any way
(including removal or loosening/tightening of seat
attachment bolts), take the vehicle to an authorized
dealer. Only manufacturer approved seat accessories
may be used. If it is necessary to modify the air bag
system for persons with disabilities, contact an au-
thorized dealer.
Event Data Recorder (EDR)
This vehicle is equipped with an event data recorder
(EDR). The main purpose of an EDR is to record, in certain
crash or near crash-like situations, such as an air bag
deployment or hitting a road obstacle, data that will assist
in understanding how a vehicle’s systems performed. The
EDR is designed to record data related to vehicle dynamics and safety systems for a short period of time, typically 30
seconds or less. The EDR in this vehicle is designed to
record such data as:
•
How various systems in your vehicle were operating;
• Whether or not the driver and passenger safety belts
were buckled/fastened;
• How far (if at all) the driver was depressing the accel-
erator and/or brake pedal; and,
• How fast the vehicle was traveling.
These data can help provide a better understanding of the
circumstances in which crashes and injuries occur.
NOTE: EDR data are recorded by your vehicle only if a
non-trivial crash situation occurs; no data are recorded by
the EDR under normal driving conditions and no personal
data (e.g., name, gender, age, and crash location) are
recorded. However, other parties, such as law enforcement,
could combine the EDR data with the type of personally
identifying data routinely acquired during a crash investi-
gation.
To read data recorded by an EDR, special equipment is
required, and access to the vehicle or the EDR is needed. In
addition to the vehicle manufacturer, other parties, such as
5
SAFETY 275
Page 278 of 696
law enforcement, that have the special equipment, can read
the information if they have access to the vehicle or the
EDR.
Child Restraints
Everyone in your vehicle needs to be buckled up at all
times, including babies and children. Every state in the
United States, and every Canadian province, requires that
small children ride in proper restraint systems. This is the
law, and you can be prosecuted for ignoring it.
Children 12 years or younger should ride properly buckled
up in a rear seat, if available. According to crash statistics,
children are safer when properly restrained in the rear
seats rather than in the front.
WARNING!
In a collision, an unrestrained child can become a
projectile inside the vehicle. The force required to hold
even an infant on your lap could become so great that
you could not hold the child, no matter how strong you
are. The child and others could be badly injured or
killed. Any child riding in your vehicle should be in a
proper restraint for the child’s size.There are different sizes and types of restraints for children
from newborn size to the child almost large enough for an
adult safety belt. Always check the child seat Owner ’s
Manual to make sure you have the correct seat for your
child. Carefully read and follow all the instructions and
warnings in the child restraint Owner ’s Manual and on all
the labels attached to the child restraint.
Before buying any restraint system, make sure that it has a
label certifying that it meets all applicable Safety Stan-
dards. You should also make sure that you can install it in
the vehicle where you will use it.
NOTE:
•
For additional information, refer to http://www.nhtsa.gov/
parents-and-caregivers or call: 1–888–327–4236
•Canadian residents should refer to Transport Canada’s web-
site for additional information: http://www.tc.gc.ca/eng/
motorvehiclesafety/safedrivers-childsafety-index-53.htm
276 SAFETY
Page 283 of 696
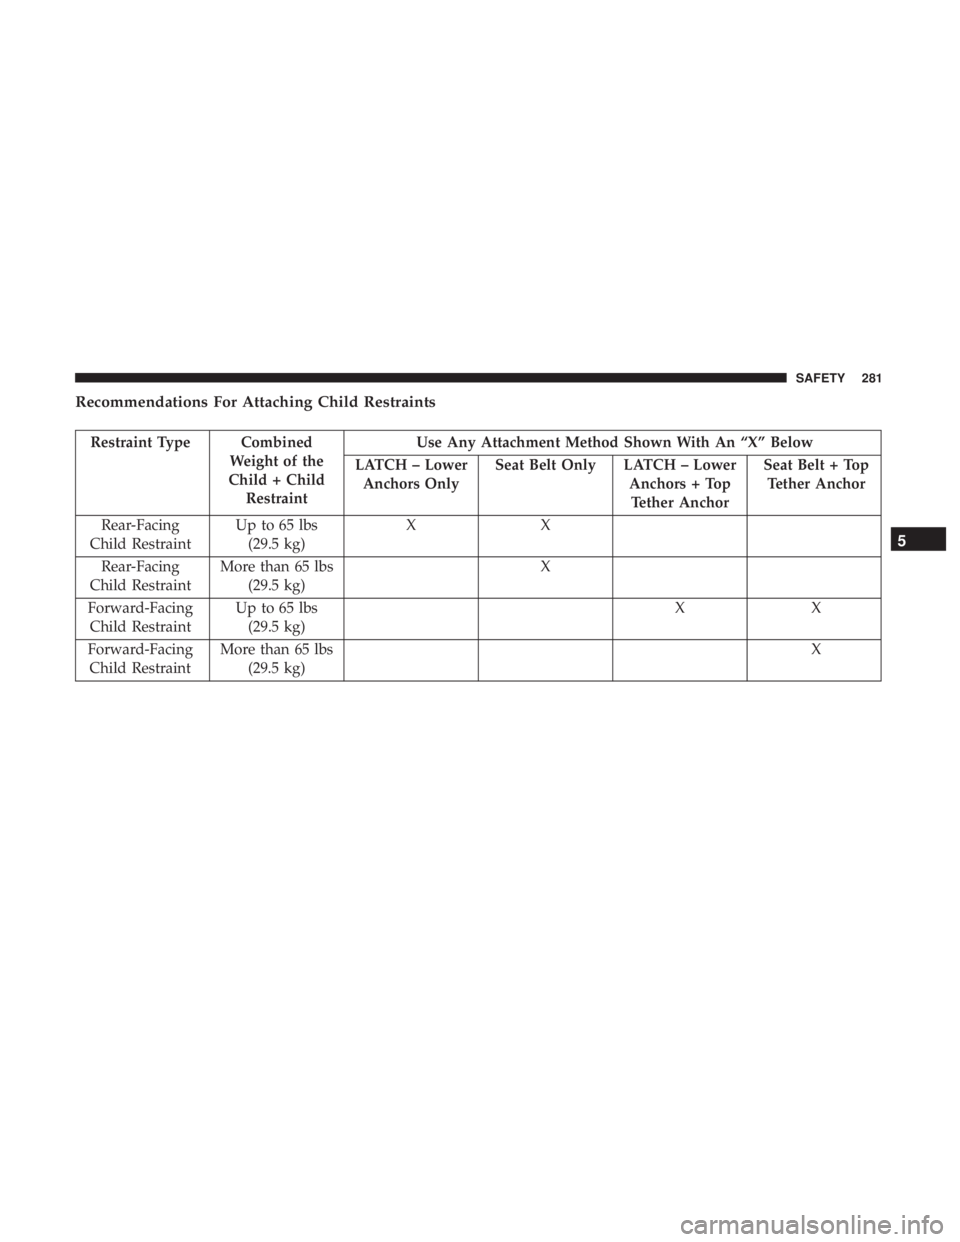
Recommendations For Attaching Child Restraints
Restraint Type CombinedWeight of the
Child + Child Restraint Use Any Attachment Method Shown With An “X” Below
LATCH – Lower Anchors Only Seat Belt Only LATCH – Lower
Anchors + TopTether Anchor Seat Belt + Top
Tether Anchor
Rear-Facing
Child Restraint Up to 65 lbs
(29.5 kg) XX
Rear-Facing
Child Restraint More than 65 lbs
(29.5 kg) X
Forward-Facing Child Restraint Up to 65 lbs
(29.5 kg) XX
Forward-Facing Child Restraint More than 65 lbs
(29.5 kg) X
5
SAFETY 281
Page 287 of 696
WARNING!
Always make sure the head restraint is in its upright
position when the seat is to be used by an occupant
who is not in a child restraint. Sitting in a seat with the
head restraint in its lowered position could result in
serious injury or death in a collision.
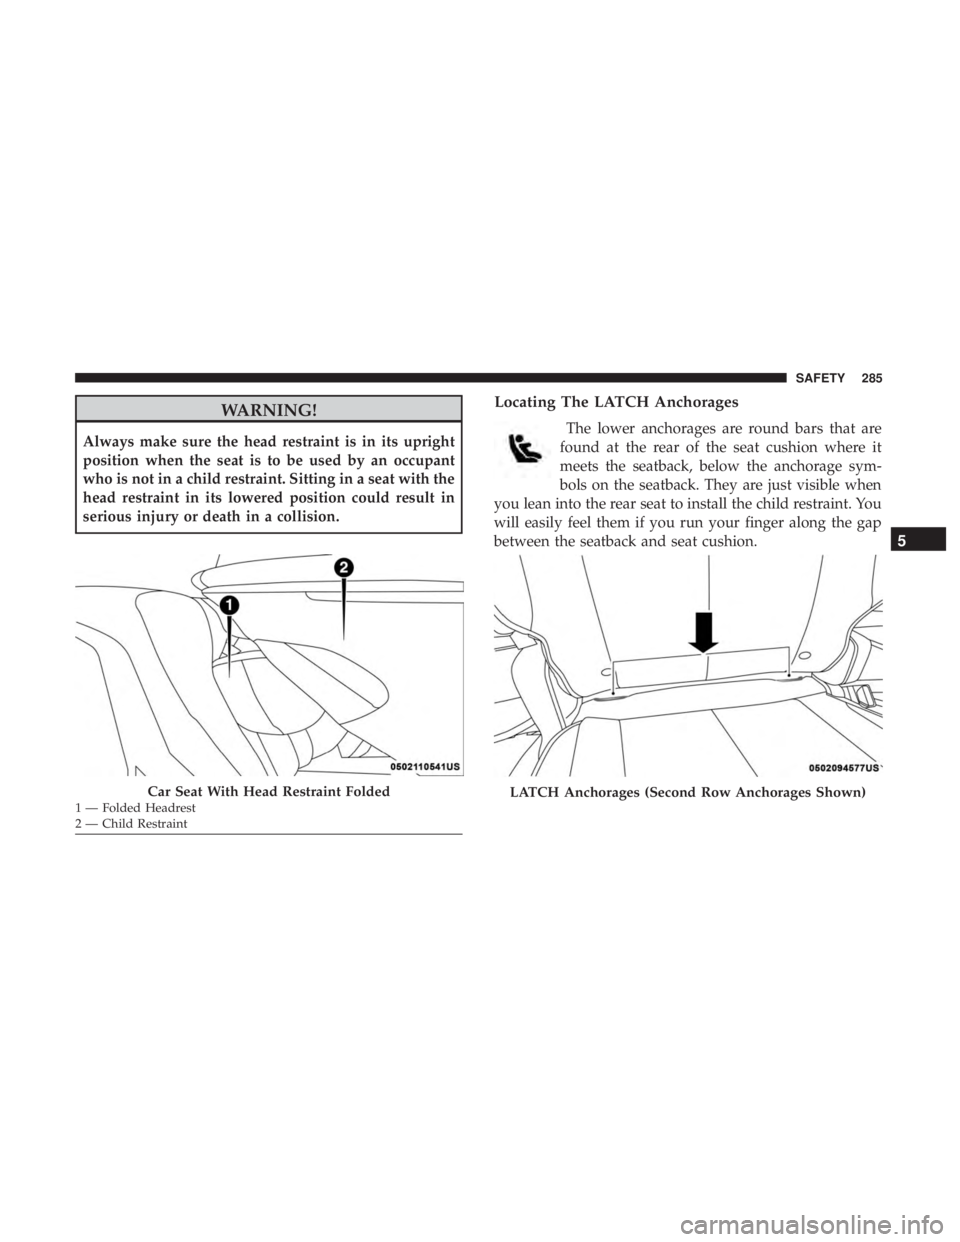
Locating The LATCH Anchorages
The lower anchorages are round bars that are
found at the rear of the seat cushion where it
meets the seatback, below the anchorage sym-
bols on the seatback. They are just visible when
you lean into the rear seat to install the child restraint. You
will easily feel them if you run your finger along the gap
between the seatback and seat cushion.
Car Seat With Head Restraint Folded1 — Folded Headrest
2 — Child RestraintLATCH Anchorages (Second Row Anchorages Shown)
5
SAFETY 285
Page 290 of 696
LATCH-compatible child restraint systems will be
equipped with a rigid bar or a flexible strap on each side.
Each will have a hook or connector to attach to the lower
anchorage and a way to tighten the connection to the
anchorage. Forward-facing child restraints and some rear-
facing child restraints will also be equipped with a tether
strap. The tether strap will have a hook at the end to attach
to the top tether anchorage and a way to tighten the strap
after it is attached to the anchorage.
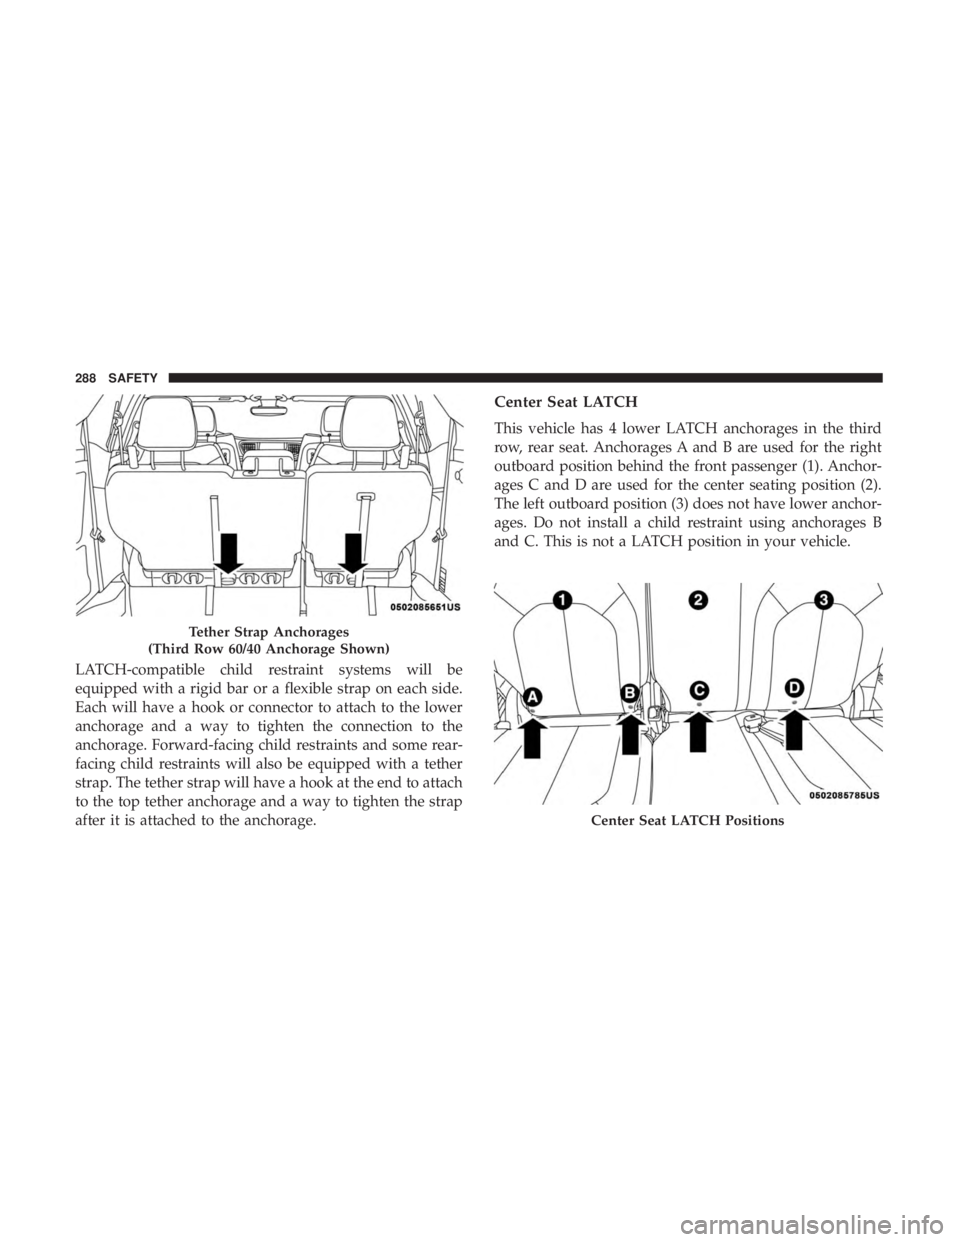
Center Seat LATCH
This vehicle has 4 lower LATCH anchorages in the third
row, rear seat. Anchorages A and B are used for the right
outboard position behind the front passenger (1). Anchor-
ages C and D are used for the center seating position (2).
The left outboard position (3) does not have lower anchor-
ages. Do not install a child restraint using anchorages B
and C. This is not a LATCH position in your vehicle.
Tether Strap Anchorages
(Third Row 60/40 Anchorage Shown)
Center Seat LATCH Positions
288 SAFETY
Page 292 of 696
5. Tighten all of the straps as you push the child restraintrearward and downward into the seat. Remove slack in
the straps according to the child restraint manufactur-
er ’s instructions.
6. Test that the child restraint is installed tightly by pulling back and forth on the child seat at the belt path. It
should not move more than 1 inch (25.4 mm) in any
direction.
How To Stow An Unused Switchable-ALR (ALR)
Seat Belt:
When using the LATCH attaching system to install a child
restraint, stow all ALR seat belts that are not being used by
other occupants or being used to secure child restraints. An
unused belt could injure a child if they play with it and
accidentally lock the seat belt retractor. Before installing a
child restraint using the LATCH system, buckle the seat
belt behind the child restraint and out of the child’s reach.
If the buckled seat belt interferes with the child restraint
installation, instead of buckling it behind the child re-
straint, route the seat belt through the child restraint belt
path and then buckle it. Do not lock the seat belt. Remind
all children in the vehicle that the seat belts are not toys and
that they should not play with them.
WARNING!
•Improper installation of a child restraint to the
LATCH anchorages can lead to failure of the re-
straint. The child could be badly injured or killed.
Follow the child restraint manufacturer ’s directions
exactly when installing an infant or child restraint.
• Child restraint anchorages are designed to withstand
only those loads imposed by correctly-fitted child
restraints. Under no circumstances are they to be
used for adult seat belts, harnesses, or for attaching
other items or equipment to the vehicle.
Installing Child Restraints Using The Vehicle Seat
Belt
Child restraint systems are designed to be secured in
vehicle seats by lap belts or the lap belt portion of a
lap/shoulder belt.
WARNING!
•Improper installation or failure to properly secure a
child restraint can lead to failure of the restraint. The
child could be badly injured or killed.
(Continued)
290 SAFETY
Page 300 of 696
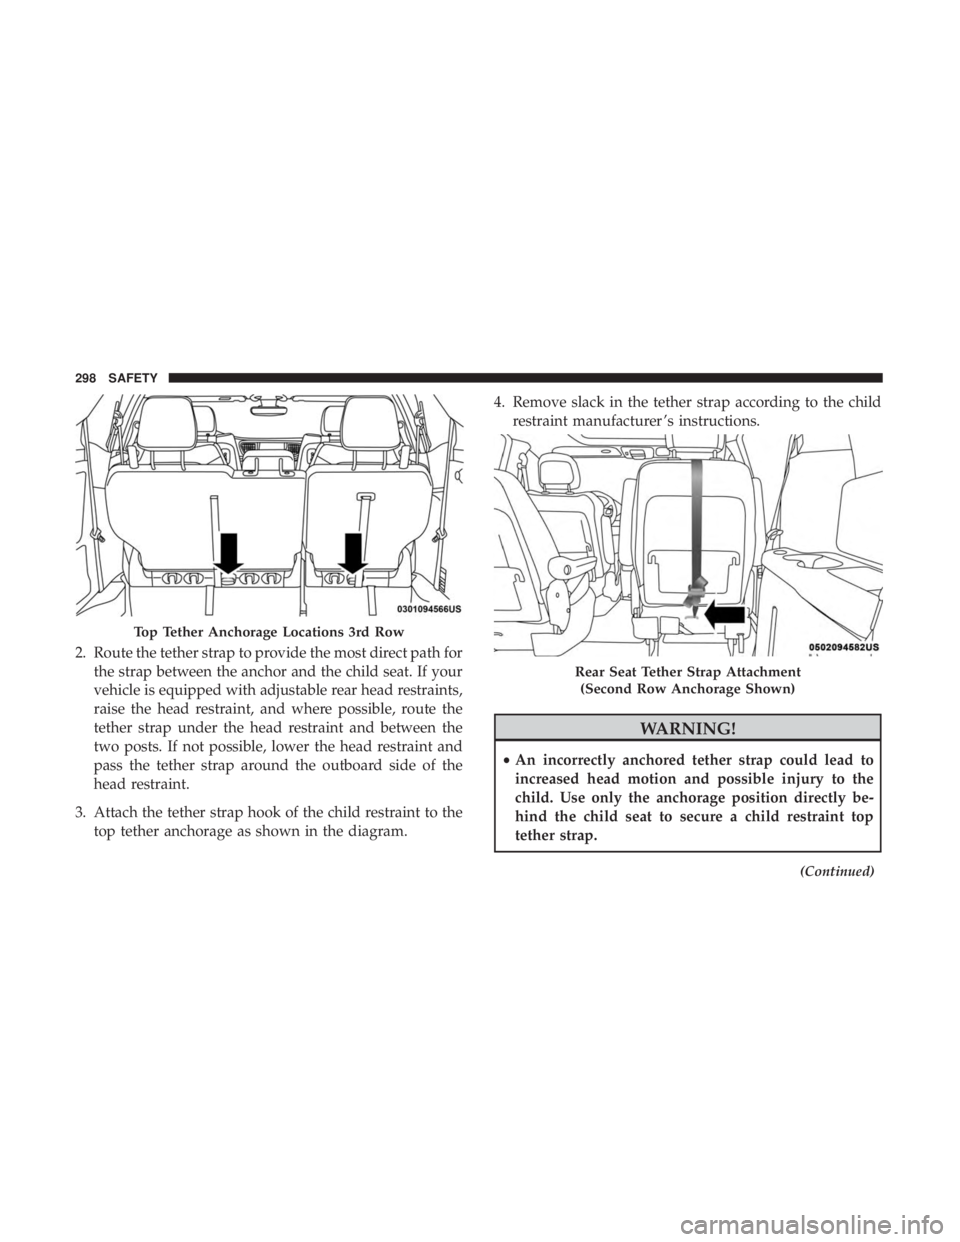
2. Route the tether strap to provide the most direct path forthe strap between the anchor and the child seat. If your
vehicle is equipped with adjustable rear head restraints,
raise the head restraint, and where possible, route the
tether strap under the head restraint and between the
two posts. If not possible, lower the head restraint and
pass the tether strap around the outboard side of the
head restraint.
3. Attach the tether strap hook of the child restraint to the top tether anchorage as shown in the diagram. 4. Remove slack in the tether strap according to the child
restraint manufacturer ’s instructions.
WARNING!
•An incorrectly anchored tether strap could lead to
increased head motion and possible injury to the
child. Use only the anchorage position directly be-
hind the child seat to secure a child restraint top
tether strap.
(Continued)
Top Tether Anchorage Locations 3rd Row
Rear Seat Tether Strap Attachment
(Second Row Anchorage Shown)
298 SAFETY
Page 301 of 696
WARNING!(Continued)
•If your vehicle is equipped with a split rear seat,
make sure the tether strap does not slip into the
opening between the seatbacks as you remove slack
in the strap.
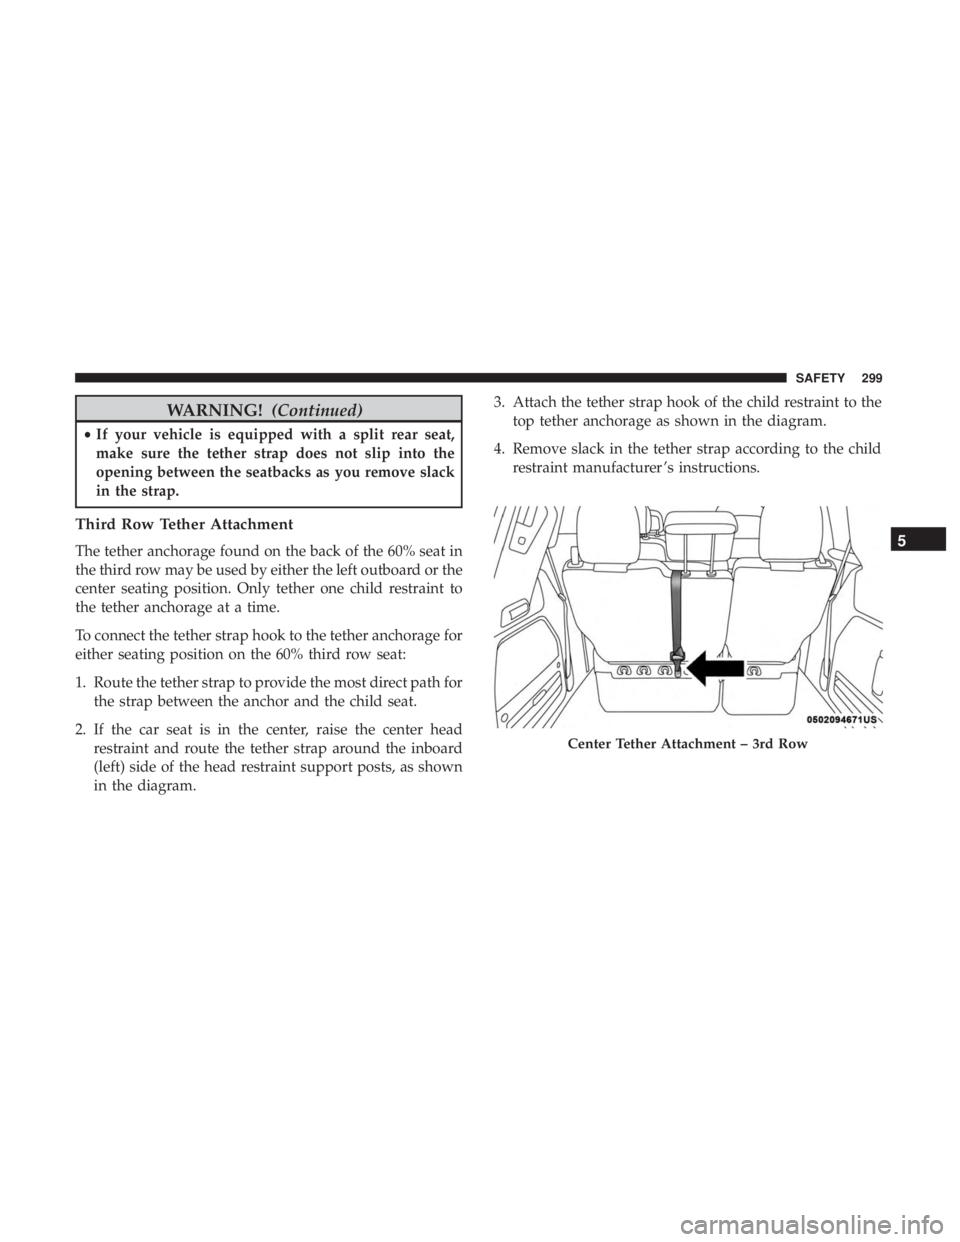
Third Row Tether Attachment
The tether anchorage found on the back of the 60% seat in
the third row may be used by either the left outboard or the
center seating position. Only tether one child restraint to
the tether anchorage at a time.
To connect the tether strap hook to the tether anchorage for
either seating position on the 60% third row seat:
1. Route the tether strap to provide the most direct path for
the strap between the anchor and the child seat.
2. If the car seat is in the center, raise the center head restraint and route the tether strap around the inboard
(left) side of the head restraint support posts, as shown
in the diagram. 3. Attach the tether strap hook of the child restraint to the
top tether anchorage as shown in the diagram.
4. Remove slack in the tether strap according to the child restraint manufacturer ’s instructions.
Center Tether Attachment – 3rd Row
5
SAFETY 299