CHRYSLER PACIFICA 2018 Owners Manual
Manufacturer: CHRYSLER, Model Year: 2018, Model line: PACIFICA, Model: CHRYSLER PACIFICA 2018Pages: 696, PDF Size: 8.48 MB
Page 581 of 696
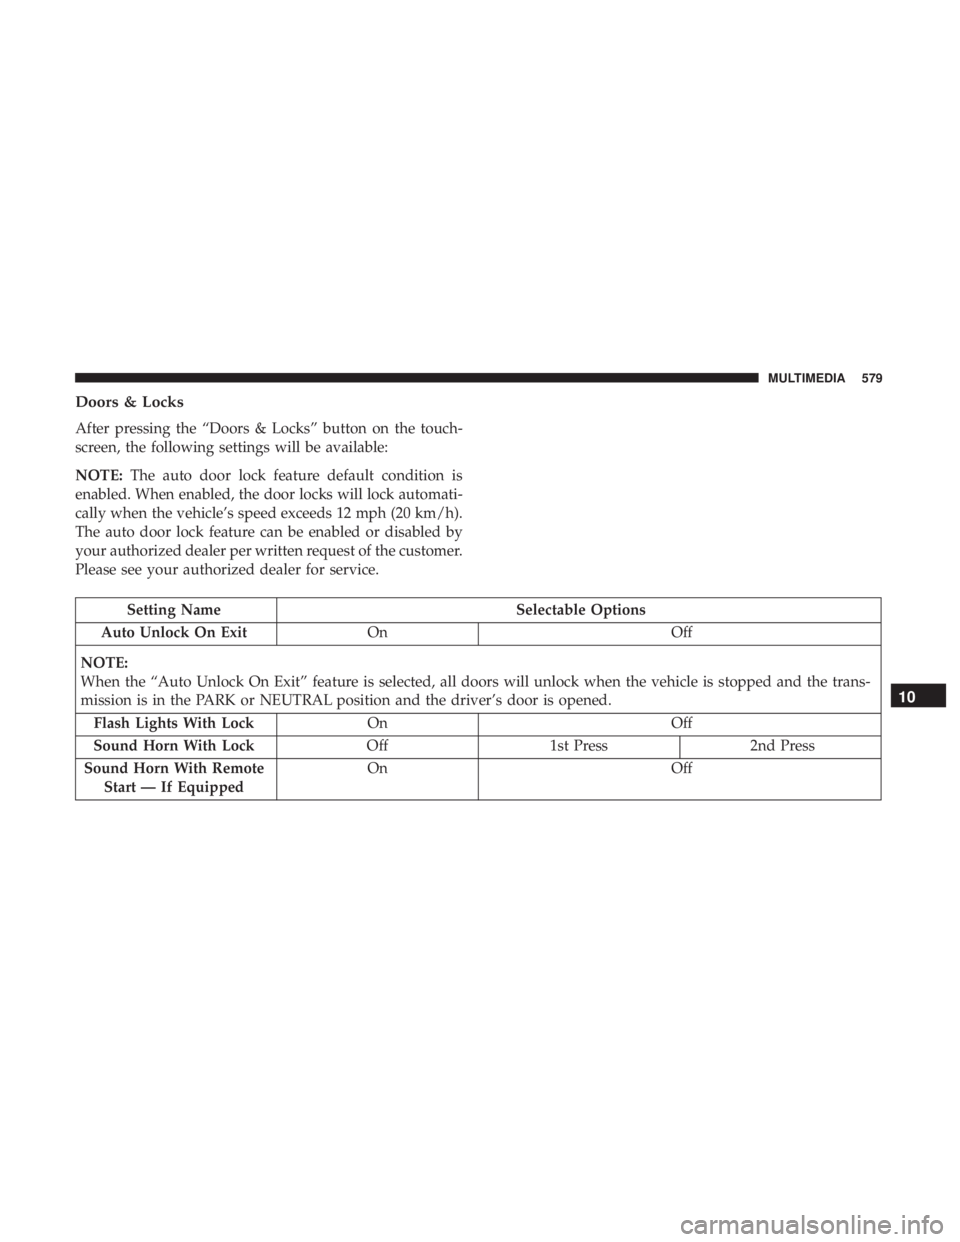
Doors & Locks
After pressing the “Doors & Locks” button on the touch-
screen, the following settings will be available:
NOTE:The auto door lock feature default condition is
enabled. When enabled, the door locks will lock automati-
cally when the vehicle’s speed exceeds 12 mph (20 km/h).
The auto door lock feature can be enabled or disabled by
your authorized dealer per written request of the customer.
Please see your authorized dealer for service.
Setting Name Selectable Options
Auto Unlock On Exit On Off
NOTE:
When the “Auto Unlock On Exit” feature is selected, all doors will unlock when the vehicle is stopped and the trans-
mission is in the PARK or NEUTRAL position and the driver’s door is opened. Flash Lights With Lock On Off
Sound Horn With Lock Off1st Press 2nd Press
Sound Horn With Remote Start — If Equipped On
Off
10
MULTIMEDIA 579
Page 582 of 696
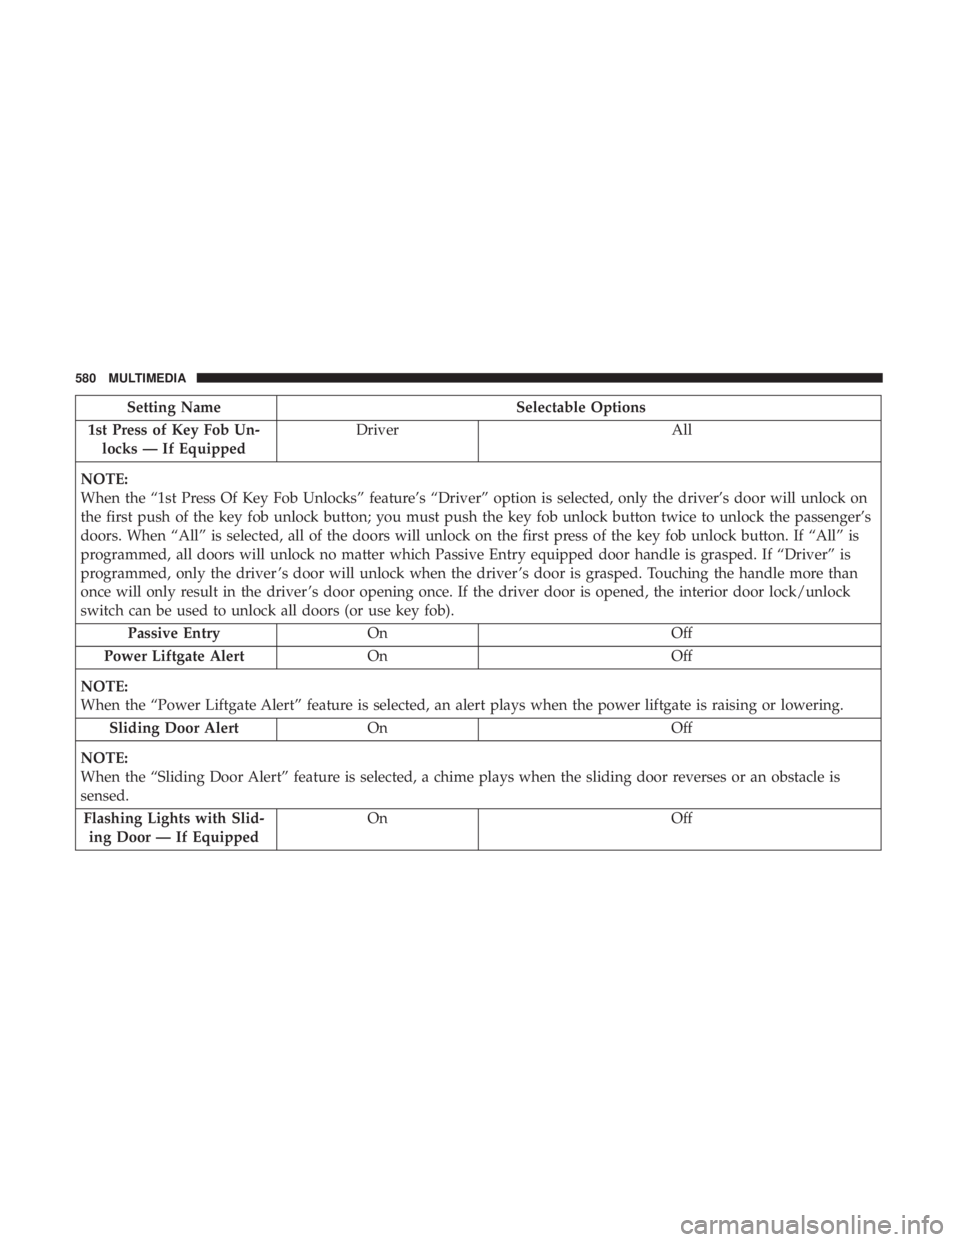
Setting NameSelectable Options
1st Press of Key Fob Un- locks — If Equipped Driver
All
NOTE:
When the “1st Press Of Key Fob Unlocks” feature’s “Driver” option is selected, only the driver’s door will unlock on
the first push of the key fob unlock button; you must push the key fob unlock button twice to unlock the passenger’s
doors. When “All” is selected, all of the doors will unlock on the first press of the key fob unlock button. If “All” is
programmed, all doors will unlock no matter which Passive Entry equipped door handle is grasped. If “Driver” is
programmed, only the driver ’s door will unlock when the driver ’s door is grasped. Touching the handle more than
once will only result in the driver ’s door opening once. If the driver door is opened, the interior door lock/unlock
switch can be used to unlock all doors (or use key fob). Passive Entry On Off
Power Liftgate Alert On Off
NOTE:
When the “Power Liftgate Alert” feature is selected, an alert plays when the power liftgate is raising or lowering. Sliding Door Alert On Off
NOTE:
When the “Sliding Door Alert” feature is selected, a chime plays when the sliding door reverses or an obstacle is
sensed. Flashing Lights with Slid- ing Door — If Equipped On
Off
580 MULTIMEDIA
Page 583 of 696
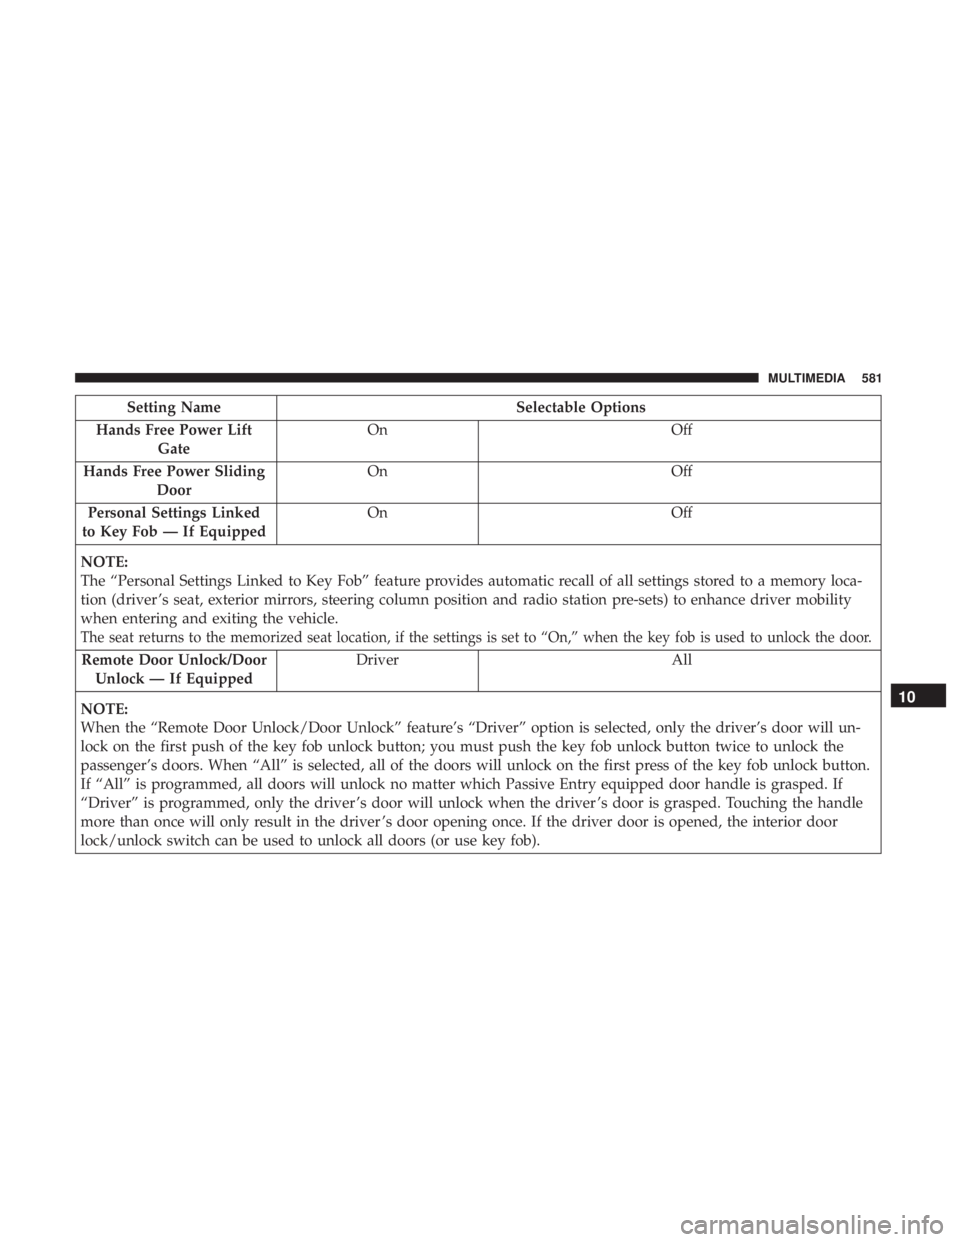
Setting NameSelectable Options
Hands Free Power Lift Gate On
Off
Hands Free Power Sliding Door On
Off
Personal Settings Linked
to Key Fob — If Equipped On
Off
NOTE:
The “Personal Settings Linked to Key Fob” feature provides automatic recall of all settings stored to a memory loca-
tion (driver ’s seat, exterior mirrors, steering column position and radio station pre-sets) to enhance driver mobility
when entering and exiting the vehicle.
The seat returns to the memorized seat location, if the settings is set to “On,” when the key fob is used to unlock the door.
Remote Door Unlock/Door Unlock — If Equipped Driver All
NOTE:
When the “Remote Door Unlock/Door Unlock” feature’s “Driver” option is selected, only the driver’s door will un-
lock on the first push of the key fob unlock button; you must push the key fob unlock button twice to unlock the
passenger’s doors. When “All” is selected, all of the doors will unlock on the first press of the key fob unlock button.
If “All” is programmed, all doors will unlock no matter which Passive Entry equipped door handle is grasped. If
“Driver” is programmed, only the driver ’s door will unlock when the driver ’s door is grasped. Touching the handle
more than once will only result in the driver ’s door opening once. If the driver door is opened, the interior door
lock/unlock switch can be used to unlock all doors (or use key fob).
10
MULTIMEDIA 581
Page 584 of 696
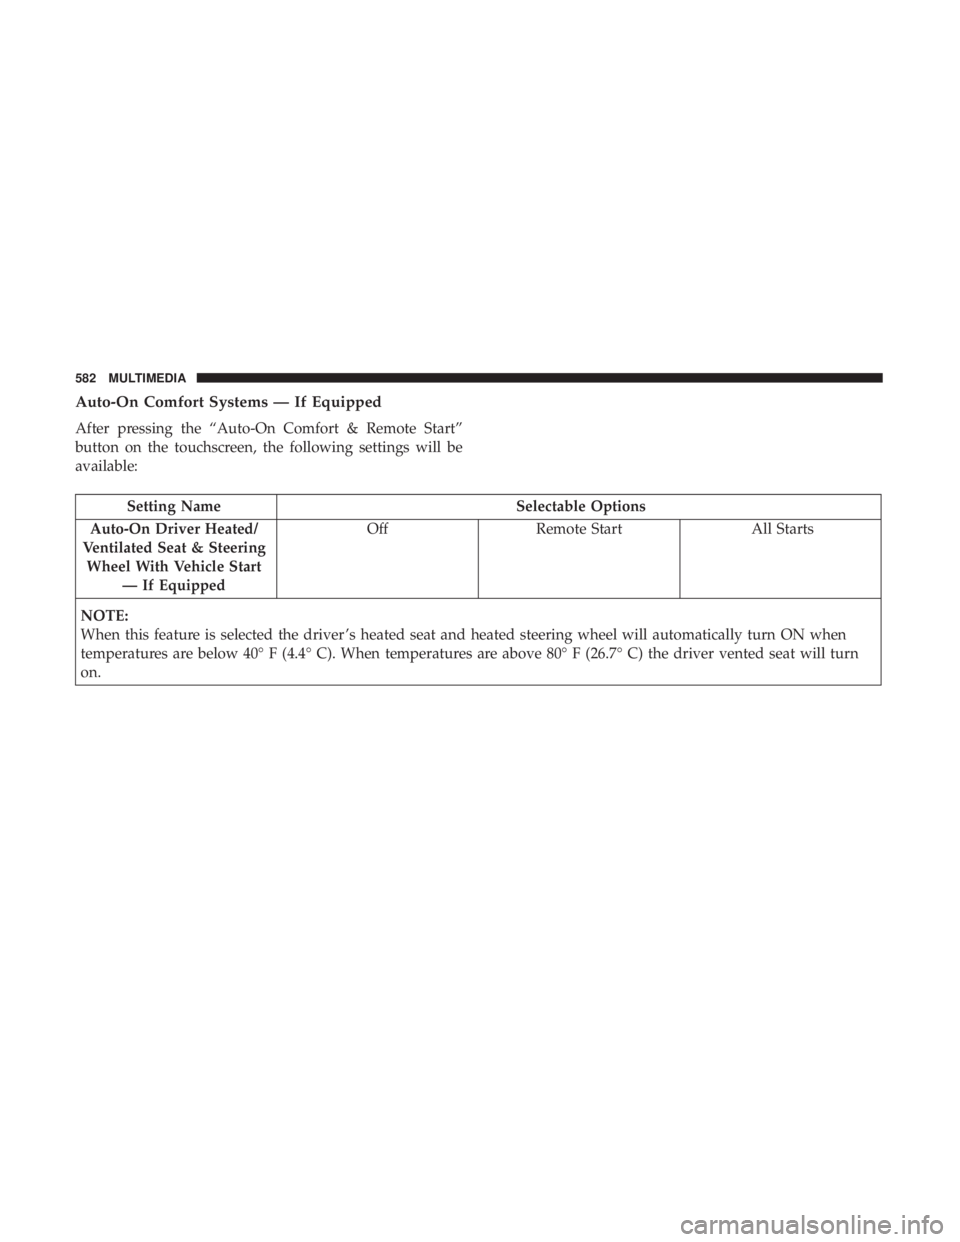
Auto-On Comfort Systems — If Equipped
After pressing the “Auto-On Comfort & Remote Start”
button on the touchscreen, the following settings will be
available:
Setting NameSelectable Options
Auto-On Driver Heated/
Ventilated Seat & Steering Wheel With Vehicle Start — If Equipped Off
Remote Start All Starts
NOTE:
When this feature is selected the driver ’s heated seat and heated steering wheel will automatically turn ON when
temperatures are below 40° F (4.4° C). When temperatures are above 80° F (26.7° C) the driver vented seat will turn
on.
582 MULTIMEDIA
Page 585 of 696
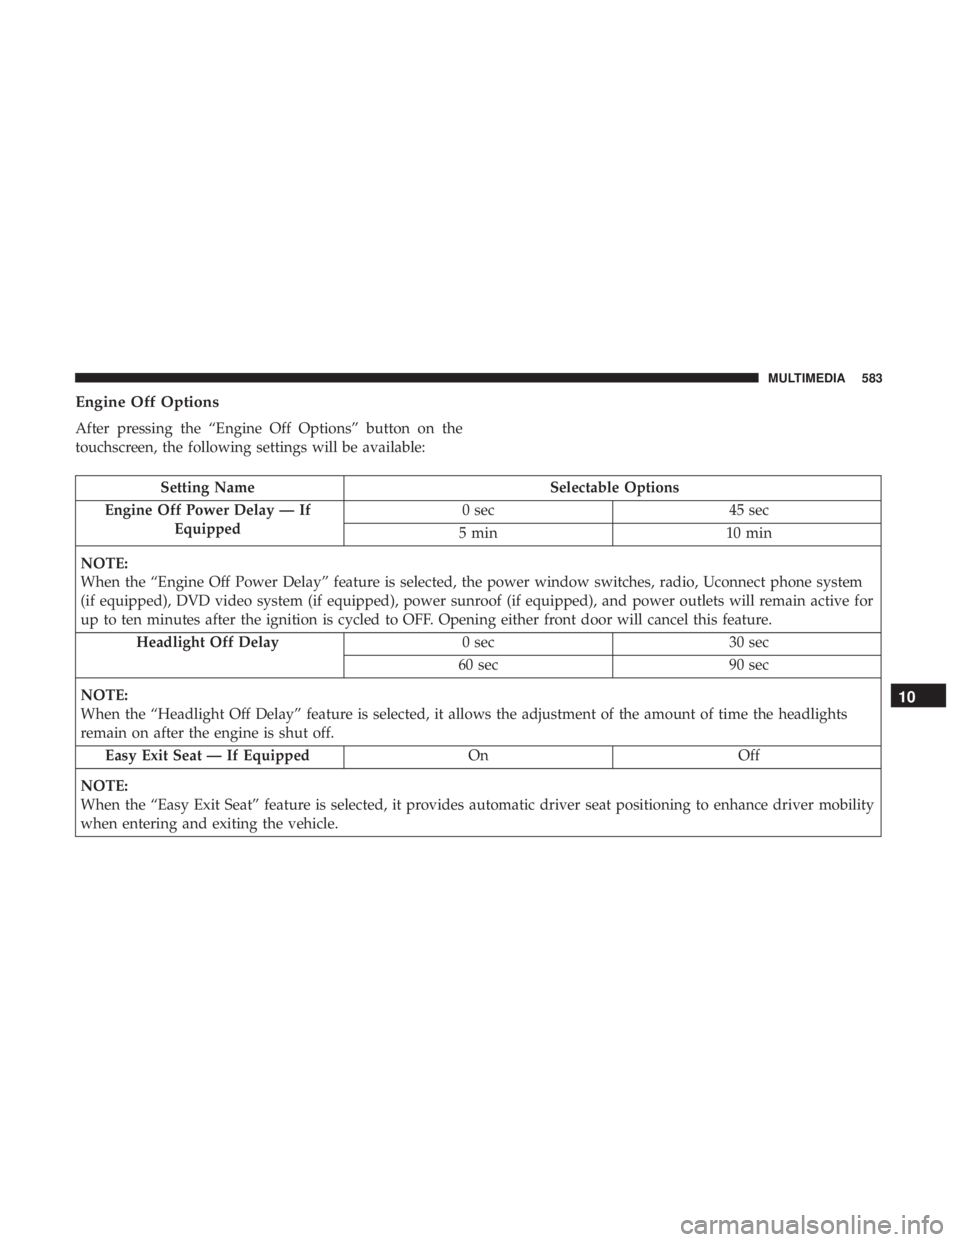
Engine Off Options
After pressing the “Engine Off Options” button on the
touchscreen, the following settings will be available:
Setting NameSelectable Options
Engine Off Power Delay — If Equipped 0 sec
45 sec
5 min 10 min
NOTE:
When the “Engine Off Power Delay” feature is selected, the power window switches, radio, Uconnect phone system
(if equipped), DVD video system (if equipped), power sunroof (if equipped), and power outlets will remain active for
up to ten minutes after the ignition is cycled to OFF. Opening either front door will cancel this feature. Headlight Off Delay 0 sec30 sec
60 sec 90 sec
NOTE:
When the “Headlight Off Delay” feature is selected, it allows the adjustment of the amount of time the headlights
remain on after the engine is shut off. Easy Exit Seat — If Equipped OnOff
NOTE:
When the “Easy Exit Seat” feature is selected, it provides automatic driver seat positioning to enhance driver mobility
when entering and exiting the vehicle.
10
MULTIMEDIA 583
Page 586 of 696
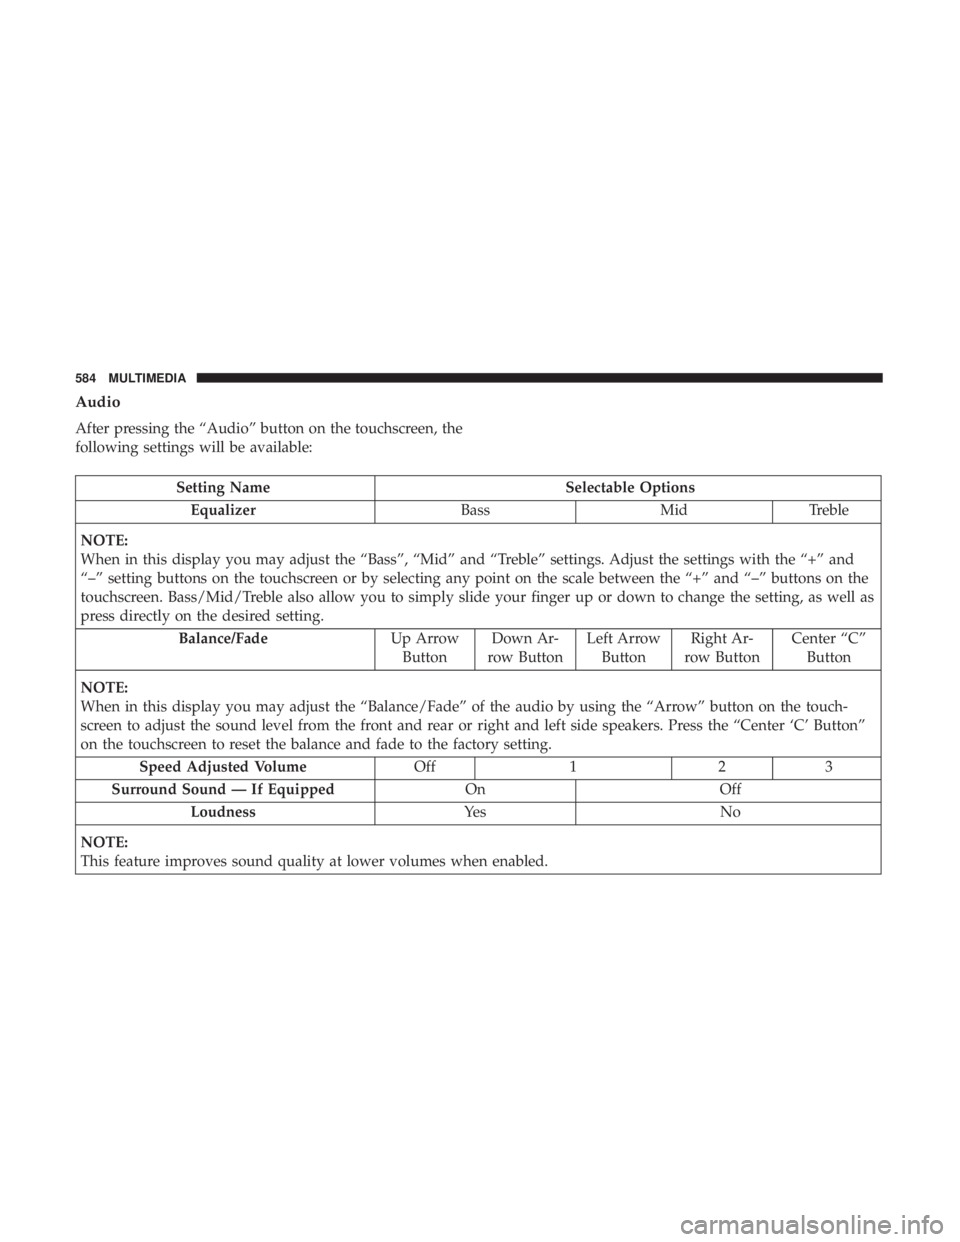
Audio
After pressing the “Audio” button on the touchscreen, the
following settings will be available:
Setting NameSelectable Options
Equalizer BassMidTreble
NOTE:
When in this display you may adjust the “Bass”, “Mid” and “Treble” settings. Adjust the settings with the “+” and
“–” setting buttons on the touchscreen or by selecting any point on the scale between the “+” and “–” buttons on the
touchscreen. Bass/Mid/Treble also allow you to simply slide your finger up or down to change the setting, as well as
press directly on the desired setting. Balance/Fade Up Arrow
Button Down Ar-
row Button Left Arrow
Button Right Ar-
row Button Center “C”
Button
NOTE:
When in this display you may adjust the “Balance/Fade” of the audio by using the “Arrow” button on the touch-
screen to adjust the sound level from the front and rear or right and left side speakers. Press the “Center ‘C’ Button”
on the touchscreen to reset the balance and fade to the factory setting. Speed Adjusted Volume Off123
Surround Sound — If Equipped OnOff
Loudness Ye sN o
NOTE:
This feature improves sound quality at lower volumes when enabled.
584 MULTIMEDIA
Page 587 of 696
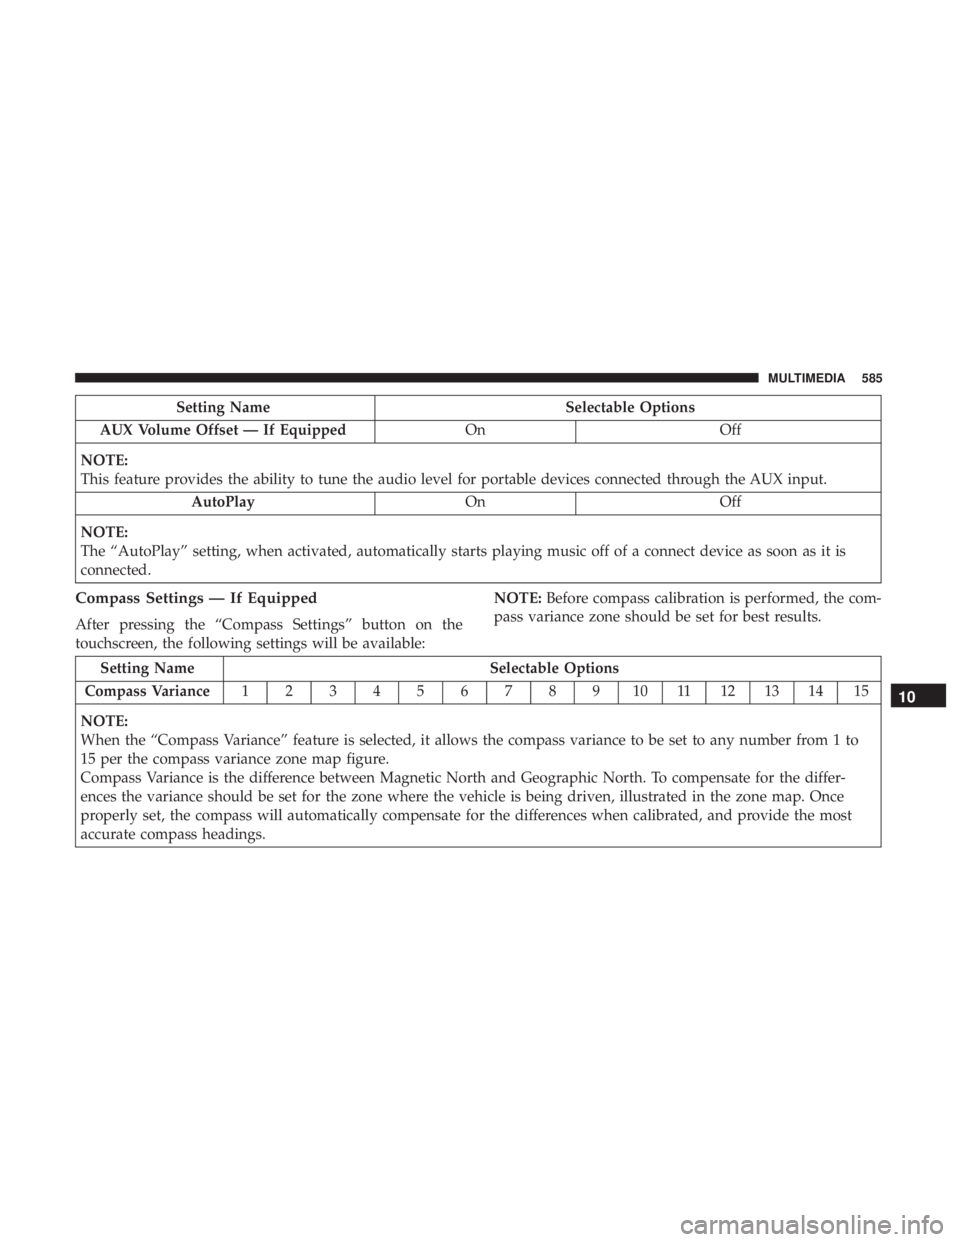
Setting NameSelectable Options
AUX Volume Offset — If Equipped OnOff
NOTE:
This feature provides the ability to tune the audio level for portable devices connected through the AUX input. AutoPlay OnOff
NOTE:
The “AutoPlay” setting, when activated, automatically starts playing music off of a connect device as soon as it is
connected.
Compass Settings — If Equipped
After pressing the “Compass Settings” button on the
touchscreen, the following settings will be available: NOTE:
Before compass calibration is performed, the com-
pass variance zone should be set for best results.
Setting Name Selectable Options
Compass Variance 1 2 3 4 5 6 7 8 9 10 11 12 13 14 15
NOTE:
When the “Compass Variance” feature is selected, it allows the compass variance to be set to any number from 1 to
15 per the compass variance zone map figure.
Compass Variance is the difference between Magnetic North and Geographic North. To compensate for the differ-
ences the variance should be set for the zone where the vehicle is being driven, illustrated in the zone map. Once
properly set, the compass will automatically compensate for the differences when calibrated, and provide the most
accurate compass headings.
10
MULTIMEDIA 585
Page 588 of 696
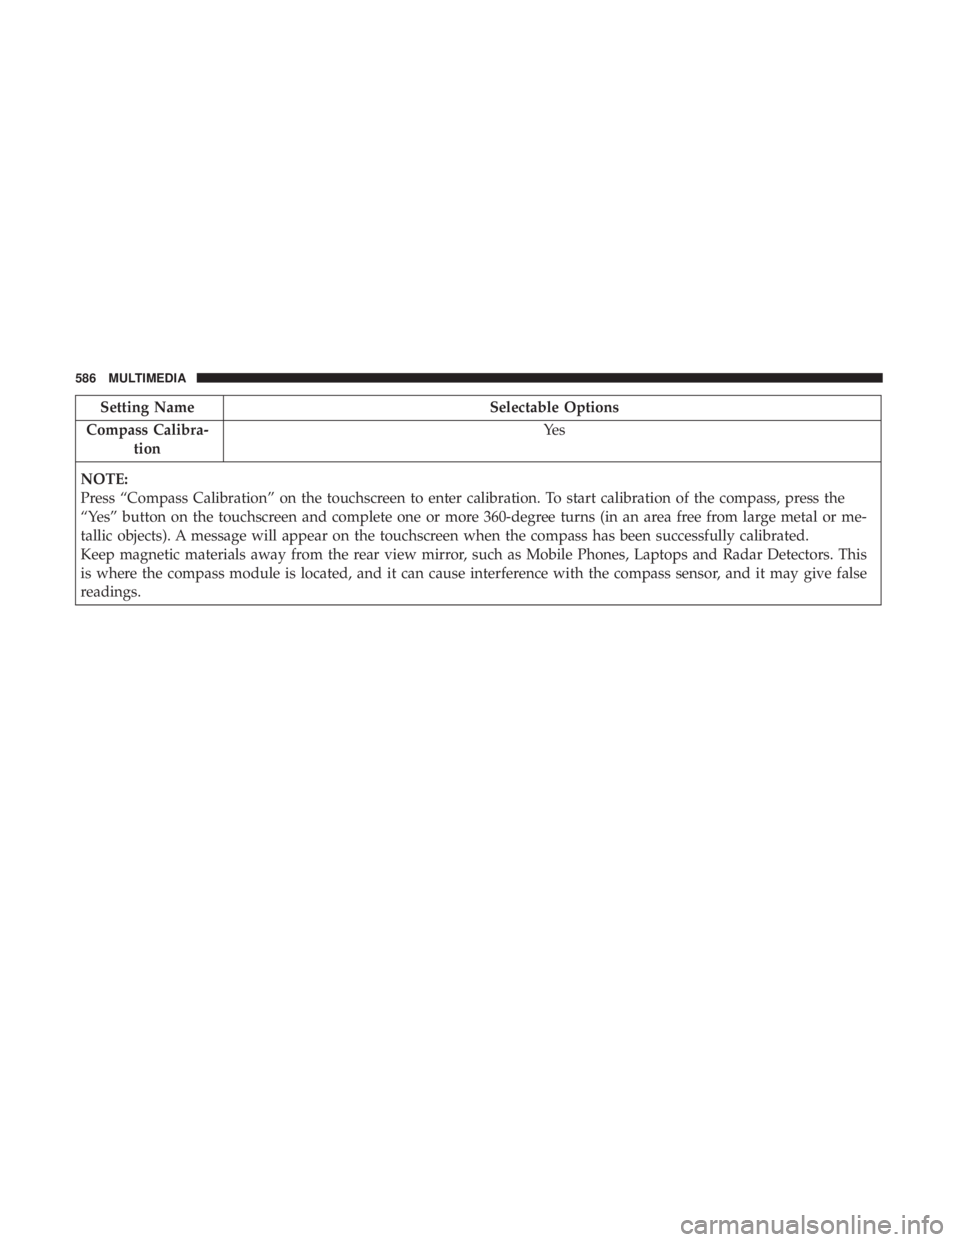
Setting NameSelectable Options
Compass Calibra- tion Ye s
NOTE:
Press “Compass Calibration” on the touchscreen to enter calibration. To start calibration of the compass, press the
“Yes” button on the touchscreen and complete one or more 360-degree turns (in an area free from large metal or me-
tallic objects). A message will appear on the touchscreen when the compass has been successfully calibrated.
Keep magnetic materials away from the rear view mirror, such as Mobile Phones, Laptops and Radar Detectors. This
is where the compass module is located, and it can cause interference with the compass sensor, and it may give false
readings.
586 MULTIMEDIA
Page 589 of 696
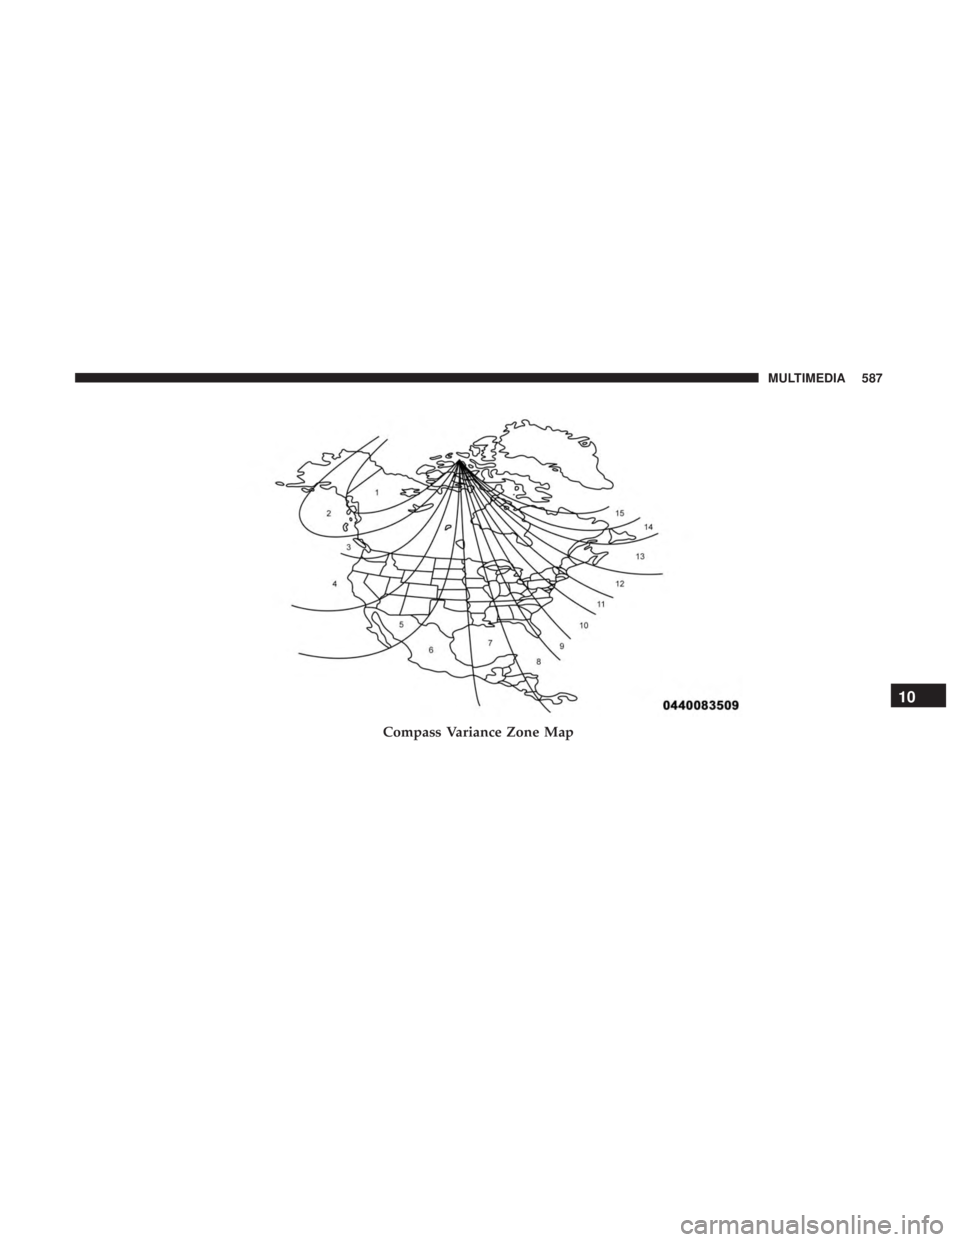
Compass Variance Zone Map
10
MULTIMEDIA 587
Page 590 of 696
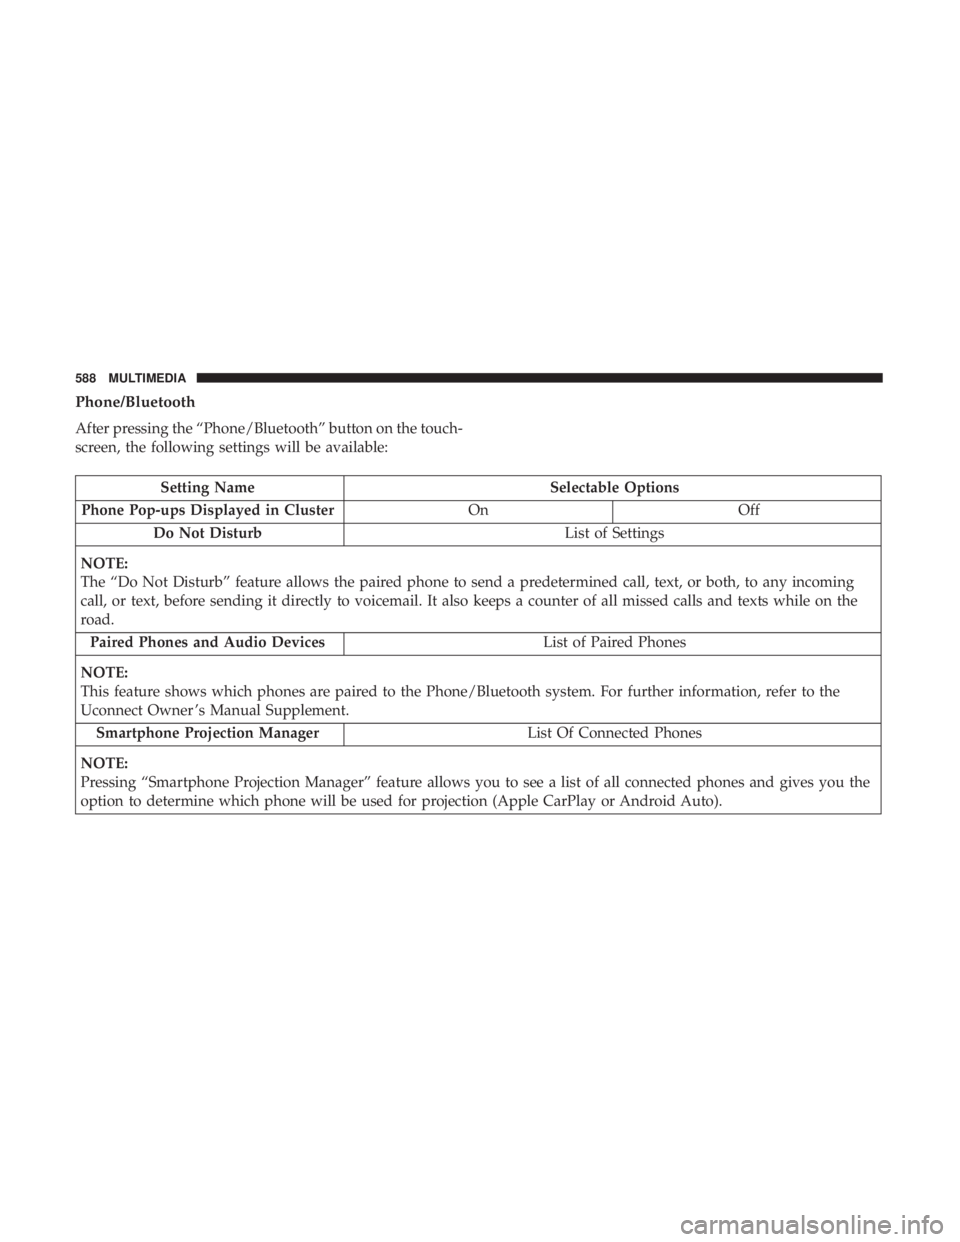
Phone/Bluetooth
After pressing the “Phone/Bluetooth” button on the touch-
screen, the following settings will be available:
Setting NameSelectable Options
Phone Pop-ups Displayed in Cluster OnOff
Do Not Disturb List of Settings
NOTE:
The “Do Not Disturb” feature allows the paired phone to send a predetermined call, text, or both, to any incoming
call, or text, before sending it directly to voicemail. It also keeps a counter of all missed calls and texts while on the
road. Paired Phones and Audio Devices List of Paired Phones
NOTE:
This feature shows which phones are paired to the Phone/Bluetooth system. For further information, refer to the
Uconnect Owner ’s Manual Supplement. Smartphone Projection Manager List Of Connected Phones
NOTE:
Pressing “Smartphone Projection Manager” feature allows you to see a list of all connected phones and gives you the
option to determine which phone will be used for projection (Apple CarPlay or Android Auto).
588 MULTIMEDIA