ESP CHRYSLER PACIFICA 2022 Owner's Manual
[x] Cancel search | Manufacturer: CHRYSLER, Model Year: 2022, Model line: PACIFICA, Model: CHRYSLER PACIFICA 2022Pages: 384, PDF Size: 23.92 MB
Page 166 of 384
164STARTING AND OPERATING
NOTE:
When searching for a parking space, use the
turn signal indicator to select which side of the
vehicle you want to perform the parking
maneuver. The ParkSense Active Park Assist
system will automatically search for a parking
space on the passenger's side of the vehicle if
the turn signal is not activated.
The driver needs to make sure that the selected
parking space for the maneuver remains free
and clear of any obstructions (e.g. pedestrians,
bicycles, etc.).
The driver is responsible to ensure that the
selected parking space is suitable for the
maneuver and free/clear of anything that may
be overhanging or protruding into the parking
space (e.g., ladders, tailgates, etc., from
surrounding objects/vehicles).
When searching for a parking space, the driver
should drive as parallel or perpendicular
(depending on the type of maneuver) to other
vehicles as possible.
The feature will only indicate the last detected
parking space (example: if passing multiple
available parking spaces, the system will only
indicate the last detected parking space for the
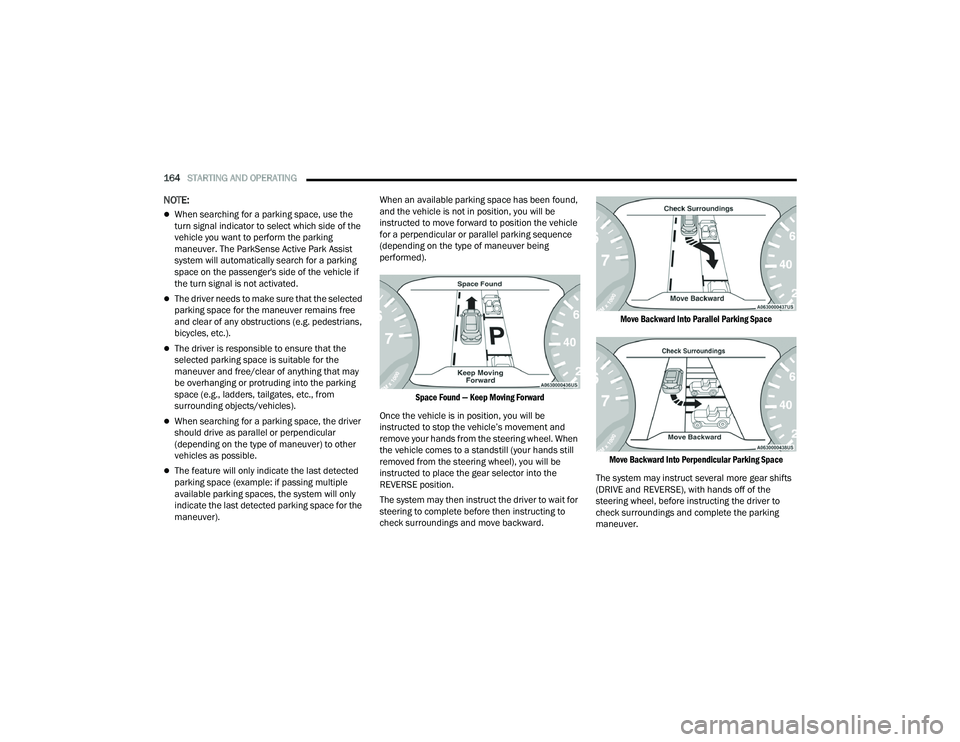
maneuver). When an available parking space has been found,
and the vehicle is not in position, you will be
instructed to move forward to position the vehicle
for a perpendicular or parallel parking sequence
(depending on the type of maneuver being
performed).
Space Found — Keep Moving Forward
Once the vehicle is in position, you will be
instructed to stop the vehicle’s movement and
remove your hands from the steering wheel. When
the vehicle comes to a standstill (your hands still
removed from the steering wheel), you will be
instructed to place the gear selector into the
REVERSE position.
The system may then instruct the driver to wait for
steering to complete before then instructing to
check surroundings and move backward.
Move Backward Into Parallel Parking Space
Move Backward Into Perpendicular Parking Space
The system may instruct several more gear shifts
(DRIVE and REVERSE), with hands off of the
steering wheel, before instructing the driver to
check surroundings and complete the parking
maneuver.
22_RUP_OM_EN_USC_t.book Page 164
Page 167 of 384

STARTING AND OPERATING165
When the vehicle is in the parking position, the
maneuver is complete and the driver will be
instructed to check the vehicle's parking position,
then shift the vehicle into PARK. The message
"Active ParkSense Complete - Check Parking
Position" will be displayed momentarily.
NOTE:
It is the driver's responsibility to use the brake
and accelerator during the semi-automatic
parking maneuver.
It is the driver's responsibility to use the brake
and stop the vehicle. The driver should check
their surroundings and be prepared to stop the
vehicle either when instructed to, or when driver
intervention is required.
When the system instructs the driver to remove
their hands from the steering wheel, the driver
should check their surroundings and begin to
back up slowly.
The ParkSense Active Park Assist system will
allow a maximum number of shifts between
DRIVE and REVERSE. If the maneuver cannot be
completed within six shifts, the system will
cancel and the instrument cluster display will
instruct the driver to complete the maneuver
manually.
The system will cancel the maneuver if the
vehicle speed exceeds 5 mph (7 km/h) during
active steering guidance into the parking space.
The system will provide a warning to the driver
at 3 mph (5 km/h) that tells them to slow down.
The driver is then responsible for completing the
maneuver if the system is canceled.
If the system is canceled during the maneuver
for any reason, the driver must take control of
the vehicle.
WARNING!
Drivers must be careful when performing
parallel or perpendicular parking maneuvers
even when using the ParkSense Active Park
Assist system. Always check carefully behind
and in front of your vehicle, look behind and in
front of you, and be sure to check for
pedestrians, animals, other vehicles,
obstructions, and blind spots before backing up
and moving forward. You are responsible for
safety and must continue to pay attention to
your surroundings. Failure to do so can result in
serious injury or death.
CAUTION!
The ParkSense Active Park Assist system is
only a parking aid and it is unable to recognize
every obstacle, including small obstacles.
Parking curbs might be temporarily detected
or not detected at all. Obstacles located above
or below the sensors will not be detected
when they are in close proximity.
The vehicle must be driven slowly when using
the ParkSense Active Park Assist system in
order to be able to stop in time when an
obstacle is detected. It is recommended that
the driver looks over his/her shoulder when
using the ParkSense Active Park Assist
system.4
22_RUP_OM_EN_USC_t.book Page 165
Page 171 of 384
STARTING AND OPERATING169
The following table shows the approximate
distances for each zone:
NOTE:If snow, ice, mud, or any foreign substance builds
up on the camera lens, clean the lens, rinse with
water, and dry with a soft cloth. Do not cover the
lens.
SURROUND VIEW CAMERA SYSTEM —
IF EQUIPPED
Your vehicle may be equipped with the Surround
View Camera system that allows you to see an
on-screen image of the surroundings and Top View
of your vehicle whenever the gear selector is put
into REVERSE or a different view is selected
through the touchscreen soft buttons. The Top
View of the vehicle will show which doors are open.
The image will be displayed on the touchscreen
display along with a caution note “Check Entire
Surroundings” across the top of the screen.
After five seconds, this note will disappear.
The Surround View Camera system is comprised of
four sequential cameras located in the front grille,
rear liftgate and side mirrors.
NOTE:The Surround View Camera system has program -
mable settings that may be selected through the
Uconnect system Ú page 188.
Press this button on the touchscreen to
enter the Surround View Camera menu in
the Uconnect system.
When the vehicle is shifted into REVERSE, the Rear
View and Top View is the default view of the
system.
When the vehicle is shifted out of REVERSE with
camera delay turned on, the camera image will
continue to be displayed for up to 10 seconds
unless the vehicle speed exceeds 8 mph (13 km/h),
the vehicle is shifted into PARK, or the ignition is
placed in the OFF position. There is a touchscreen
button X to disable the display of the camera image.
When the vehicle is shifted out of REVERSE with
camera delay turned off, the Surround View system
is exited and the last known screen appears again.
Whenever the Rear View Camera image is
activated through the Back Up Camera button in
the Controls menu, and the vehicle speed is
greater than, or equal to, 8 mph (13 km/h), a
display timer for the image is initiated. The image
will continue to be displayed until the display timer
exceeds 10 seconds.
Zone
Distance To The Rear Of
The Vehicle
Red 0 - 1 ft (0 - 30 cm)
Yellow 1 ft - 6.5 ft (30 cm - 2 m)
Green 6.5 ft or greater
(2 m or greater)
WARNING!
Drivers must be careful when backing up even
when using the ParkView Rear Back Up Camera.
Always check carefully behind your vehicle, and
be sure to check for pedestrians, animals, other
vehicles, obstructions, or blind spots before
backing up. You are responsible for the safety of
your surroundings and must continue to pay
attention while backing up. Failure to do so can
result in serious injury or death.
CAUTION!
To avoid vehicle damage, ParkView should
only be used as a parking aid. The ParkView
camera is unable to view every obstacle or
object in your drive path.
To avoid vehicle damage, the vehicle must be
driven slowly when using ParkView to be able
to stop in time when an obstacle is seen. It is
recommended that the driver look frequently
over his/her shoulder when using ParkView.
4
22_RUP_OM_EN_USC_t.book Page 169
Page 172 of 384
170STARTING AND OPERATING
NOTE:
If the vehicle speed remains below 8 mph
(13 km/h), the Rear View Camera image will be
displayed continuously until deactivated via the
touchscreen button X, the transmission is
shifted into PARK, or the ignition is placed in the
OFF position.
The touchscreen button X to disable display of
the camera image is made available ONLY when
the vehicle is not in REVERSE.
When enabled, active guidelines are overlaid on
the image to illustrate the width of the vehicle,
including the side view mirrors and its projected
back up path based on the steering wheel position.
Different colored zones indicate the distance to
the rear of the vehicle.
The following table shows the approximate
distances for each zone: Modes Of Operation
Manual activation of the Surround View system is
selected by pressing the Surround View Camera
soft key located in the Controls screen within the
Uconnect system.
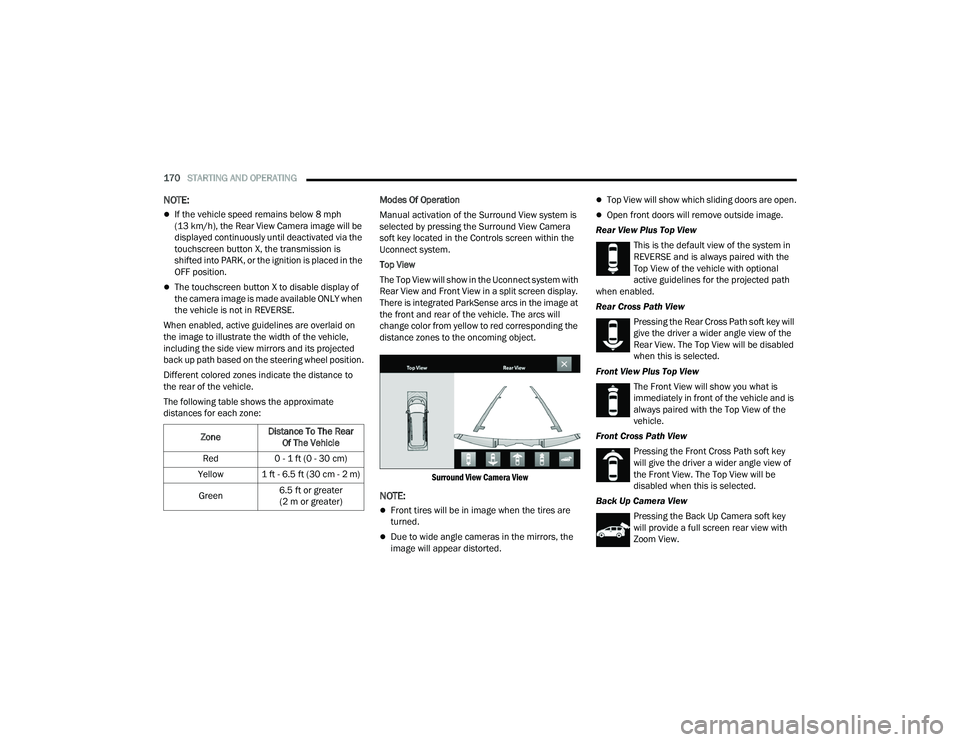
Top View
The Top View will show in the Uconnect system with
Rear View and Front View in a split screen display.
There is integrated ParkSense arcs in the image at
the front and rear of the vehicle. The arcs will
change color from yellow to red corresponding the
distance zones to the oncoming object.
Surround View Camera View
NOTE:
Front tires will be in image when the tires are
turned.
Due to wide angle cameras in the mirrors, the
image will appear distorted.
Top View will show which sliding doors are open.
Open front doors will remove outside image.
Rear View Plus Top View This is the default view of the system in
REVERSE and is always paired with the
Top View of the vehicle with optional
active guidelines for the projected path
when enabled.
Rear Cross Path View
Pressing the Rear Cross Path soft key will
give the driver a wider angle view of the
Rear View. The Top View will be disabled
when this is selected.
Front View Plus Top View The Front View will show you what is
immediately in front of the vehicle and is
always paired with the Top View of the
vehicle.
Front Cross Path View Pressing the Front Cross Path soft key
will give the driver a wider angle view of
the Front View. The Top View will be
disabled when this is selected.
Back Up Camera View Pressing the Back Up Camera soft key
will provide a full screen rear view with
Zoom View.
Zone
Distance To The Rear
Of The Vehicle
Red 0 - 1 ft (0 - 30 cm)
Yellow 1 ft - 6.5 ft (30 cm - 2 m)
Green 6.5 ft or greater
(2 m or greater)
22_RUP_OM_EN_USC_t.book Page 170
Page 173 of 384
STARTING AND OPERATING171
Zoom View
When the Rear View is being displayed, and the
vehicle speed is below 8 mph (13 km/h) while in
any gear selector position, Zoom View is available.
By pressing the “magnifying glass” icon in the
upper left of the display screen, the image will
zoom in to four times the standard view. Pressing
the icon a second time will return the view to the
standard Rear View.
When Zoom View is selected while the vehicle is in
REVERSE, then shifted to DRIVE, the camera delay
will display the standard Rear View. If the vehicle is
then returned to REVERSE gear from DRIVE, the
Zoom View selection will automatically resume.
Shifting to NEUTRAL from any gear will maintain
the selected view (Zoom or Standard) as long as
the vehicle is below 8 mph (13 km/h).
If the vehicle is in PARK, Zoom View is available
until the gear selector is placed in DRIVE or
REVERSE and speeds are at or above 8 mph
(13 km/h).
NOTE:
If the vehicle is in DRIVE, NEUTRAL, or REVERSE,
and speed is greater than or equal to 8 mph
(13 km/h), Zoom View is unavailable and the
icon will appear grey.
While in Zoom View, the guidelines will not be
visible. Deactivation
The system can be deactivated under the following
conditions:
The speed of the vehicle is greater than 8 mph
(13 km/h).
The vehicle shifted into PARK.
The vehicle is in any gear other than REVERSE
and the X button is pressed.
The camera delay system is turned off manually
through the Uconnect Settings Ú
page 188.
NOTE:
If snow, ice, mud, or any foreign substance
builds up on the camera lenses, clean the
lenses, rinse with water, and dry with a soft
cloth. Do not cover the lenses.
If a malfunction with the system has occurred,
see an authorized dealer.
FAMCAM SYSTEM — IF EQUIPPED
Your vehicle may be equipped with a FamCam
system that consists of an interior monitoring
camera mounted on the headliner that allows you
to view cargo/passengers in the rear interior of the
vehicle through the Uconnect screen.
To activate the feature, press the FamCam button
under “Controls” in the Vehicle Menu of the
Uconnect system Úpage 188. Alternatively, the
feature can be accessed through the App Drawer
or a shortcut for the feature can be added to the
Favorites bar at the top of the screen for quick
access.
WARNING!
Drivers must be careful when backing up even
when using the Surround View Camera. Always
check carefully behind your vehicle, and be sure
to check for pedestrians, animals, other
vehicles, obstructions, or blind spots before
backing up. You are responsible for the safety of
your surroundings and must continue to pay
attention while backing up. Failure to do so can
result in serious injury or death.
CAUTION!
To avoid vehicle damage, Surround View
should only be used as a parking aid. The
Surround View camera is unable to view every
obstacle or object in your drive path.
To avoid vehicle damage, the vehicle must be
driven slowly when using Surround View to be
able to stop in time when an obstacle is seen.
It is recommended that the driver look
frequently over his/her shoulder when using
Surround View.
4
22_RUP_OM_EN_USC_t.book Page 171
Page 192 of 384
190MULTIMEDIA
My Profile
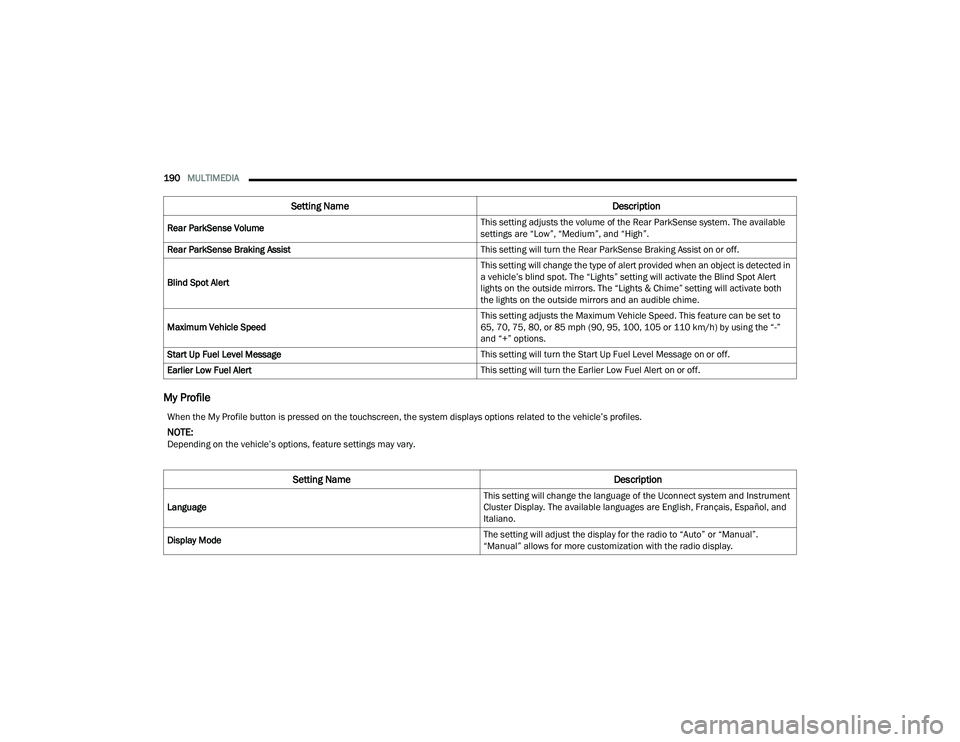
Rear ParkSense Volume This setting adjusts the volume of the Rear ParkSense system. The available
settings are “Low”, “Medium”, and “High”.
Rear ParkSense Braking Assist This setting will turn the Rear ParkSense Braking Assist on or off.
Blind Spot Alert This setting will change the type of alert provided when an object is detected in
a vehicle’s blind spot. The “Lights” setting will activate the Blind Spot Alert
lights on the outside mirrors. The “Lights & Chime” setting will activate both
the lights on the outside mirrors and an audible chime.
Maximum Vehicle Speed This setting adjusts the Maximum Vehicle Speed. This feature can be set to
65, 70, 75, 80, or 85 mph (90, 95, 100, 105 or 110 km/h) by using the “-”
and “+” options.
Start Up Fuel Level Message This setting will turn the Start Up Fuel Level Message on or off.
Earlier Low Fuel Alert This setting will turn the Earlier Low Fuel Alert on or off.
Setting NameDescription
When the My Profile button is pressed on the touchscreen, the system displays options related to the vehicle’s profiles.
NOTE:Depending on the vehicle’s options, feature settings may vary.
Setting NameDescription
Language This setting will change the language of the Uconnect system and Instrument
Cluster Display. The available languages are English, Français, Español, and
Italiano.
Display Mode The setting will adjust the display for the radio to “Auto” or “Manual”.
“Manual” allows for more customization with the radio display.
22_RUP_OM_EN_USC_t.book Page 190
Page 196 of 384
194MULTIMEDIA
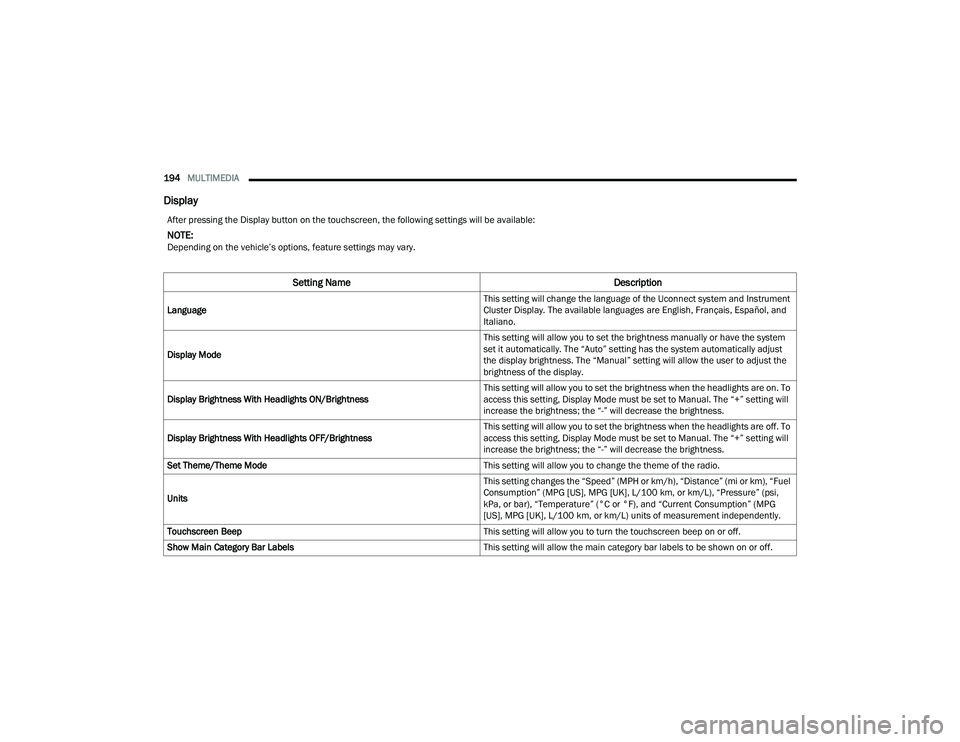
Display
After pressing the Display button on the touchscreen, the following settings will be available:
NOTE:Depending on the vehicle’s options, feature settings may vary.
Setting Name Description
Language This setting will change the language of the Uconnect system and Instrument
Cluster Display. The available languages are English, Français, Español, and
Italiano.
Display Mode This setting will allow you to set the brightness manually or have the system
set it automatically. The “Auto” setting has the system automatically adjust
the display brightness. The “Manual” setting will allow the user to adjust the
brightness of the display.
Display Brightness With Headlights ON/Brightness This setting will allow you to set the brightness when the headlights are on. To
access this setting, Display Mode must be set to Manual. The “+” setting will
increase the brightness; the “-” will decrease the brightness.
Display Brightness With Headlights OFF/Brightness This setting will allow you to set the brightness when the headlights are off. To
access this setting, Display Mode must be set to Manual. The “+” setting will
increase the brightness; the “-” will decrease the brightness.
Set Theme/Theme Mode This setting will allow you to change the theme of the radio.
Units This setting changes the “Speed” (MPH or km/h), “Distance” (mi or km), “Fuel
Consumption” (MPG [US], MPG [UK], L/100 km, or km/L), “Pressure” (psi,
kPa, or bar), “Temperature” (°C or °F), and “Current Consumption” (MPG
[US], MPG [UK], L/100 km, or km/L) units of measurement independently.
Touchscreen Beep This setting will allow you to turn the touchscreen beep on or off.
Show Main Category Bar Labels This setting will allow the main category bar labels to be shown on or off.
22_RUP_OM_EN_USC_t.book Page 194
Page 220 of 384
218MULTIMEDIA
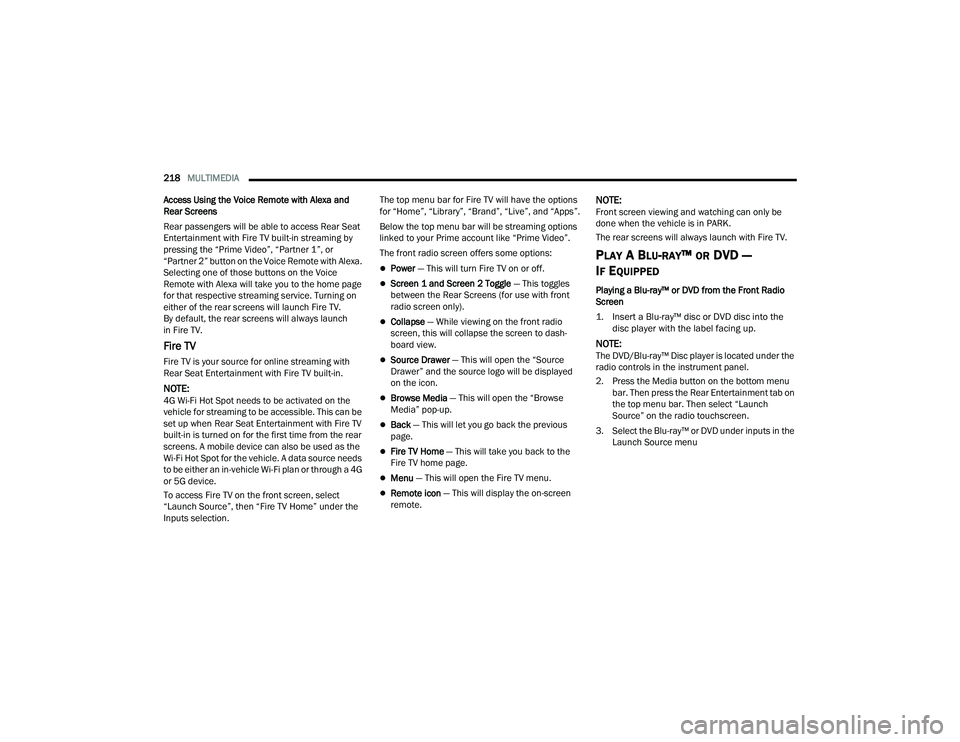
Access Using the Voice Remote with Alexa and
Rear Screens
Rear passengers will be able to access Rear Seat
Entertainment with Fire TV built-in streaming by
pressing the “Prime Video”, “Partner 1”, or
“Partner 2” button on the Voice Remote with Alexa.
Selecting one of those buttons on the Voice
Remote with Alexa will take you to the home page
for that respective streaming service. Turning on
either of the rear screens will launch Fire TV.
By default, the rear screens will always launch
in Fire TV.
Fire TV
Fire TV is your source for online streaming with
Rear Seat Entertainment with Fire TV built-in.
NOTE:4G Wi-Fi Hot Spot needs to be activated on the
vehicle for streaming to be accessible. This can be
set up when Rear Seat Entertainment with Fire TV
built-in is turned on for the first time from the rear
screens. A mobile device can also be used as the
Wi-Fi Hot Spot for the vehicle. A data source needs
to be either an in-vehicle Wi-Fi plan or through a 4G
or 5G device.
To access Fire TV on the front screen, select
“Launch Source”, then “Fire TV Home” under the
Inputs selection. The top menu bar for Fire TV will have the options
for “Home”, “Library”, “Brand”, “Live”, and “Apps”.
Below the top menu bar will be streaming options
linked to your Prime account like “Prime Video”.
The front radio screen offers some options:
Power — This will turn Fire TV on or off.
Screen 1 and Screen 2 Toggle
— This toggles
between the Rear Screens (for use with front
radio screen only).
Collapse — While viewing on the front radio
screen, this will collapse the screen to dash -
board view.
Source Drawer — This will open the “Source
Drawer” and the source logo will be displayed
on the icon.
Browse Media — This will open the “Browse
Media” pop-up.
Back — This will let you go back the previous
page.
Fire TV Home — This will take you back to the
Fire TV home page.
Menu — This will open the Fire TV menu.
Remote icon — This will display the on-screen
remote.
NOTE:Front screen viewing and watching can only be
done when the vehicle is in PARK.
The rear screens will always launch with Fire TV.
PLAY A BLU-RAY™ OR DVD —
I
F EQUIPPED
Playing a Blu-ray™ or DVD from the Front Radio
Screen
1. Insert a Blu-ray™ disc or DVD disc into the
disc player with the label facing up.
NOTE:The DVD/Blu-ray™ Disc player is located under the
radio controls in the instrument panel.
2. Press the Media button on the bottom menu bar. Then press the Rear Entertainment tab on
the top menu bar. Then select “Launch
Source” on the radio touchscreen.
3. Select the Blu-ray™ or DVD under inputs in the Launch Source menu
22_RUP_OM_EN_USC_t.book Page 218
Page 227 of 384
SAFETY225
Dynamic Steering Torque (DST)
DST is a feature of the ESC and Electric Power
Steering (EPS) modules that provides torque at the
steering wheel for certain driving conditions in
which the ESC module is detecting vehicle
instability. The torque that the steering wheel
receives is only meant to help the driver
realize optimal steering behavior in order to
reach/maintain vehicle stability. The only
notification the driver receives that the feature is
active, is the torque applied to the steering wheel.
NOTE:The DST feature is only meant to help the driver
realize the correct course of action through small
torques on the steering wheel, which means the
effectiveness of the DST feature is highly
dependent on the driver’s sensitivity and overall
reaction to the applied torque. It is very important
to realize that this feature will not steer the vehicle,
meaning the driver is still responsible for steering
the vehicle.
Electronic Brake Force Distribution (EBD)
The EBD function manages the distribution of the
braking torque between the front and rear axles by
limiting braking pressure to the rear axle. This is
done to prevent overslip of the rear wheels to avoid
vehicle instability, and to prevent the rear axle from
entering the Anti-Lock Brake System (ABS) before
the front axle.
Electronic Roll Mitigation (ERM)
ERM anticipates the potential for wheel lift by
monitoring the driver’s steering wheel input and
the speed of the vehicle. When ERM determines
that the rate of change of the steering wheel angle
and vehicle’s speed are sufficient to potentially
cause wheel lift, it then applies the appropriate
brake and may also reduce engine power to lessen
the chance that wheel lift will occur. ERM can only
reduce the chance of wheel lift occurring during
severe or evasive driving maneuvers; it cannot
prevent wheel lift due to other factors, such as
road conditions, leaving the roadway, striking
objects or other vehicles.
Electronic Stability Control (ESC)
ESC enhances directional control and stability of
the vehicle under various driving conditions. ESC
corrects for oversteering or understeering of the
vehicle by applying the brake of the appropriate
wheel(s) to assist in counteracting the above
conditions. Engine power may also be reduced to
help the vehicle maintain the desired path.
Oversteer — when the vehicle is turning more
than appropriate for the steering wheel position.
Understeer — when the vehicle is turning less
than appropriate for the steering wheel position.
ESC uses sensors in the vehicle to determine the
vehicle path intended by the driver and compares
it to the actual path of the vehicle. When the actual
path does not match the intended path, ESC
applies the brake of the appropriate wheel to
assist in counteracting the oversteer or understeer
condition.
WARNING!
Many factors, such as vehicle loading, road
conditions and driving conditions, influence the
chance that wheel lift or rollover may occur. ERM
cannot prevent all wheel lift or rollovers,
especially those that involve leaving the roadway
or striking objects or other vehicles. The
capabilities of an ERM-equipped vehicle must
never be exploited in a reckless or dangerous
manner which could jeopardize the user's safety
or the safety of others.
6
22_RUP_OM_EN_USC_t.book Page 225
Page 230 of 384
228SAFETY
Disabling And Enabling HSA
This feature can be turned on or turned off. To
change the current setting, proceed as follows:
Úpage 188.
Towing With HSA
HSA will also provide assistance to mitigate roll
back while towing a trailer.
Rain Brake Support (RBS)
RBS may improve braking performance in wet
conditions. It will periodically apply a small amount
of brake pressure to remove any water buildup on
the front brake rotors. It functions when the
windshield wipers are in LO or HI speed. When RBS
is active, there is no notification to the driver and
no driver interaction is required.
Ready Alert Braking (RAB)
RAB may reduce the time required to reach full
braking during emergency braking situations. It
anticipates when an emergency braking situation
may occur by monitoring how fast the throttle is
released by the driver. The Electronic Brake
Control (EBC) system will prepare the brake system
for a panic stop.
Rear Seat Reminder Alert (RSRA)
RSRA will consider the presence of an object in the
rear seat when a rear entry/exit door is opened at
the beginning of each key cycle. To activate, the
rear door must be open for more than one second
and the vehicle must be placed in the ON/RUN
position within 10 minutes. When the potential
presence of an object is determined and/or
otherwise inferred, a message will appear in the
instrument cluster display reminding driver to
check the rear seat(s) immediately after key off
accompanied by an alert upon exiting the vehicle.
Traction Control System (TCS)
The TCS monitors the amount of wheel spin of
each of the driven wheels. If wheel spin is
detected, the TCS may apply brake pressure to the
spinning wheel(s) and/or reduce vehicle power to
provide enhanced acceleration and stability. A
feature of the TCS, Brake Limited Differential (BLD)
functions similarly to a limited slip differential and
controls the wheel spin across a driven axle.
WARNING!
There may be situations where the Hill Start
Assist (HSA) will not activate and slight rolling
may occur, such as on minor hills or with a
loaded vehicle, or while pulling a trailer. HSA is
not a substitute for active driving involvement. It
is always the driver’s responsibility to be
attentive to distance to other vehicles, people,
and objects, and most importantly brake
operation to ensure safe operation of the vehicle
under all road conditions. Your complete
attention is always required while driving to
maintain safe control of your vehicle. Failure to
follow these warnings can result in a collision or
serious personal injury.
WARNING!
If you use a trailer brake controller with your
trailer, the trailer brakes may be activated and
deactivated with the brake switch. If so, there
may not be enough brake pressure to hold
both the vehicle and the trailer on a hill when
the brake pedal is released. In order to avoid
rolling down an incline while resuming accel -
eration, manually activate the trailer brake or
apply more vehicle brake pressure prior to
releasing the brake pedal.
HSA is not a parking brake. Always apply the
parking brake fully when exiting your vehicle.
Also, be certain to place the transmission in
PARK.
Failure to follow these warnings can result in a
collision or serious personal injury.
22_RUP_OM_EN_USC_t.book Page 228