My profile CHRYSLER PACIFICA 2022 Owners Manual
[x] Cancel search | Manufacturer: CHRYSLER, Model Year: 2022, Model line: PACIFICA, Model: CHRYSLER PACIFICA 2022Pages: 384, PDF Size: 23.92 MB
Page 34 of 384
32GETTING TO KNOW YOUR VEHICLE
DRIVER MEMORY SETTINGS — IF EQUIPPED
This feature allows the driver to save up to two
different memory profiles for easy recall through a
memory switch. Each memory profile saves
desired position settings for the following features:
Driver’s seat
Easy Entry/Exit seat operation (if equipped)
Power steering wheel position (if equipped)
Side mirrors (if equipped)
A set of desired radio station presets
NOTE:
Your vehicle is equipped with two key fobs, each
can be linked to either memory position 1 or 2.
Memory settings will be linked to the driver
profiles in the Uconnect system, in addition to
several other features (radio presets, home
screens, settings, navigation, phone, etc.)
Úpage 188.
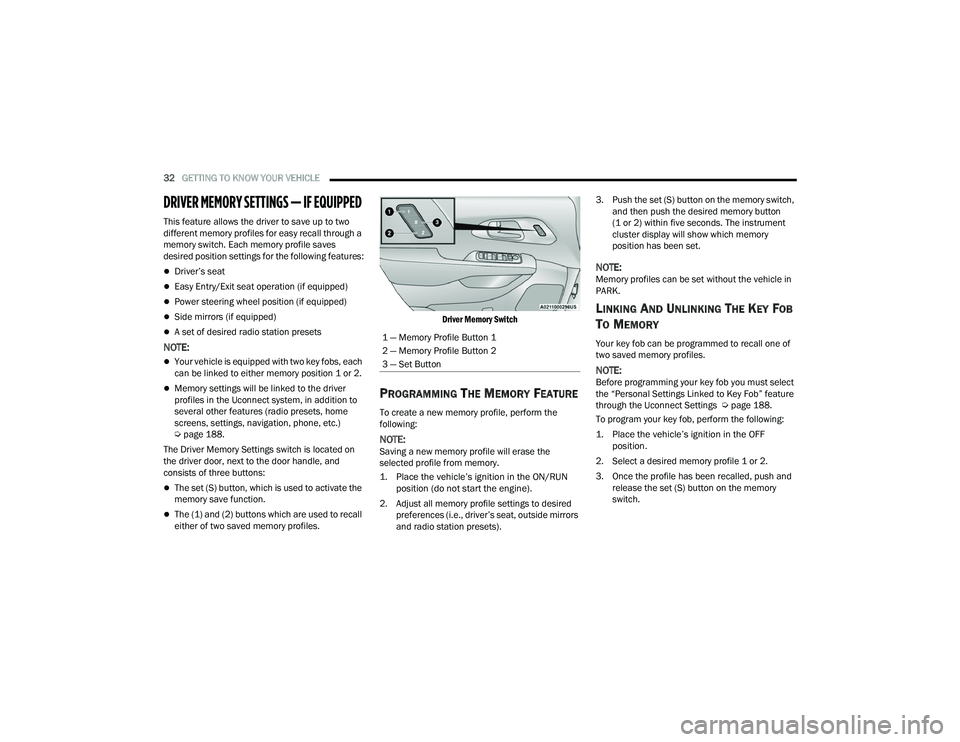
The Driver Memory Settings switch is located on
the driver door, next to the door handle, and
consists of three buttons:
The set (S) button, which is used to activate the
memory save function.
The (1) and (2) buttons which are used to recall
either of two saved memory profiles.
Driver Memory Switch
PROGRAMMING THE MEMORY FEATURE
To create a new memory profile, perform the
following:
NOTE:Saving a new memory profile will erase the
selected profile from memory.
1. Place the vehicle’s ignition in the ON/RUN
position (do not start the engine).
2. Adjust all memory profile settings to desired preferences (i.e., driver’s seat, outside mirrors
and radio station presets). 3. Push the set (S) button on the memory switch,
and then push the desired memory button
(1 or 2) within five seconds. The instrument
cluster display will show which memory
position has been set.
NOTE:Memory profiles can be set without the vehicle in
PARK.
LINKING AND UNLINKING THE KEY FOB
T
O MEMORY
Your key fob can be programmed to recall one of
two saved memory profiles.
NOTE:Before programming your key fob you must select
the “Personal Settings Linked to Key Fob” feature
through the Uconnect Settings Ú page 188.
To program your key fob, perform the following:
1. Place the vehicle’s ignition in the OFF position.
2. Select a desired memory profile 1 or 2.
3. Once the profile has been recalled, push and release the set (S) button on the memory
switch.
1 — Memory Profile Button 1
2 — Memory Profile Button 2
3 — Set Button
22_RUP_OM_EN_USC_t.book Page 32
Page 35 of 384
GETTING TO KNOW YOUR VEHICLE33
4. Push and release button (1) or (2) accordingly. “Memory Profile Set” (1 or 2) will display in the
instrument cluster.
5. Push and release the lock button on the key fob within 10 seconds.
NOTE:Your key fob can be unlinked from your memory
settings by pushing the set (S) button, and then,
within 10 seconds, pushing the unlock button on
the key fob.
MEMORY POSITION RECALL
NOTE:
The vehicle speed must be less than or equal to
5 mph (8 km/h) to recall memory positions. If a
recall is attempted when the vehicle speed is
greater than 5 mph (8 km/h), a message will be
displayed in the instrument cluster display.
Memory settings can be linked to driver profiles
in the Uconnect system. Changing driver profiles
will also recall the linked memory settings if the
conditions are met Ú page 188.
To recall the memory settings for driver one or
two, push the desired memory button (1 or 2) on
the driver's door or the unlock button on the key
fob linked to the desired memory position. A recall can be canceled by pushing any of the
memory buttons on the driver's door during a recall
(S, 1, or 2). When a recall is canceled, the driver's
seat stops moving. A delay of one second will occur
before another recall can be selected.
NOTE:Pushing the mirror adjust switch will cancel the
memory mirror recall.
SEATS
Seats are a part of the Occupant Restraint system
of the vehicle.
MANUAL ADJUSTMENT (FRONT SEATS) —
I
F EQUIPPED
WARNING!
It is dangerous to ride in a cargo area, inside
or outside of a vehicle. In a collision, people
riding in these areas are more likely to be seri -
ously injured or killed.
Do not allow people to ride in any area of your
vehicle that is not equipped with seats and
seat belts. In a collision, people riding in these
areas are more likely to be seriously injured or
killed.
Be sure everyone in your vehicle is in a seat
and using a seat belt properly.
WARNING!
Adjusting a seat while the vehicle is moving is
dangerous. The sudden movement of the seat
could cause you to lose control. The seat belt
might not be adjusted properly and you could
be injured. Adjust the seat only while the
vehicle is parked.
Do not ride with the seatback reclined so that
the shoulder belt is no longer resting against
your chest. In a collision you could slide under
the seat belt and be seriously or even fatally
injured. Use the recliner only when the vehicle
is parked.
2
22_RUP_OM_EN_USC_t.book Page 33
Page 51 of 384
GETTING TO KNOW YOUR VEHICLE49
(Continued)
When enabled within Uconnect Settings, Easy
Entry and Easy Exit positions are stored in each
memory setting profile (if equipped) Ú
page 32.
NOTE:The Easy Entry/Exit feature is enabled or disabled
within the Uconnect system Úpage 188.
POWER ADJUSTMENT (REAR SEATS) —
I
F EQUIPPED
Third Row Power Recline — If Equipped
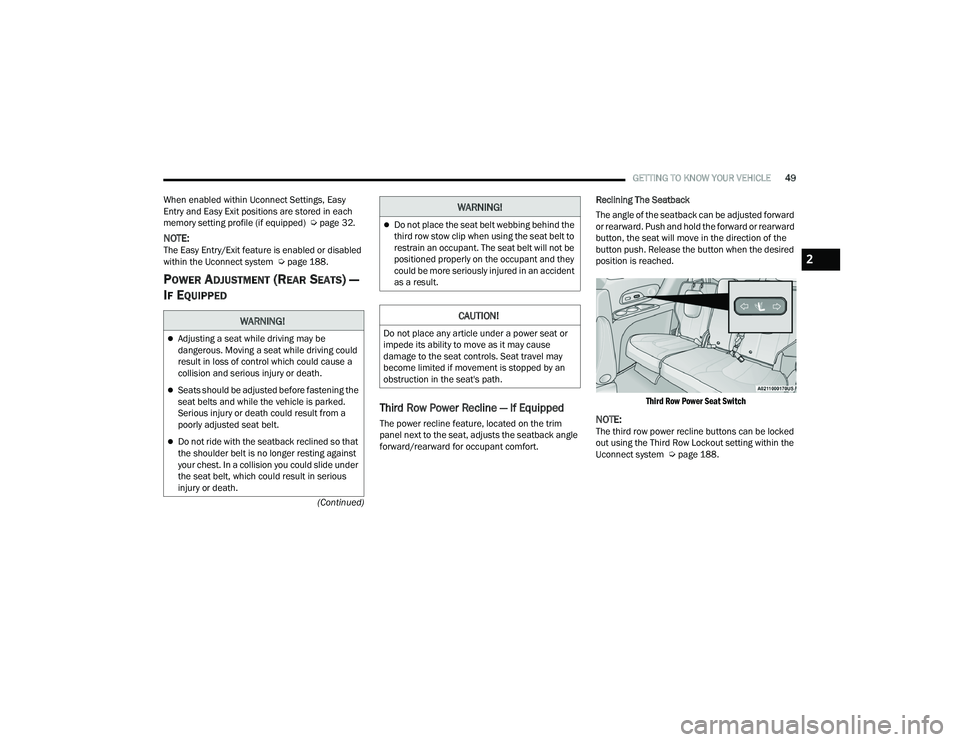
The power recline feature, located on the trim
panel next to the seat, adjusts the seatback angle
forward/rearward for occupant comfort. Reclining The Seatback
The angle of the seatback can be adjusted forward
or rearward. Push and hold the forward or rearward
button, the seat will move in the direction of the
button push. Release the button when the desired
position is reached.
Third Row Power Seat Switch
NOTE:The third row power recline buttons can be locked
out using the Third Row Lockout setting within the
Uconnect system Ú page 188.
WARNING!
Adjusting a seat while driving may be
dangerous. Moving a seat while driving could
result in loss of control which could cause a
collision and serious injury or death.
Seats should be adjusted before fastening the
seat belts and while the vehicle is parked.
Serious injury or death could result from a
poorly adjusted seat belt.
Do not ride with the seatback reclined so that
the shoulder belt is no longer resting against
your chest. In a collision you could slide under
the seat belt, which could result in serious
injury or death.
Do not place the seat belt webbing behind the
third row stow clip when using the seat belt to
restrain an occupant. The seat belt will not be
positioned properly on the occupant and they
could be more seriously injured in an accident
as a result.
CAUTION!
Do not place any article under a power seat or
impede its ability to move as it may cause
damage to the seat controls. Seat travel may
become limited if movement is stopped by an
obstruction in the seat's path.
WARNING!
2
22_RUP_OM_EN_USC_t.book Page 49
Page 61 of 384
GETTING TO KNOW YOUR VEHICLE59
POWER MIRRORS — IF EQUIPPED
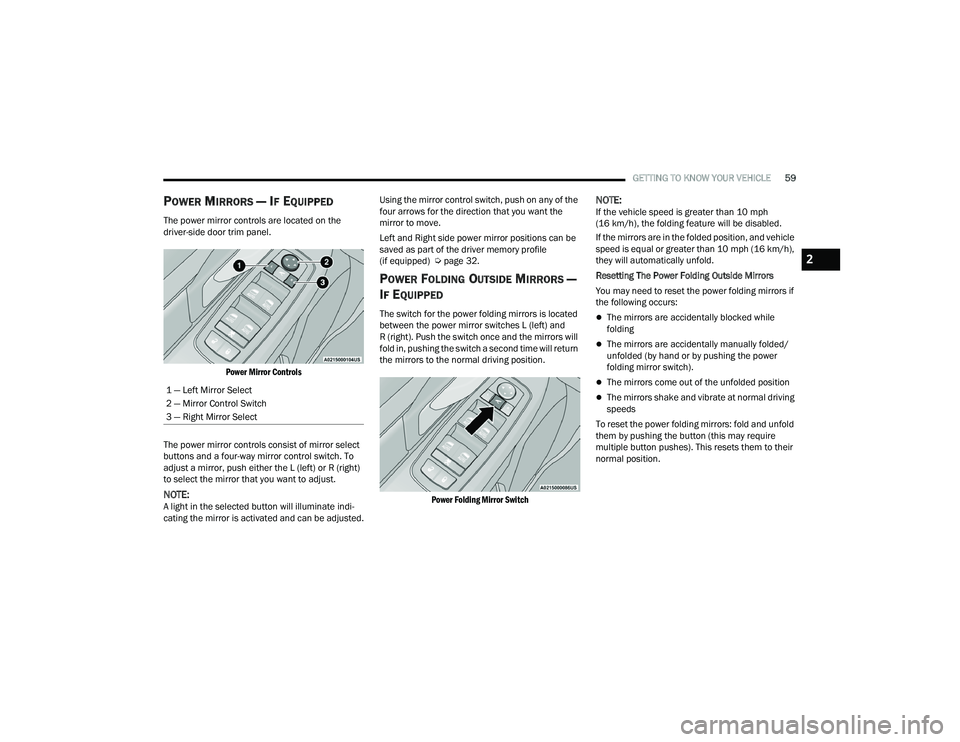
The power mirror controls are located on the
driver-side door trim panel.
Power Mirror Controls
The power mirror controls consist of mirror select
buttons and a four-way mirror control switch. To
adjust a mirror, push either the L (left) or R (right)
to select the mirror that you want to adjust.
NOTE:A light in the selected button will illuminate indi -
cating the mirror is activated and can be adjusted. Using the mirror control switch, push on any of the
four arrows for the direction that you want the
mirror to move.
Left and Right side power mirror positions can be
saved as part of the driver memory profile
(if equipped) Ú
page 32.
POWER FOLDING OUTSIDE MIRRORS —
I
F EQUIPPED
The switch for the power folding mirrors is located
between the power mirror switches L (left) and
R (right). Push the switch once and the mirrors will
fold in, pushing the switch a second time will return
the mirrors to the normal driving position.
Power Folding Mirror Switch
NOTE:If the vehicle speed is greater than 10 mph
(16 km/h), the folding feature will be disabled.
If the mirrors are in the folded position, and vehicle
speed is equal or greater than 10 mph (16 km/h),
they will automatically unfold.
Resetting The Power Folding Outside Mirrors
You may need to reset the power folding mirrors if
the following occurs:
The mirrors are accidentally blocked while
folding
The mirrors are accidentally manually folded/
unfolded (by hand or by pushing the power
folding mirror switch).
The mirrors come out of the unfolded position
The mirrors shake and vibrate at normal driving
speeds
To reset the power folding mirrors: fold and unfold
them by pushing the button (this may require
multiple button pushes). This resets them to their
normal position.
1 — Left Mirror Select
2 — Mirror Control Switch
3 — Right Mirror Select
2
22_RUP_OM_EN_USC_t.book Page 59
Page 130 of 384

128GETTING TO KNOW YOUR INSTRUMENT PANEL
KeySense Indicator Light —
If Equipped
The KeySense indicator is illuminated
when a KeySense key is detected upon
startup of the vehicle. The indicator will
remain lit for the entire key cycle as a
reminder that the KeySense key is in use. While
the KeySense key is in use, the vehicle will respond
to settings associated with the KeySense profile
Ú page 14.
LaneSense Indicator Light — If Equipped
The LaneSense indicator light illuminates
solid green when both lane markings
have been detected and the system is
“armed” and ready to provide visual and
torque warnings if an unintentional lane departure
occurs Ú page 166.
Parking/Headlights On Indicator Light
This indicator light will illuminate when
the parking lights or headlights are
turned on.
Stop/Start Active Indicator Light —
If Equipped
This indicator light will illuminate when
the Stop/Start function is in “Autostop”
mode Úpage 143.
Turn Signal Indicator Lights
When the left or right turn signal is
activated, the turn signal indicator will
flash independently and the
corresponding exterior turn signal lamps
will flash. Turn signals can be activated when the
multifunction lever is moved down (left) or
up (right).
NOTE:
A continuous chime will sound if the vehicle is
driven more than 1 mile (1.6 km) with either
turn signal on.
Check for an inoperative outside light bulb if
either indicator flashes at a rapid rate.
WHITE INDICATOR LIGHTS
Adaptive Cruise Control (ACC) Ready
Light — If Equipped
This indicator light will illuminate when
the vehicle equipped with ACC has been
turned on but not set Ú page 147.
Cruise Control Ready Indicator Light
This indicator light will illuminate when
the cruise control is ready, but not set
Úpage 146.
LaneSense Indicator Light — If Equipped
When the LaneSense system is ON, but
not armed, the LaneSense indicator light
illuminates solid white. This occurs when
only left, right, or neither lane line has
been detected. If a single lane line is detected, the
system is ready to provide only visual warnings if
an unintentional lane departure occurs on the
detected lane line Ú page 166.
Speed Warning Indicator Light
The white indicator will illuminate along
with a pop-up message (Speed Warning
Set to XX followed by unit), once the
feature is enabled. When the set speed is
exceeded, a continuous chime (up to 10 seconds
or until the speed is no longer exceeded) will sound
along with a Speed Warning Exceeded pop-up
message and the indicator light will turn yellow and
flash.
NOTE:The number “31” is only an example of a speed
that can be selected.
Set Speed Display
The Set Speed Display indicator light
indicates the set speed for the Cruise
Control and Adaptive Cruise Control
(ACC) settings.
22_RUP_OM_EN_USC_t.book Page 128
Page 192 of 384
190MULTIMEDIA
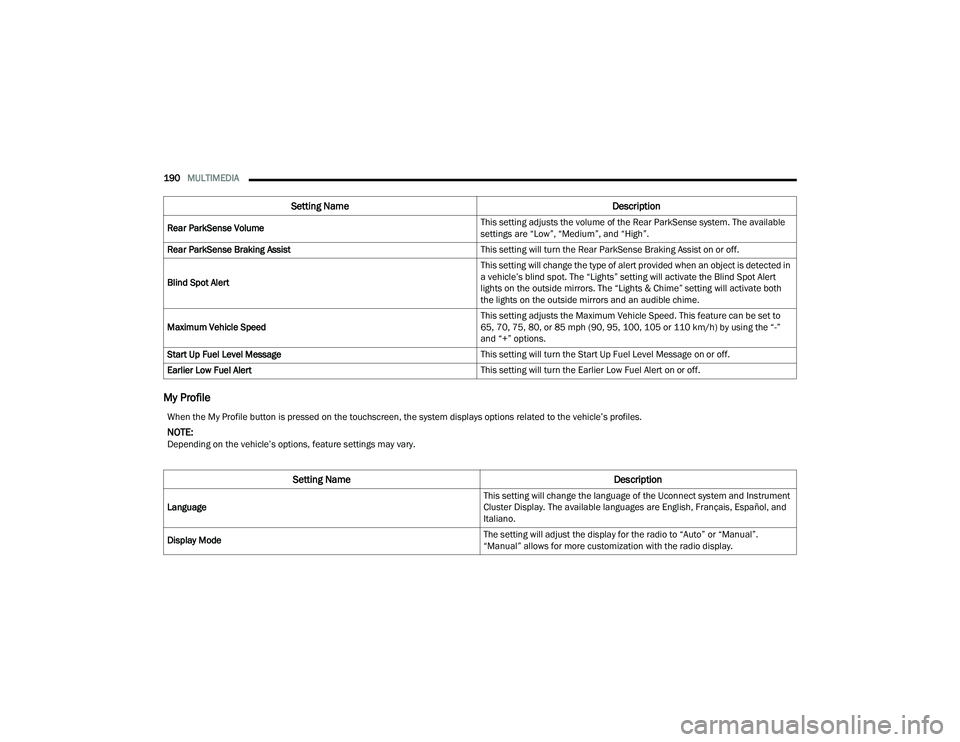
My Profile
Rear ParkSense Volume This setting adjusts the volume of the Rear ParkSense system. The available
settings are “Low”, “Medium”, and “High”.
Rear ParkSense Braking Assist This setting will turn the Rear ParkSense Braking Assist on or off.
Blind Spot Alert This setting will change the type of alert provided when an object is detected in
a vehicle’s blind spot. The “Lights” setting will activate the Blind Spot Alert
lights on the outside mirrors. The “Lights & Chime” setting will activate both
the lights on the outside mirrors and an audible chime.
Maximum Vehicle Speed This setting adjusts the Maximum Vehicle Speed. This feature can be set to
65, 70, 75, 80, or 85 mph (90, 95, 100, 105 or 110 km/h) by using the “-”
and “+” options.
Start Up Fuel Level Message This setting will turn the Start Up Fuel Level Message on or off.
Earlier Low Fuel Alert This setting will turn the Earlier Low Fuel Alert on or off.
Setting NameDescription
When the My Profile button is pressed on the touchscreen, the system displays options related to the vehicle’s profiles.
NOTE:Depending on the vehicle’s options, feature settings may vary.
Setting NameDescription
Language This setting will change the language of the Uconnect system and Instrument
Cluster Display. The available languages are English, Français, Español, and
Italiano.
Display Mode The setting will adjust the display for the radio to “Auto” or “Manual”.
“Manual” allows for more customization with the radio display.
22_RUP_OM_EN_USC_t.book Page 190
Page 195 of 384
MULTIMEDIA193
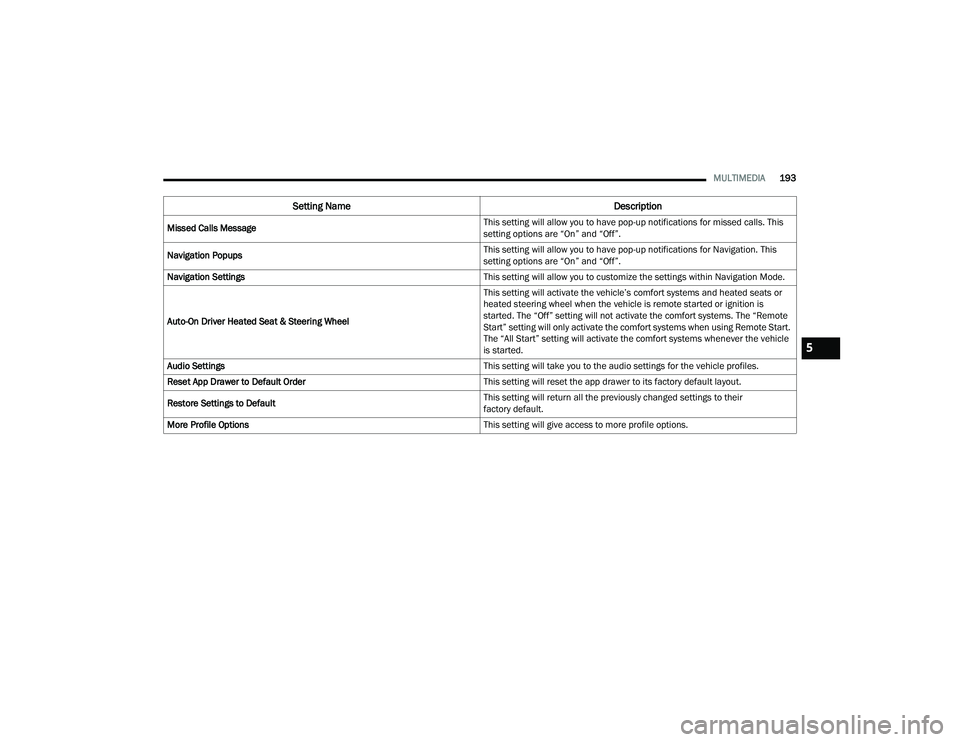
Missed Calls Message This setting will allow you to have pop-up notifications for missed calls. This
setting options are “On” and “Off”.
Navigation Popups This setting will allow you to have pop-up notifications for Navigation. This
setting options are “On” and “Off”.
Navigation Settings This setting will allow you to customize the settings within Navigation Mode.
Auto-On Driver Heated Seat & Steering Wheel This setting will activate the vehicle’s comfort systems and heated seats or
heated steering wheel when the vehicle is remote started or ignition is
started. The “Off” setting will not activate the comfort systems. The “Remote
Start” setting will only activate the comfort systems when using Remote Start.
The “All Start” setting will activate the comfort systems whenever the vehicle
is started.
Audio Settings This setting will take you to the audio settings for the vehicle profiles.
Reset App Drawer to Default Order This setting will reset the app drawer to its factory default layout.
Restore Settings to Default This setting will return all the previously changed settings to their
factory default.
More Profile Options This setting will give access to more profile options.
Setting NameDescription
5
22_RUP_OM_EN_USC_t.book Page 193
Page 211 of 384
MULTIMEDIA209
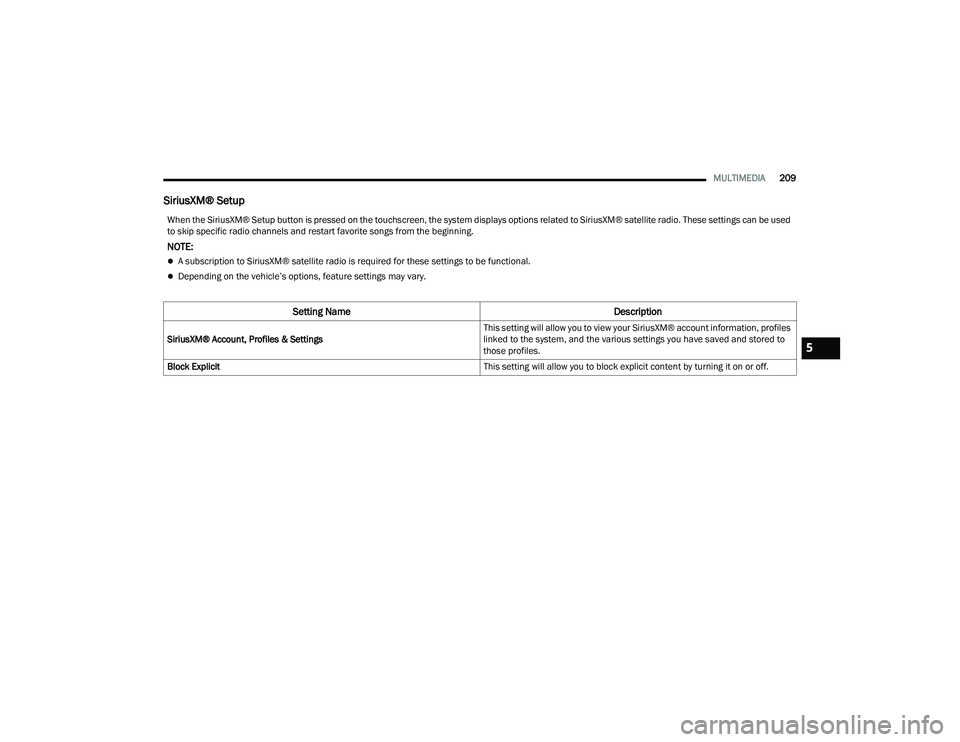
SiriusXM® Setup
When the SiriusXM® Setup button is pressed on the touchscreen, the system displays options related to SiriusXM® satellite radio. These settings can be used
to skip specific radio channels and restart favorite songs from the beginning.
NOTE:
A subscription to SiriusXM® satellite radio is required for these settings to be functional.
Depending on the vehicle’s options, feature settings may vary.
Setting Name Description
SiriusXM® Account, Profiles & Settings This setting will allow you to view your SiriusXM® account information, profiles
linked to the system, and the various settings you have saved and stored to
those profiles.
Block Explicit This setting will allow you to block explicit content by turning it on or off.5
22_RUP_OM_EN_USC_t.book Page 209
Page 356 of 384
354SERVICING AND MAINTENANCE
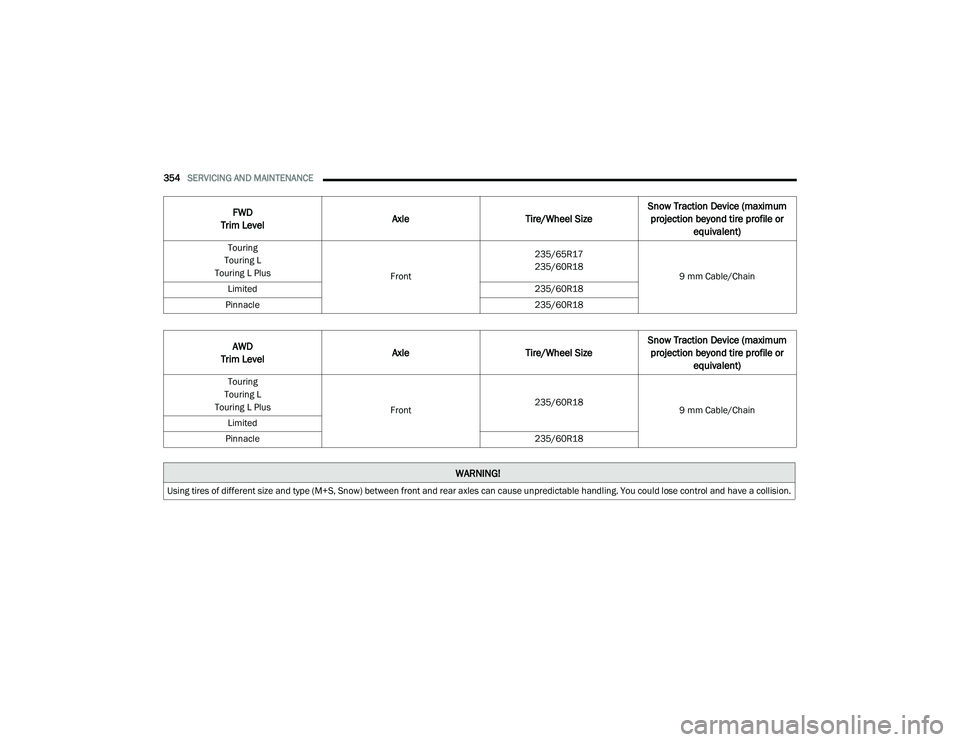
FWD
Trim Level Axle
Tire/Wheel SizeSnow Traction Device (maximum
projection beyond tire profile or equivalent)
Touring
Touring L
Touring L Plus Front235/65R17
235/60R18
9 mm Cable/Chain
Limited 235/60R18
Pinnacle 235/60R18
AWD
Trim Level Axle
Tire/Wheel SizeSnow Traction Device (maximum
projection beyond tire profile or equivalent)
Touring
Touring L
Touring L Plus Front235/60R18
9 mm Cable/Chain
Limited
Pinnacle 235/60R18
WARNING!
Using tires of different size and type (M+S, Snow) between front and rear axles can cause unpredictable handling. You could lose control and have a collision.
22_RUP_OM_EN_USC_t.book Page 354