sensor CHRYSLER PACIFICA 2022 Owners Manual
[x] Cancel search | Manufacturer: CHRYSLER, Model Year: 2022, Model line: PACIFICA, Model: CHRYSLER PACIFICA 2022Pages: 384, PDF Size: 23.92 MB
Page 7 of 384
5
PARKSENSE FRONT/REAR PARK ASSIST
SYSTEM — IF EQUIPPED .................................... 156 ParkSense Sensors ....................................... 157
ParkSense Display ........................................ 157
ParkSense Warning Display.......................... 160
Enabling And Disabling ParkSense .............. 160
Service The ParkSense Park Assist
System ........................................................... 160Cleaning The ParkSense System ................. 161ParkSense System Usage Precautions ........ 161
PARKSENSE ACTIVE PARK ASSIST
SYSTEM — IF EQUIPPED ..................................... 162
Enabling And Disabling The ParkSense
Active Park Assist System ............................. 162
Parallel/Perpendicular Parking Space
Assistance Operation .................................... 163 LANESENSE — IF EQUIPPED ............................. 166
LaneSense Operation ................................... 166Turning LaneSense On Or Off ....................... 166
LaneSense Warning Message ...................... 166Changing LaneSense Status ........................ 168
PARKVIEW REAR BACK UP CAMERA .............. 168
SURROUND VIEW CAMERA SYSTEM —
IF EQUIPPED ....................................................... 169
FAMCAM SYSTEM — IF EQUIPPED.................... 171
REFUELING THE VEHICLE ................................... 172
VEHICLE LOADING .............................................. 173 Certification Label ......................................... 173
TRAILER TOWING ................................................ 174
Common Towing Definitions......................... 174
Trailer Hitch Classification ............................ 176
Trailer Towing Weights (Maximum
Trailer Weight Ratings).................................. 177
Vehicle Loading Chart ................................... 178Trailer And Tongue Weight ........................... 180Towing Requirements .................................. 180
Towing Tips ................................................... 183 RECREATIONAL TOWING
(BEHIND MOTORHOME) ..................................... 184
Towing This Vehicle Behind Another
Vehicle ........................................................... 184
DRIVING TIPS ....................................................... 185
Driving On Slippery Surfaces ........................ 185Driving Through Water ................................. 186
MULTIMEDIA
UCONNECT SYSTEMS ......................................... 187
CYBERSECURITY ................................................. 187
UCONNECT SETTINGS ......................................... 188 Customer Programmable Features ............ 188
REAR SEAT ENTERTAINMENT WITH
AMAZON FIRE TV BUILT-IN —
IF EQUIPPED ......................................................... 213
Overview ........................................................ 213
Getting Started .............................................. 213
Accessing Rear Seat Entertainment
with Fire TV Built-in from the Front
Radio Screen ................................................. 213
22_RUP_OM_EN_USC_t.book Page 5
Page 31 of 384
GETTING TO KNOW YOUR VEHICLE29
HANDS-FREE SLIDING DOORS —
I
F EQUIPPED
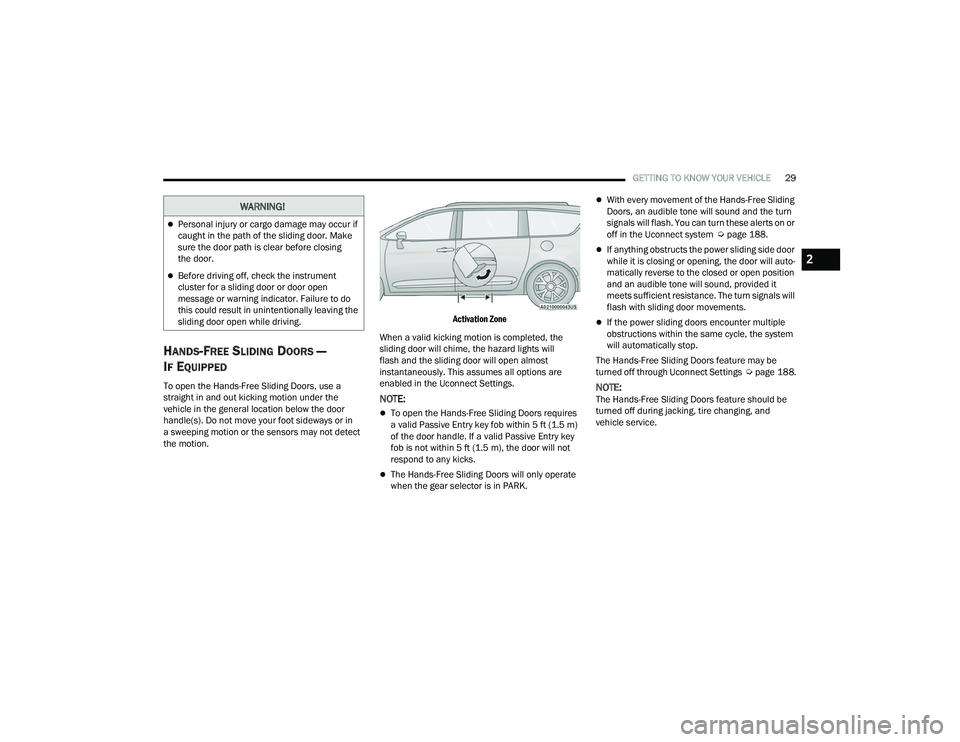
To open the Hands-Free Sliding Doors, use a
straight in and out kicking motion under the
vehicle in the general location below the door
handle(s). Do not move your foot sideways or in
a sweeping motion or the sensors may not detect
the motion.
Activation Zone
When a valid kicking motion is completed, the
sliding door will chime, the hazard lights will
flash and the sliding door will open almost
instantaneously. This assumes all options are
enabled in the Uconnect Settings.
NOTE:
To open the Hands-Free Sliding Doors requires
a valid Passive Entry key fob within 5 ft (1.5 m)
of the door handle. If a valid Passive Entry key
fob is not within 5 ft (1.5 m), the door will not
respond to any kicks.
The Hands-Free Sliding Doors will only operate
when the gear selector is in PARK.
With every movement of the Hands-Free Sliding
Doors, an audible tone will sound and the turn
signals will flash. You can turn these alerts on or
off in the Uconnect system Ú page 188.
If anything obstructs the power sliding side door
while it is closing or opening, the door will auto -
matically reverse to the closed or open position
and an audible tone will sound, provided it
meets sufficient resistance. The turn signals will
flash with sliding door movements.
If the power sliding doors encounter multiple
obstructions within the same cycle, the system
will automatically stop.
The Hands-Free Sliding Doors feature may be
turned off through Uconnect Settings Úpage 188.
NOTE:The Hands-Free Sliding Doors feature should be
turned off during jacking, tire changing, and
vehicle service.
WARNING!
Personal injury or cargo damage may occur if
caught in the path of the sliding door. Make
sure the door path is clear before closing
the door.
Before driving off, check the instrument
cluster for a sliding door or door open
message or warning indicator. Failure to do
this could result in unintentionally leaving the
sliding door open while driving.
2
22_RUP_OM_EN_USC_t.book Page 29
Page 59 of 384
GETTING TO KNOW YOUR VEHICLE57
ADDITIONAL INFORMATION
© 2021 FCA US LLC. All rights reserved. Mopar and
Uconnect are registered trademarks and Mopar
Owner Connect is a trademark of FCA US LLC.
SiriusXM® and all related marks and logos are
trademarks of SiriusXM® Radio Inc. Ú page 370.
For Uconnect system support, call
1-877-855-8400 (24 hours a day 7 days a week)
or visit
DriveUconnect.com (US) or DriveUconnect.ca (Canada).
MIRRORS
INSIDE REARVIEW MIRROR
Manual Mirror — If Equipped
A single ball joint mirror is used to allow the driver
to adjust up, down and left, right. The mirror should
be adjusted to center on the view through the rear
window. Headlight glare can be reduced by moving the
small control under the mirror to the night position
(toward the rear of the vehicle). The mirror should
be adjusted while set in the day position (toward
the windshield).
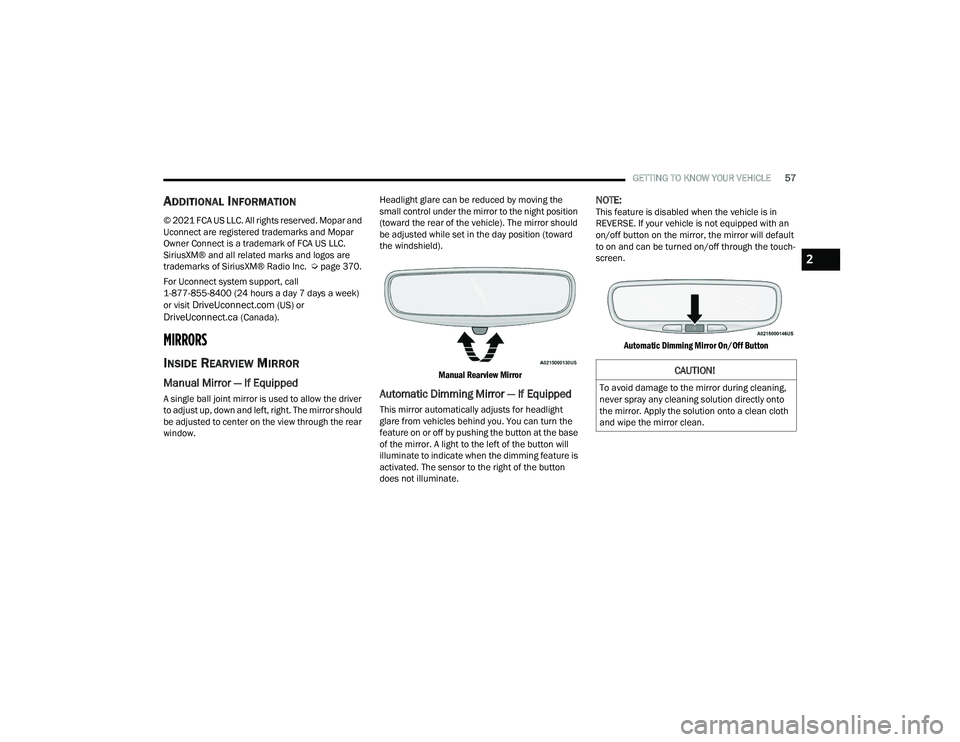
Manual Rearview Mirror
Automatic Dimming Mirror — If Equipped
This mirror automatically adjusts for headlight
glare from vehicles behind you. You can turn the
feature on or off by pushing the button at the base
of the mirror. A light to the left of the button will
illuminate to indicate when the dimming feature is
activated. The sensor to the right of the button
does not illuminate.
NOTE:This feature is disabled when the vehicle is in
REVERSE. If your vehicle is not equipped with an
on/off button on the mirror, the mirror will default
to on and can be turned on/off through the touch -
screen.
Automatic Dimming Mirror On/Off Button
CAUTION!
To avoid damage to the mirror during cleaning,
never spray any cleaning solution directly onto
the mirror. Apply the solution onto a clean cloth
and wipe the mirror clean.
2
22_RUP_OM_EN_USC_t.book Page 57
Page 73 of 384
GETTING TO KNOW YOUR VEHICLE71
Mist
Push the lever upward to the MIST position and
release for a single wiping cycle.
NOTE:The Mist feature does not activate the washer
pump; therefore, no washer fluid will be sprayed on
the windshield. The wash function must be used in
order to spray the windshield with washer fluid.
For information on wiper care and replacement,
see Ú page 320.
RAIN SENSING WIPERS — IF EQUIPPED
This feature senses rain or snowfall on the
windshield and automatically activates the wipers.
Rotate the end of the windshield wiper lever to one
of the four detent positions to activate this feature.
The sensitivity of the system is adjustable from the
windshield wiper lever. Wiper sensitivity position 1
is the least sensitive, and wiper sensitivity position
4 is the most sensitive.
NOTE:
The Rain Sensing feature will not operate when
the wiper switch is in the low or high position.
The Rain Sensing feature may not function prop -
erly when ice or dried saltwater is present on the
windshield.
Use of Rain-X or products containing wax or sili-
cone may reduce rain sensor performance.
The Rain Sensing feature can be turned on and
off through the Uconnect system Ú page 188.
The Rain Sensing system has protective features
for the wiper blades and arms. It will not operate
under the following conditions:
Low Temperature Wipe Inhibit — The Rain
Sensing feature will not operate when the igni -
tion is first placed in the ON position, when the
vehicle is stationary and the outside tempera -
ture is below 32°F (0°C), unless the wiper
control on the windshield wiper lever is moved,
the vehicle speed becomes greater than 3 mph
(5 km/h) or the outside temperature rises
above freezing.
Neutral Wipe Inhibit — The Rain Sensing feature
will not operate when the ignition is ON, when
the transmission gear selector is in the
NEUTRAL position and the vehicle speed is less
than 3 mph (5 km/h), unless the wiper control
on the windshield wiper lever is moved, the
vehicle speed is greater than 3 mph (5 km/h) or the gear selector is moved out of the NEUTRAL
position.
Remote Start Mode Inhibit — On vehicles
equipped with the Remote Start system, Rain
Sensing wipers are not operational when the
vehicle is in the Remote Start mode. Once the
operator is in the vehicle and has placed the
ignition switch in the ON/RUN position, rain
sensing wiper operation can resume, if it has
been selected, and no other inhibit conditions
(mentioned previously) exist.
REAR WIPER AND WASHER
The rear wiper/washer is operated by rotating a
switch, located at the middle of the lever.
Rotate the center portion of the lever
upward to the first detent for intermittent
operation and to the second detent for
continuous rear wiper operation.
Rear Window Washer Operation Pushing the windshield wiper lever
forward activates the rear window
washer. If the lever is pushed while on
the intermittent setting, the wipers will
turn on and operate for several wipe cycles after
the lever is released, and then resume the
intermittent interval previously selected. If the
lever is pushed while the wipers are in the off
position, the wipers will operate several wipe
cycles, then turn off.
2
22_RUP_OM_EN_USC_t.book Page 71
Page 101 of 384

GETTING TO KNOW YOUR VEHICLE99
HANDS-FREE LIFTGATE — IF EQUIPPED
Hands-Free Liftgate Activation Zone
To open the liftgate using hands-free activation,
use a straight in and out kicking motion under the
vehicle activation zone in the general location
below the liftgate door handle. Do not move your
foot sideways or in a sweeping motion or the
sensors may not detect the motion. Vehicles Equipped With A Trailer Tow Package
NOTE:If your vehicle is equipped with the Trailer Tow
Package, the hands-free activation zone(s) for the
Power Liftgate will be located on the left and right
side of the receiver. Use a straight kicking motion
under either activation zone to open the
Hands-Free Liftgate.
Hands-Free Liftgate Trailer Tow Activation Zones
When a valid kicking motion is completed, the
liftgate will chime, the hazard lights will flash and
the liftgate will open after approximately one
second. This assumes all options are enabled in
the Uconnect system.
NOTE:To open the Hands-Free Liftgate requires a valid
Passive Entry key fob within 5 ft (1.5 m) of the door
handle. If a valid Passive Entry key fob is not within
5 ft (1.5 m), the liftgate will not respond to any
kicks.
NOTE:
The Hands-Free Liftgate will only operate when
the transmission is in PARK.
If anything obstructs the Hands-Free Liftgate
while it is opening or closing, the liftgate will
automatically reverse to the closed position,
provided it meets sufficient resistance.
There are pinch sensors attached to the side of
the liftgate opening. Light pressure anywhere
along these strips will cause the liftgate to
return to the open position.
CAUTION!
The Hands-Free Liftgate feature may be turned
on or off in Uconnect Settings. The Hands-Free
Liftgate feature should be turned off during
jacking, tire changing, and vehicle service
Ú page 188.
2
22_RUP_OM_EN_USC_t.book Page 99
Page 121 of 384
GETTING TO KNOW YOUR INSTRUMENT PANEL119
Defaults
Restore
Cancel
Speed Warning — If Equipped
Push and release the up or down arrow
button until Speed Warning is highlighted in the
instrument cluster display. Push and release the
OK button to enter Speed Warning. Use the up
or down arrow button to turn the Speed Warning
ON or OFF, then push and release the OK button to
confirm the selection. If the ON status is selected,
use the up or down arrow button to set the
desired speed, then push the OK button to set the
speed for the Speed Warning. A Speed Warning
light will illuminate in the instrument cluster, with a
number matching the set speed, with a pop-up
message to inform the driver that the Speed
Warning has been set to the desired speed. Each
time the set speed is exceeded, a single chime will
sound and a pop-up warning message will display.
If the set speed is exceeded more than 2 mph
(3 km/h), a continuous chime will sound for up to
10 seconds, or until the speed is no longer
exceeded. The telltale in the instrument cluster will
also change from white to yellow, and a pop-up
warning message will pop-up on the instrument
cluster display.
NOTE:Speed Warning is unavailable while KeySense is
in use.
BATTERY SAVER ON/BATTERY SAVER
M
ODE MESSAGE — ELECTRICAL LOAD
R
EDUCTION ACTIONS — IF EQUIPPED
This vehicle is equipped with an Intelligent Battery
Sensor (IBS) to perform additional monitoring of
the electrical system and status of the vehicle
battery.
In cases when the IBS detects charging system
failure, or the 12 Volt vehicle battery conditions are
deteriorating, electrical load reduction actions will
take place to extend the driving time and distance
of the vehicle. This is done by reducing power to or
turning off non-essential 12 Volt electrical loads.
Load reduction will be functional when the vehicle
propulsion system is active.
The vehicle may not be running depending on the
High Voltage (HV) battery State Of Charge (SOC) or
temperature. It will display a message if there is a
risk of battery depletion to the point where the
vehicle may stall due to lack of electrical supply, or
will not restart after the current drive cycle.
When 12 Volt load reduction is activated, the
message “Battery Saver On” or “Battery Saver
Mode” will appear in the instrument cluster display.
These messages indicate the vehicle battery has a
low state of charge and continues to lose electrical
charge at a rate that the charging system cannot
sustain.
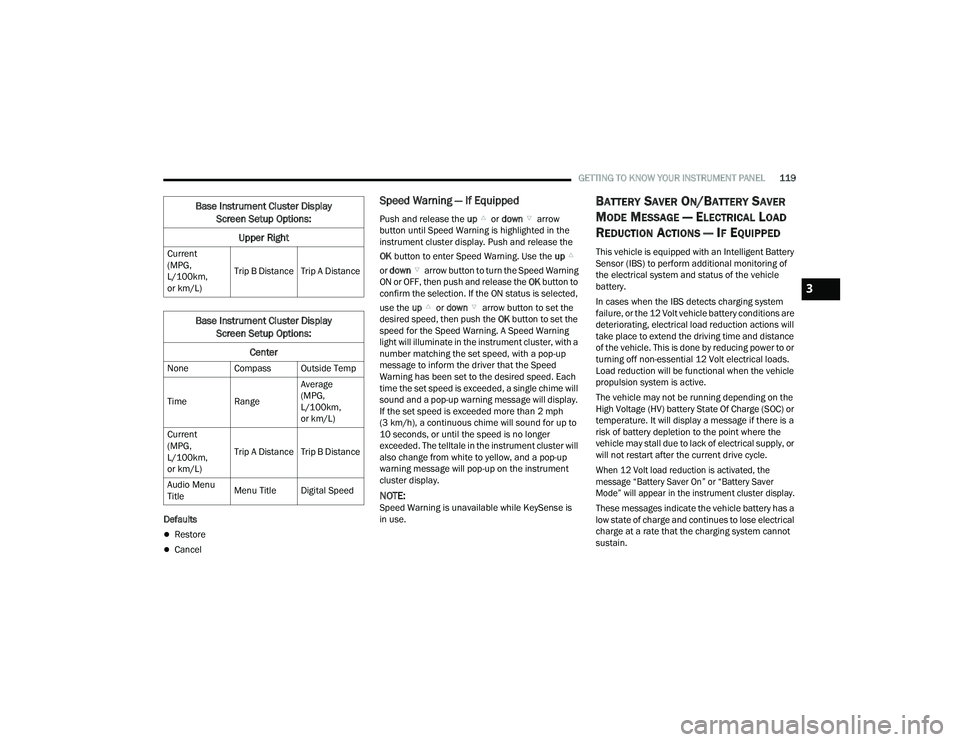
Current
(MPG,
L/100km,
or km/L)
Trip B Distance Trip A Distance
Base Instrument Cluster Display
Screen Setup Options:
Center
None Compass Outside Temp
Time Range Average
(MPG,
L/100km,
or km/L)
Current
(MPG,
L/100km,
or km/L) Trip A Distance Trip B Distance
Audio Menu
Title Menu Title Digital Speed
Base Instrument Cluster Display
Screen Setup Options:
Upper Right
3
22_RUP_OM_EN_USC_t.book Page 119
Page 129 of 384
GETTING TO KNOW YOUR INSTRUMENT PANEL127
Please note that the TPMS is not a substitute for
proper tire maintenance, and it is the driver’s
responsibility to maintain correct tire pressure,
even if underinflation has not reached the level to
trigger illumination of the TPMS low tire pressure
telltale.
Your vehicle has also been equipped with a TPMS
malfunction indicator to indicate when the system
is not operating properly. The TPMS malfunction
indicator is combined with the low tire pressure
telltale. When the system detects a malfunction,
the telltale will flash for approximately one minute
and then remain continuously illuminated. This
sequence will continue upon subsequent vehicle
start-ups as long as the malfunction exists. When
the malfunction indicator is illuminated, the
system may not be able to detect or signal low tire
pressure as intended. TPMS malfunctions may
occur for a variety of reasons, including the
installation of replacement or alternate tires or
wheels on the vehicle that prevent the TPMS from
functioning properly. Always check the TPMS
malfunction telltale after replacing one or more
tires or wheels on your vehicle to ensure that the
replacement or alternate tires and wheels allow
the TPMS to continue to function properly.
YELLOW INDICATOR LIGHTS
Forward Collision Warning (FCW) or
Pedestrian Emergency Braking (PEB) OFF
Indicator Light — If Equipped
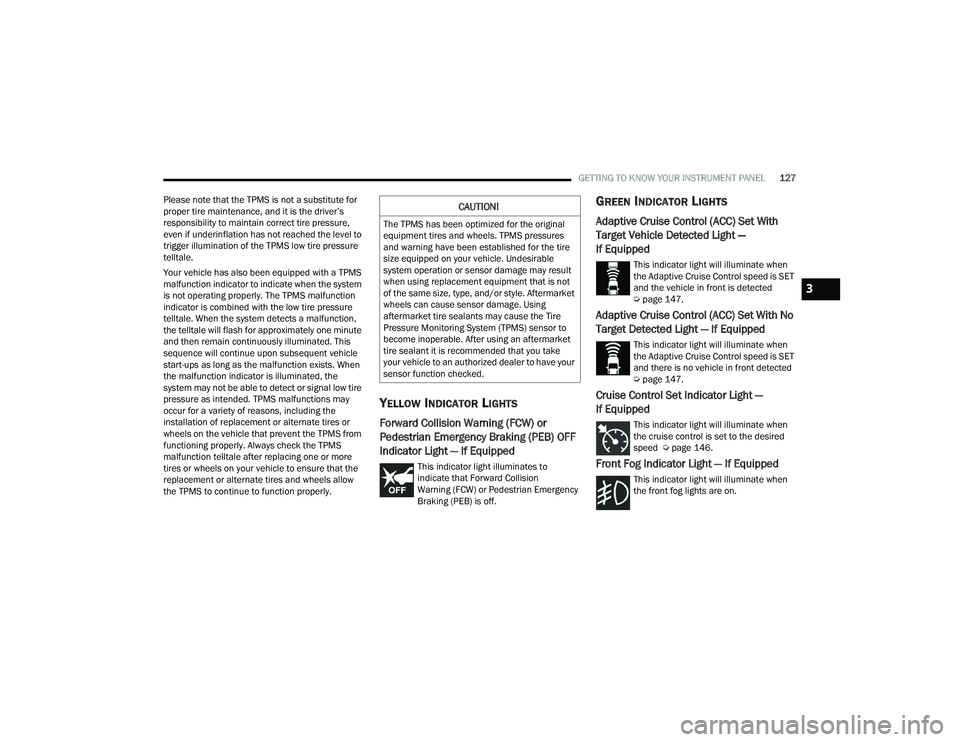
This indicator light illuminates to
indicate that Forward Collision
Warning (FCW) or Pedestrian Emergency
Braking (PEB) is off.
GREEN INDICATOR LIGHTS
Adaptive Cruise Control (ACC) Set With
Target Vehicle Detected Light —
If Equipped
This indicator light will illuminate when
the Adaptive Cruise Control speed is SET
and the vehicle in front is detected
Ú page 147.
Adaptive Cruise Control (ACC) Set With No
Target Detected Light — If Equipped
This indicator light will illuminate when
the Adaptive Cruise Control speed is SET
and there is no vehicle in front detected
Úpage 147.
Cruise Control Set Indicator Light —
If Equipped
This indicator light will illuminate when
the cruise control is set to the desired
speed Ú page 146.
Front Fog Indicator Light — If Equipped
This indicator light will illuminate when
the front fog lights are on.
CAUTION!
The TPMS has been optimized for the original
equipment tires and wheels. TPMS pressures
and warning have been established for the tire
size equipped on your vehicle. Undesirable
system operation or sensor damage may result
when using replacement equipment that is not
of the same size, type, and/or style. Aftermarket
wheels can cause sensor damage. Using
aftermarket tire sealants may cause the Tire
Pressure Monitoring System (TPMS) sensor to
become inoperable. After using an aftermarket
tire sealant it is recommended that you take
your vehicle to an authorized dealer to have your
sensor function checked.
3
22_RUP_OM_EN_USC_t.book Page 127
Page 150 of 384
148STARTING AND OPERATING
(Continued)
ACC will allow you to keep Cruise Control engaged
in light to moderate traffic conditions without the
constant need to reset your Cruise Control.
ACC utilizes a radar sensor and a forward facing
camera designed to detect a vehicle directly ahead
of you.
NOTE:
If the ACC sensor detects a vehicle ahead, ACC
will apply limited braking or accelerate (not to
exceed the original set speed) automatically to
maintain a preset following distance, while
matching the speed of the vehicle ahead.
Any chassis/suspension or tire size modifica
-
tions to the vehicle will affect the performance
of the Adaptive Cruise Control and Forward Colli -
sion Warning system.
Fixed Speed Cruise Control will not detect vehi -
cles directly ahead of you. Always be aware of
the feature selected Ú page 370.
WARNING!
Adaptive Cruise Control (ACC) is a conve -
nience system. It is not a substitute for active
driver involvement. It is always the driver’s
responsibility to be attentive of road, traffic,
and weather conditions, vehicle speed,
distance to the vehicle ahead and, most
importantly, brake operation to ensure safe
operation of the vehicle under all road condi -
tions. Your complete attention is always
required while driving to maintain safe control
of your vehicle. Failure to follow these warn -
ings can result in a collision and death or
serious personal injury.
The ACC system:
Does not react to pedestrians, oncoming
vehicles, and stationary objects (e.g., a
stopped vehicle in a traffic jam or a
disabled vehicle).
Cannot take street, traffic, and weather
conditions into account, and may be
limited upon adverse sight distance
conditions.
Does not always fully recognize complex
driving conditions, which can result in
wrong or missing distance warnings.
Will bring the vehicle to a complete stop
while following a target vehicle and hold
the vehicle for approximately three
minutes in the stop position. If the target
vehicle does not start moving within three
minutes the parking brake will be acti -
vated, and the ACC system will be
canceled.
You should switch off the ACC system:
When driving in fog, heavy rain, heavy snow,
sleet, heavy traffic, and complex driving situa -
tions (i.e., in highway construction zones).
When entering a turn lane or highway
off-ramp; when driving on roads that are
winding, icy, snow-covered, slippery, or have
steep uphill or downhill slopes.
When towing a trailer up or down steep slopes.
When circumstances do not allow safe driving
at a constant speed.
WARNING!
22_RUP_OM_EN_USC_t.book Page 148
Page 154 of 384
152STARTING AND OPERATING
When ACC Is Active
When you use the SET (-) button to decelerate, if
the engine’s braking power does not slow the
vehicle sufficiently to reach the set speed, the
brake system will automatically slow the
vehicle.
The ACC system decelerates the vehicle to a full
stop when following the vehicle in front. If your
vehicle follows the vehicle in front to a standstill,
after two seconds the driver will either have to
push the RES (resume) button, or apply the
accelerator pedal to reengage the ACC to the
existing set speed.
The ACC system maintains set speed when
driving uphill and downhill. However, a slight
speed change on moderate hills is normal. In
addition, downshifting may occur while climbing
uphill or descending downhill. This is normal
operation and necessary to maintain set speed.
When driving uphill and downhill, the ACC
system will cancel if the braking temperature
exceeds normal range (overheated).
Setting The Following Distance In ACC
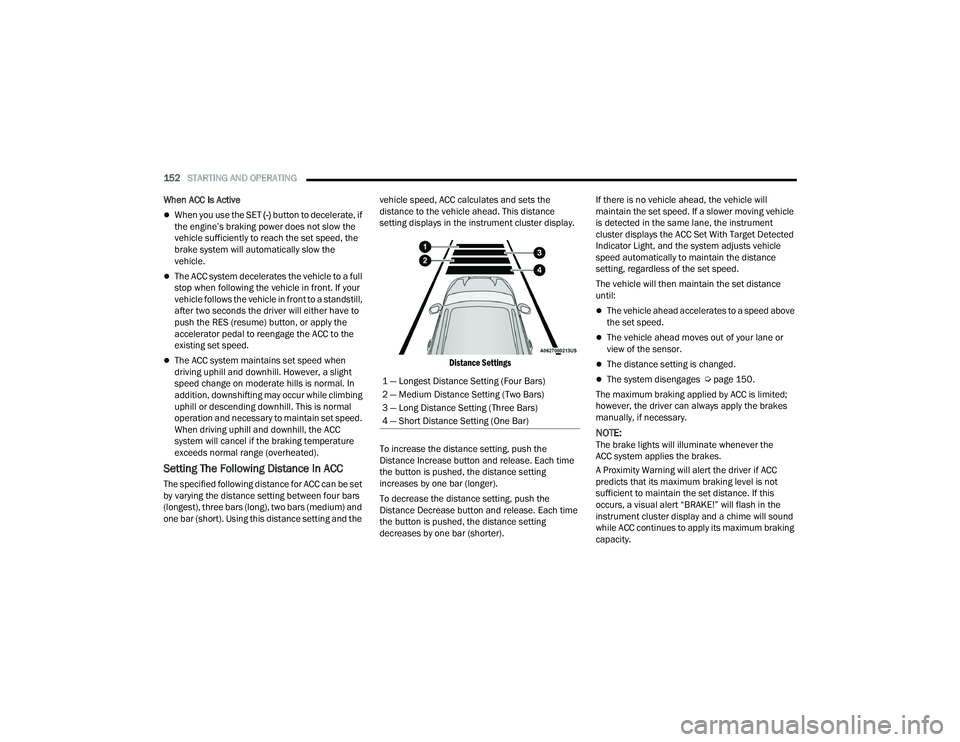
The specified following distance for ACC can be set
by varying the distance setting between four bars
(longest), three bars (long), two bars (medium) and
one bar (short). Using this distance setting and the vehicle speed, ACC calculates and sets the
distance to the vehicle ahead. This distance
setting displays in the instrument cluster display.
Distance Settings
To increase the distance setting, push the
Distance Increase button and release. Each time
the button is pushed, the distance setting
increases by one bar (longer).
To decrease the distance setting, push the
Distance Decrease button and release. Each time
the button is pushed, the distance setting
decreases by one bar (shorter). If there is no vehicle ahead, the vehicle will
maintain the set speed. If a slower moving vehicle
is detected in the same lane, the instrument
cluster displays the ACC Set With Target Detected
Indicator Light, and the system adjusts vehicle
speed automatically to maintain the distance
setting, regardless of the set speed.
The vehicle will then maintain the set distance
until:
The vehicle ahead accelerates to a speed above
the set speed.
The vehicle ahead moves out of your lane or
view of the sensor.
The distance setting is changed.
The system disengages Ú
page 150.
The maximum braking applied by ACC is limited;
however, the driver can always apply the brakes
manually, if necessary.
NOTE:The brake lights will illuminate whenever the
ACC system applies the brakes.
A Proximity Warning will alert the driver if ACC
predicts that its maximum braking level is not
sufficient to maintain the set distance. If this
occurs, a visual alert “BRAKE!” will flash in the
instrument cluster display and a chime will sound
while ACC continues to apply its maximum braking
capacity.
1 — Longest Distance Setting (Four Bars)
2 — Medium Distance Setting (Two Bars)
3 — Long Distance Setting (Three Bars)
4 — Short Distance Setting (One Bar)
22_RUP_OM_EN_USC_t.book Page 152
Page 155 of 384
STARTING AND OPERATING153
NOTE:The “BRAKE!” screen in the instrument cluster
display is a warning for the driver to take action
and does not necessarily mean that the Forward
Collision Warning system is applying the brakes
autonomously.
Overtake Aid
When driving with Adaptive Cruise Control (ACC)
engaged and following a vehicle, the system will
provide an additional acceleration up to the ACC
set speed to assist in passing the vehicle. This
additional acceleration is triggered when the driver
utilizes the left turn signal and will only be active
when passing on the left hand side.
ACC Operation At Stop
In the event that the ACC system brings your
vehicle to a standstill while following the vehicle in
front, your vehicle will resume motion, without the
need for any driver action, if the vehicle in front
starts moving within two seconds.
If the vehicle in front does not start moving within
two seconds of your vehicle coming to a standstill,
the driver will either have to push the RES (resume)
button, or apply the accelerator pedal to reengage
the ACC to the existing set speed.
NOTE:After the ACC system holds your vehicle at a stand -
still for approximately three consecutive minutes,
the parking brake will be activated, and the ACC
system will be canceled.
While the ACC system is holding your vehicle at a
standstill, if the driver seat belt is unbuckled or the
driver door is opened, the parking brake will be
activated, and the ACC system will be canceled.
Display Warnings And Maintenance
“WIPE FRONT RADAR SENSOR” WARNING
The “ACC/AEB Unavailable Wipe Front Radar
Sensor” warning will display and a chime will
sound when conditions temporarily limit system
performance. This most often occurs at times of poor visibility,
such as in snow or heavy rain. The ACC system may
also become temporarily blinded due to
obstructions, such as mud, dirt or ice. In these
cases, the instrument cluster display will show
“ACC/AEB Unavailable Wipe Front Radar Sensor”
and the system will deactivate.
The “ACC/AEB Unavailable Wipe Front Radar
Sensor” message can sometimes be displayed
while driving in highly reflective areas (i.e. ice and
snow, or tunnels with reflective tiles). The ACC
system will recover after the vehicle has left these
areas. Under rare conditions, when the radar is not
tracking any vehicles or objects in its path this
warning may temporarily occur.
NOTE:If the “ACC/AEB Unavailable Wipe Front Radar
Sensor” warning is active, Fixed Speed Cruise
Control is still available.
If weather conditions are not a factor, the driver
should examine the sensor. It may require cleaning
or removal of an obstruction. The sensor is located
in the center of the vehicle behind the lower grille.
WARNING!
When the ACC system is resumed, the driver
must ensure that there are no pedestrians,
vehicles or objects in the path of the vehicle.
Failure to follow these warnings can result in a
collision and death or serious personal injury.
4
22_RUP_OM_EN_USC_t.book Page 153